
1 | P a g e
PEGASUS USER’S GUIDE
GPS /GPRS SOLUTION FOR YOUR FLEET
Table of Content
General Introduction ......................................................................................................................... 5
Login................................................................................................................................................. 5
Compatibility .................................................................................................................................... 5
Main Graphical User Interface ........................................................................................................... 6
Devices Panel .................................................................................................................................... 8
A. Show Unit ...........................................................................................................................................8
B. Unit Name ..........................................................................................................................................8
C. Keep Unit in View ...............................................................................................................................8
D. Motion States .....................................................................................................................................8
E. GPS Locking ........................................................................................................................................9
F. Position Detection ..............................................................................................................................9
G. Communication Mode.........................................................................................................................9
H. Feature Set .........................................................................................................................................9
Information Grid ............................................................................................................................. 10
Status Bar ....................................................................................................................................... 11
A. Device Configuration status ............................................................................................................... 12
B. Group Bar ......................................................................................................................................... 12
Search Devices ................................................................................................................................ 12
Actions............................................................................................................................................ 14
A. General............................................................................................................................................. 15
B. Status ............................................................................................................................................... 16
C. Security ............................................................................................................................................ 17
D. Setup ................................................................................................................................................ 18
E. Admin .............................................................................................................................................. 19
New Device ..................................................................................................................................... 19
A. General ................................................................................................................................................ 20
View Device Details ......................................................................................................................... 21
Edit Device ...................................................................................................................................... 22
Delete Device .................................................................................................................................. 22
Device History ................................................................................................................................. 23

2 | P a g e
A. Track Player ...................................................................................................................................... 23
Device Reports ................................................................................................................................ 23
Device Zones ................................................................................................................................... 24
A. Polygon Zones .................................................................................................................................. 24
B. Route Zones ...................................................................................................................................... 24
C. POI Route ......................................................................................................................................... 24
Update Device Locations ................................................................................................................. 25
Client Correspondence..................................................................................................................... 25
Device Maintenance........................................................................................................................ 26
Command History ........................................................................................................................... 27
Show Group .................................................................................................................................... 27
Administration ................................................................................................................................ 28
A. Accounts ........................................................................................................................................... 28
Users .............................................................................................................................................. 29
Roles ............................................................................................................................................... 32
Device Profiles ................................................................................................................................ 33
Manage AMF .................................................................................................................................. 35
Sub Account Access ......................................................................................................................... 35
Log Back to Master ......................................................................................................................... 36
Uninstall Device .............................................................................................................................. 36
Tools ............................................................................................................................................... 37
Change Password ............................................................................................................................ 37
Attach Driver .................................................................................................................................. 37
Camera Gallery ............................................................................................................................... 38
Complaint ....................................................................................................................................... 38
Faults Management ........................................................................................................................ 39
Medical Rescue ............................................................................................................................... 40
Fuel Entries ..................................................................................................................................... 41
Assign Installer ............................................................................................................................... 41
User Setting .................................................................................................................................... 42
Zones .............................................................................................................................................. 42
Geozone.......................................................................................................................................... 43
Routes ............................................................................................................................................ 44
POIs (Points of Interest) ................................................................................................................... 44
Find Nearest Vehicles ...................................................................................................................... 44
POI Dashboard ................................................................................................................................ 45
POI Overstay Dashboard ................................................................................................................. 46
Reports ........................................................................................................................................... 47
Vehicle History Report ..................................................................................................................... 48
Trip Report ...................................................................................................................................... 49

3 | P a g e
Idle Time Report .............................................................................................................................. 50
Mileage Report ............................................................................................................................... 51
Driver Safety Report ........................................................................................................................ 52
Driving Safety Violation Report ....................................................................................................... 53
Vehicle Maintenance Report ........................................................................................................... 53
Driver Vehicle Report ...................................................................................................................... 54
Devices Status Report...................................................................................................................... 54
Home Visit Report ........................................................................................................................... 55
POI (Points of Interest) Report ......................................................................................................... 55
POI Report – Visits Report: .............................................................................................................. 56
POI Report – Distance Report .......................................................................................................... 56
POI Report – Present Report ............................................................................................................ 57
POI Report Non-Visit Report ..................................................................................................... 57
POI Report Home to POI Trips ................................................................................................... 58
POI Routes ...................................................................................................................................... 58
Stops Report ................................................................................................................................... 59
Correspondence Report ................................................................................................................... 60
Dashboard Report ........................................................................................................................... 60
Fuel Report ..................................................................................................................................... 61
Fuel Report (2) ................................................................................................................................ 62
Simple Fuel Report .......................................................................................................................... 62
Station Travel Report ...................................................................................................................... 63
Trip Fuel Report .............................................................................................................................. 64
GenSet Report ................................................................................................................................. 64
Alerts Report ................................................................................................................................... 65
Alert Ack Report .............................................................................................................................. 66
Action Log Report ........................................................................................................................... 66
AMF Report .................................................................................................................................... 67
NR/ Unlocked Devices Report .......................................................................................................... 67
SIM Report ...................................................................................................................................... 68
Attribute ......................................................................................................................................... 69
Device Maintenance........................................................................................................................ 69
GEO Fence Report ........................................................................................................................... 70
Temperature Report ........................................................................................................................ 71
Exact Report ................................................................................................................................... 71
Temperature Report – Average Report ............................................................................................ 72
Temperature Report – Dashboard Report ........................................................................................ 73
Temperature Report – Excel Report ................................................................................................. 73
Route Travel Report ........................................................................................................................ 74

4 | P a g e
Route Deviation Report ................................................................................................................... 74
POI Shuttle Report .......................................................................................................................... 75
Daily Snapshot Report ..................................................................................................................... 75
Trip Expenses Report ....................................................................................................................... 76
Trip Exception Report ...................................................................................................................... 76
Shipment Report ............................................................................................................................. 77
Vehicle Report ................................................................................................................................ 78
Ignition ON / OFF Report ................................................................................................................. 79
Notification Report ......................................................................................................................... 80
Daily Summary Report. ................................................................................................................... 81
Excel Report .................................................................................................................................... 82
A. Trip Report – Excel Sheet ................................................................................................................... 82
Dashboard Report ........................................................................................................................... 83
A. Fuel Entries Report ........................................................................................................................... 84
Report Emailing .............................................................................................................................. 85
Scheduling Reports ......................................................................................................................... 86
Scheduled Reports ........................................................................................................................... 86
Technician Activity Report ............................................................................................................... 87
Vehicles .......................................................................................................................................... 87
Add/ Edit Vehicles ........................................................................................................................... 87
Vehicle Maintenance....................................................................................................................... 88
Vehicle Incident............................................................................................................................... 89
Drivers ............................................................................................................................................ 90
Shipment ........................................................................................................................................ 91
Show Tracks .................................................................................................................................... 92
Communication ............................................................................................................................... 93
Communication Log ........................................................................................................................ 93
Alerts Log........................................................................................................................................ 94
Device Info Log ............................................................................................................................... 95
Events Log ...................................................................................................................................... 96
Message Log ................................................................................................................................... 97
Installation Log ............................................................................................................................... 98
Group Command ........................................................................................................................... 100
Group ........................................................................................................................................... 100
Customers ..................................................................................................................................... 102
Notifications ................................................................................................................................. 103
Notification Type .......................................................................................................................... 107
SIMs ............................................................................................................................................. 112
Pegasus Dashboard ....................................................................................................................... 113
A. Filters ............................................................................................................................................. 113
5 | P a g e
B. Groups............................................................................................................................................ 113
C. Information Table ........................................................................................................................... 114
General Introduction
This user manual will walk you through the initial login and the various capabilities of the Pegasus system, including
Device Initialization, Profile Creation, Mapping, Device Communication and Reporting capability. This user manual
intends to be a step-by-step guide, showing how each of the various features and capabilities of the software is
accessed and exercised in order to learn how it can be of benefit to you and your business. You can follow along with
the Pegasus Site at http://pegasus.naxertech.com/MainPage.aspx. with the given login information.
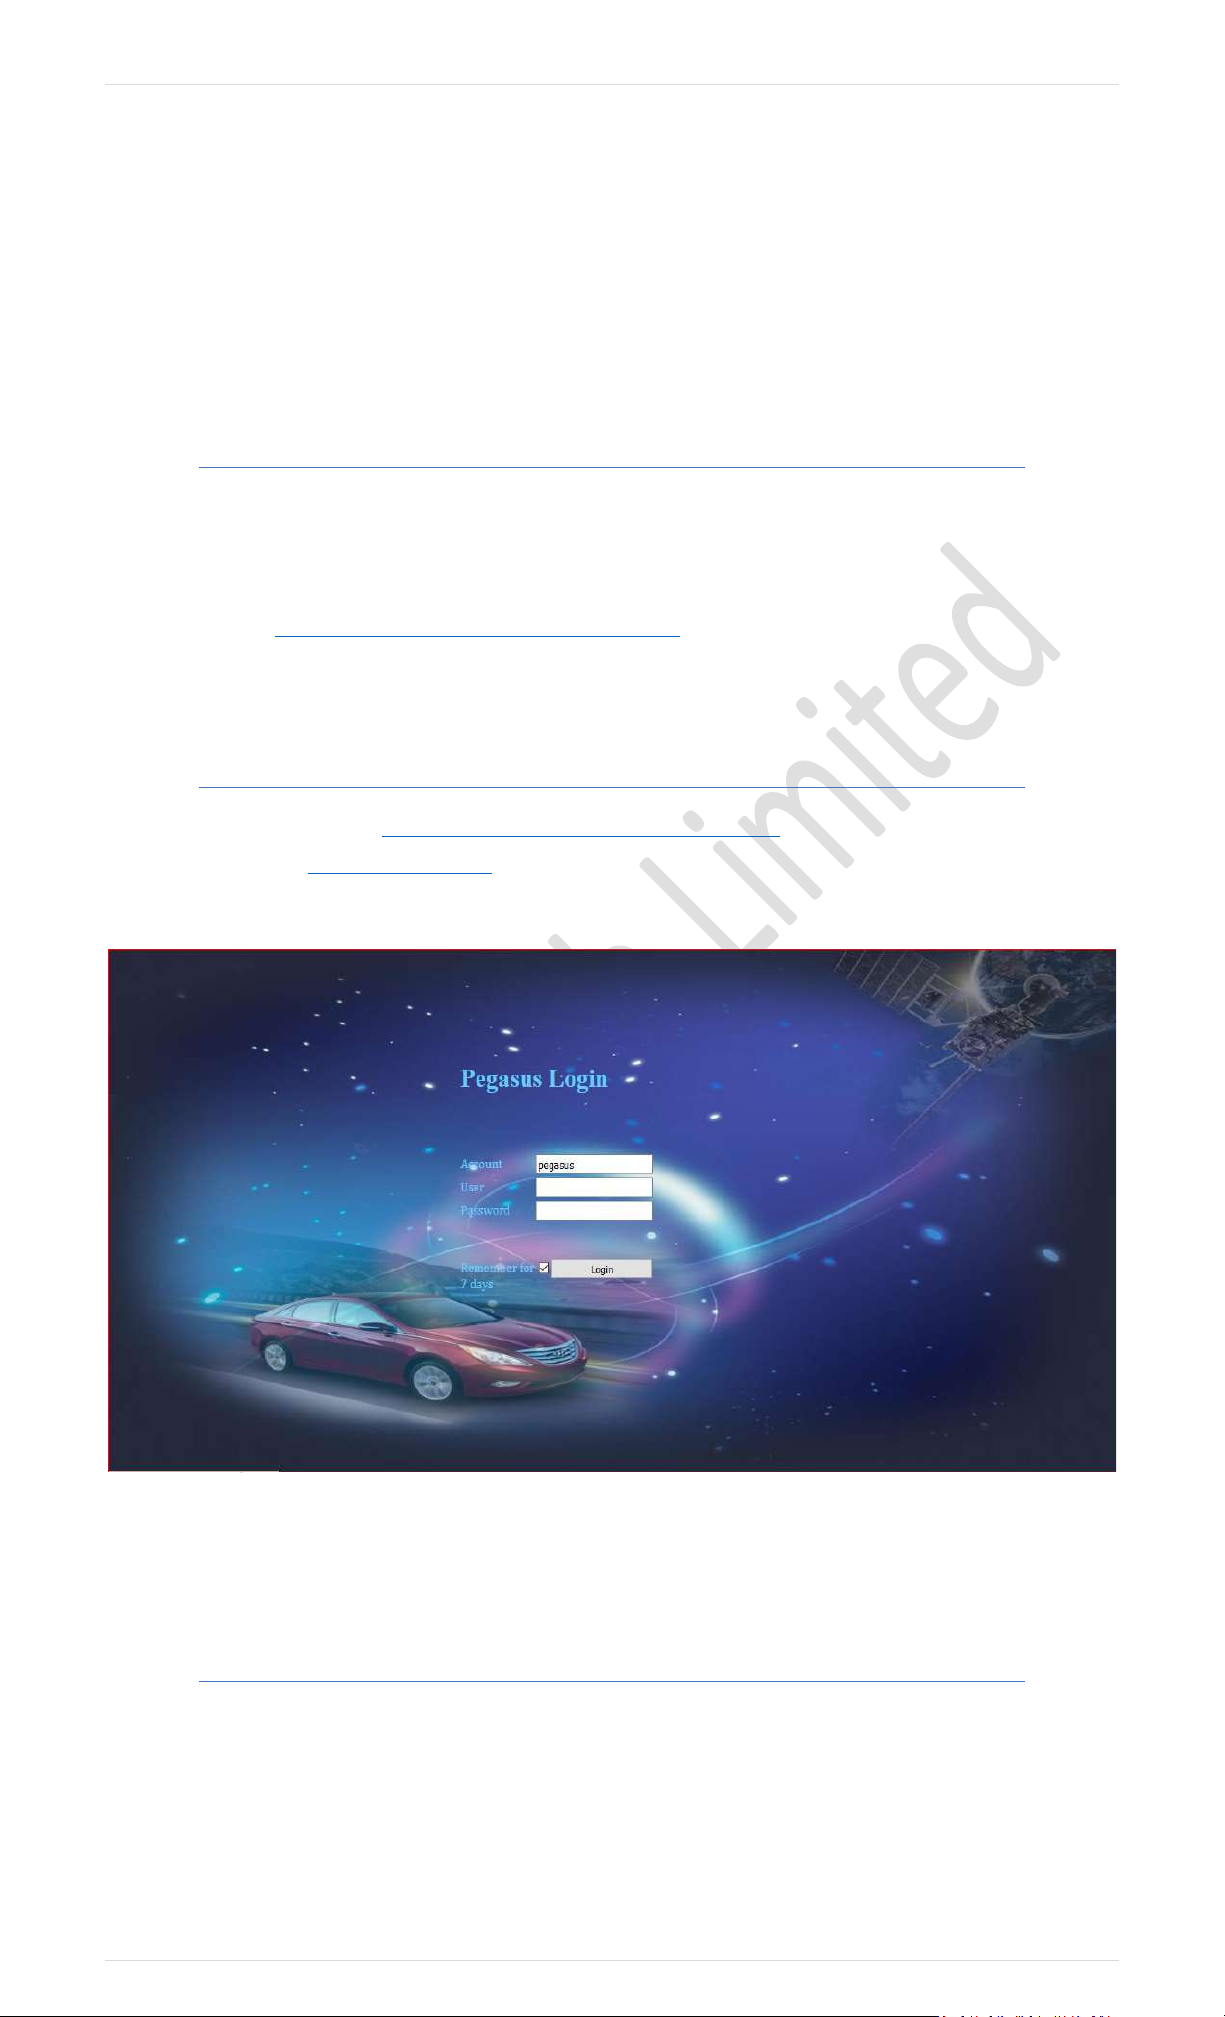
Login
The Pegasus login is at the URL http://pegasus.naxertech.com/MainPage.aspx. The user login option is also available
at our official website www.naxertech.com. By using these options, you will be presented with a Login window as
shown below:
Please use the provided credentials and click Login button. This will take you to the main user interface of the Pegasus
software as shown in the image on the next page.
Compatibility
Pegasus System does support all available versions of windows including Microsoft windows 7, 10 …etc. We do recommend
to login Pegasus System by using Microsoft Internet explorer version 11, Google Chrome (Latest Versions) or Mozilla Firefox
ESR (Extended support Release) for better browsing results and getting most advanced features of Pegasus Systems.
6 | P a g e
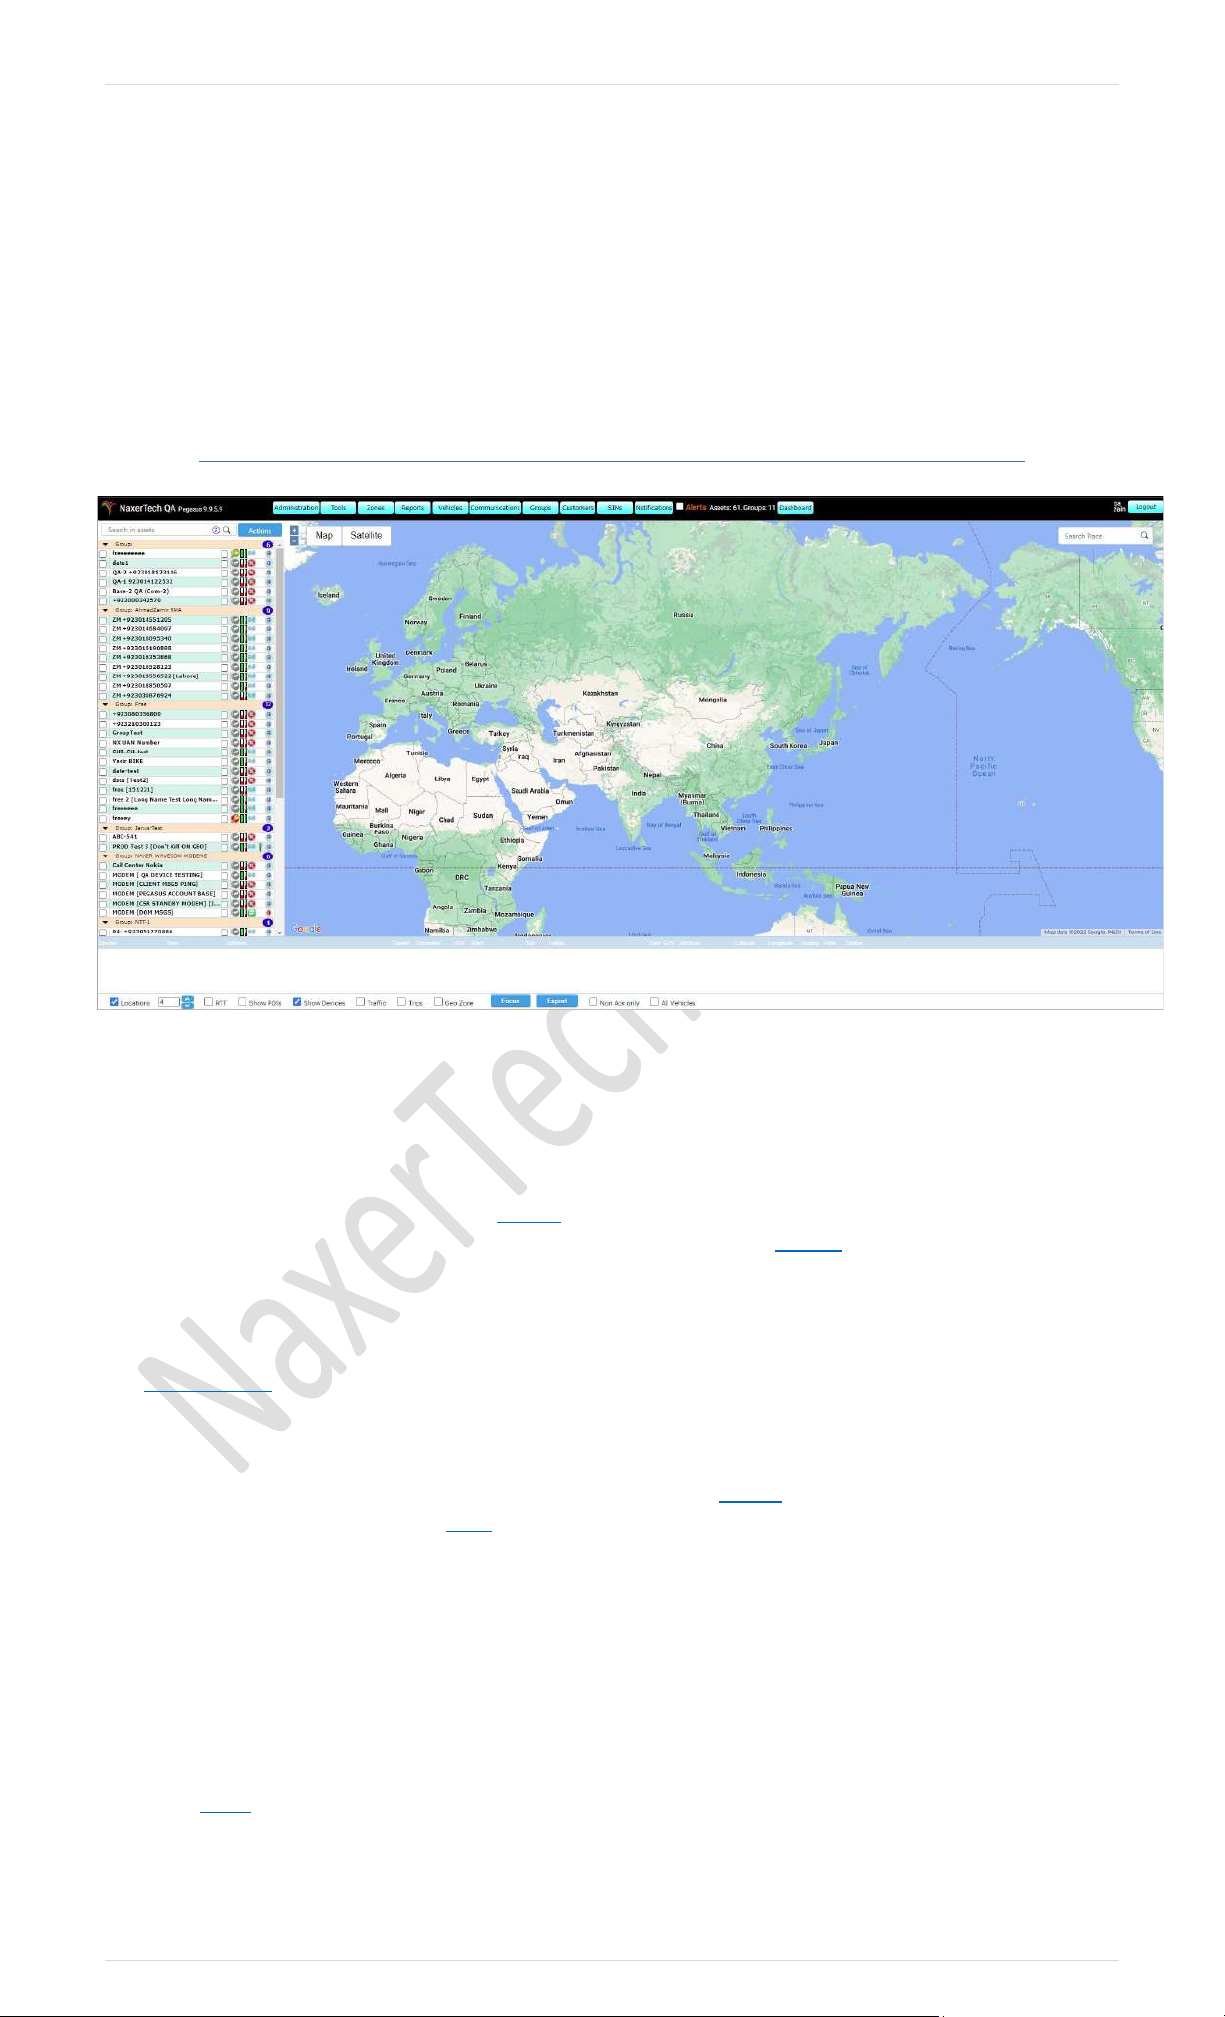
Main Graphical User Interface
A. Actions
Actions button in the Devices Panel offers variety
of functionalities and correspondence to specific
and multiple installed devices. You can also
add/edit or delete devices here. Click on Actions .
B. Administration
Accounts button enables you to Create & Edit
Administrator/ Master Accounts, User Accounts
and set roles for the Users. More details under
Administration section.
C. Tools
Tools button opens a whole bundle of options to
set various settings that should be applied to a
tracking device. More detail under Tools section.
D. Zones
This contains options i.e., Geo Zones, routes, POI
and find nearest vehicle. POIs button opens up
Point of Interest dialog box which allows marking
points of interest on the map. Each place can have
its image on the map (an icon). Geo Zones button
open up Geo Zone dialog box where co-ordinates
could be specified to set a geo zone. More detail
under Zones section.
E. Reports
Reports button open up a Reports dialog box
where you can generate variety of reports for the
vehicles added to the Pegasus system. More detail
under Reports section.
F. Vehicle
You can Add/Edit or delete vehicle details and this
can be reflected under installed devices
description. Driver ID and Shipment handling are
its most enhanced features. More detail under
Vehicle section.
G. Communication
You can find all the logs of communication
between Pegasus software and tracking device and
vice versa. For example, Comm logs, Alert log,
Event log, Installation logs, not responding devices
and Group commands privileges. A panel listing all
the alerts generated by the tracking device(s)
added to the Pegasus system under a Master
account. Enabling/ Disabling the Alert checkbox
enable/ disable alert notifications
7 | P a g e
H. Groups
Groups button open up Device Groups dialog box
where you can Add & Edit a group and assign
multiple vehicles to a group. You can maintain
subgroups with desired attributes of alerts popup.
This usually used for fleet management. More
detail under Groups section.
I. Customers
Customers Information dialog box where you can
Add & Edit information about the customers and
attach customer profile to a particular device or
group. More detail under Customers section.
J. SIMs
SIMs is an extra feature which facilitates user (especially for Distributors or large Fleet Management) to manage SIMs
of different GSM operators in a country that are in use with the tracking devices. More detail under SIMs section.
K. Notifications
This notification system is a combination of software and hardware that provides a means of delivering a message to
the recipient(s). More detail under Notifications section.
L. Dashboard
With one glance, a dashboard offers the user an array of important business insight i.e., Moving vehicles, Idle Vehicles, stop
vehicles along with forecast of weather conditions. More details under Dashboard.
M. Log Out
Click to log out from Pegasus system.
N. Devices Panel
Device panel displays all the devices that are added to the Pegasus system. Devices panel provides variety of options which
are available through graphics displayed in front of each tracking device added to the Pegasus system. More details under
Devices Panel section.
O. Map
Digital map from Google to display devices and tracks of vehicles where currently located.
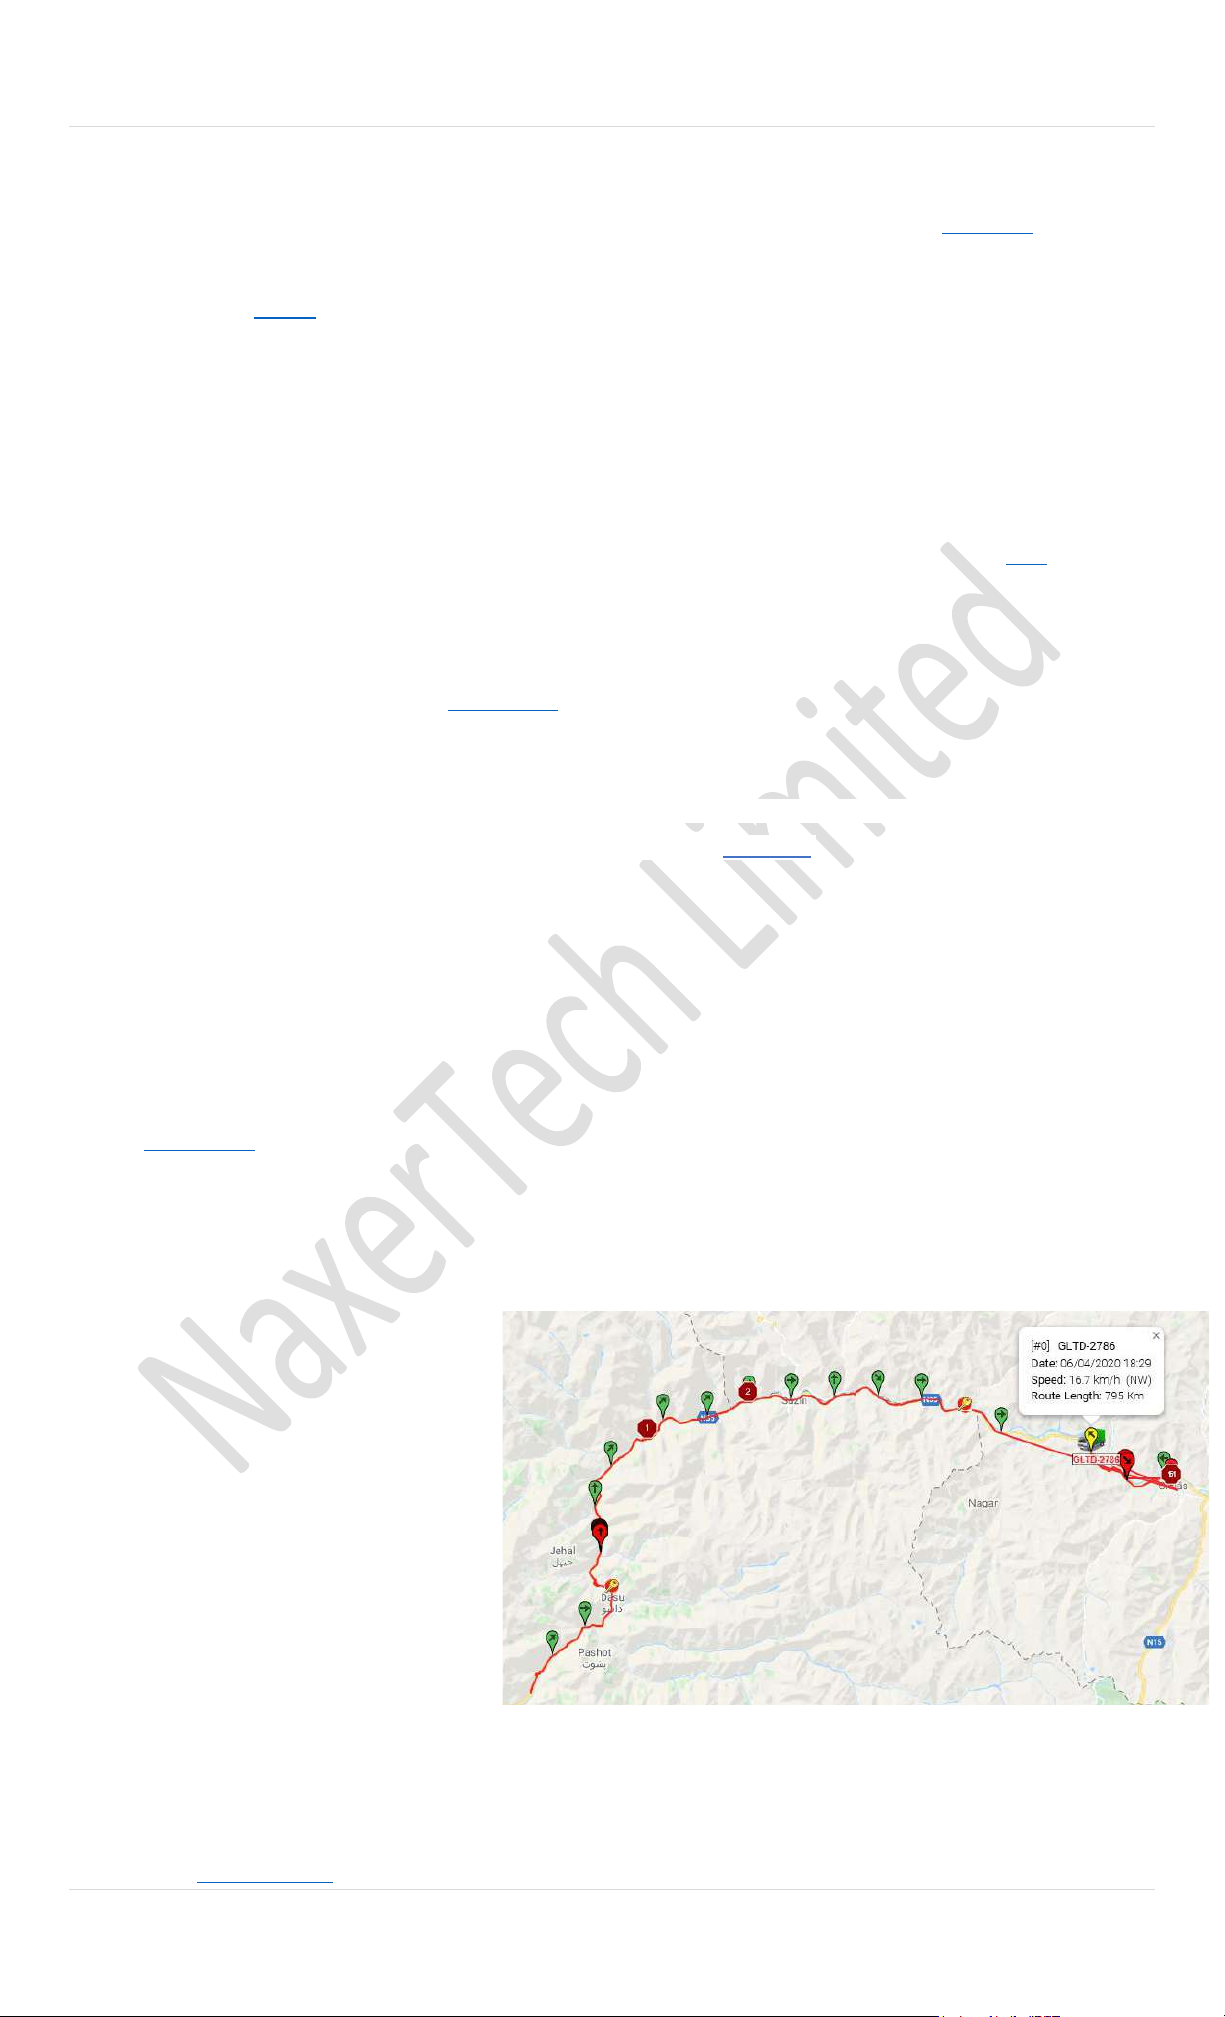
➢ Route Length
Vehicle Traveled distance can be seen
in Info box on the vehicle icon in the
map as shown in picture.
You can denote currently route
length of the currently loaded route
for getting customized route length in
specific time.
P. Information Grid
Information grid displays all the necessary, required information for the selected device. It includes, Name, Time, Address,
Speed, Odometer, IGN, Alerts, Src, GPS, Attributes, Latitude/ Longitude, Analog, Pkt#, Status, Sats and Fields. More detail
under Information Grid section.
8 | P a g e
Q. Status Bar
Status bar of the Pegasus system provides more helpful options. These options include Locations, Logs, Show POIs, Hide List,
Traffic, Trip, Focus and Export. More detail under Status Bar section.
Devices Panel
Device panel displays all the devices that are added to the Pegasus system. Devices panel provides variety of options which
are available through graphics displayed in front of each tracking device added to the Pegasus system. Let’s first discuss the
options that are available to us in graphical shape. Most of these options are for informational purpose as shown in the belo w
image.
A. Show Unit
Enabling the check Show Unit check box in the Device Panel shows the last location of the tracking unit on the map.
By default, all the check boxes are checked when the user logs into the Pegasus system and Pegasus displays all the
vehicles in the group on the map as per the last location sent by the tracking unit.
B. Unit Name
Devices are displayed under the Devices Panel by the names given to them in the Device Form. Devices can be named
with a specific naming convention followed in your company or it can b e a license plate number.
You can show device description in devices list view which can be edit by user having Device Admin – Read View rights.
This is to allow temporary labels to be added to devices.
C. Keep Unit in View
Enabling this check box will locate the unit/ vehicle instantly on the map and will always display it on the map. If the
vehicle is moving, map will automatically refresh itself with the current position of the vehicle and there will be no
need to refresh the browser to get the updated location of the vehicle on the map. Unit/ Vehicle will not be displayed
on the map if the check box is not enabled. This option is provided if you do not want a specific Unit/ vehicle(s) to be
displayed on the map simultaneously this will help you to locate a Unit/ vehicle quickly and allowing the software to
consume less resources of the machine which means high efficiency of the Pegasus system.
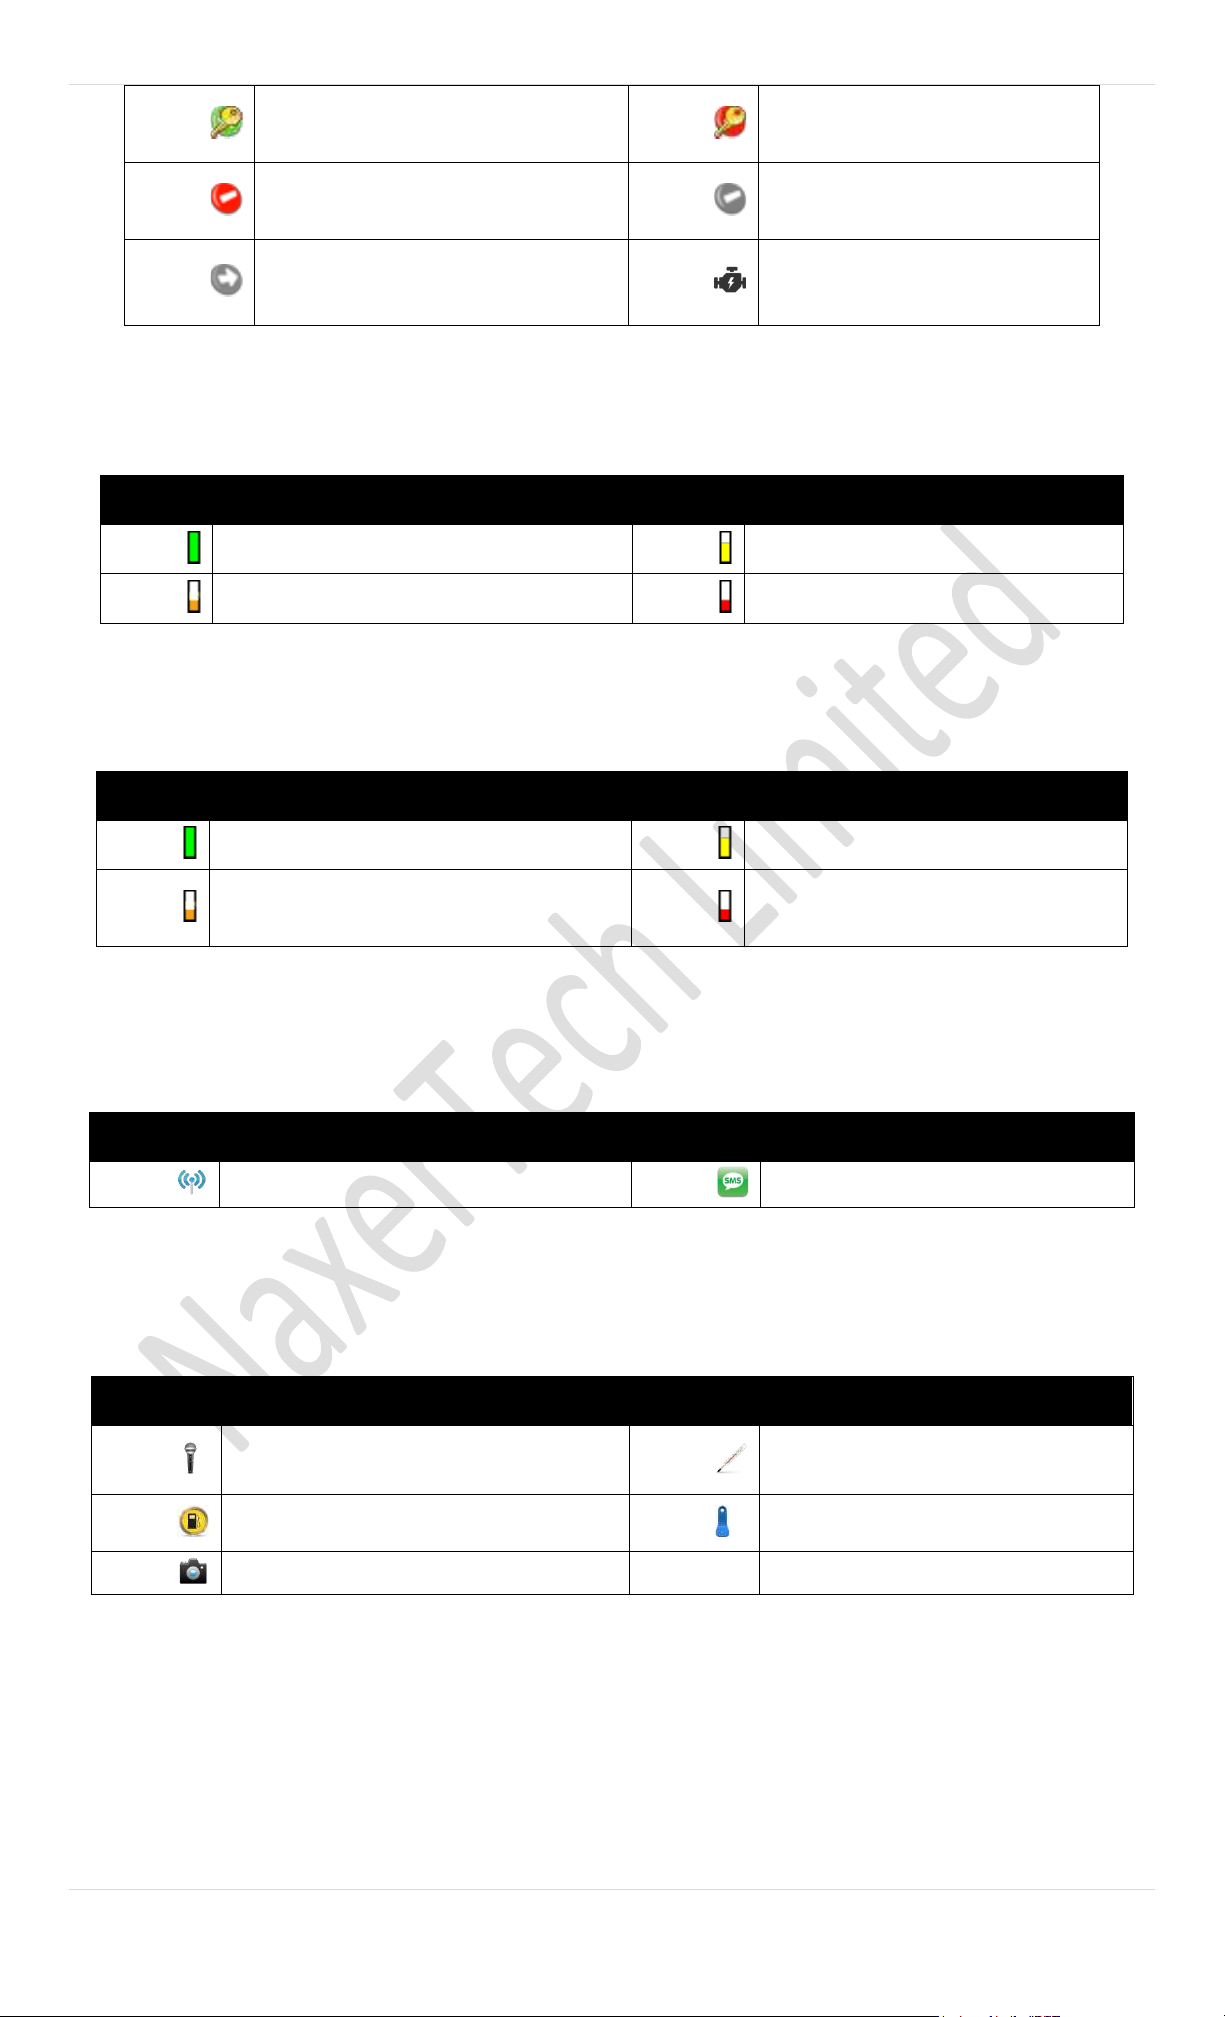
D. Motion States
This column displays different Motion States of the unit and the icons changes as per the current s tate of a unit/
vehicle. Below is the list of motion states with description.
Icon
Description
Icon
Description
9 | P a g e
Engine is on & vehicle is Moving.
Engine is on but vehicle is
stopped.
Engine is off & vehicle is not
moving.
Last known status is
standing.
Unknown motion status and it
appears if the time is passed
more than 90 minutes.
Engine Immobilized
E. GPS Locking
This column displays different states of GPS Locking. If the GPS of the tracking unit is completely locked, an icon
colored in green will display. Below is the matrix of the different state of the GPS lock.
Icon
Description
Icon
Description
GPS is locked.
GPS never locked.
F. Position Detection
This column displays different states of Position Detection. It is based on the time interval; icon will be colored green
if the time interval is less. Below is the matrix of the different state of the Position Detection.
Icon
Description
Icon
Description
Currently detected position.
Communicated an hour before.
Four hours passed.
Never detected any position or
last position detected X days ago.
G. Communication Mode
This column displays the last Communication Mode of the unit over which it was connected to the server. Below is the matrix
of the different type of Communication Mode.
Icon
Description
Icon
Description
Last connection on GPRS.
Last connection on SMS.
H. Feature Set
This column displays the icon of the feature set. Feature set selection is available under Add Device discussed above in the
document. Below is the matrix of the different type of Feature sets.
Icon
Description
Icon
Description
Voice Interface. (NTT-101 Voice
Model)
Temperature (NTT-101
Temperature Model)
Fuel (NTT-101 Fuel Model)
iButton (NTT-101 iButton
Model)
Camera (NTT-101 Camera Model)
10 | P a g e
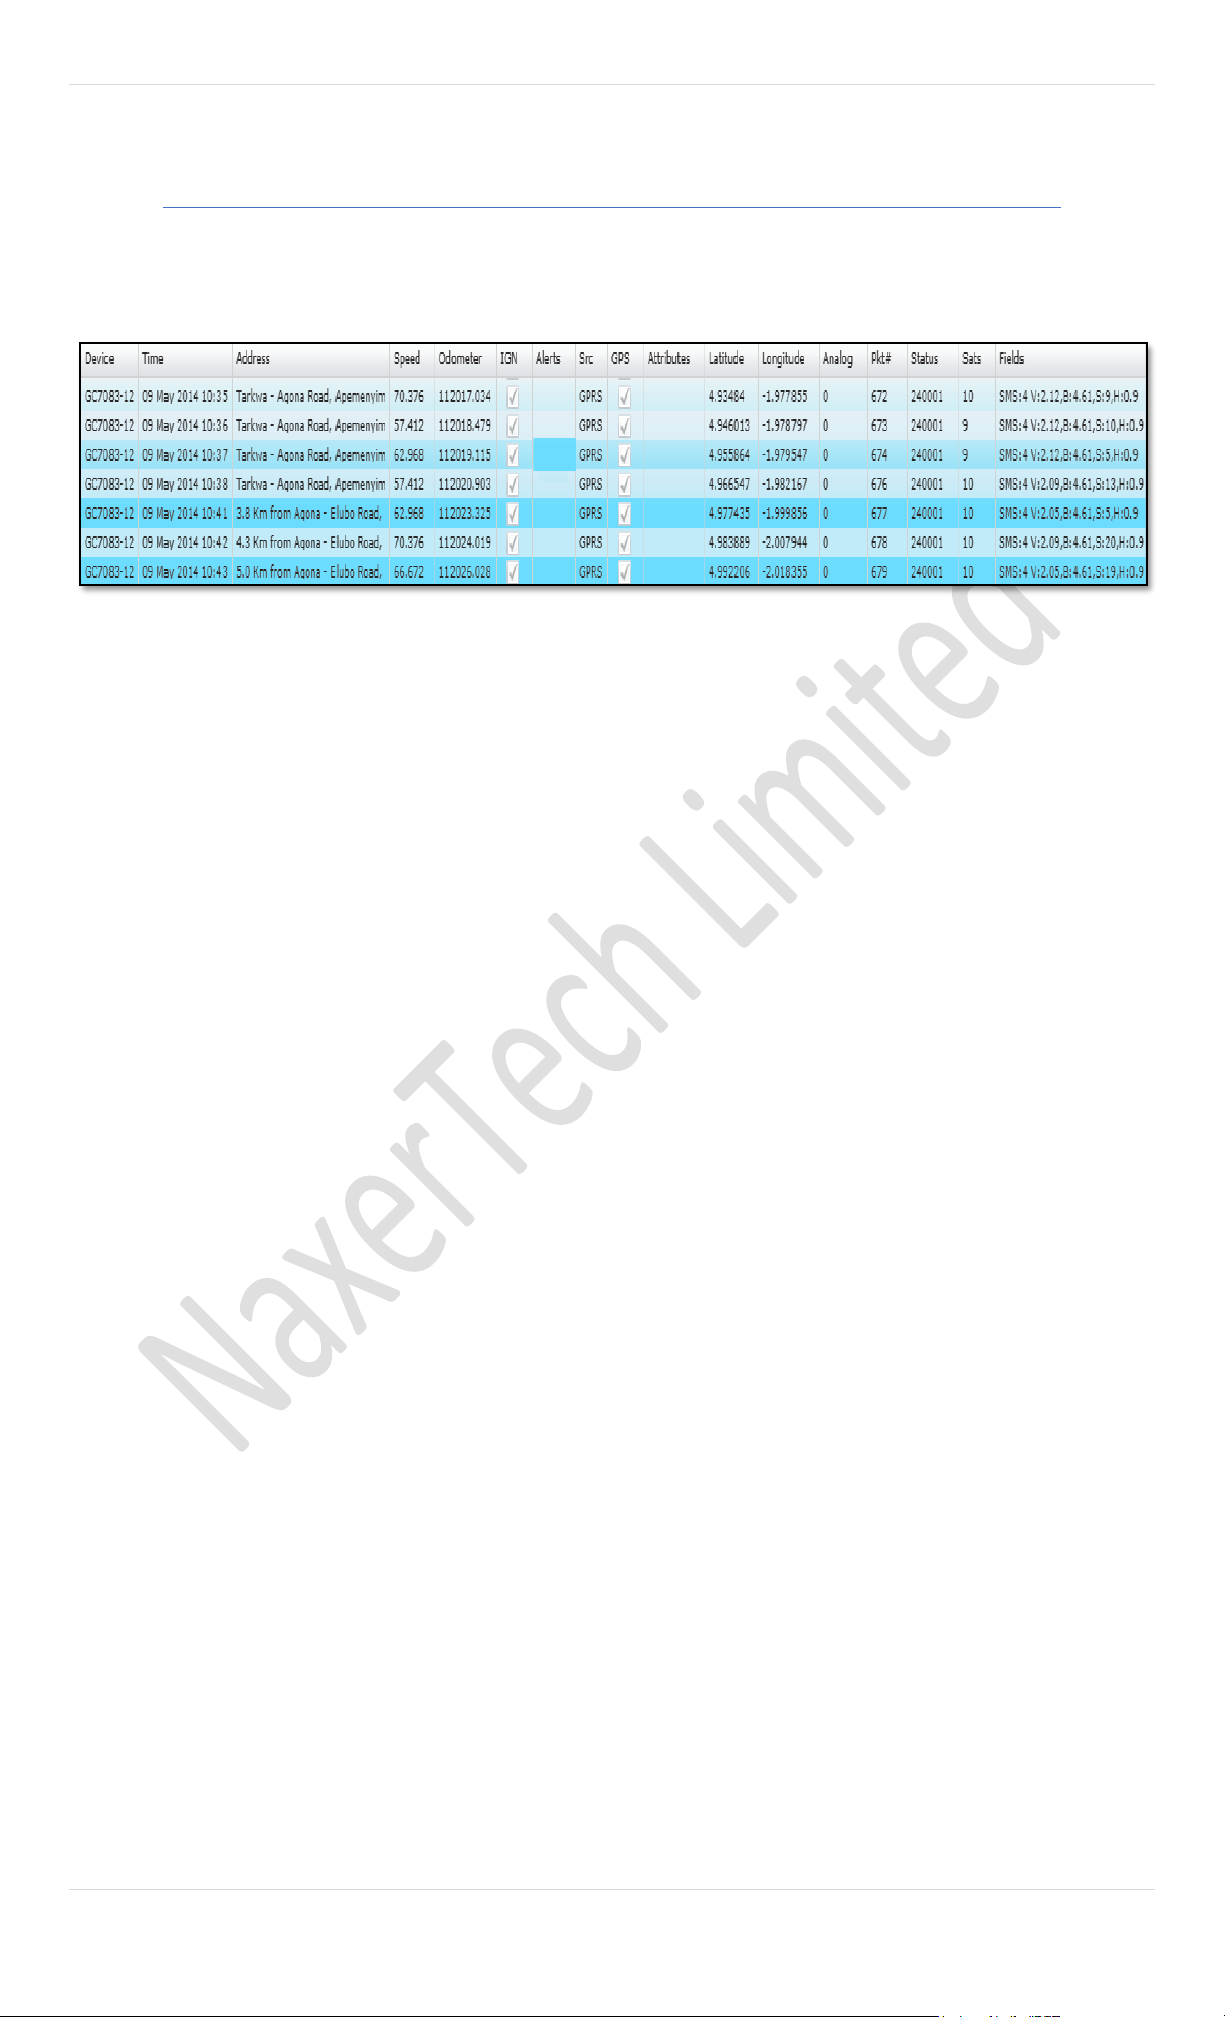
Information Grid
Information grid displays such information regarding selected device(s) for which is required instantly by the user. An image of the
information grid is shown below:
Explanation of each column of the Information Grid is given below:
A. Device
Displays the name(s) of the device(s) selected in the
Device Panel.
B. Time
Displays the date & time of the location packet
received by the Pegasus system.
C. Address
Displays the address of the location sent by the device
to Pegasus system.
D. Speed
Displays the speed of the vehicle detected and
reported by the device to the Pegasus system.
E. Odometer
Displays the current odometer reading of the vehicle
if synced with the vehicle’s odometer when adding
the device to the Pegasus system.
F. IGN
Displays the ignition status of the vehicle reported by
the device to the Pegasus system. If checked vehicle’s
ignition is on otherwise Off.
G. Alerts
Displays the alerts reported by the device to the
Pegasus system.
H. Src
Displays the communication medium used by the
device to send location packet by the device to
Pegasus system i.e., GPRS or SMS.
I. GPS
Displays the status of the GPS of the device reported
to Pegasus system. Checked if GPS is locked,
unchecked when GPS is unlocked.
J. Latitude/ Longitude
Displays the latitude/ longitude values detected by
the GPS module of the device and reported by the
device to Pegasus system.
K. Analog
Displays the voltage detected by the device,
connected to the analog input of the device, to
Pegasus system.
L. Pkt#
Displays the number of location packets sent by the
device to Pegasus system.
M. Status
Displays the status bits.
N. Sats
Displays the number of satellites connected to the
device, when location was saved by the device.
O. Fields
Displays other informational data related to the
device.
i. SMS
Displays the number of SMS sent by the
device.
ii. V
Displays the voltage of the main battery i.e.,
vehicle’s own battery.
iii. B
Displays the voltage of the backup battery
i.e., battery inside the device.
iv. H
Displays the HDOP value calculated by the
device when the location was saved by the
device.
11 | P a g e
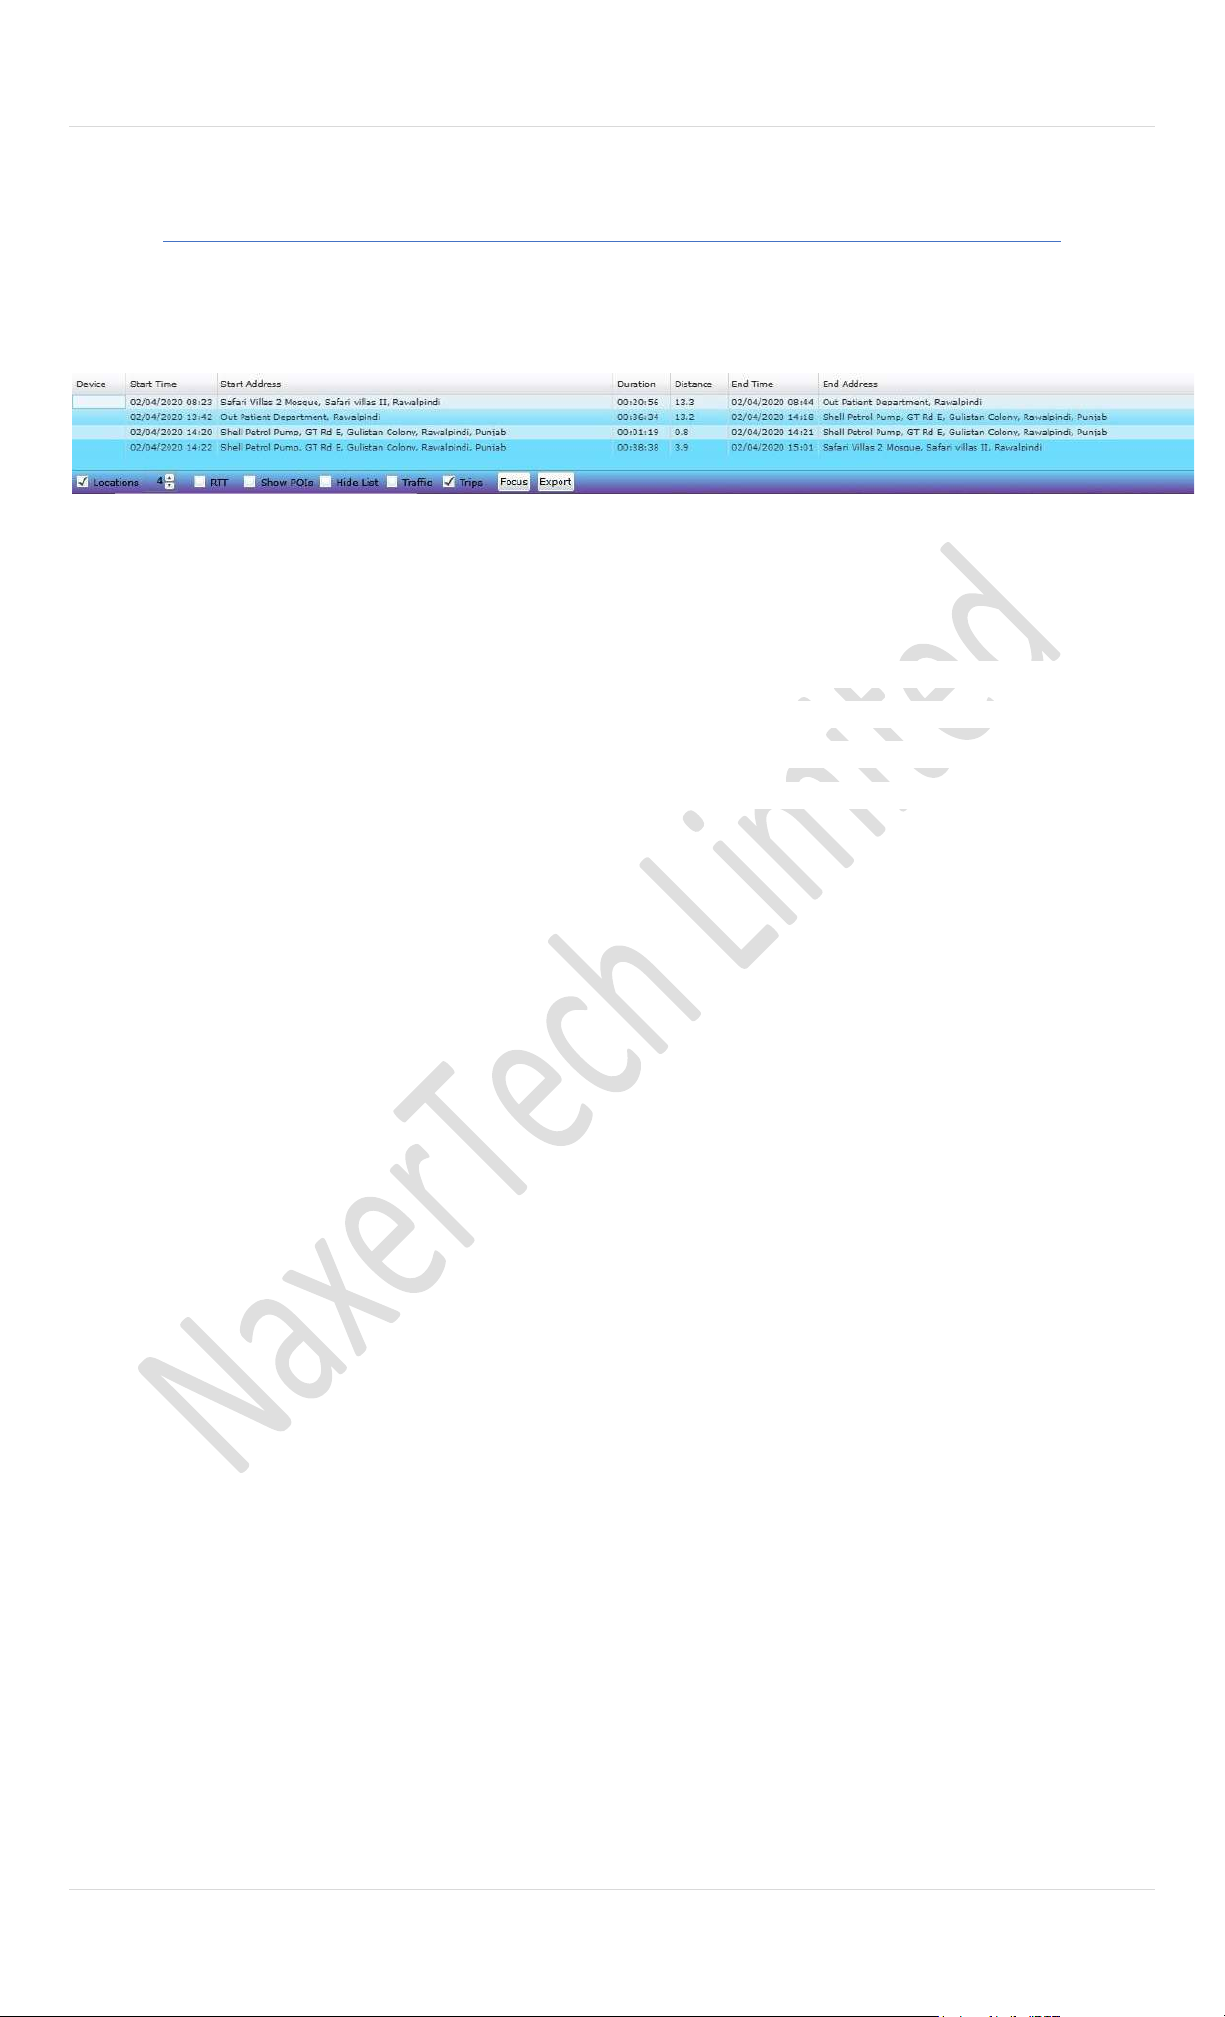
Status Bar
Status bar of the Pegasus system provide more useful options to users. Status bar is located at the bottom and just under the
Information Grid of the Pegasus system as shown in the below image:
Let’s discuss in detail all the options that are available to us on the status bar of the Pegasus system.
A. Locations
Enable the check box to hide/ unhide the Information
Grid. Increase/ Decrease the number of locations either by
inputting a numerical digit or by the pressing the increase/
decrease buttons.
B. RRT (Real Time Tracking)
Get real time location updates by enabling the check box
labelled as RTT. By default, its unchecked. Select any
vehicle(s) by enabling the check box having tool tip “Keep
asset in view” and enable the check box available at the
bottom of the Pegasus system GUI labelled as “RTT”. A
small window will appear on the map and start populating
with the information of Time when location packet
received by Pegasus system, Name of the selected
vehicle(s) and Time when device took the location.
Information grid available on the main GUI of the Pegasus
system will also update with the current location of the
vehicle. Please note that information will be available for
the current location only.
C. Show POIs
Enable the check box labelled as Show POIs in Status Bar
to display POIs on the map. By default, POIs are hidden on
the map to avoid clutter and speed up refresh.
D. Traffic
This option will provide traffic details on the map,
Traffic delays, crashes, construction, and road
closures can be monitored by just enabling traffic
check box
E. Trips
Enable the check box with double click on
desired device in device list, it will show you
trips of current day. You can select each trip
information to view on Map.
F. Hide List
Enable the check box labelled as hide list to hide the
Device Panel. This is to allow maximum map size.
G. Focus
Clicking the focus button will re-focus map on the
selected assets/ devices in Device Panel.
H. Export
All the data available in the Information Grid on the
main GUI of the Pegasus system can be exported to
an Excel file. Please follow the given below steps:
➢ Double click any device in the Device Panel
and Pegasus system will populate the
Information Grid with all the location data
sent by the device.
➢ Click the Export button, it will open the File
Saving dialog box.
➢ Select a proper location to save the file on
the machine.
➢ Give a proper name to the Excel file and click
Save button.
➢ Pegasus system will create & save an excel
file at the desired location populated with
the same data that is available in the
Information Grid.
12 | P a g e
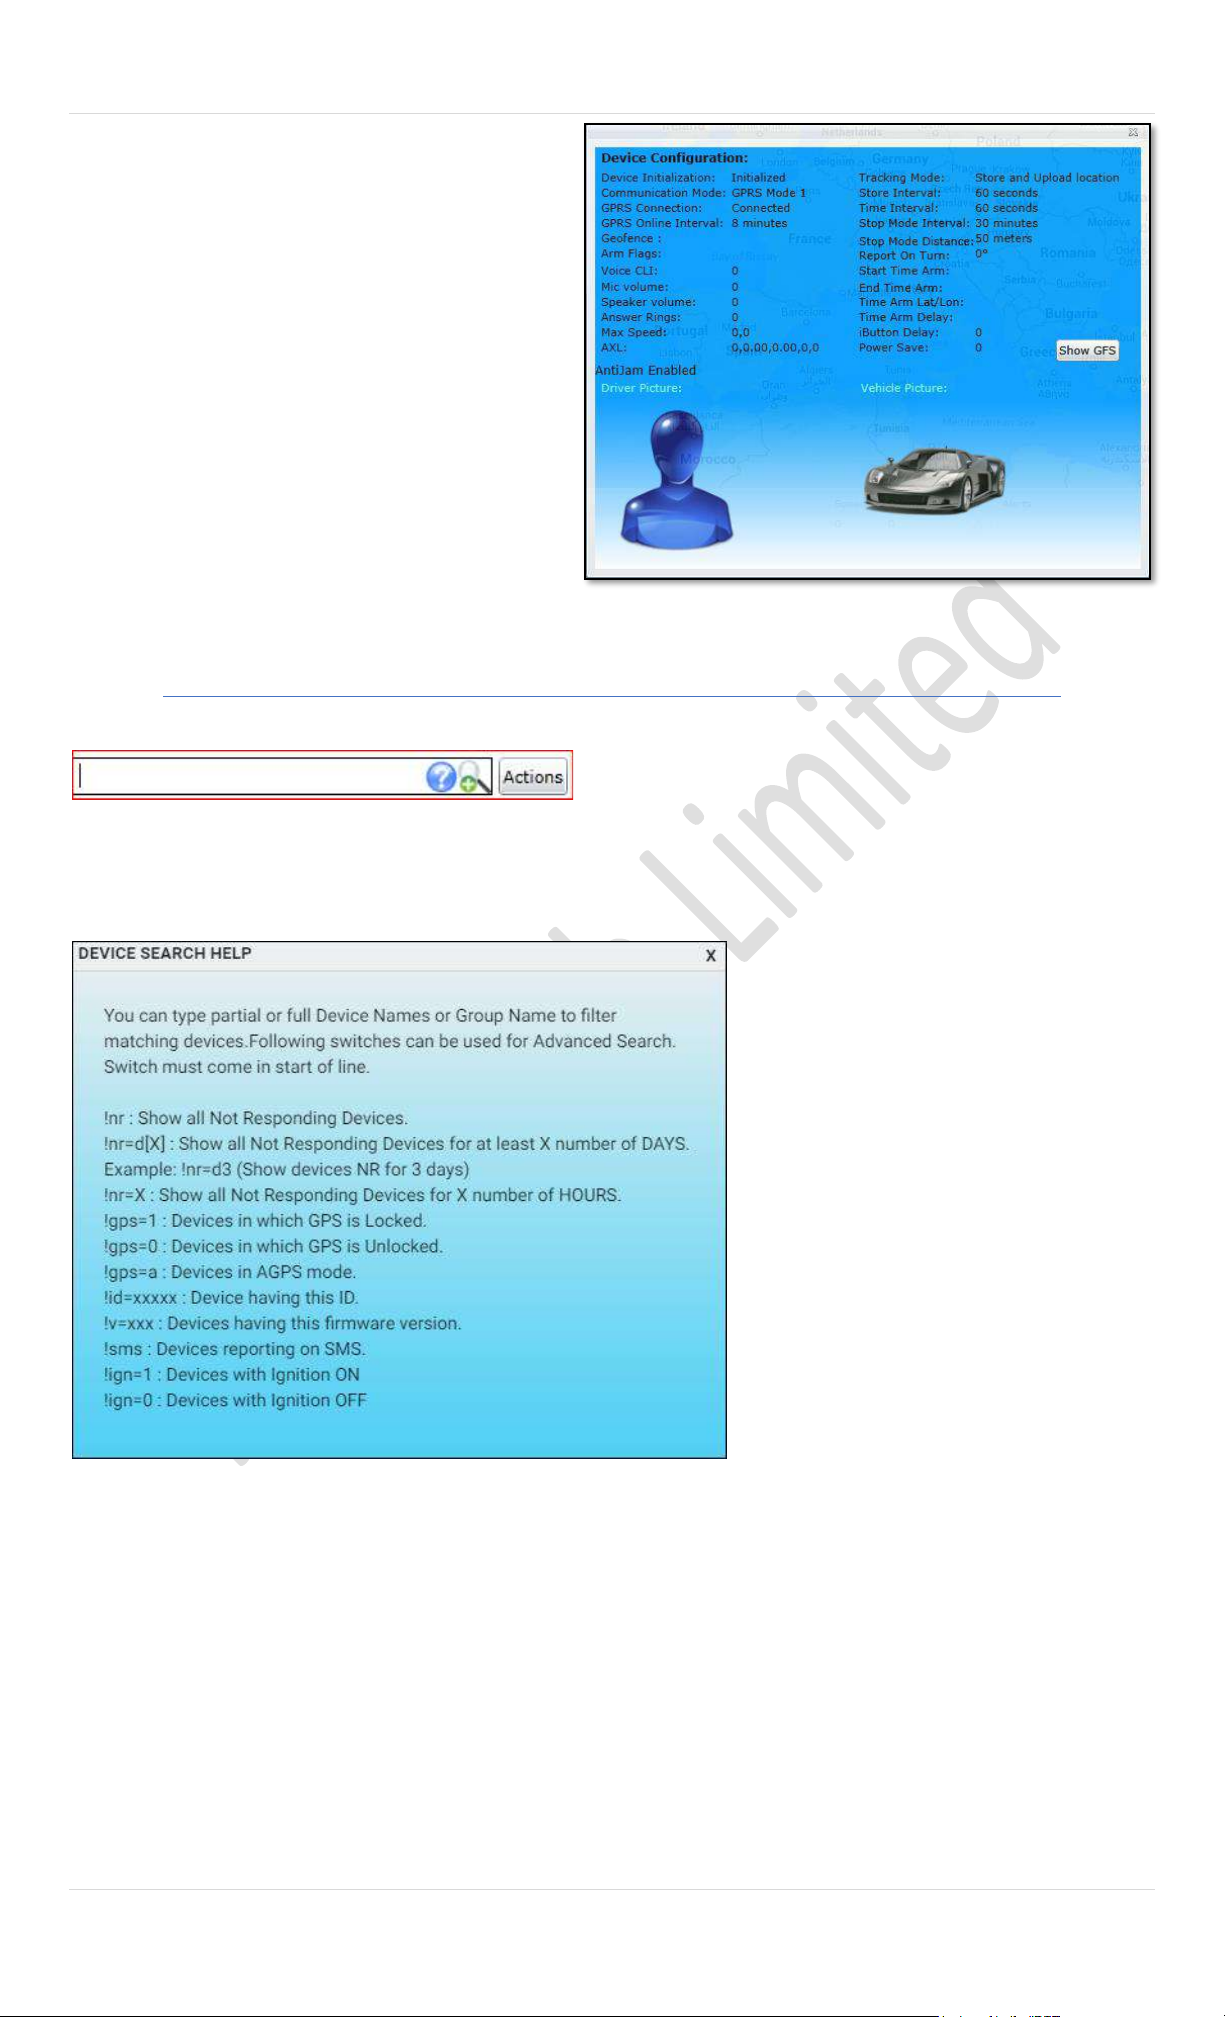
A. Device Configuration status
Clicking this icon displays a dialog box showing
all the configuration settings of the respective
device as shown in the below image:
B. Group Bar
Group bar displays the name of the group and
number of vehicles that are under a group.
Search Devices
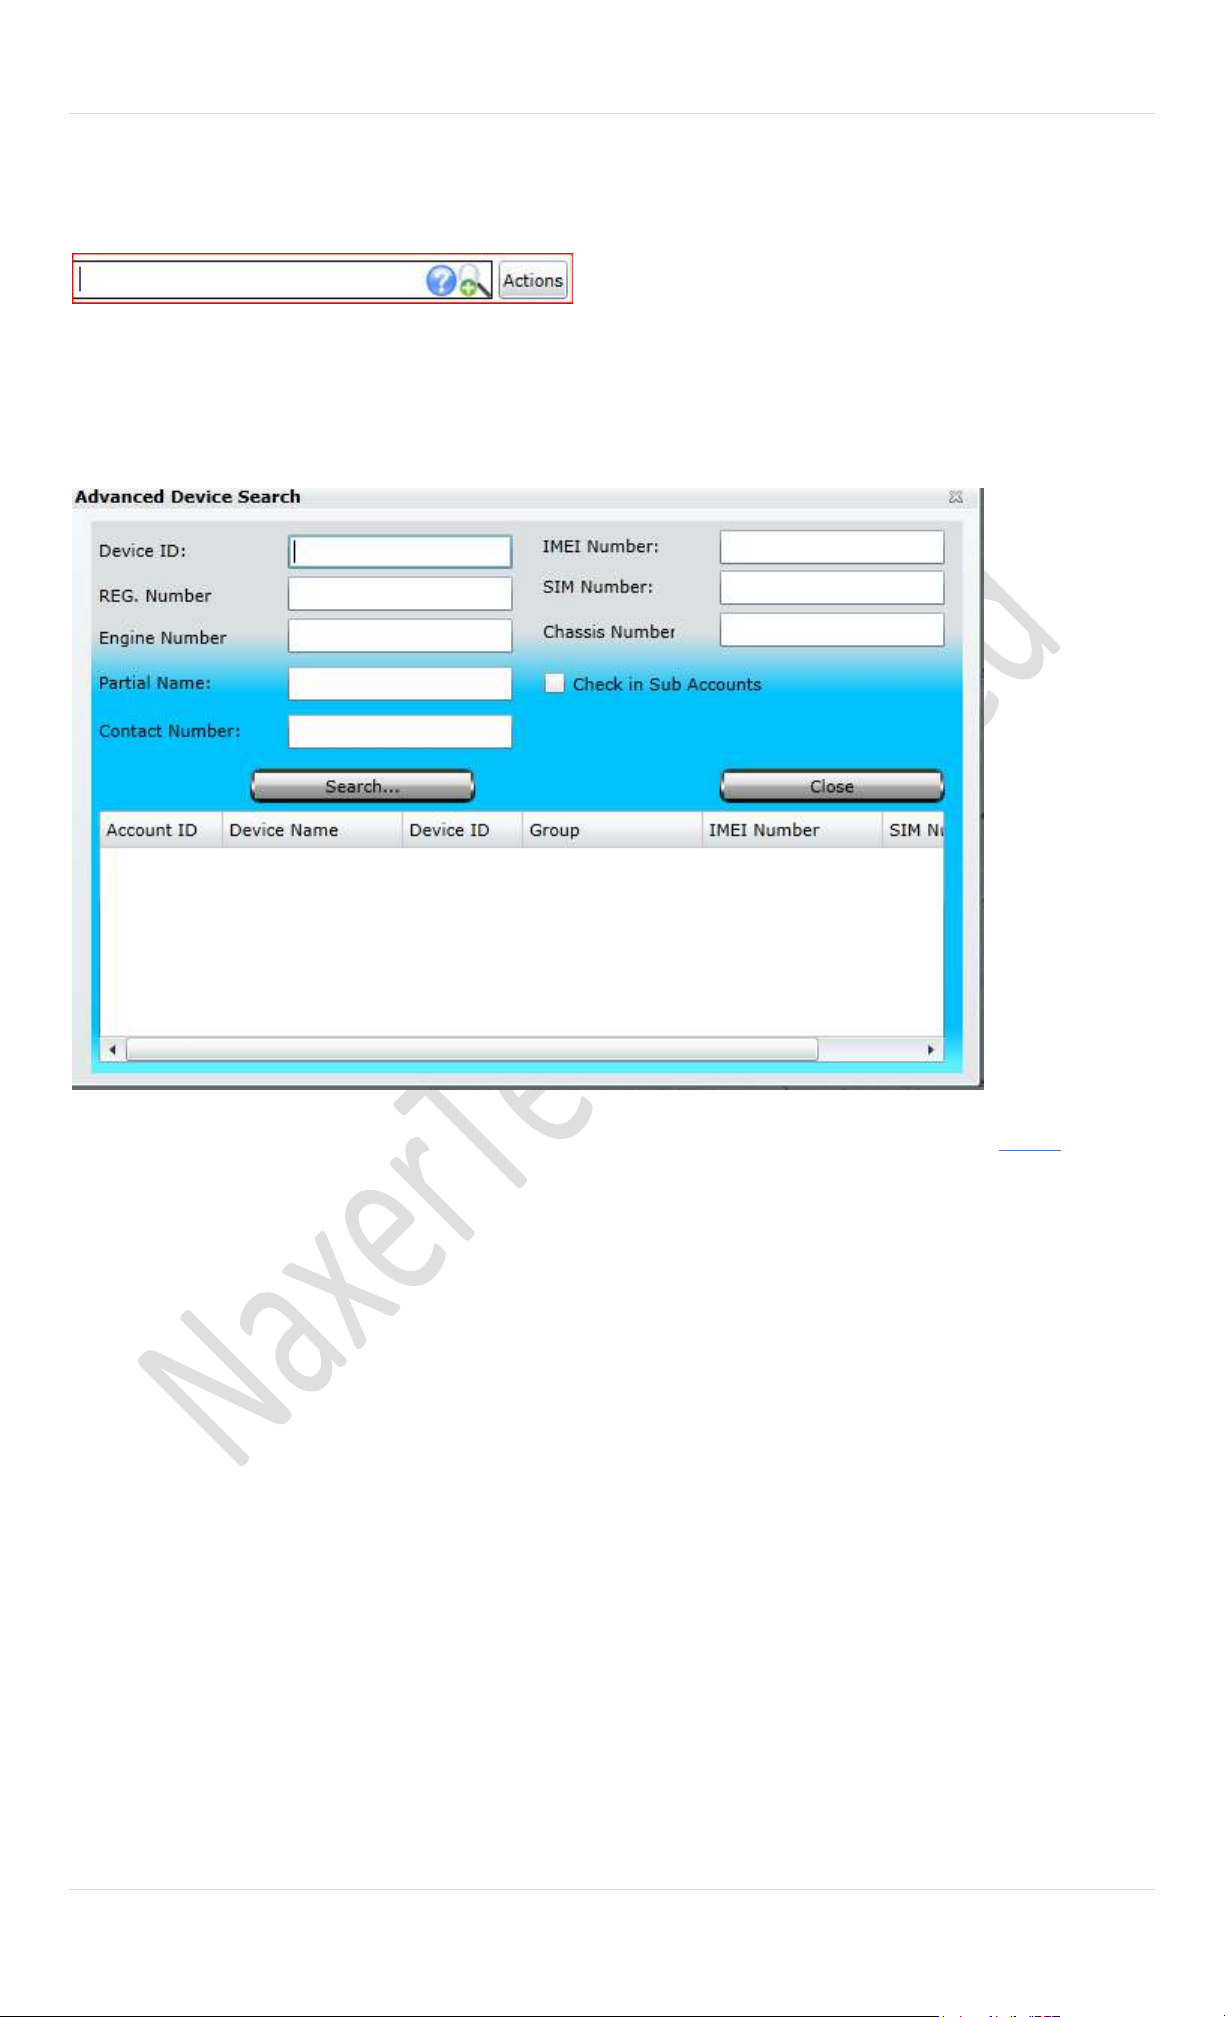
Installed devices can be searched in search bar which is top left side of Pegasus application .
You can type partial or full devices name or Group name to filter matching devices. Here is “question mark” sign to help you
in syntax for apply in search bar.
13 | P a g e
Advance Device Search
Advanced device search option will popup new window when you r click on + sign with magnifier (Describing in picture)
Advance Device Search Form dialog box is consisted on two segments. The upper part of advance device search, you can input
information you we want to search, this option workout even you remember a single entry such as Device ID, IMEI Number,
Registered number in device and more importantly by contact number …etc
A query will be generated according to given information and all similar data from Pegasus database will be extracted and
show as results.
14 | P a g e
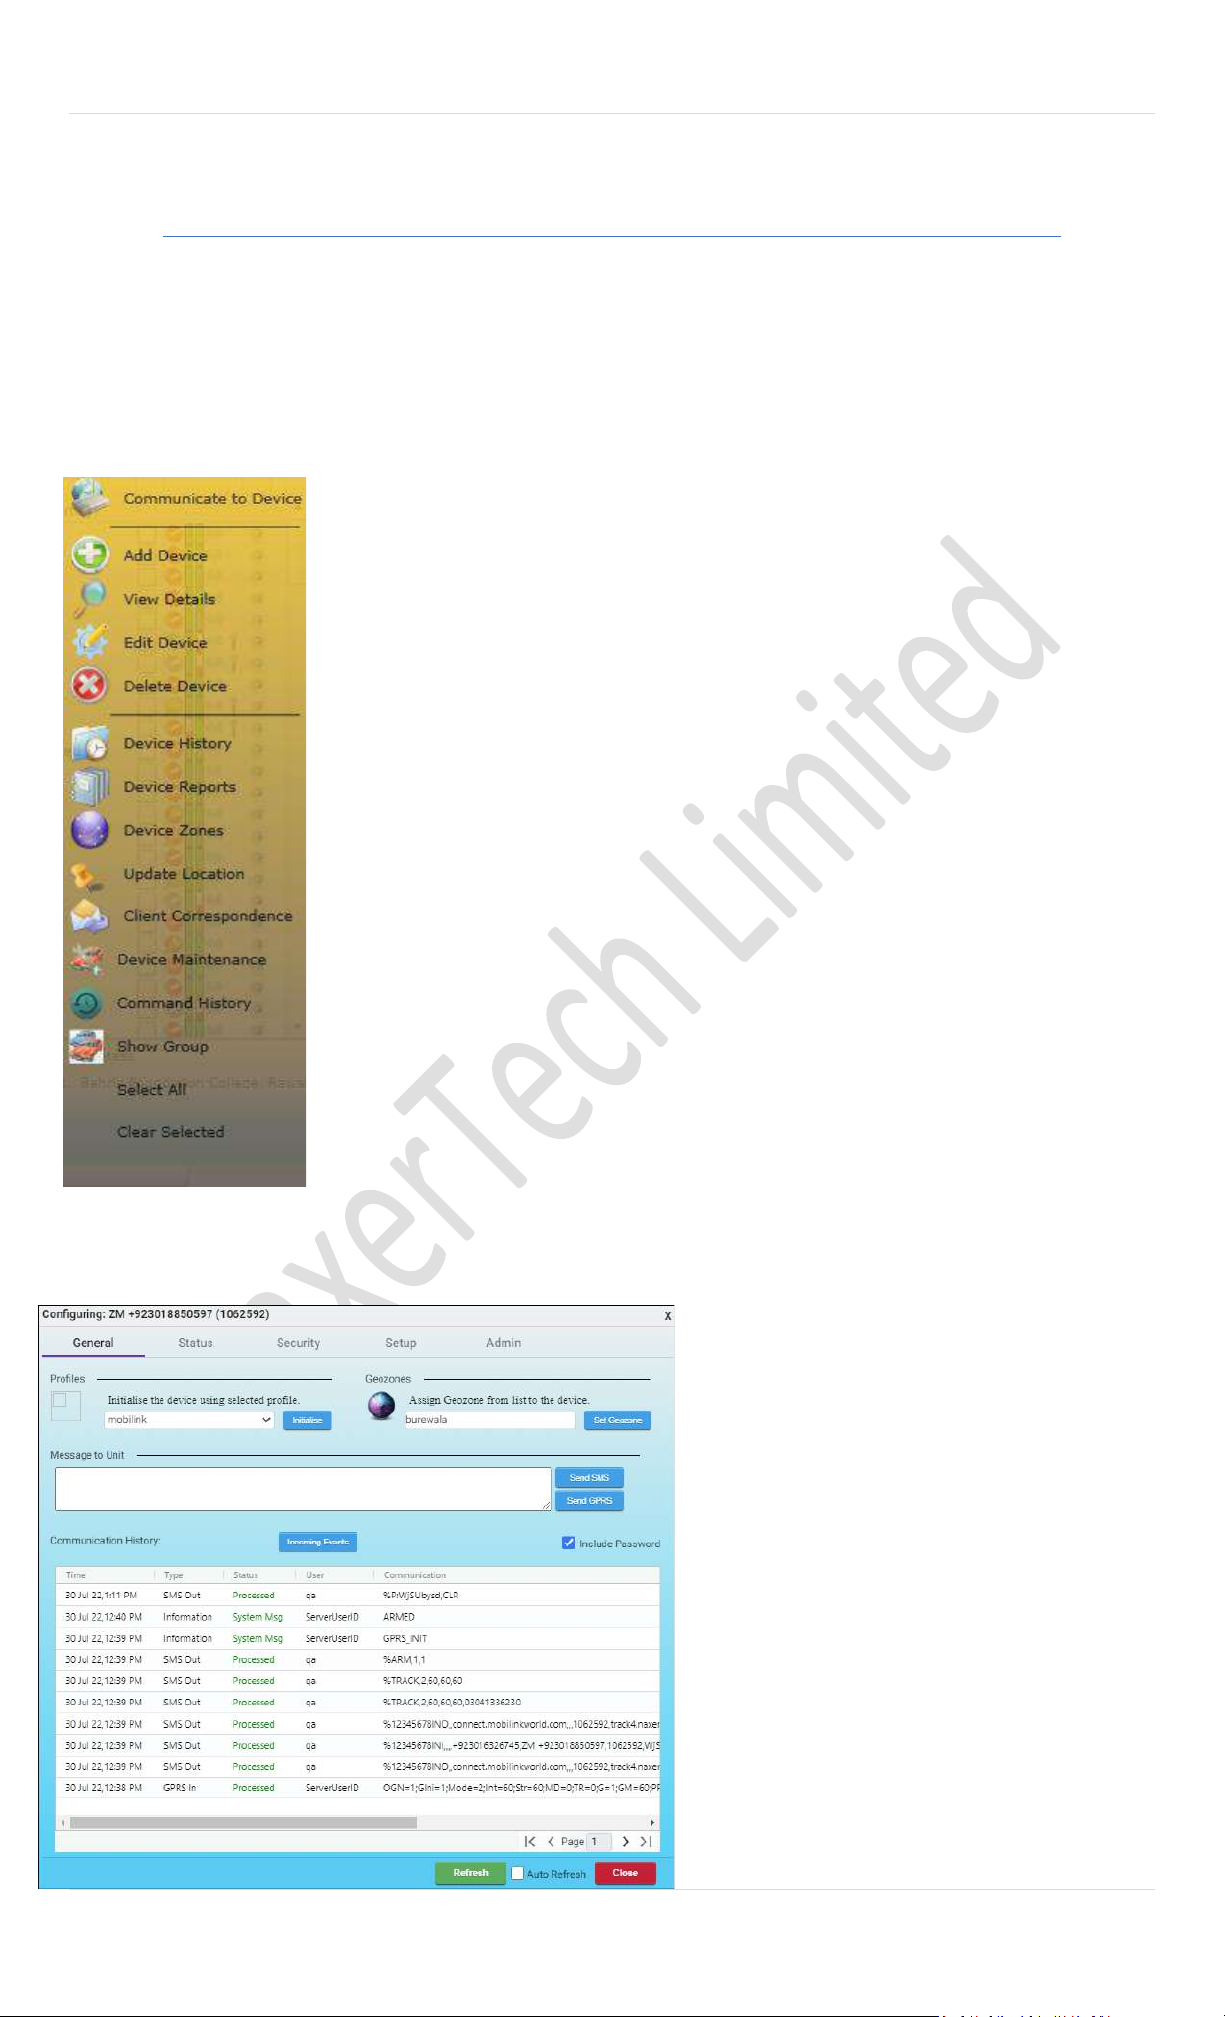
Actions
When a new account will be created there wouldn’t be any device added to the Devices Panel but the Actions button will be
enabled so that a device could be added which is the next step after adding SIM in the SIMs module and creating a Profile in
the Pegasus system.
In other case if there are devices added to the Pegasus system and are available in the Devices Panel, Actions butto n will only
enable if a device is selected from the Devices Panel to perform any action. Below is an image illustrating Actions menu:
Communicate to Device: Pegasus offers you to communicate its hardware level. You can setup devices , get their
status, implement securities and administrate tracking device through its shell commands.
Add Device: A device form will be opened for basic information that is required to add the device in Pegasus
database. Discussed in detail below in “Add Device” section)
View Details: This opens the Device Form in view mode in which information can only be read.
Edit Device: By using this, you can edit existing devices. Selecting this option opens the Device Form in edit
mode in which you can make changes to the form fields and Save the changes.
Delete Device: For deleting existing vehicles and will no longer appear under the Device Panel. (By default,
this option is disabled)
Device History: Here you can provide the appropriate parameters and Pegasus will draw the whole route
on the map as per the locations received from the device.
Device Reports: Pegasus will open its Reports panel which is also available from main menu where various
forms of reports could be generated.
Device Zones: Selecting this option, Pegasus will open Geo Zone dialogue box, where you can apply
Polygonal or Route, geo zone to the device.
Update Location: It will retrieve all available positions recorded on the current day from its database and
will update map with its complete route.
Client Correspondence: This is to send customized messages to multiple registered numbers of the client.
Device Maintenance: Maintenance dialog box, where you can save maintenance records of a device and
view early maintenance performed on the device.
Command History: It will display all those commands sent to the device through Pegasus system. Here you
can select a single command or multiple commands to send to the device again.
Show Group: Pegasus will display locations of all devices on the map that are under a group.
Select All: Selecting this option will select all the devices that are under a group.
Clear Selected: Selecting this option will clear the selection of all the selected devices under a group.
a. Communicate to Device
Once the tracking device is added to the Pegasus
system now it’s time to communicate with the
tracking device i.e., send initialization commands to
the tracking device so that it starts giving its location,
accepts commands, execute commands & report
accordingly. This will open the communication dialog
box which allows you to configure and send supported
commands to the tracking device as shown in the
below image.
Communication dialog box is divided into different
tabs according to the commands type i.e., General,
Status, Security, Setup and Admin commands. We now
discuss each tab and commands in detail:

15 | P a g e
A. General
General tab offers basic commands to be sent to the
tracking device in order to start responding to the
commands i.e., Profile, Geo Zones, Tracking Configuration,
Message to Device and Status. Below each command that
a General tab offers is discussed in detail.
Profile – Edit Profile
This is the basic command and is mandatory to be sent to
the tracking device as it enables tracking device to set its
communication parameters. Select a profile from the
predefined profiles available in the profile dropdown list
(dropdown list will only populate if profiles are already created under
Profile or create your own profile which will also appear in
the same profile dropdown list and click Initialize button.
Once the initialize button is clicked, Edit Profile dialog box
will appear where you can make any final changes to the
selected profile if required before sending it to the tracking
device. You can also edit the profile by clicking the Edit
Profile button before clicking the Initialize button.
A profile includes tracking device’s basic settings like which
GSM Network to use, what are the Base Control Number
and others which we will discuss in detail later. Once the
initialization settings are sent, you can notice the status of
the commands sent to the tracking device by the Pegasus
software in the Status grid (Marked in green colour in the above
image). As soon as the tracking device receives the
command from the Pegasus system, it starts processing
i.e., setting up its parameters, as set by you in the selected
profile. Once the settings are set by the tracking device, it
confirms it by sending its position to the Pegasus system
which could be checked by enabling the “Keep in View”
check box option under the Devices Panel and device will
reflect its position on the map.
Assign
You can Assign specific profile to device. This can be
used for any further re-initialization
Geo Zone
Setting a Geo Zone on a tracking device is optional; Geo
Zone could be applied to the tracking device at this initial
stage or could also be applied later on. Select the
predefined Geo zone (which you can create from main menu Zones
then click on GeoZone) settings from the Geo Zone dropdown
list and click Set Geo Zone button. Doing so will show the
command line that has to be sent to the tracking device in
the Message to Device text box, if required you can change
the latitude and longitude settings before sending it finally
to the tracking device. If no changes are required you can
send Geo Zone settings to the tracking device by clicking
Send SMS or Send GPRS button. Multiple Geo Zones can be
applied and view in different colours by clicking Show
Tracks in Vehicles tab.
Tracking Configuration
Setting Tracking Configuration is also optional; these
settings could be applied to the tracking device at this
initial stage or could also be applied later on. There are
multiple tracking modes that you can set on the tracking
device. Just select the required tracking mode, enter the
parameters in Upload Interval, Store Interval, Distance &
Stationary Interval. Once the parameters are set then click
the OK button, respective command line as per the tracking
mode set will appear in the Message to Device text box and
if no further changes are required you can send the
command to the tracking device by clicking the Send SMS
button or Send GPRS button. Below is the short description
of the tracking modes offered by Pegasus system.
Interval Base Tracking
Setting tracking mode to Interval Base Tracking will enable
the tracking device to store GPS and status data after every
specified Store Interval (in seconds) to its internal memory
and will send all the stored location to Pegasus system
when the Upload Interval is achieved. In case tracking
device loses its connection with GSM network, it will send
all the locations stored in buffer to Pegasus system as soon
as tracking device gets back in to the GSM network and
establish its connection.
Real Time Tracking
Setting tracking mode to Real Time Tracking will enable the
tracking device to send its GPS and status data to Pegasus
system after every specified Upload Interval. Setting the
Upload Interval and Store Interval to 0 seconds will enable
the Real Time Tracking mode.
Store and Upload Location
Setting tracking mode to Store and Upload Location will
enable the tracking device to store GPS and status data
after every specified Store Interval (in seconds) to its memory
and will send to Pegasus system after every specified
Upload Interval (in seconds) and will clear its memory.
Distance Base Tracking
Setting tracking mode to Distance Base Tracking will enable
the tracking device to store GPS and status data after every
specified Distance interval (in meters) to its memory and will
send to Pegasus system after every specified Upload
Interval (in seconds) and will clear the memory. If the Upload
Interval is complete but specified Distance Interval is not
yet covered, device will not send any location to Pegasus
system.
Motion Base Tracking
Setting tracking mode to Motion Base Tracking will enable
the tracking device to store GPS and status data after every
specified Store Interval (in seconds) to its internal memory
and will send all the stored location to Pegasus system
when the Upload Interval is achieved. Motion base tracking
is different from Interval base tracking as Motion base
tracking will only send the location when the vehicle will
move from a stop state i.e., when the vehicle is stopped,
device will not store or send any location.
Status Grid
Status Grid keeps you updated with the status of all the
commands that are sent to the tracking device. In the
Status Grid, Date & Time of the command, Type of
command i.e., sent the command through SMS or GPRS,
Status of the command i.e., the command sent is either
pending or processed or failed and Communication i.e.,
what command has been sent to the tracking device.
16 | P a g e
Auto Refresh
Enabling this option will automatically keep updating the
Status Grid.
Commands Only
Enabling this will only show the commands that are sent to
the selected device.
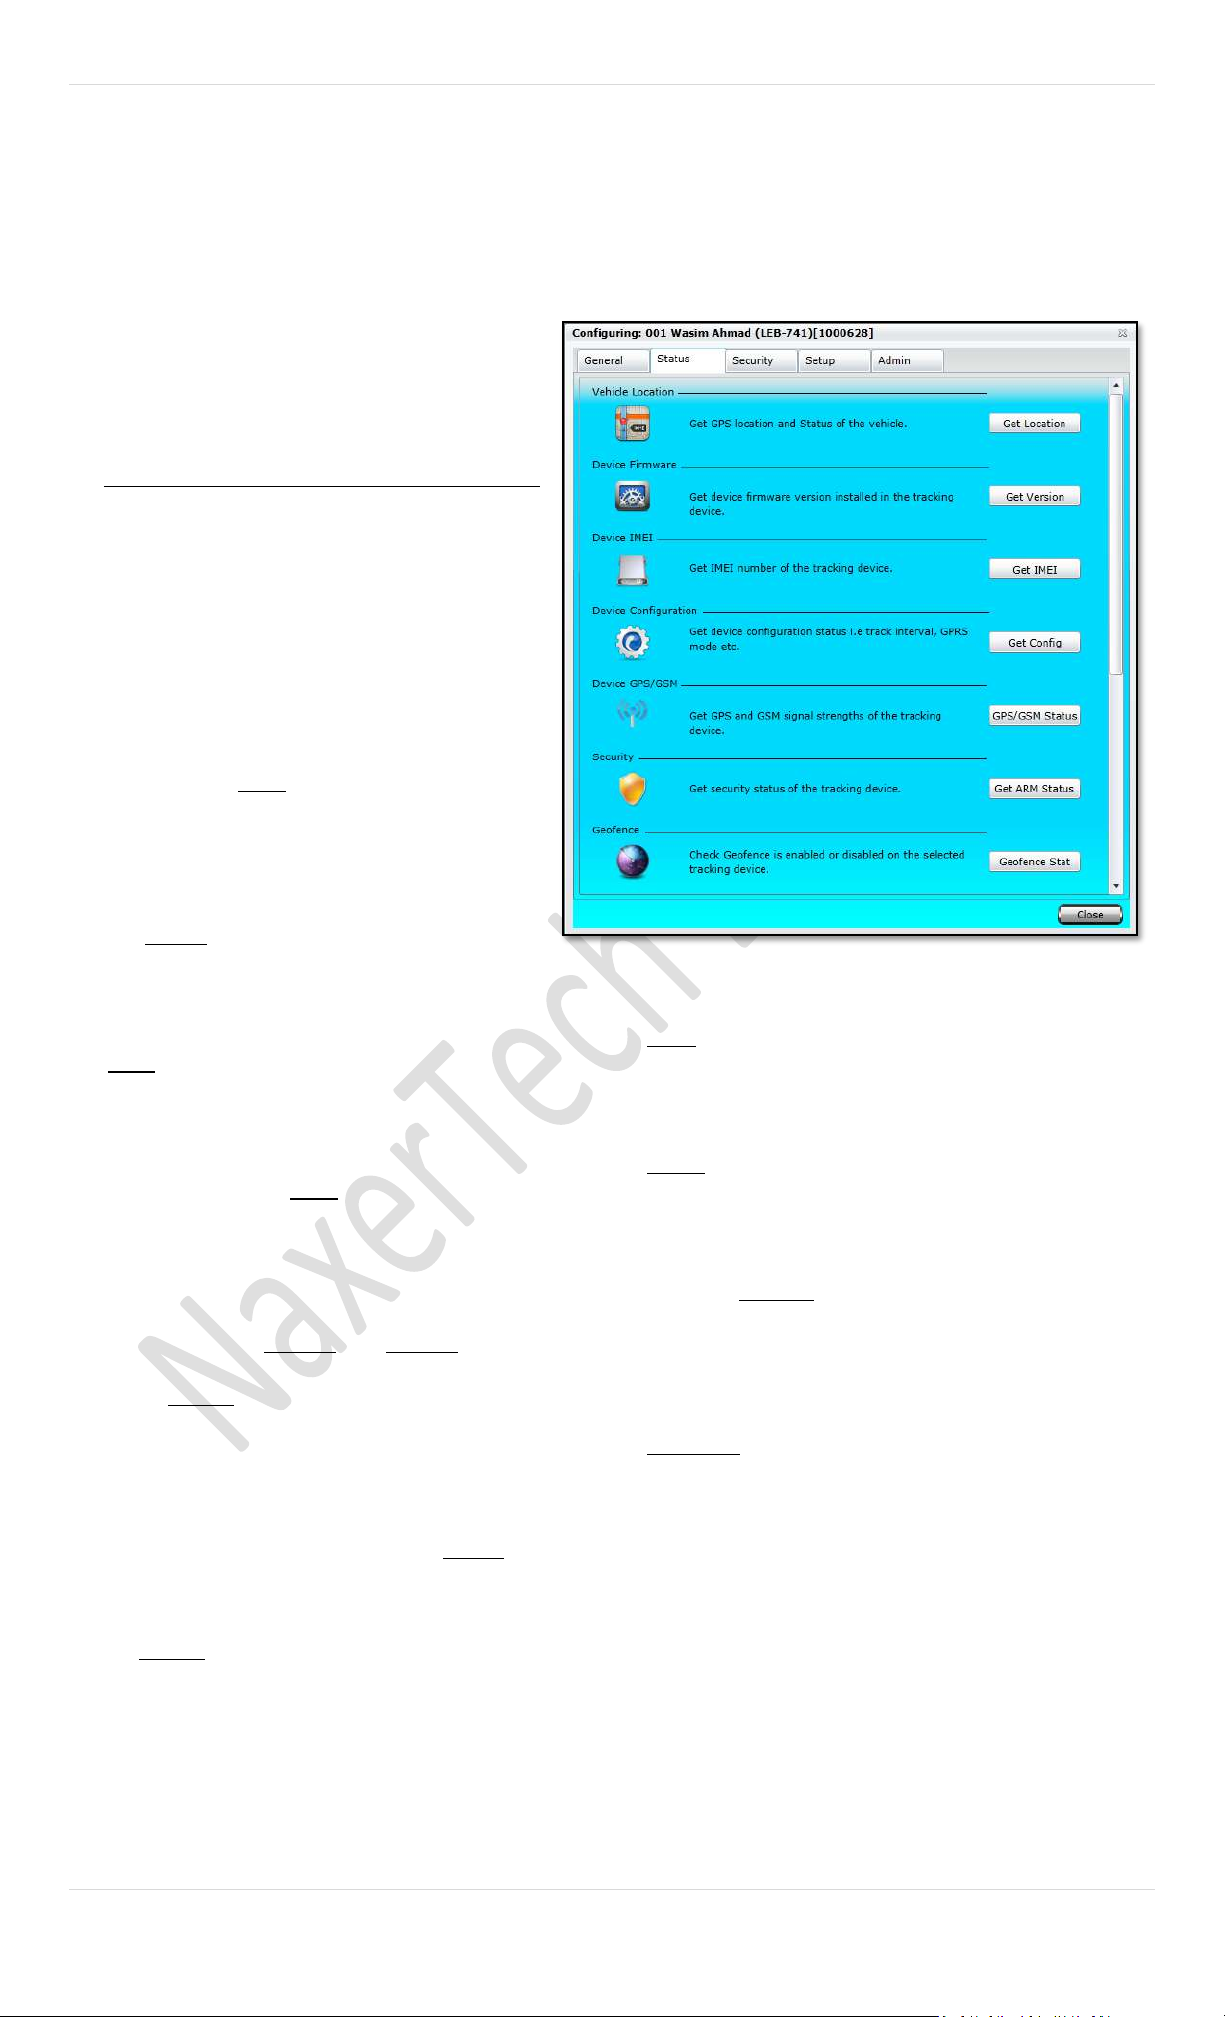
B. Status
Status tab offers such commands to be sent to
the tracking device to get the status of the
features that the tracking device offers. Let’s
discuss each Status command in detail:
Vehicle Location
To find recent location of the vehicle, you can simply
click on “Get Location” button.
A popup window will generate command
automatically for you. Next you need to select it
sending medium either GPS or GPRS.
Device Firmware
Click on “Get version “button which will create
command for you %VER. Send this command to the
tracking device to get the current version of the
firmware installed in it.
Device IMEI
Click on “Get IMEI” button which will create command
for you %CGSN. Send this command to the tracking
device to get its IMEI number.
Device Configuration
Click on “Get Config” button which will create command for
you %GFS. Send this command to the tracking device to get
all the settings applied to it.
Device GPS/ GSM
By clicking on “Get GPS/GSM Status” button which will
create command for you %GPS. Send this command to the
tracking device to get the tracking device’s GSM & GPS
status.
Security
There are two modes in security, vehicle engine mobilizes
and immobilize with %ARM,0 and %ARM,1 respectively.
Click on “Get ARM Status” button which will create
command %ARM? Send this command to the tracking
device to get the settings set for the security mode.
Geofence
To find what Geo Zone and how many are configured in the
tracking device, you need to Click on “Geo Zone Stat”
button which will create command for you %GEO?
Analog Input
Click on the “ADC Scan” button which will create command
for you %ADC,1. Send this command to the tracking device
to get the current values on its analogue inputs.
Device Initialization
Click on “Get INI” button which will pop up with command
%INI? Send this command to the tracking device to get the
settings applied on the device including contact numbers.
GPRS Status
Click on button “Get Info” which will create command
%INO? Send this command to the tracking device to get the
GPRS settings set for GPRS connection.
SMS Counter Status
Click on the button “Get SMS Stat” which will create
command %SMSN? Time period of SMS count is 1 month
after that it will starts from 0. You may check this command
response in Communication History of General Tab.
Battery Alert Status
Click on button “Get Bat Alert” which will create command
%BATCUT? Send this command to the tracking device to get
the status of the machine battery connected to the device
17 | P a g e
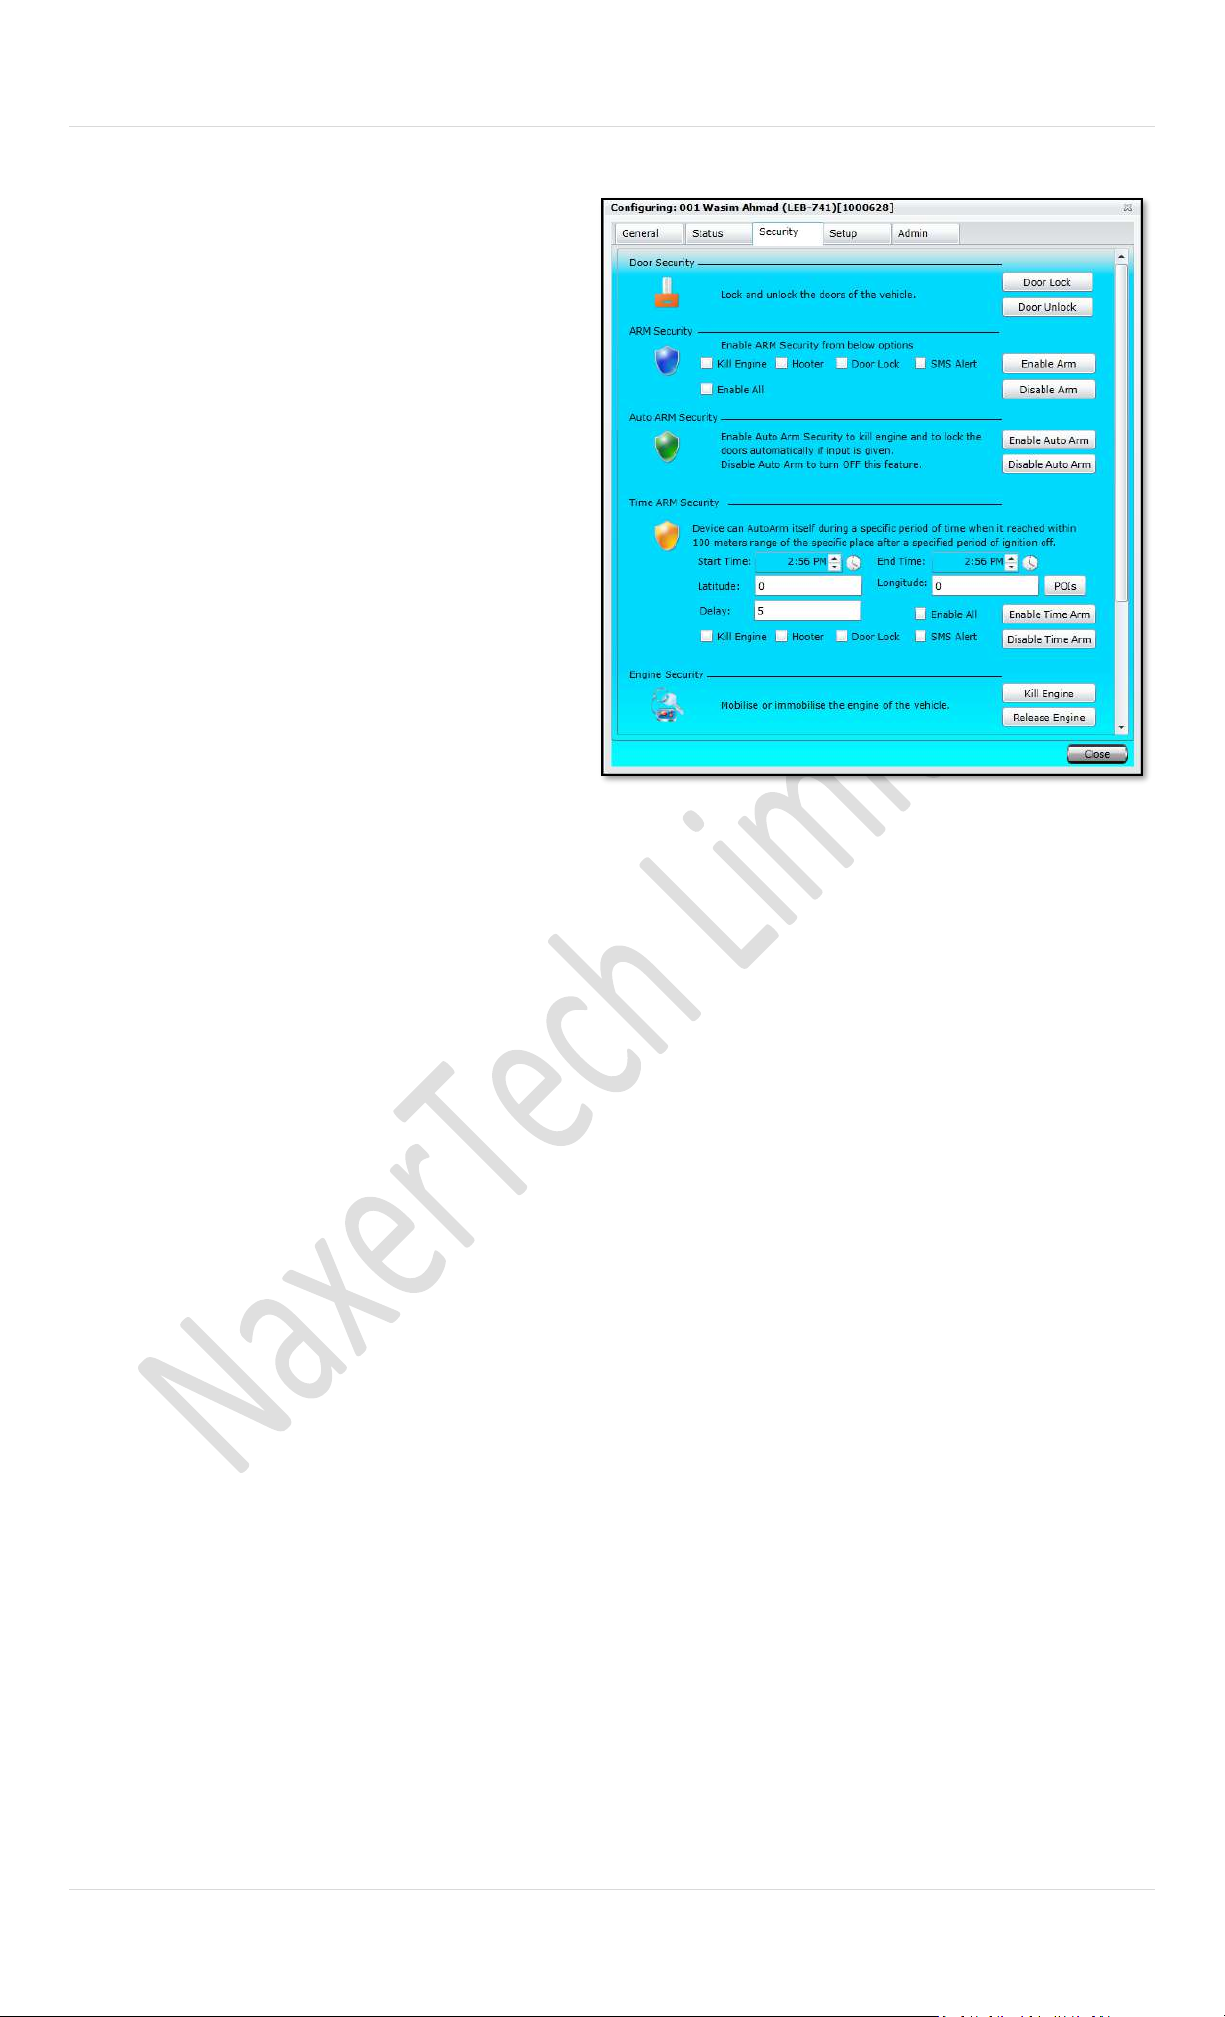
C. Security
Security tab offers such commands to be sent to
the tracking device to enable/ disable features
that the tracking device offers. Let’s discuss each
Security command in detail:
Door Security
Send command to the tracking device to lock/ unlock the
car doors.
ARM Security
Send command to the tracking device to turn ON/ OFF the
security mode with enabling/ disabling the options to Kill
Engine, Hooter, Door Lock and SMS Alert.
Auto ARM Security
Send command to the tracking device to turn ON/ OFF the
auto security mode.
Time ARM Security
Send command to the tracking device to turn ON/ OFF the security mode for a specific period of time within 100
meters range of the specific place after a specified period of ignition off.
Engine Security
Send command to the tracking device to turn ON/ OFF engine immobilizing mode.
Jammer Detection
Send command to the tracking device to turn ON/ OFF anti jamming mode with the actions to perform (Kill Engine and Hooter,
Hooter only or Alert only).
Battery Security
Send command to the tracking device to turn ON/ OFF battery tampering alert.
18 | P a g e
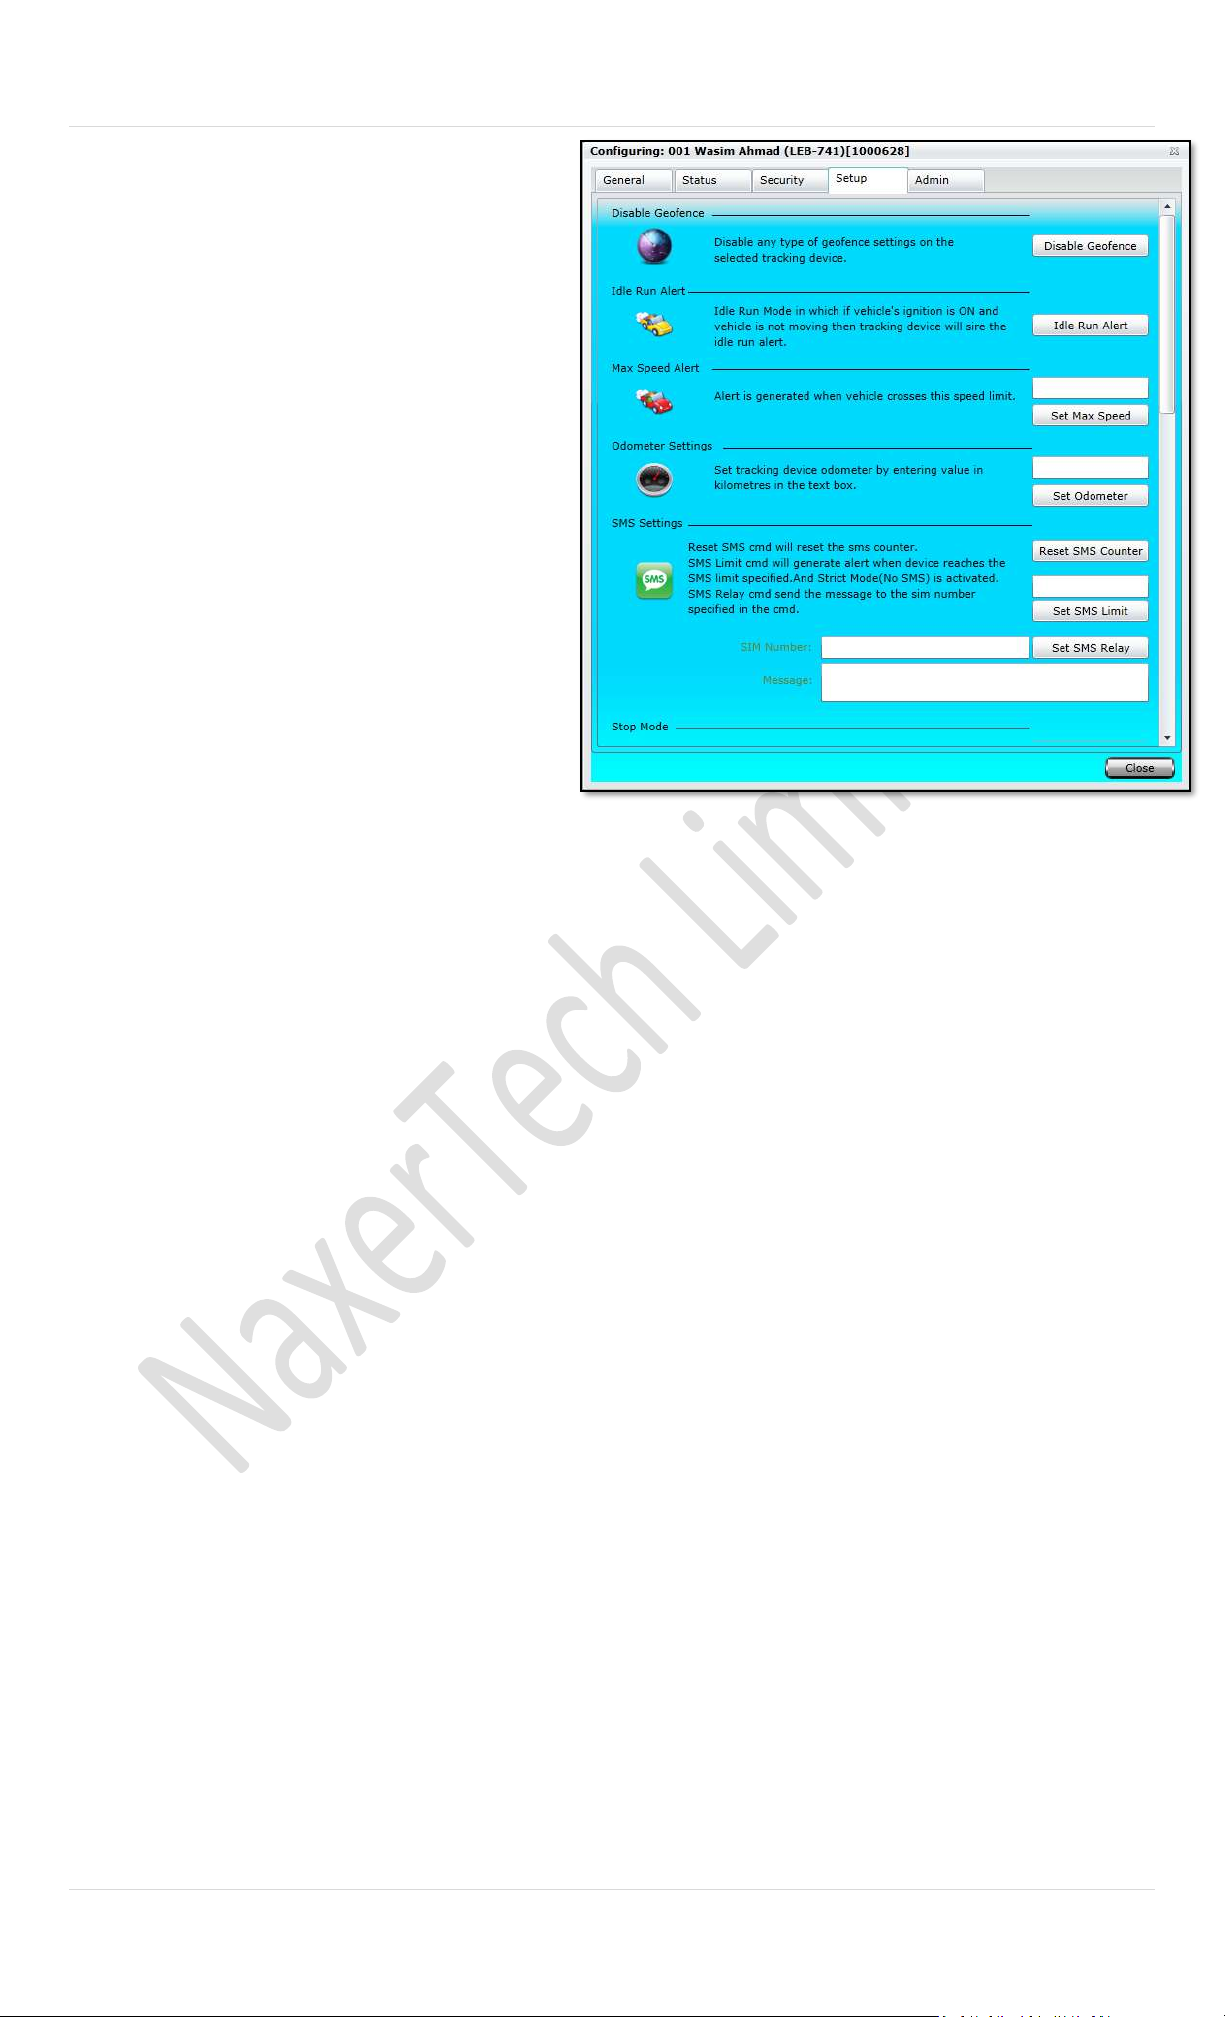
D. Setup
Setup tab offers such commands to be sent to
the tracking device to set the parameters for the
features that the tracking device offers. Let’s
discuss each Setup command in detail:
a. Disable Geofence
Send command to the tracking device to
turn OFF any geofence settings applied to it.
b. Idle Run Alert
Send command to the tracking device to
turn ON the Idle Run Alert.
c. Max Speed Alert
Send command to the tracking device to
turn ON the Max Speed Alert specifying the
max speed in the text box.
d. Odometer Setting
Send command to set the tracking unit’s
odometer according to the vehicle’s
odometer.
e. SMS Settings
Send “Reset SMS Counter” command to the
tracking device to reset the SMS sent by the
device counter to zero. Send “Set SMS Limit”
command by specifying the counter to restrict
the device to a limit.
f. Stop Mode
Send command to the tracking device to turn
ON/ OFF the tracking mode while vehicle is
stopped.
g. Analog Media Settings
Send command to the tracking device to turn
ON/ OFF Analog Input Median calculations.
h. GSM Mode Settings
Send command to the tracking device to turn
ON/ OFF GPRS keep alive status or different
modes.
i. Input Alerts Settings
Send command to set the tracking device to
turn ON/ OFF alerts for its three (3) digital
inputs.
j. Turns Settings
Send command to set the tracking device to
send alerts to server when the device turns at
an angle more than the specified.
k. Acceleration & Harsh Breaks Settings
Send command to set the tracking device to
send an alert when threshold set for
Acceleration and Harsh Breaks has been
breached.
l. Audio Settings
Send command to set the tracking device’s
Number of Rings, Microphone Volume and
Speaker Volume.
19 | P a g e
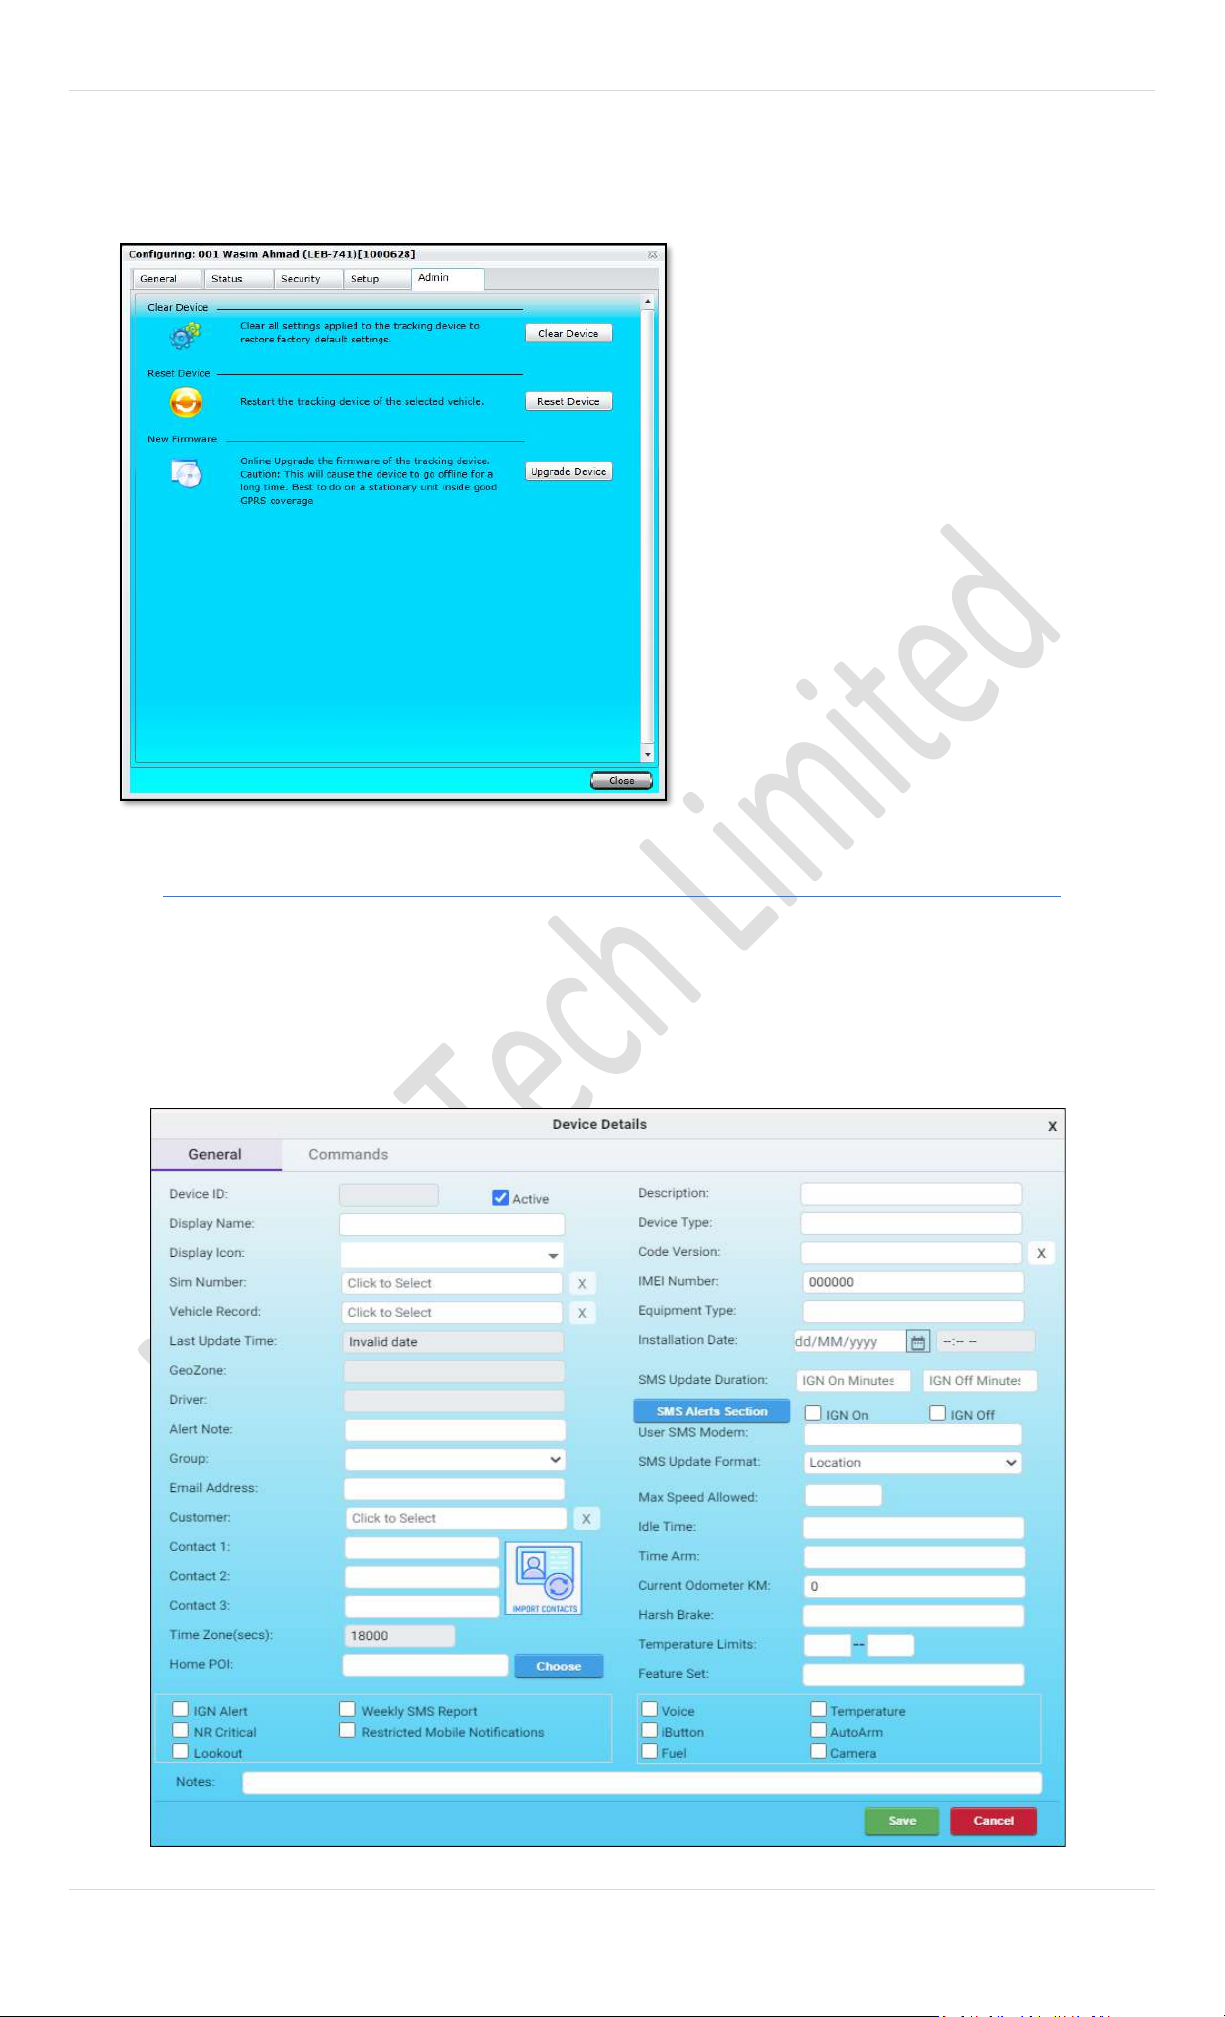
E. Admin
Admin tab offers such commands to be sent to the tracking device to clear all the settings, reset it and install a new
version of firmware when available. Admin tab is only for the Administrator of the account . Let’s discuss each Setup
command in detail:
a. Clear Device
Send command to the tracking device to clear all the
settings applied to it.
b. Reset Device
Send command to the tracking device to reboot it.
c. New Firmware
Send command to the tracking device to install newer
version of firmware when available. Make sure
vehicle is stationary while firmware is being
upgraded.
New Device
Adding a device to the Pegasus system will be the next step for a newly created Account. Select the Add Device option from
the drop-down menu by clicking the Actions button which will open a Device Form in which basic information has to be filled
that is required to add the device to the Pegasus database under General tab and only then it will be displayed by the Pegasu s
system under the Devices Panel. Please note that adding the device to the Pegasus database does not mean it’s functional and
you can start tracking it. At this stage it’s only added to the Pegasus system and initial settings has yet to be applied to the
device to make it working. Let’s discuss the Device Form that opens up when you select Add Device option and is shown in the
image:

20 | P a g e
A. General
i. Device ID
This will be assigned automatically by server when
device is added. This is unique across the entire Pegasus
system.
ii. Description
Enter a short description or temporary note which can
be seen with device name in device list without changing
actual device name for further reference.
iii. Display Name
Display Name accepts both numeric & alpha numeric
characters. Enter the name of the tracking device that
you want to be displayed with under the Devices Panel.
This can be any specific format which your company
follows or a license plate number could also be entered
which helps later when tracking the vehicle.
iv. Display Icon:
Select an icon of your choice out of many available in the
dropdown list. Selected icon will display on the map
while tracking the vehicle.
v. Code Version:
Displays the version of the firmware installed in the
device. It will populate automatically once the device
sends its first location.
vi. SIM Number:
Pegasus system automatically populated this drop-down
list. This list will only show those SIM numbers which are
added to the Pegasus system under SIM management
module and are not yet assigned to any device in the
Pegasus system. Select the desired SIM number from the
drop-down list.
vii. IMEI/ ESN Number:
IMEI Number only accepts numeric characters. This will
be automatically populated by server when the device
sends its first location.
viii. License Plate Number:
Select the License Plate Number of the vehicle in which
tracking device has to be installed, available in the drop-
down list. This will be populated by the server when a
vehicle is added to the Pegasus system.
ix. Active
By default, device will be enabled as Active. Disabling
this check box will deactivate the device.
x. Feature Set
Enable all those feature sets that are installed with the
device. Enabling the check boxes here in Add Device will
have impact in Device Panel and an icon of respective
feature set will appear against the device.
xi. Geo Zone
Displays the predefined set of boundaries.
xii. Driver
Displays the name of the driver to whom the vehicle is
assigned under Driver Information Form. This will be
populated automatically by the Pegasus system.
xiii. Home POI
Point of interest needs to create from Main Menu under
Zones tab. You can choose already created POIs list.
xiv. Group
Displays the name of the group which is assigned to the
device under an Account. This will be populated
automatically by the Pegasus system.
xv. Profile
Pegasus system automatically fills Profile field once a profile
is assigned to a tracking device. (Discussed later in this document)
xvi. Current Odometer KM
Enter the current odometer reading of the vehicle so that
the odometer in Pegasus system should start from the same
reading as in the vehicle. This helps in generating different
types of Reports.
xvii. Customer
Pegasus system automatically populates this drop-down list.
This list will only show those customer names which are
added to the Pegasus system under Customer management
module. Select the respective customer’s name from the
drop-down list.
xviii. Installation Date
Enter the date when the tracking device is installed in the
vehicle.
xix. SMS Update Duration
Enter the duration in minutes after which Pegasus system
should send out an SMS, to update customer. This SMS will
be sent to first authorize contact number.
xx. IGN ON/ IGN OFF
Enable the check boxes. This will allow Pegasus system to
send the SMS to the authorized cell phone numbers
whenever ignition of the vehicle is turned On or Off.
xxi. SMS Email
Enter the email address to which SMS from the device is
required to be sent.
xxii. Notes
Write Notes in this field and these notes could be related to
the tracking device or about a specific customer which has a
tracking device installed in his/ her vehicle.
xxiii. Time Zone (Secs)
Time Zone is the time zone of the home area/country of
device in seconds. This time zone is set automatically from
the Account Time Zone by the Pegasus system.
xxiv. Max Speed
Set the Max Speed for the device,
Device will generate an alert if max speed violation is
detected.
21 | P a g e
xxv. SIM Responding
SIM Responding is for diagnostic purpose and is set if Device
SIM is receiving ring on call. This value appears in the NR/
Unlocked Devices Report.
xxvi. Temperature Limits
This option works when you have add-on temperature
sensor with your tracking device. You can add values
and select SMS Update Format either Location, Temp.
with location or Location with Fuel
xxvii. IGN Alert
By enabling this check box will generate Ignition ON/Off
alert which you can see in alert logs in the main menu
as well as in Pegasus status bar.
xxviii. Weekly SMS Report
Active this option will give you weekly traveled distance
detail by SMS service. Pegasus gives you vehicle weekly
traveled summary on weekly bases along with day-by-
day travel distance.
xxix. Localize Messages
This option will let you send message in your local
Language. By default, it set with English and if you
enable check box you will get message in Urdu / Hindi
xxx. Restricted Mobile Notification
Mobile notification option reflects in Pegasus Atlas
mobile application. Enable Check box will Restrict
mobile notification otherwise by default these are
enabled.
xxxi. NR Critical
Once device would become in NR (Not Responding
State) it will generate message after couple of hours to
correspondence mobile number. Enable this option will
avail it and by default its unchecked. An alert will be
also raised and can be view in Alert logs.
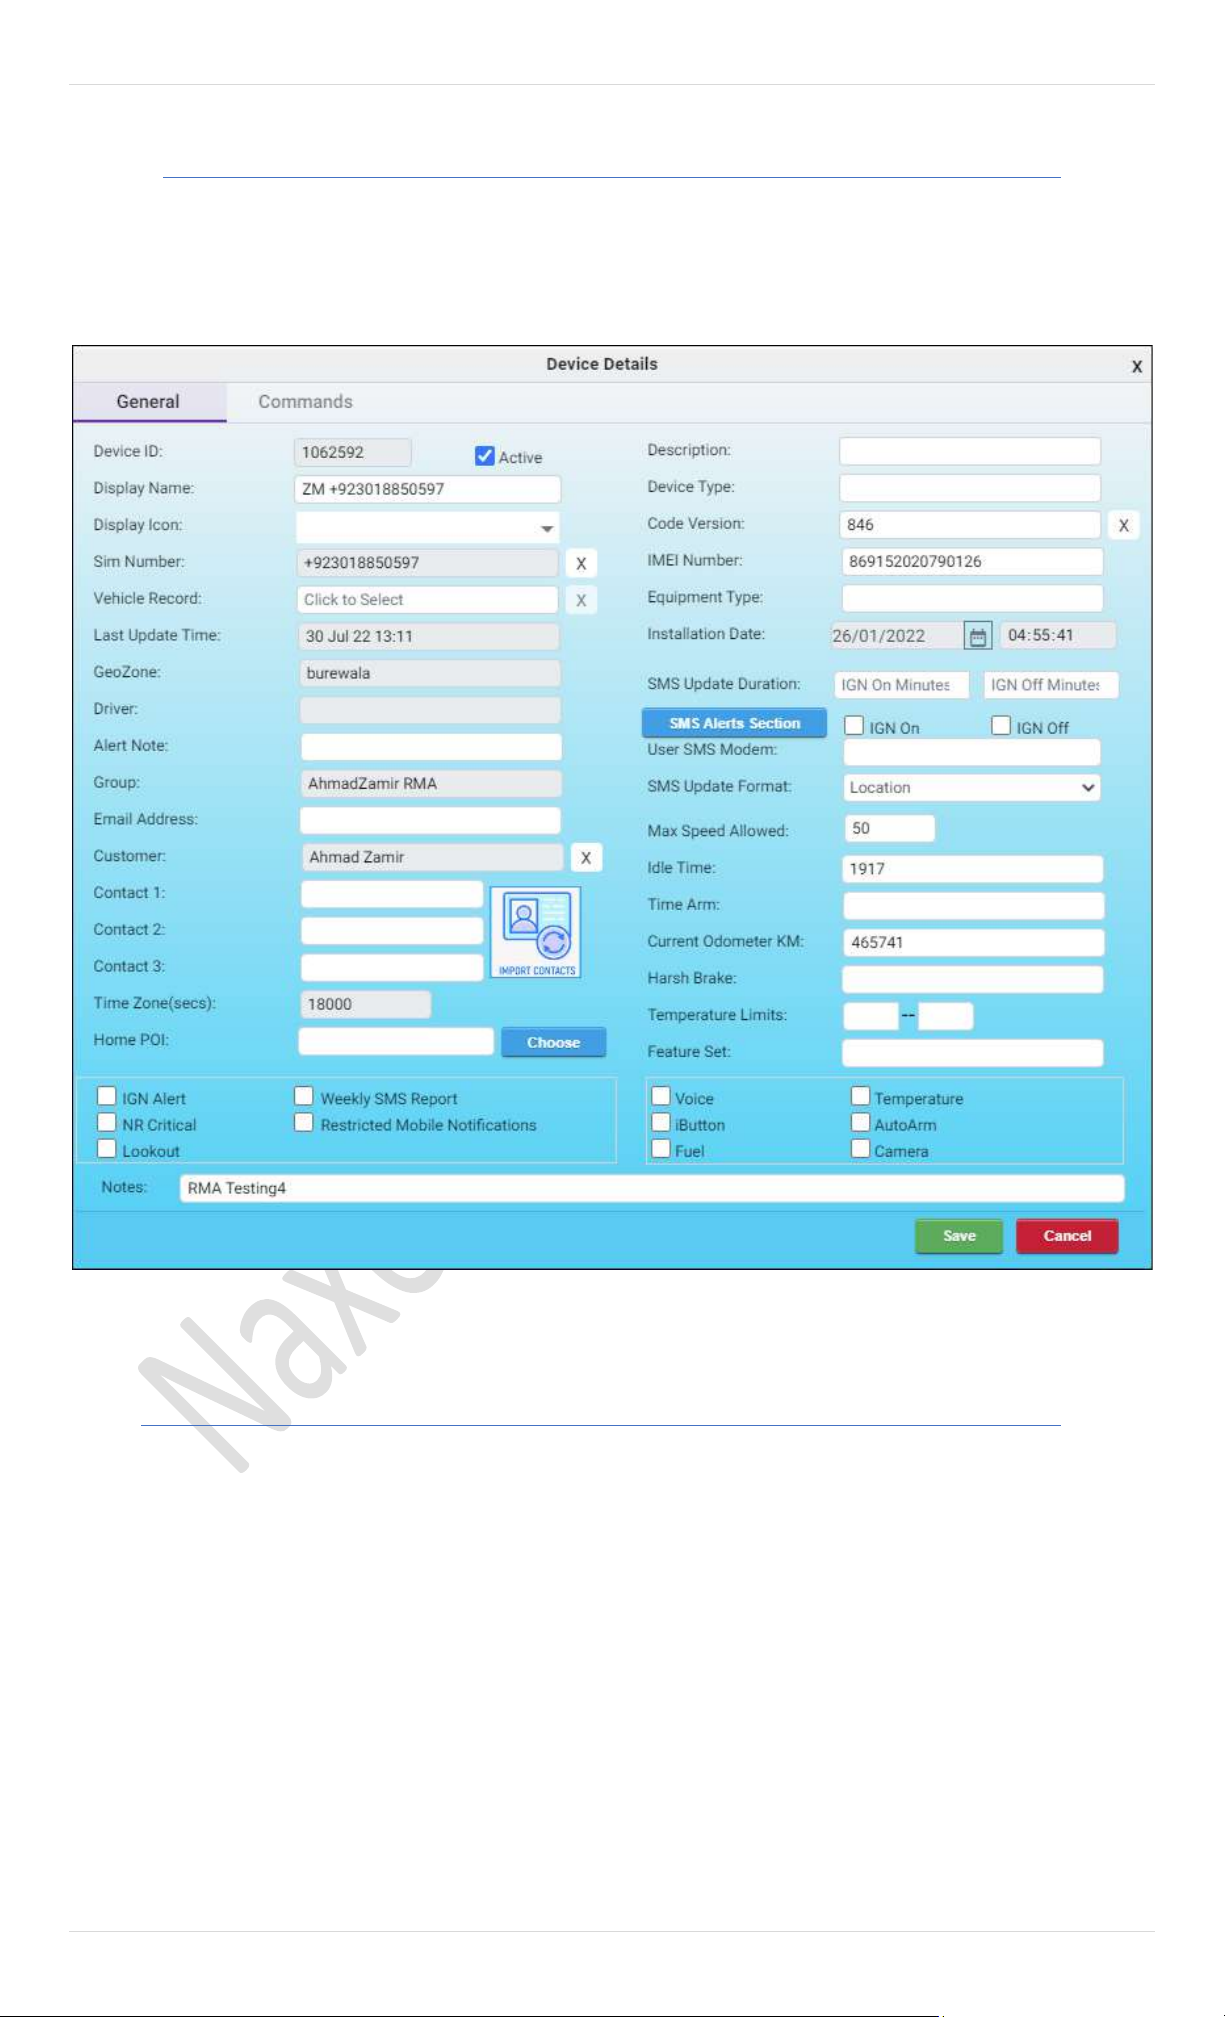
View Device Details
Pegasus system saves complete device details in its database which could later be viewed. To view device details, one must
have an Administrative account or with equivalent rights. View Device Details option is available under the Actions button
menu in the Device Panel. Upon selecting the option View Device Details, a Device Form will pop up in the middle of the work
area which will be non-editable as shown in the below image:
Commands could also be added under Commands tab.
22 | P a g e
Edit Device
Pegasus system saves complete device details in its database which could later be edited. To edit device details, one must have
an Administrative account or with equivalent rights. Edit Device Details option is available under the Actions button menu in
the Device Panel. Upon selecting the option Edit Device Details, a Device Form popup in the middle of the work area which wil l
be editable and one can edit the required fields as shown in the below image:
Delete Device
Pegasus system allows deleting a specific device added to the devices panel. To delete a device, one must have an
Administrative account or with equivalent rights. Delete Device option is available under the Actions button menu in the
Device Panel. Upon selecting the option Delete Device, a confirmation message will be displayed and clicking its Yes button
will instantly delete the device from the Device Panel.
23 | P a g e
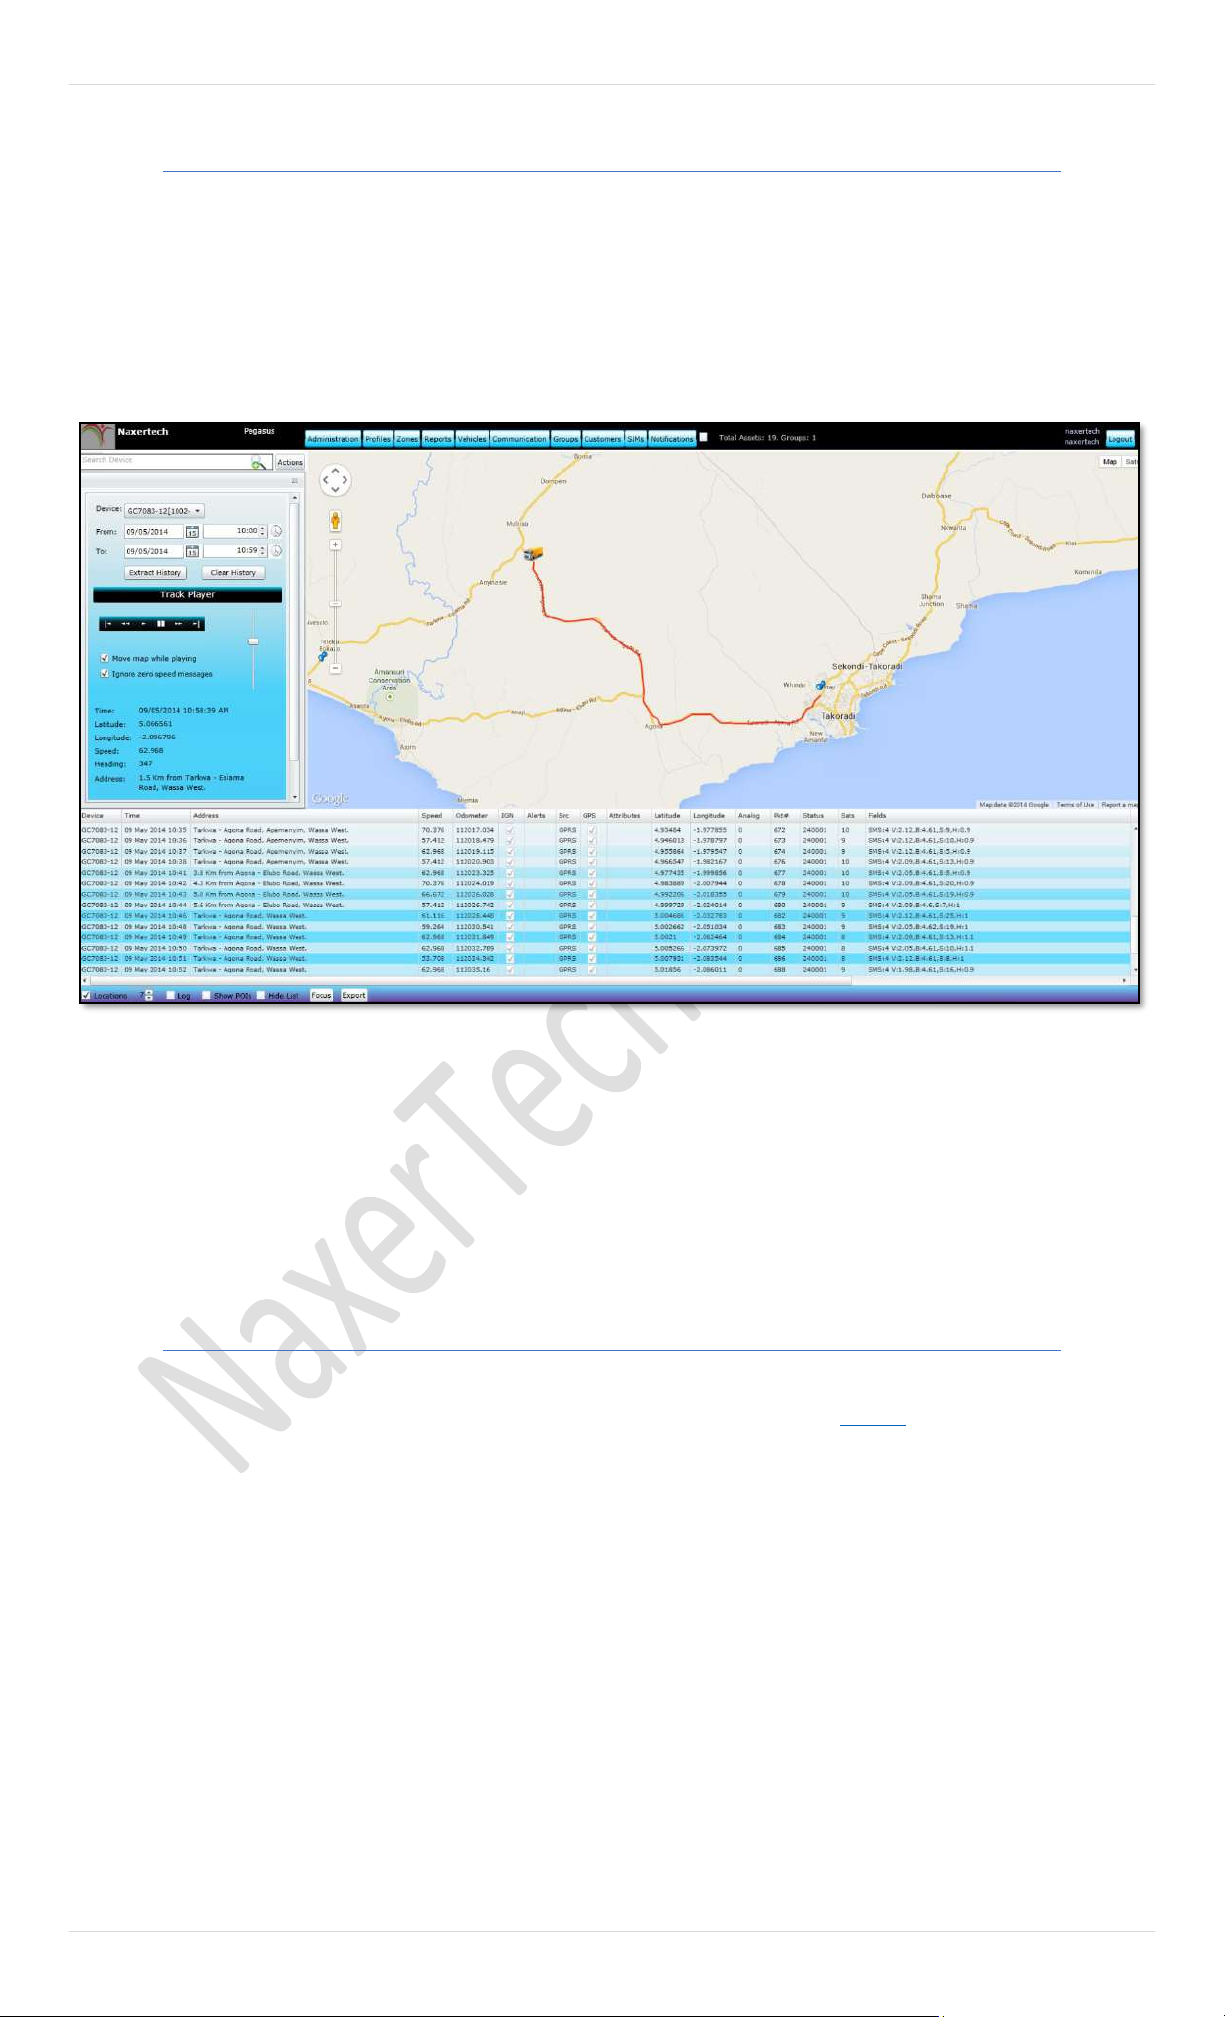
Device History
Pegasus system stores every location and its other associated attributes i.e., time, date, speed, LAT.& LONG. etc, into its
database which helps users to view Device History. Device History option is available under the Actions button menu in the
Device Panel. Selecting this option opens a Device History dialogue box, which contains a dropdown list labelled as Device,
from where user can select a vehicle from the list available, specify From/ To Date & Time range and click Extract History
button. Pegasus system will draw the whole route on the map as per the locations received from the device as shown in
below image:
A. Track Player
Pegasus system provides a unique feature of Track Player which no other web-based tracking system provider provides which
makes Pegasus system an industry leading Web Based Tracking System. Track Player re-draws the movement of the device on
the map which is basically based on the Latitude/ Longitude sent by the device to the Pegasus system. In other words, a user
can watch the Re-Play of the complete movement of the device/ vehicle. Track Player only works if the History of the device is
extracted otherwise the Track Player will remain non-responsive. While using the Track Player please be patient as it’s a CPU
sensitive task, consumes system resources especially while Fast forwarding and Fast Rewinding.
Device Reports
Pegasus system allows user to generate variety of reports which are structured to pull information from the database in
pre-defined formats that are relevant to the type of report requested. More detail under Reports section.
24 | P a g e
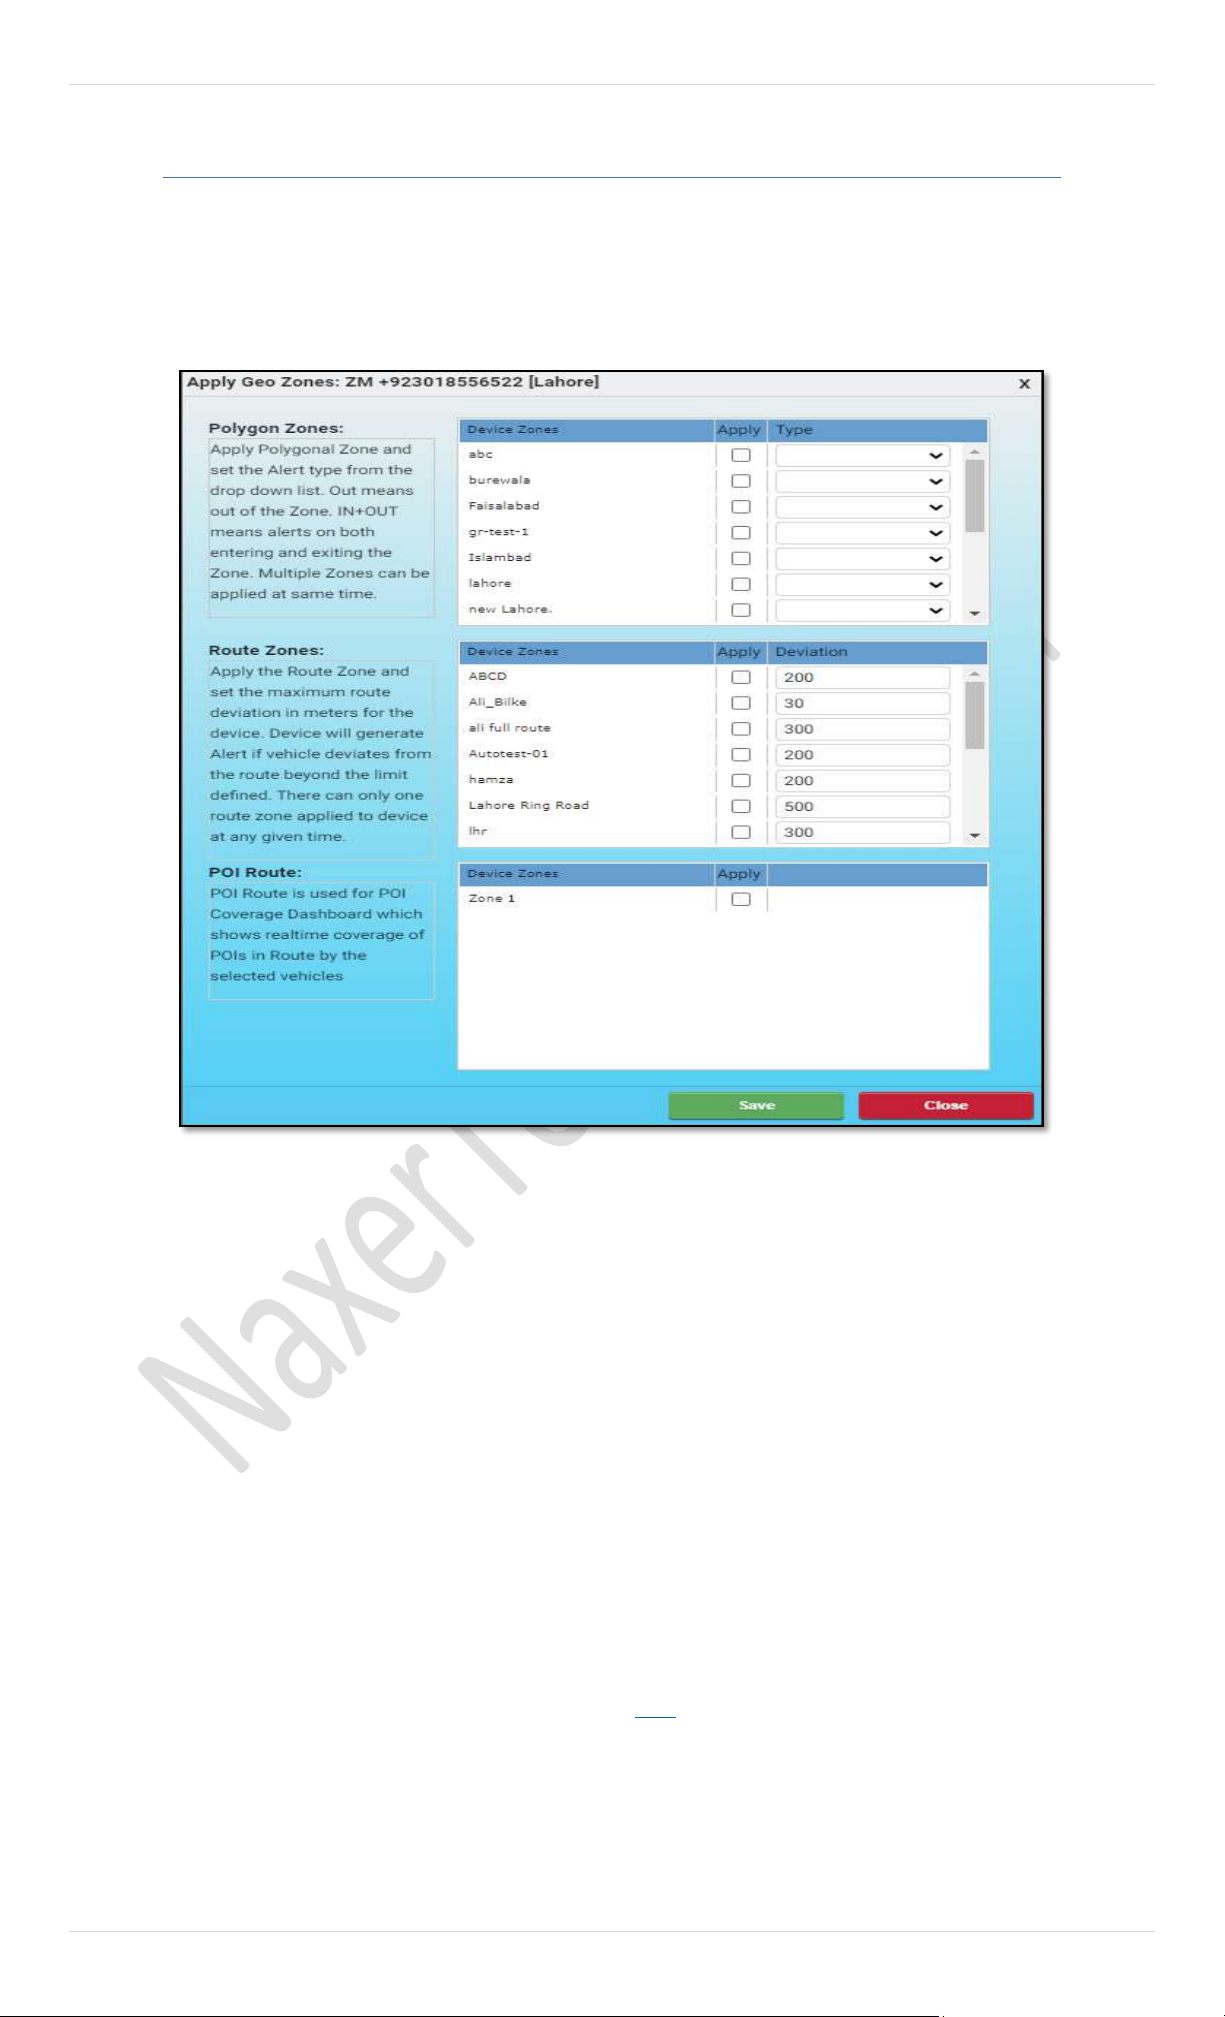
Device Zones
Pegasus system allows user to apply Polygon Zone and Route Zone to the selected device from the list of devices under
Devices Panel. To apply Zones, one must have an Administrative account or an account with equivalent privileges. Upon
selecting the Device Zones option, a Geozone dialog box will open containing the list of Polygon Zones and Route Zones.
Geozone dialog box is divided into two halves, upper half of the dialog box contains the list of all the Polygon Zone and the
other half of the dialog box contains the list of all the Route Zones as shown in the below image:
.
A. Polygon Zones
Select one or multiple Polygon Zone from the list by enabling the check box available against each Polygon Zone.
Setting the type to In, Out or In Out will set the device to generate an alert when the device enters the applied zone,
moves out of the applied zone or send out an alert if the device enters and moves out of the applied zone respectively.
B. Route Zones
Only one Route Zone could be applied to a device. Select a Route Zone available in the list by enabling the check box
available next to the Route Zone. Set the maximum deviation value (in meters) for the device. The device will
generate an alert if it deviates from the limit specified.
C. POI Route
POI Route is used for POI Coverage Dashboard which shows real-time coverage of POIs in Route by the selected
vehicles.
Note: How to create Polygon Zone and Route Zone, read in detail under section Zones.
25 | P a g e
Update Device Locations
Selecting this option, Pegasus system will take all the available positions recorded on the same day from its database and will
update the map with its complete route as shown in the below image:
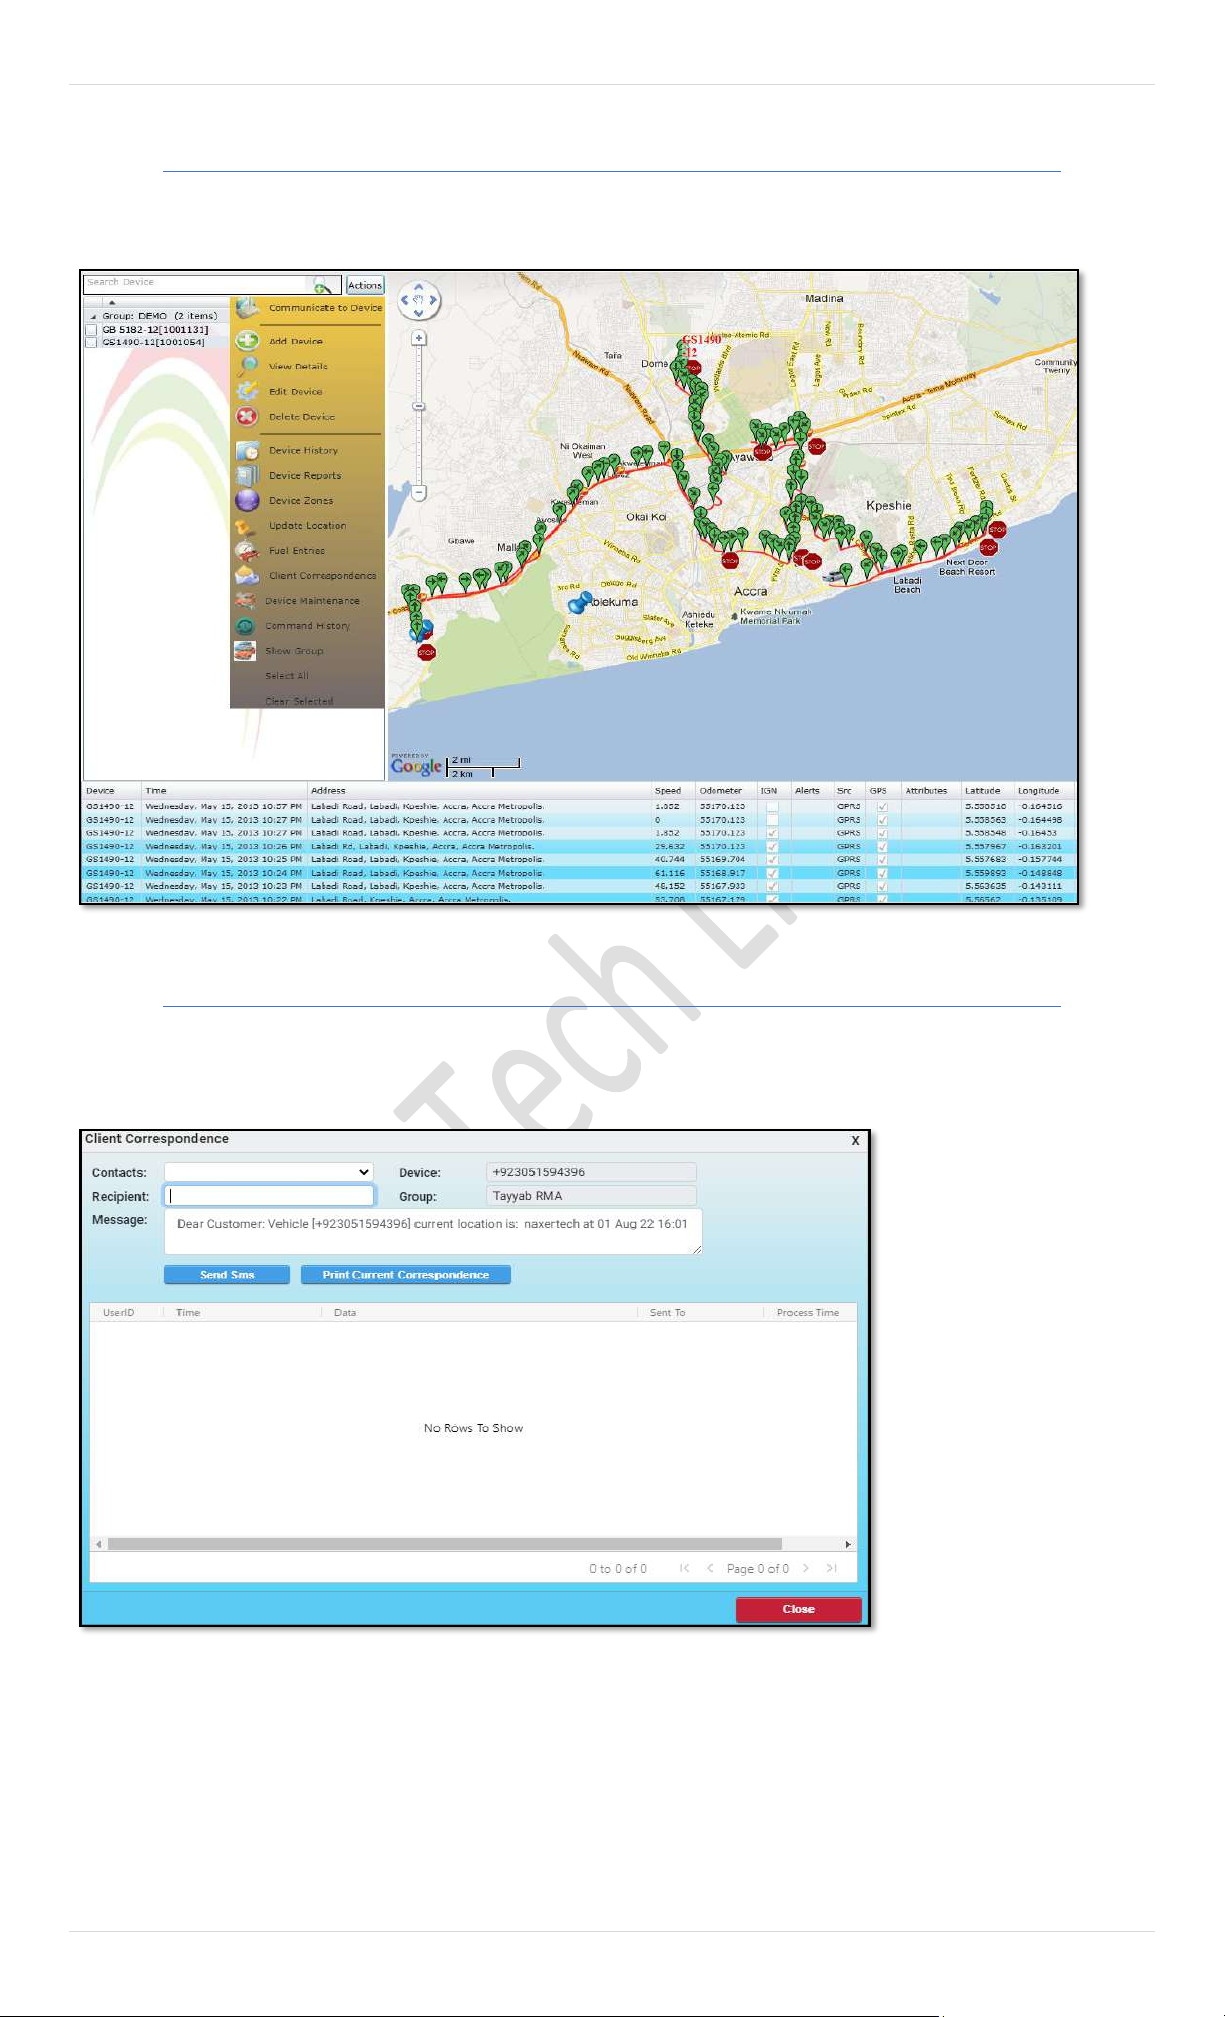
Client Correspondence
Pegasus system allows you to send customize SMS text message to a particular customer. This SMS text message could be a
greeting message or message containing the current location of the device (etc). Selecting this option, Pegasus system will
open Client Correspondence dialog box as shown in the below image:
The dialog box is divided into
three segments; at upper left
segment of the dialog box brief
information related to client is
provided. It contains Device
Information, Vehicle
Information and Customer
Information. At the upper right
segment of the dialog box is
the correspondence area,
where a contact number could
be selected from the drop-
down list containing all the
numbers provided by the client
or any other contact number
not available in the list of
Contacts could also be entered
in the text box labelled as
Message To.
A message could be typed in
the text box labelled as Message; by default, it contains a message of current location of the device. If a CSR (Customer Support
Representative) is interacting with the client, it is useful to enter remarks and to do so enter the remarks in the text box labelled as
Remarks.
Rest of the Client Correspondence dialog box displays the communication history of the device with the Pegasus Server.
26 | P a g e
Device Maintenance
Complete maintenance history of a device could also be saved in the Pegasus System which is mostly needed by such companies
maintaining a large fleet of vehicles. Selecting this option will open Device Maintenance dialog box as shown in the below image:
Device Maintenance Form dialog box is divided into two segments; the upper part of the Device Maintenance Form dialog box is called
Device Maintenance Grid where all the details of a device maintenance history could be viewed. The rest of the part is meant to add
new maintenance details or edit any previous details. Let’s create a new Device Maintenance and we will go through all the input
boxes in detail.
Click New Device Maintenance button and you will notice that an empty form with different options will appear in the second half of
the Device Maintenance Form. Now it’s time to fill in the rest of the fields as described below:
A. User ID
User ID text box will populate automatically and it will
be same user ID with which you have logged in to the
Pegasus system.
B. Vehicle Registration Number
Enter the Vehicle Registration Number for which the
device maintenance is performed.
C. Current SIM
Current SIM text box will populate automatically and
will show the SIM number currently used in the
device.
D. New SIM
Enter the New SIM number if current SIM has been
replaced. Leave blank if not.
E. Current Code Version
Current Code Version text box will populate
automatically and will display the version of the
firmware currently installed in the device.
F. New Code Version
Enter the New Code Version if the firmware of the
device is updated.
G. Problem In
Select the appropriate options for problem area from
the dropdown list for which the device maintenance
has been performed.
H. Date
Select the date from the associated calendar when
the device maintenance has been performed.
I. Action Taken
Write the Action Taken against the problem
detected while performing device maintenance.
J. Notes
Write Notes in this field and these notes could be
related to the part changed in the device or
according to the device maintenance performed.
27 | P a g e
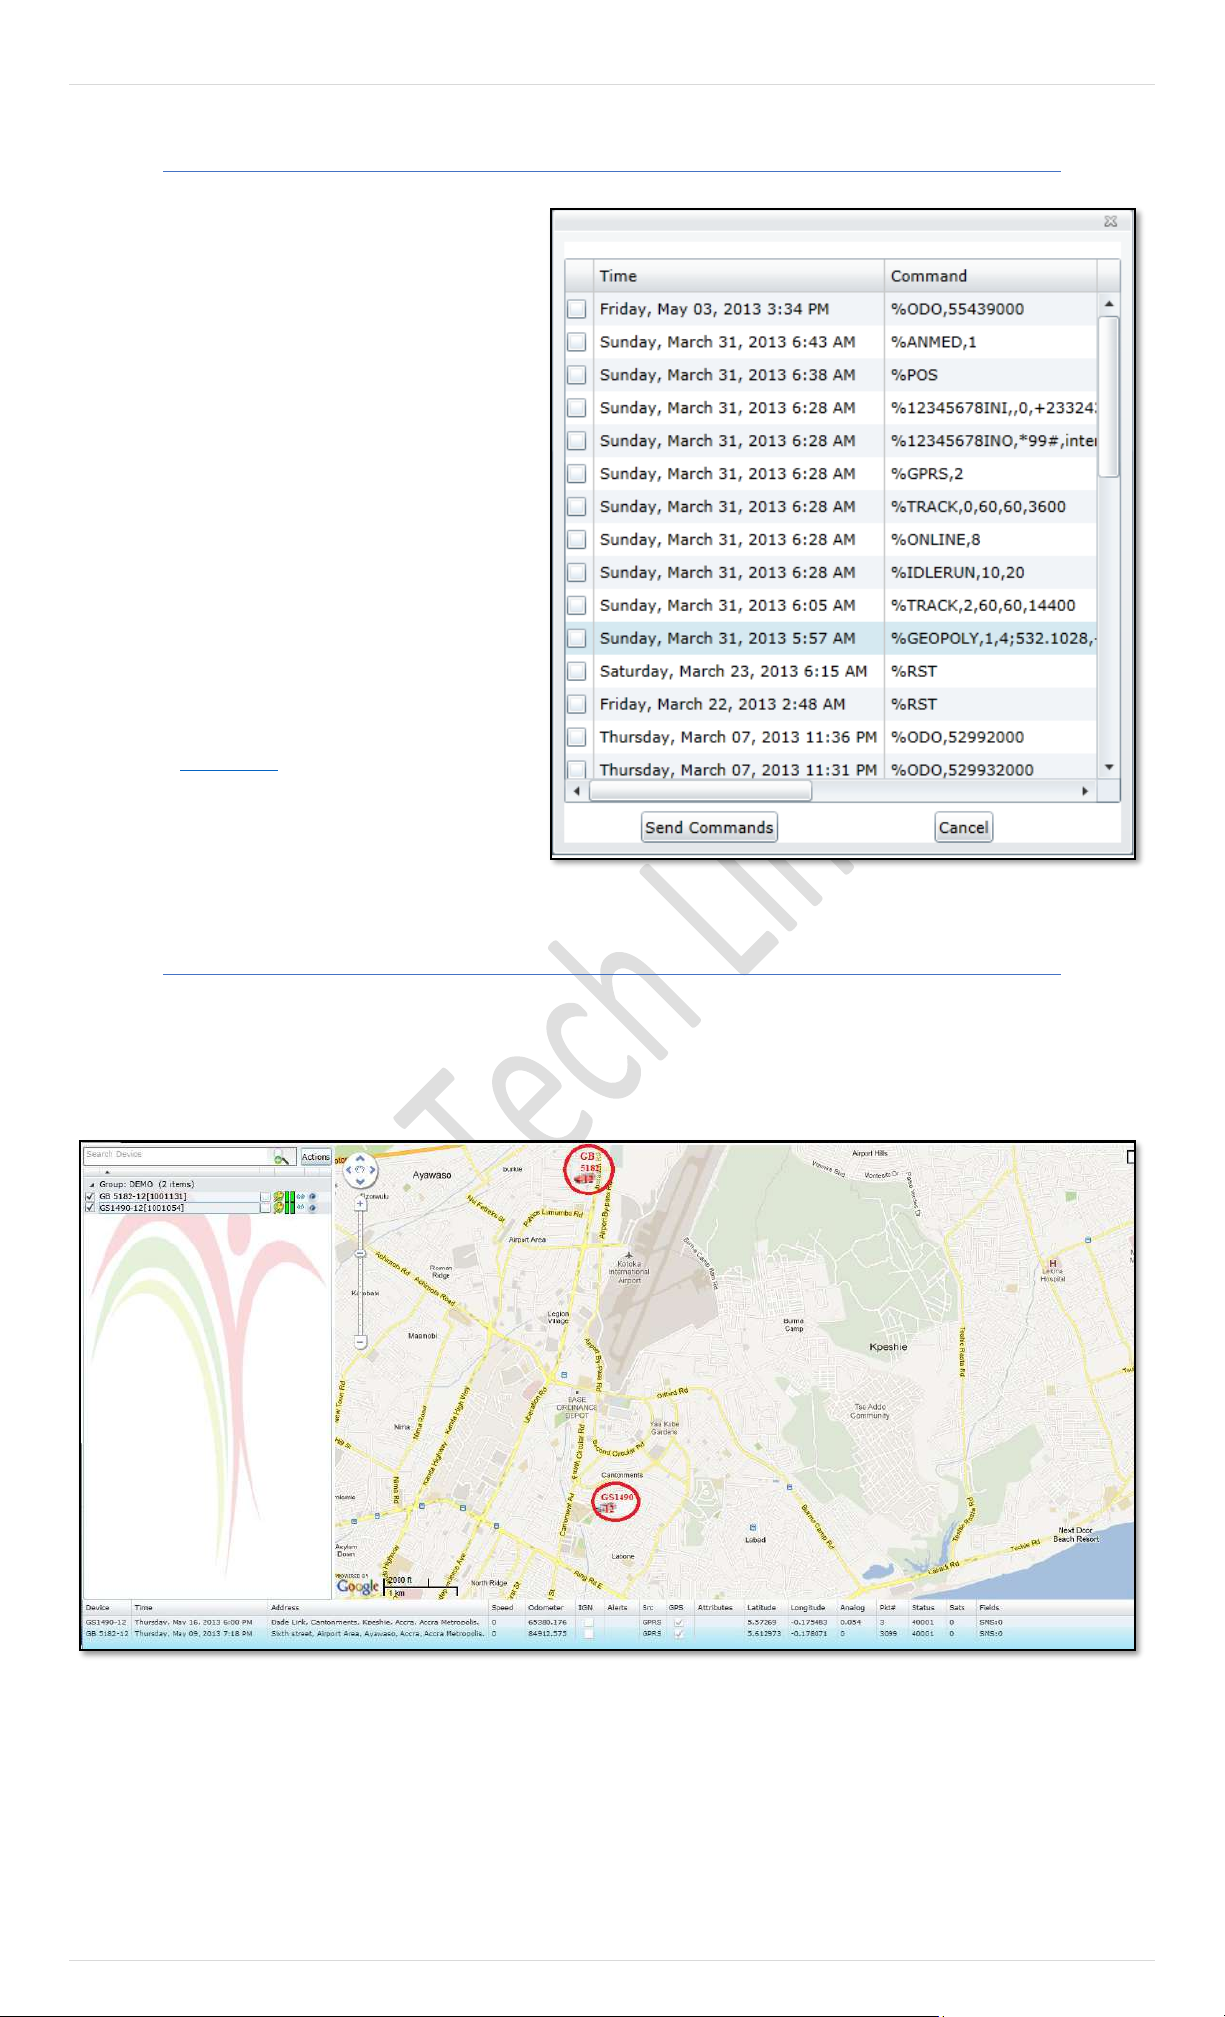
Command History
Pegasus system saves the commands sent to a device.
Selecting this option Pegasus system will open
Command History dialog box. This feature is very useful
in case if the device needed to be initialized again,
setting the parameters again will be a bit hectic but
Pegasus system made it easy. List of all the commands
sent from the Pegasus system to the device will appear
in the Command History dialog box as shown in the
image:
Select one or multiple commands to send to the device
by enabling the check box available for each command.
Once the selection is done click Send Commands button
and Pegasus system will send the selected commands
one by one to the unit. Status of the command could be
checked in Status Grid under General tab of the
Communicate to Device.
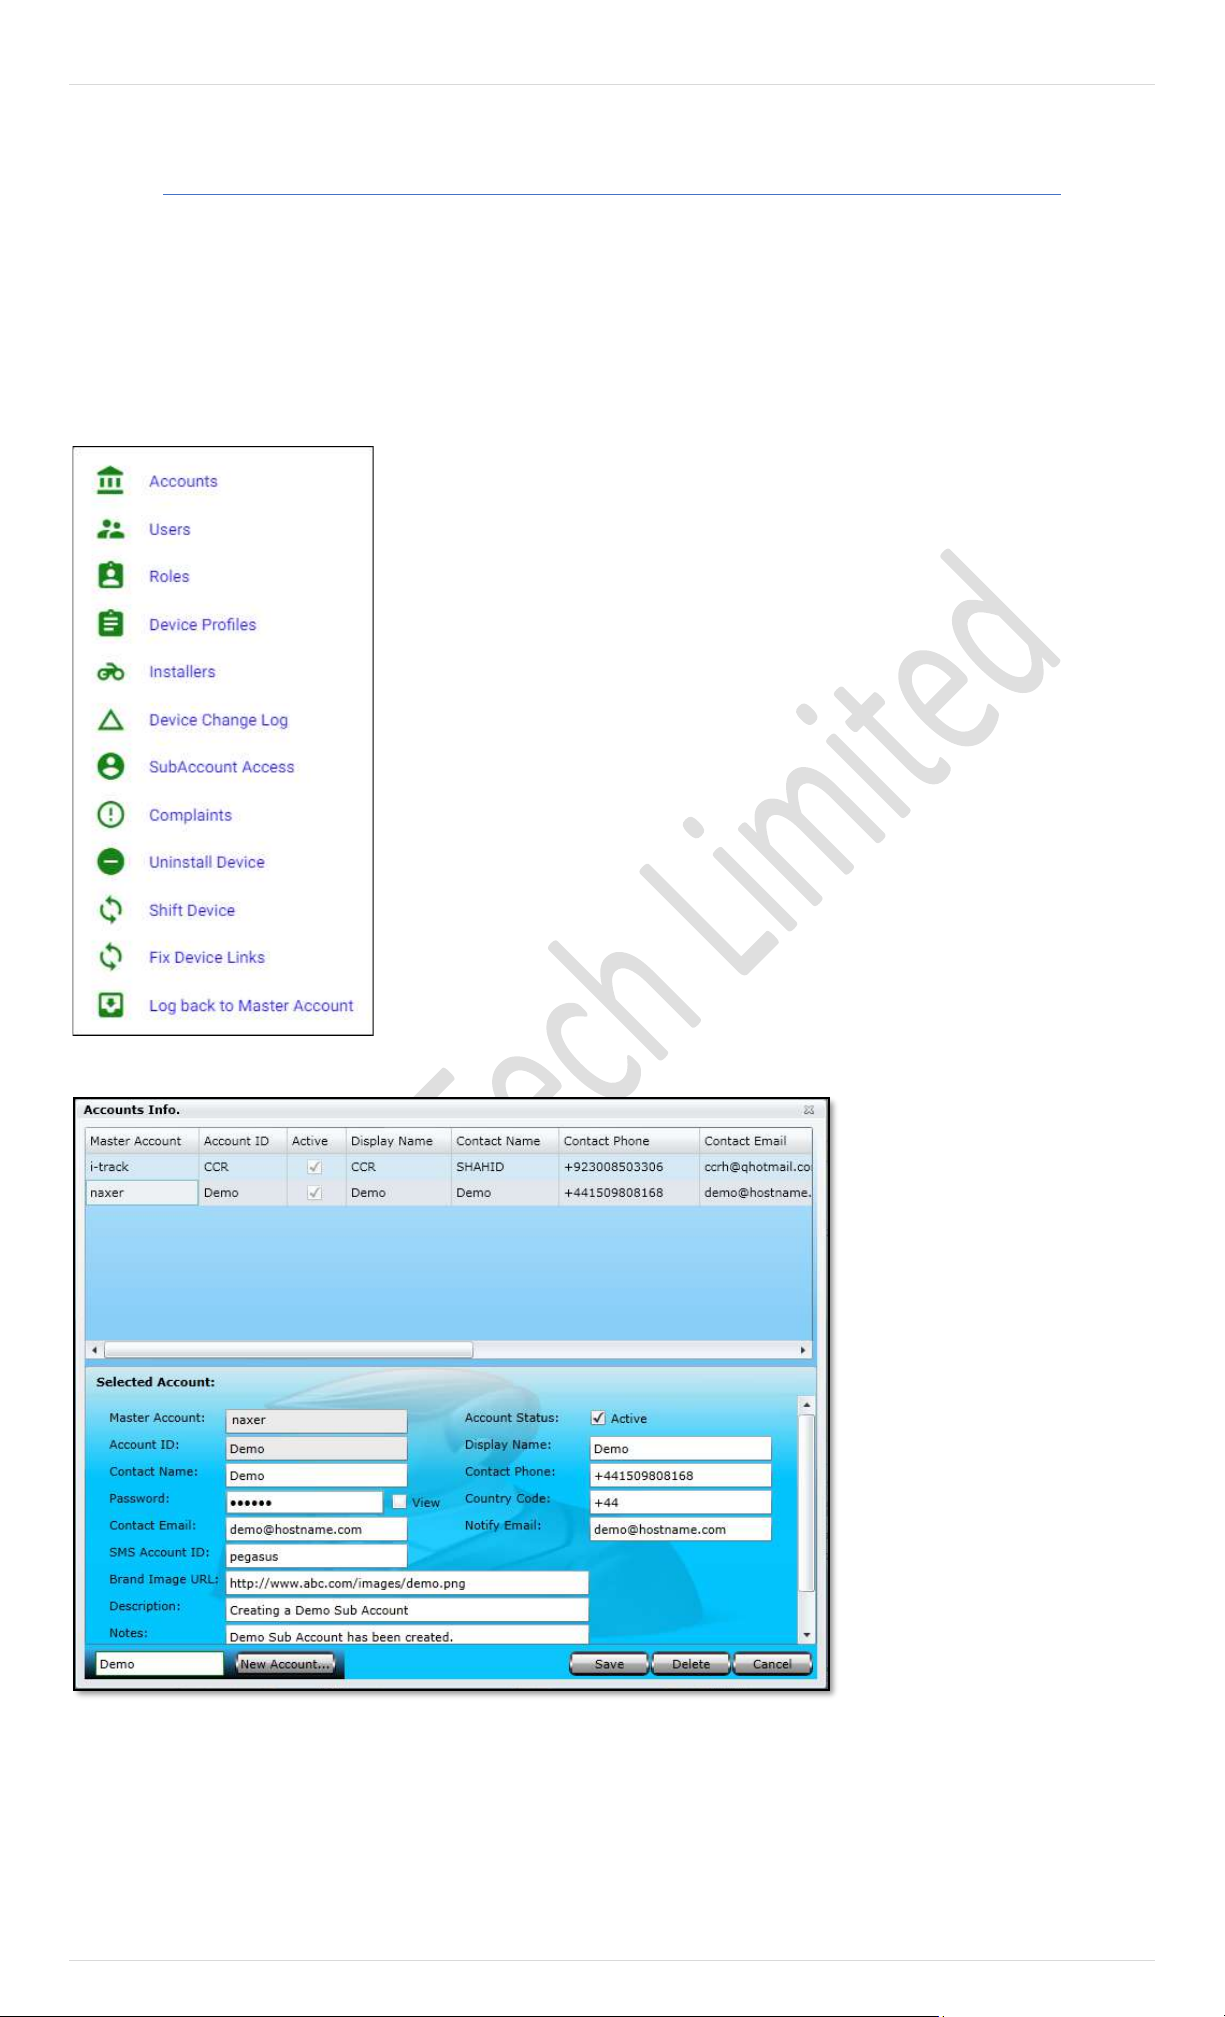
Show Group
By default, Pegasus system shows only one selected device/ vehicle on the map that are under a Group. This is done to keep up the
performance of the Pegasus system running on such machines which cannot handle much load. But if you want all of the device/
vehicles in a group to be displayed on the map select the option Show Group. Pegasus will display all the devices/ vehicles under a
specific group as per their last received position as shown in the below image:
In the above image two devices/ vehicles under a group are displayed on the map (encircled in red) when Show Group option is
selected.
28 | P a g e
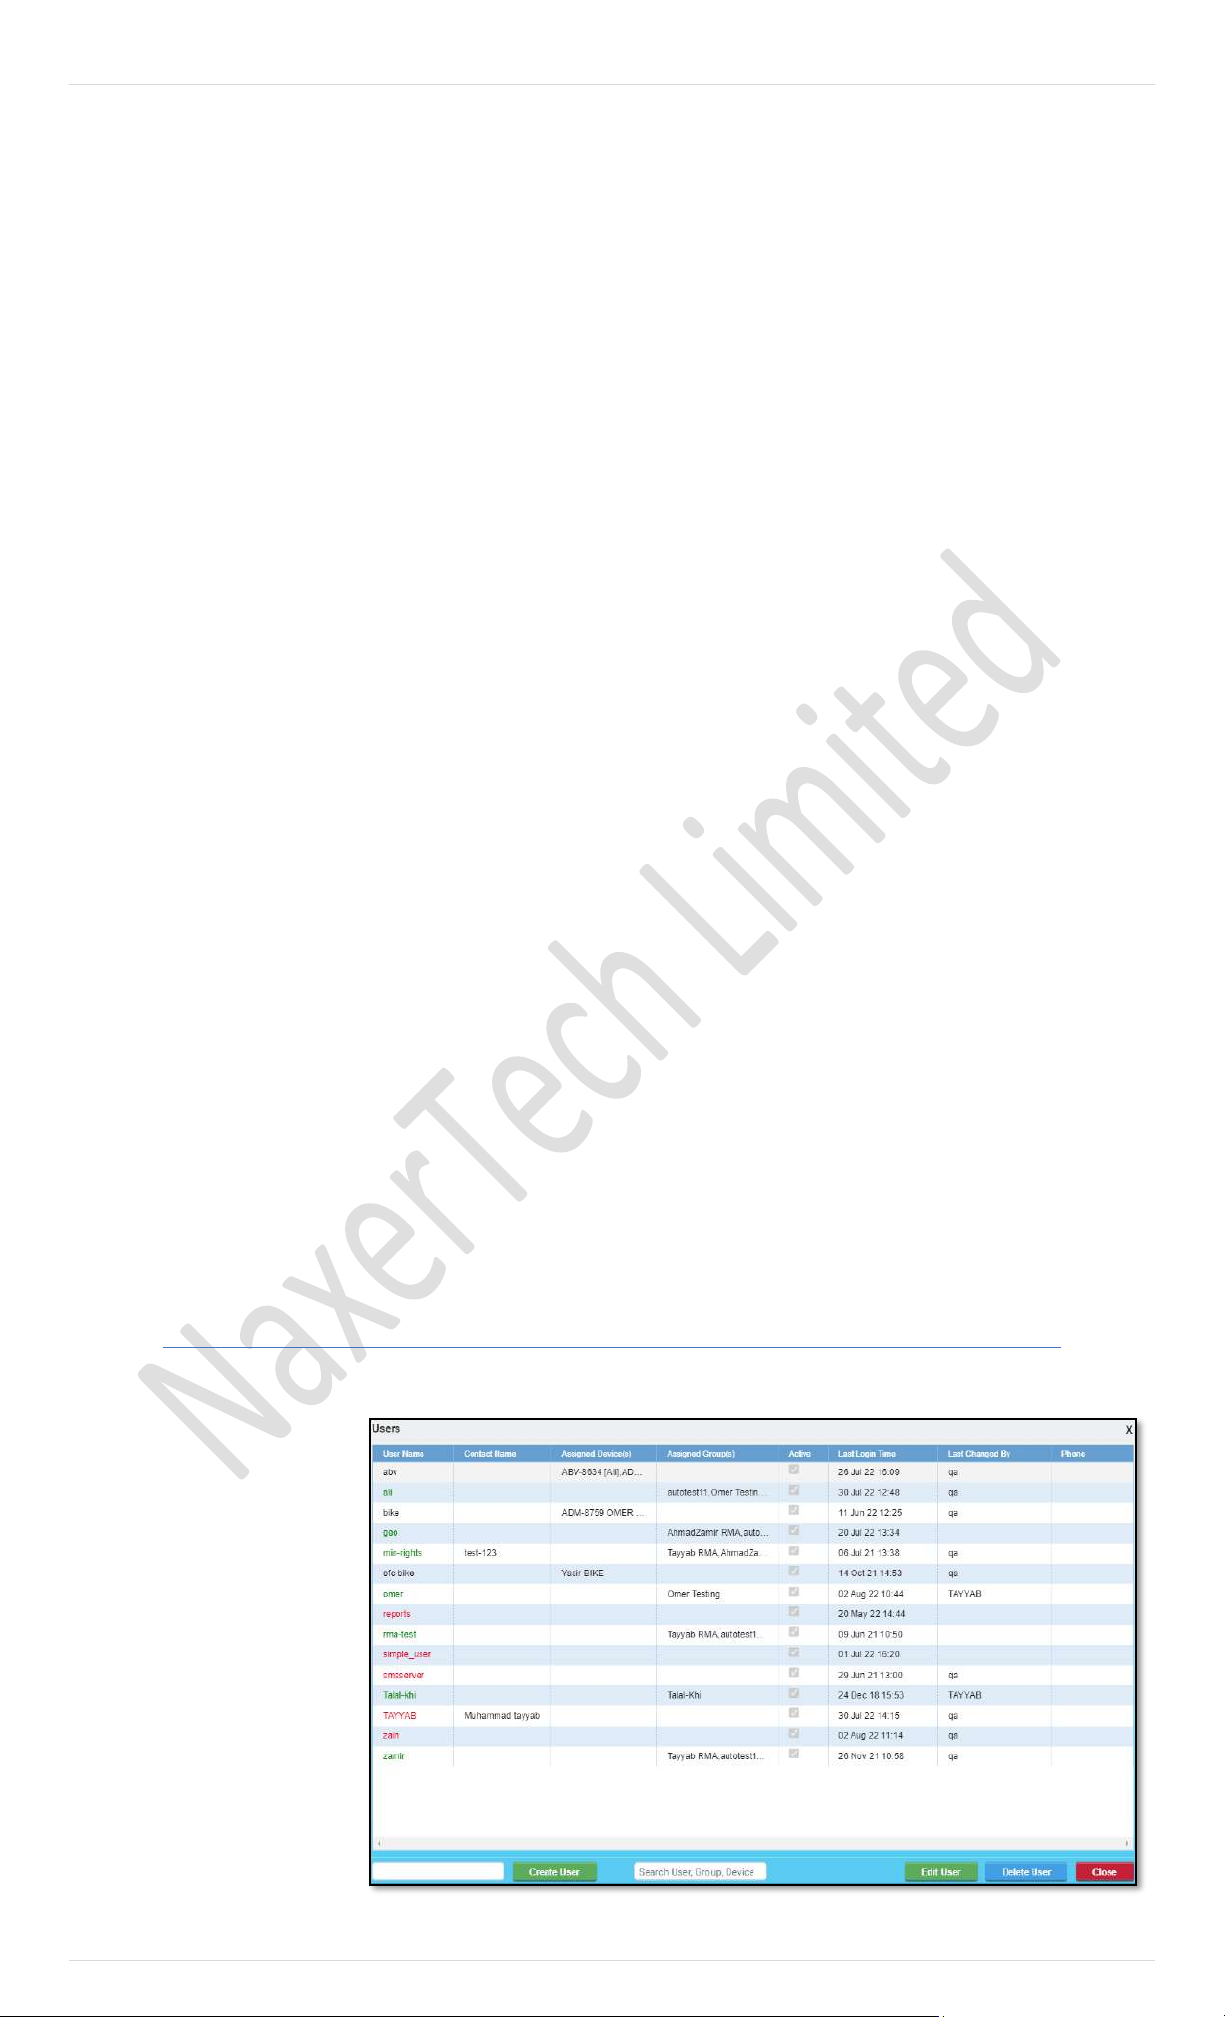
Administration
The management of Pegasus System is fulfilled through a special interface – Administration. It is specially designed for Pegasus System
managers. Administration allows you to manage your tracking service by means of system macro-objects which are accounts, users,
roles and others. Because it’s the Administrative part of the Pegasus system, Administration menu will only be visible and enabled to
Master accounts and would not work for non-master accounts.
A. Accounts
Accounts is the administrative part of the Pegasus system where you can Create, Edit and
Delete a sub account created under a Master account. Because it’s the Adm inistrative
part of the Pegasus system, Accounts option will remain disabled to any user or non -
master account. Account Detail dialog box can be accessed by pressing the Accounts
option that appears when Administration button is clicked on the main GUI of the Pegasus
system as shown in the below mage:
Account Detail dialog box is
divided into two segments; the
upper part of the Account detail
dialog box is called Accounts
Information Grid where all the
information of the sub accounts
could be viewed which have
already been added to the
Pegasus system. The rest of the
part is meant to add information
of a new sub account or edit any
existing sub account information.
Let’s create a new sub account
and we will go through all the
input boxes in detail.
First, we should have an Account
ID, to do this enter a suitable
Account ID in the text box
available at the bottom of the
Account Detail dialog box and
click the button New Account.
When the New Account button is clicked notice that the same will appear in the text box labelled as Account ID in the Account
Detail Form. Now it’s time to fill in the rest of the fields as described below:
29 | P a g e
A. Master Account
Master Account will automatically be populated by
the Pegasus system. It will be the same Master
Account with which one has logged-in into the
Pegasus System to create the sub account.
B. Account Status
Account Status check box is enabled by default,
otherwise a sub account will be created at the end
but account user will not be able to login to the
Pegasus system.
C. Account ID
Account ID will appear automatically once you
enter account ID in the text box available at the
bottom of the Account Detail dialog box and
clicking New Account.
D. Display Name
Enter a suitable and a meaningful Display Name. It
will appear on the main GUI of the Pegasus system
next to the applied logo.
E. Contact Name
Enter the name of the contact person for which a
sub account creation is underway.
F. Contact Phone
Enter the contact number of the person for which
a sub account creation is underway.
G. Password
Enter the password for the newly created sub
account.
H. Country Code
Enter the correct country code as this impacts the
complete working of Pegasus system. Ex. +44 (UK)
or +1 (USA).
I. Contact Email
Enter the email address of the person for which a
sub account creation is underway.
J. Notify Email
Enter a secondary email address of the person for
which a sub account creation is under way.
K. Brand Image URL
Enter the hyperlink of an image to represent the
brand of the master account user.
L. Description
Enter a short description about the sub account.
M. Notes
Write any special Notes in this field, these notes could
be related to the sub account or about a specific
customer with special privileges.
Once all the fields are filled with appropriate information or any sub account is edited, click the Save button to save the
information into the Pegasus system database otherwise changes will not take any effect.
Now you can log on to Pegasus system using the credentials of the newly created sub account but remember the Account &
User will now be Demo i.e., same as Account ID. Now new users, devices and other tasks could be performed same as could
be done under a Master Account.
Note: Further accounts/ sub accounts could not be created under a Sub Account.
If any sub account is required to delete, select the required sub account from the Account Detail Grid and click the Delete
button. A warning message will appear and clicking OK button will delete the selected account instantly. Be careful when
deleting a sub account as there is no way to undo it. Click Close button to close the Account Detail dialog box.
Users
Users is the administrative part of the Pegasus system where you can Create, Edit and Delete a user account under a Master
account or Super User (such User
account which have Account
Administration privileges but it’s not a
Master account). Because it’s the
Administrative part of the
Pegasus system, Users option
will only be enabled to Master
account or to Super User and
will be disabled to any other
user. Users Information dialog
box can be accessed by pressing
the Users option under
Administration button on the
main GUI of the Pegasus system
as shown in the image:
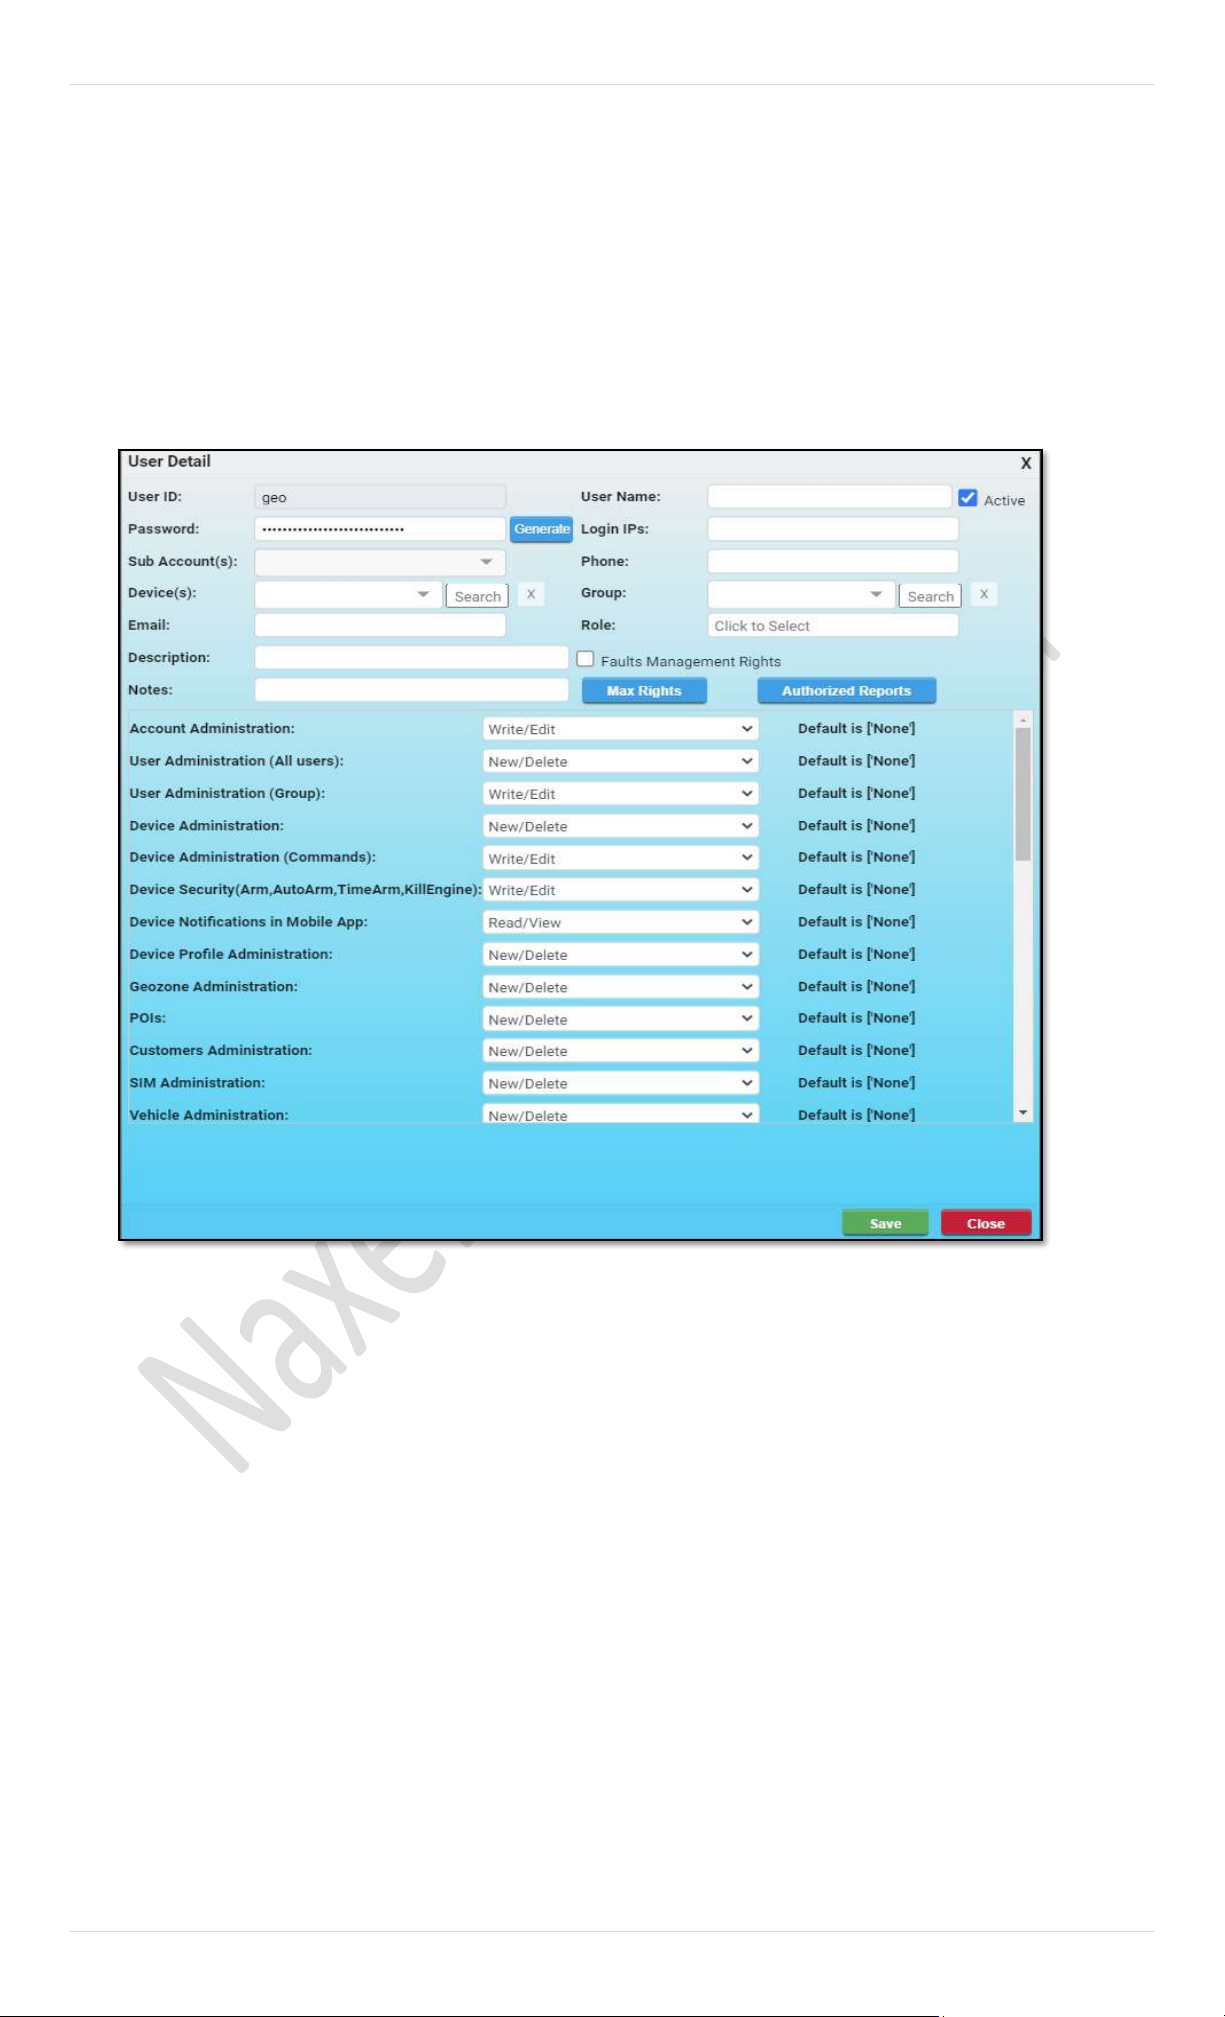
30 | P a g e
User Details.
Users Information dialog box shows basic information of all the user accounts which have already been added to the Pegasus
system by a Master Account or a Super User. Let’s create a new user account and we will go through all the options in detail.
First, we should have a User ID, to do this enter a suitable User ID in the text box available at the bottom of the Users
Information dialog box and click the button Create User. When Create User button is clicked a new User Form will appear on
the screen and notice that the same ID will appear in the text box labelled as User ID in the User Form. Here you can fill in the
information related to a user and manage its rights as shown in the image:
Account ID will appear automatically and it will be the
same Account name with which you are logged in to the
Pegasus.
Account Status: By default, the user account will be
enabled as Active. Disabling this check box will deactivate
the user account.
User ID will appear automatically once you entered the
User ID in the text box available at the bottom of the Users
Information dialog box and clicking Create User.
User Name: Enter the name of the user for which the user
has been created.
Password: Enter the password for the user account. Enable
the checkbox labelled as View to view the characters of the
password.
Phone Number: Enter the contact number of the user.
Device ID: A user could be assigned multiple vehicles from
different groups that exists under a Master account. A list
of vehicle's names appears with check boxes, to select the
vehicles, in a drop-down list box labelled as Device ID.
Group: Select a group, if a user is required to manage and
look after a specific group of vehicles added to the Pegasus
system. Group dropdown list box will show all the groups
that exist under a Master account. To detach the user from
the assigned group click Remove Group button available
next to the Group dropdown list.
Email: Enter the email address of the user.

31 | P a g e
Role: Select a role from the dropdown list. Please note that
here only those roles will appear which are created under
Roles. (Discussed in detail later in the manual). To detach
the role click Remove Role button available next to the Role
dropdown list.
Description: Enter a short description about the user.
Notes: Enter any special notes the user if required.
Max Rights: For supper user click on Max Rights button. A
confirmation window will appear for maximum rights
indication. Clicking its OK button will close the dialog box
and will set all the rights to maximum. Clicking Cancel
button will close the dialog box and will not impact any
change in the rights.
Note: If a specific Role is applied to a user, Max Right will not
take any effect.
A sub user account can also be created by a Master Account
or a Super User (which is restricted to a group of vehicles).
A newly created user under such Master Account or Super
User will also be restricted to the same group. In this way
a Master Account or Super User for the group will be able
to manage all the users for that group.
Create a user with default settings of rights or assign a
predefined role, available if any, and assign a Group. If
there are multiple groups under a Master Account or Super
User then a list of all available groups will be displayed from
which any one of the groups could be assigned. If there is
only one group that exists under a Master Account or Super
User then the same group will be assigned to the newly
created user by default. This newly created user will only
be restricted to the assigned group only.
Note: In case if multiple groups exist under a Master account or Super User, make sure at least one of the groups is selected otherwise Pegasus system will
assign all the groups to the newly created user.
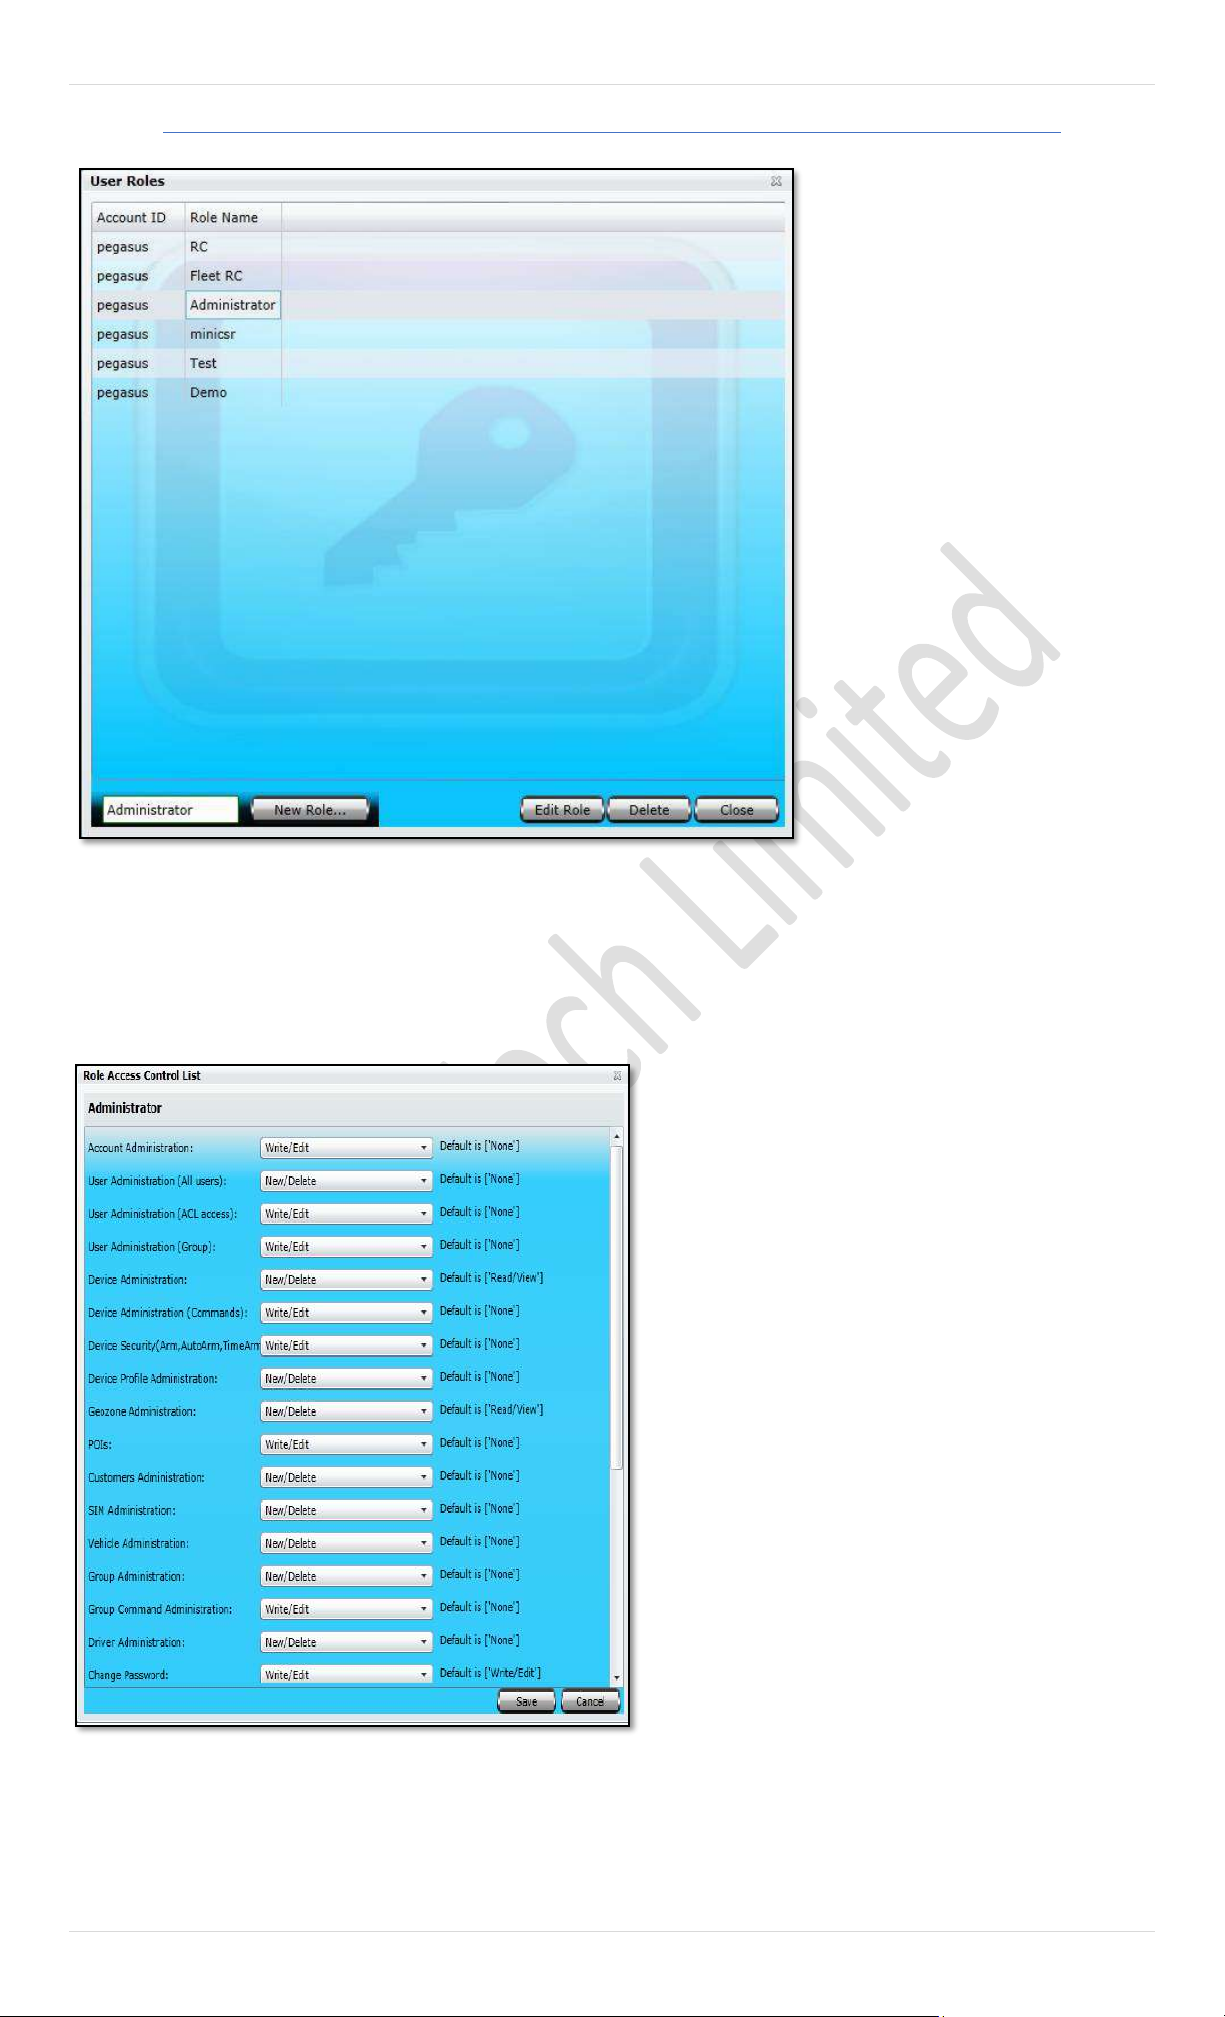
32 | P a g e
Roles
Roles is basically a centralized rights
management module. Here you can
create a Role and assign rights to it
and then later on these Roles can be
assigned to a user created under the
User module of the Administration.
This helps in saving time to assign
rights each time a user of the same
categories created under User module
of the Administration. Just select the
role from the dropdown list labelled
as Role under User Form in the User
module of the Administration.
Roles option will only be enabled to
Master accounts or a User account
having rights to Add/Edit only. This
option will be disabled to any such
user which does not possess proper
rights or non-master account. Roles
Information dialog box can be
accessed by clicking the Roles option
under Administration button on the
main GUI of the Pegasus system as
shown in the image:
First, we should have a Role Name, to do this enter a suitable Role Name in the text box available at the bottom of the Roles
Information dialog box and click the button New Role. When the New Role button is clicked a Role Access Control List will
appear on the screen and notice that the same Role Name will appear at the top of the Role Access Control List. Here you can
select the proper options for a role to be created. At the moment we are creating a role of an Administrator and will assign
the rights to this role as shown in the below image:
User Administration (All Users) This option enables the role to
administer (i.e., Add, Edit or Delete) any user of a Master account.
User Administration (ACL Access)
User Administration (Group) Enables the role to admin (i.e., Add, Edit
or Delete) the users of a group that are created in Pegasus.
Device Administration Enables the role to admin (i.e., Add, Edit or
Delete) the Devices that are added to the Pegasus system.
Device Administration (Commands) Enables the role to send the
commands, except security commands, to installed devices in Pegasus.
Device Security (Arm, Auto Arm, Time Arm) This option enables the
role to send Security Commands to the installed devices in Pegasus.
Device Profile Administration
Geo Zone Administration This option enables the role to administer
(i.e., Add, Edit or Delete) the Geo Zones (Polygonal & Route zones).
POIs It enables the role to admin (i.e., Add, Edit or Delete) all the POIs.
Customer Administration will be Enabled to admin (i.e., Add, Edit,
Delete)
SIM Administration It enables the role to admin (i.e., Add, Edit or
Delete) the SIMs that are added to the Pegasus system under SIM
Management.
Vehicle Administration Enables the role to admin (i.e., Add, Edit,
Delete) vehicles that are added to the Pegasus under Vehicle
Management.
Group Administration Enables the role to admin (i.e., Add, Edit or
Delete) the Groups that are created in the Pegasus under Groups
Management.
Group Command Administration This to send commands to vehicles that are under a group created in the Pegasus under Group Management.
Change Password For any user under any Master account
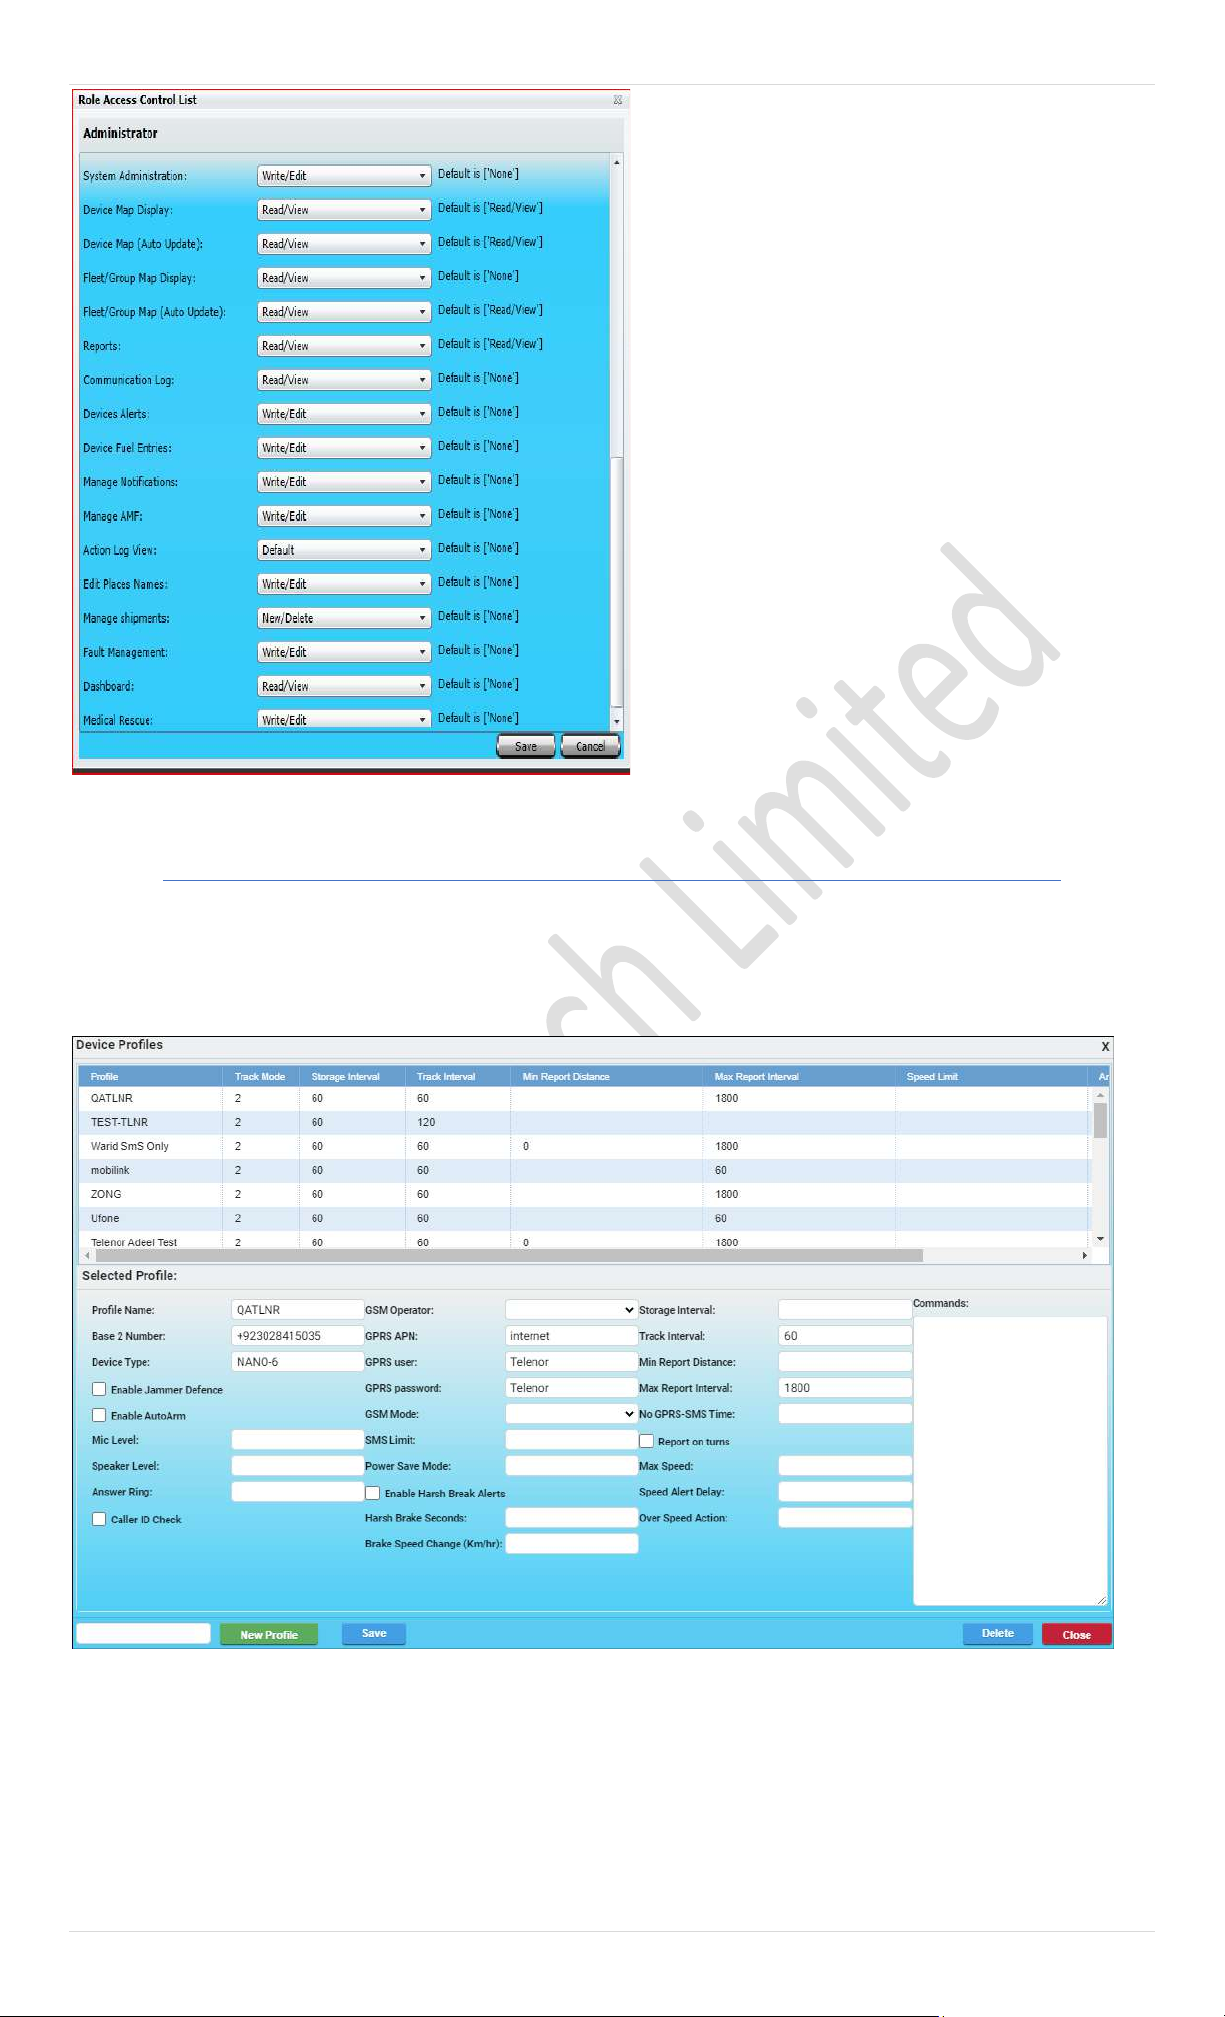
33 | P a g e
System Administration Enable/Disable System administration rights
Device Map Display Enables to display/ locate the selected vehicle on
map.
Device Map (Auto Update) Enables to auto update map for selected
vehicle.
Fleet/ Group Map Display Enables to display/ locate selected group on
map.
Fleet/ Group Map (Auto Update Enables auto update map group
selection.
Reports Enables the role to generate all the reports of Pegasus System.
Communication Log Enabling log for device communication
Devices Alerts Enables for live monitoring with buzzers
Device Fuel Entries Enables the role to enter the fuel records of a specific
device under Fuel Entries in the Pegasus system.
Manage Notifications Enables the role to administer (i.e., Add, Edit or
Delete) the Notifications engine.
Manage AMF Enables role to admin Edit dates for annual monitoring fee.
Action Log View Enables role to admin (i.e., Add, Edit or Delete)
Edit Places Names Enable role to Admin (i.e., Add, Edit or Delete) to edit
and corrections
Manage Shipments role to admin for management of New/Old shipment
Fault Management:
Dashboard:
Medical Rescue:
Device Profiles
The next step is to exercise the Profile functionality of the Pegasus system. Profile is the place where you can create your own
new profile or edit any existing profile. Profile is based on the basic settings that you set and which works as a road map for
your tracking device like the base number for it to report, which are the authorized contact numbers that your tracking devic e
should report to, which GSM network to use for GPRS connection and many more as shown in the below image.
Profile dialog box is divided into two segments; the upper part of the Profile dialog box is called Profile Grid where all th e
settings of a profile can be viewed. The rest of the part is meant to create a new profile of your own choice or edit any profile.
Let’s create a profile and we will go through all the input boxes in detail.
First, we should have a Profile ID, to do this enter a suitable Profile ID in the text box available at the bottom of the Profile
dialog box and click the button New Profile. When the New Profile button is clicked notice that the same Profile ID will appe ar
in the Profile ID text box next to the Account ID. Now it’s time to fill in the rest of the fields as described:

34 | P a g e
A. Profile Name
Profile Name will appear once you enter a suitable profile name in the text box available at the bottom of the Profile
dialog box and clicking New Profile button.
B. Base Number
Enter the base number first provided by GSM operator.
C. Enable Jammer Defense
Enabling this option will engage NTT-101’s GSM Jammer Counter measures when device detects any GSM jammer
nearby. Enabling this option here in profile will allow you to apply this security mode to all or selected vehicles when
initialized.
D. Enable Auto Arm
Enabling this option will enable the Auto Arm feature of the device. Enabling this option here in profile will allow you
to apply this security mode to all or selected vehicles when initialized.
E. GSM Operator
Select the GSM Operator from the dropdown list.
F. GPRS APN
GPRS APN is SIM Access Point Node which is required to connect the tracking device to the GPRS using local GSM
network. For this purpose, please contact the GSM operator of the SIM that you are using in the tracking device.
G. GPRS User
Enter the GPRS User name required to start a GPRS session of the SIM that is in your tracking device. Contact the GSM
operator of the SIM that you are using in the tracking device.
H. GPRS Password
Enter the GPRS Password required to start a GPRS session of the SIM that is in your tracking device. Contact the GSM
operator of the SIM that you are using in the tracking device.
I. GSM Mode
Set the GSM Mode to any option available out of five different options as per your own choice.
Setting GSM Mode to SMS Mode will set the device to use SMS service only as a communication medium to send the
Locations, Alerts and Other data to Pegasus system and authorized contacts.
Warning: This generates a large number of SMS from device and should be used only when no GPRS connection is
available or desirable.
➢ GPRS-SMS Mode 1
Setting GSM Mode to GPRS-SMS Mode 1 will set the device to use SMS service as a communication medium when
GPRS is not connecting to send Locations, Alerts and other data to Pegasus system and authorized contacts. This mode
can also generate a lot of SMS if device is out of GPRS coverage for long time.
➢ GPRS-SMS Mode 2
Setting GSM Mode to GPRS-SMS Mode 2 will set the device to use SMS service as a communication medium when
GPRS is not connecting to send Alerts only to Pegasus system and authorized contacts.
➢ GPRS-SMS Mode 3
Setting GSM Mode to GPRS-SMS Mode 3 will set the device to use SMS service as a communication medium when
GPRS is not connecting to send Alerts only to Pegasus system. Pegasus system will then send those alerts to
authorized contacts.
➢ GPRS only Mode 4
This will set the device to use GPRS service only as a communication medium to send Locations, Alerts and Other
to Pegasus system. Pegasus will send, receive Locations, Alerts and Other date to authorized contacts in an SMS.
No SMS will be sent from the device. This mode should be used when SMS usage is expensive and undesired.
Warning: If GPRS is unavailable in the GSM network for any reason then there will be no communication from device except
No Power Alert. You need to lower GSM Mode in that case if you need reply from device.
J. GPRS Online Interval
Enter the time interval to keep the GPRS session alive. This is in minutes. Device will refresh session after this number
of minutes with server.
This will increase GPRS traffic and should be used only if persistent GPRS session is vital.
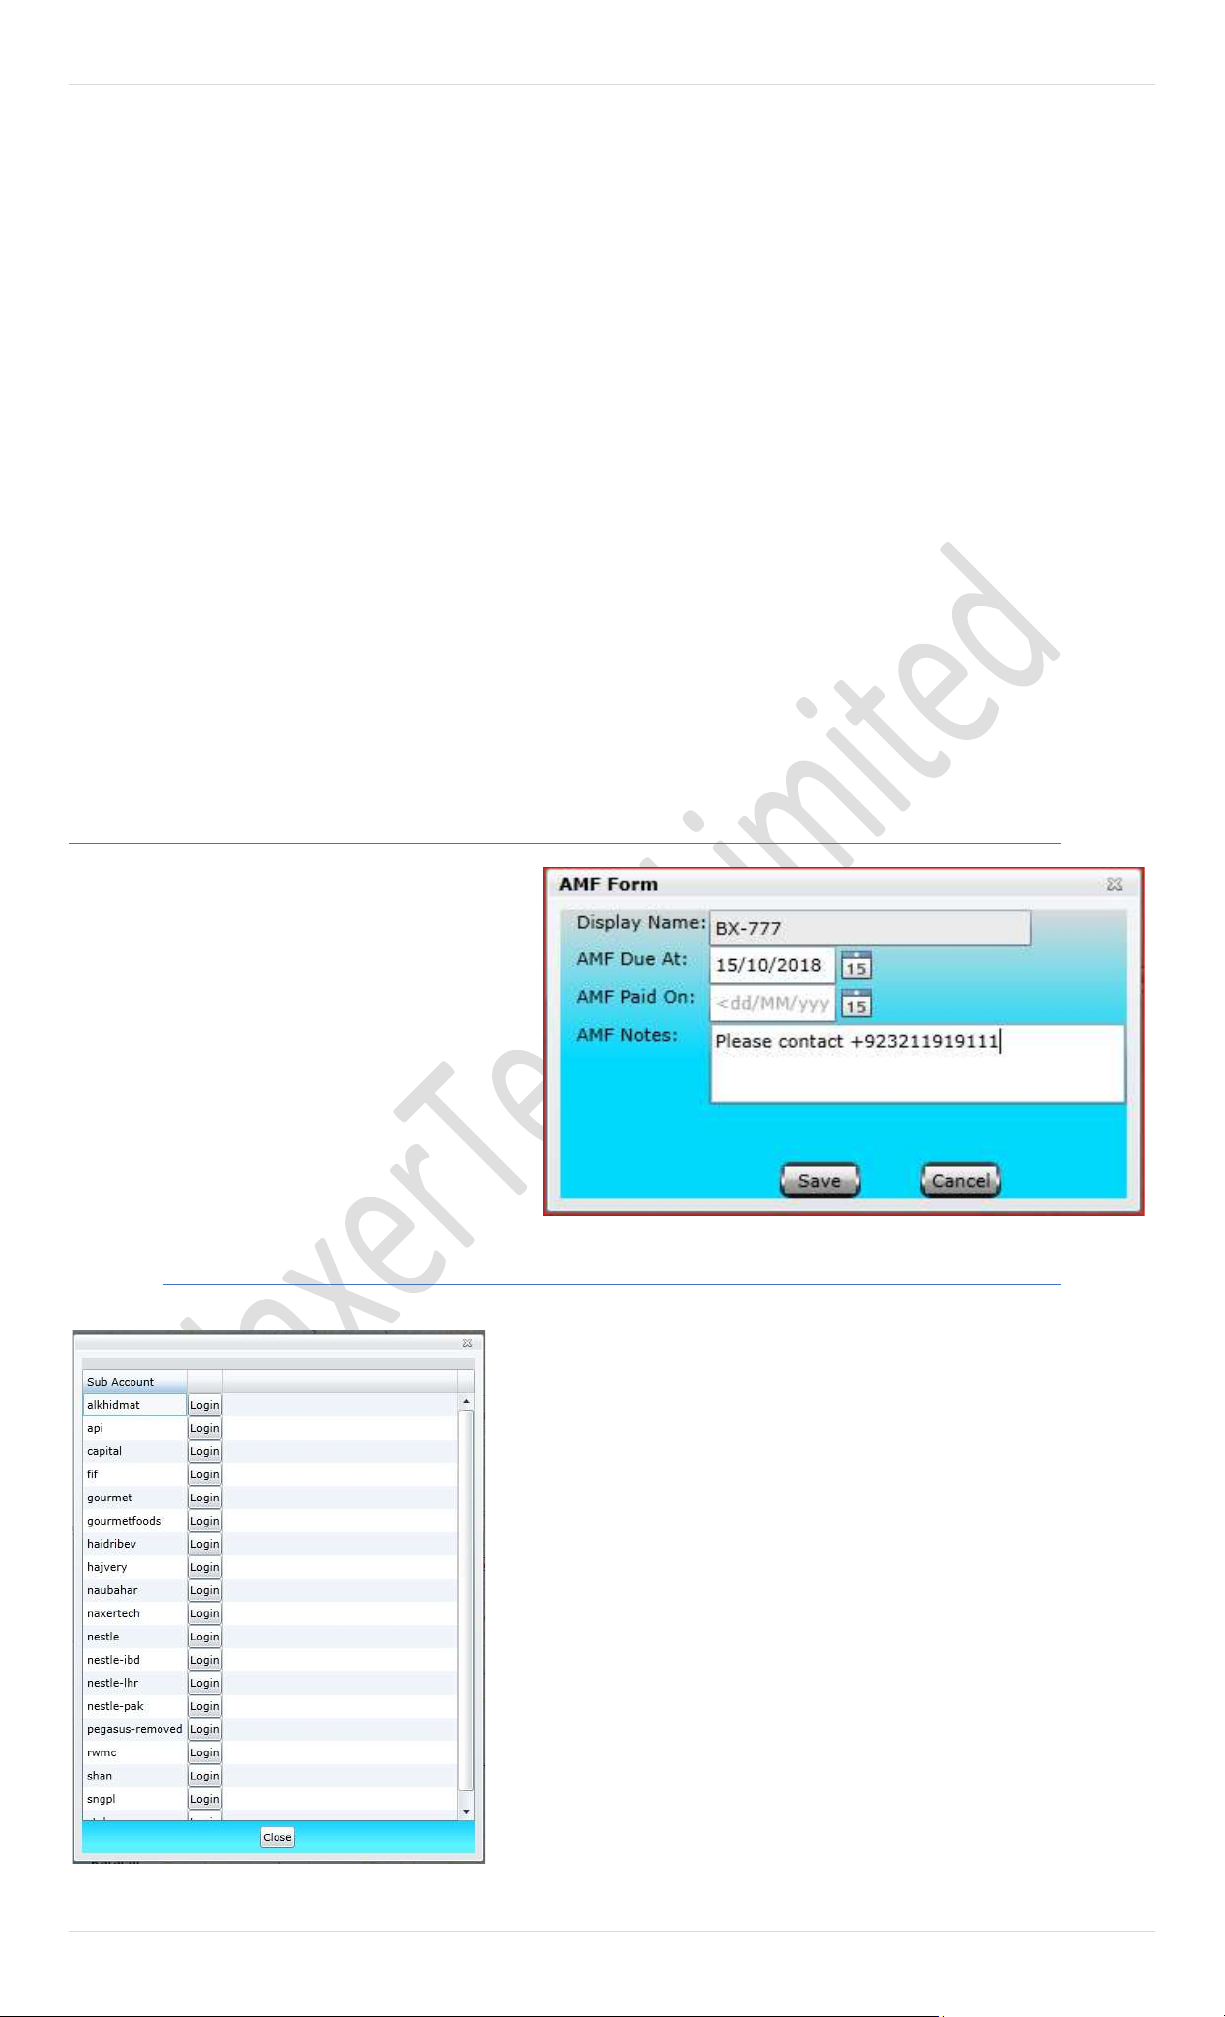
35 | P a g e
K. SMS Limit
Enter the SMS limit to limit the number of SMS sent by the device. When this limit will be reached, device will switch
to GPRS only mode (4) and no further SMS will be sent until the limit is reset.
Please refer to “Tracking Commands” section in NTT-101 Commands Document for detailed discussion of following
fields.
L. Track Mode
Select a suitable Tracking Mode from the dropdown box, by default Store and Upload Location is set.
M. Storage Interval
Set the Storage Interval as per the Tracking Mode selected.
N. Track Interval
Set the Tracking Interval as per the Tracking Mode selected.
O. Min Report Distance
Set the distance (in meters) for the device after which it should send its location. Device will not send its location until
it did not travel or more than the specified distance.
P. Max Speed
Set the Max Speed in meters, it is useful in case where the tracking device detects that the vehicle is going beyond the
Max Speed set, tracking device will send an alert to Pegasus system.
Manage AMF
Click on the vehicle in device panel and then select
Manage AMF from Administration menu.
Fill AMF due date. AMF Paid will need to be filled
once you received payment. Weekly payment
reminder via SMS can be also sent to clients, for this
privilege please contact the Engineering department
of Naxertech.
Sub Account Access
This is an administrative part of Pegasus. You can manage administrator
account with its multiple sub accounts in Pegasus.
Click on Sub Account access and you will find all the save account list. You
only need to click on login and it will give you access to sub account
devices/vehicles.
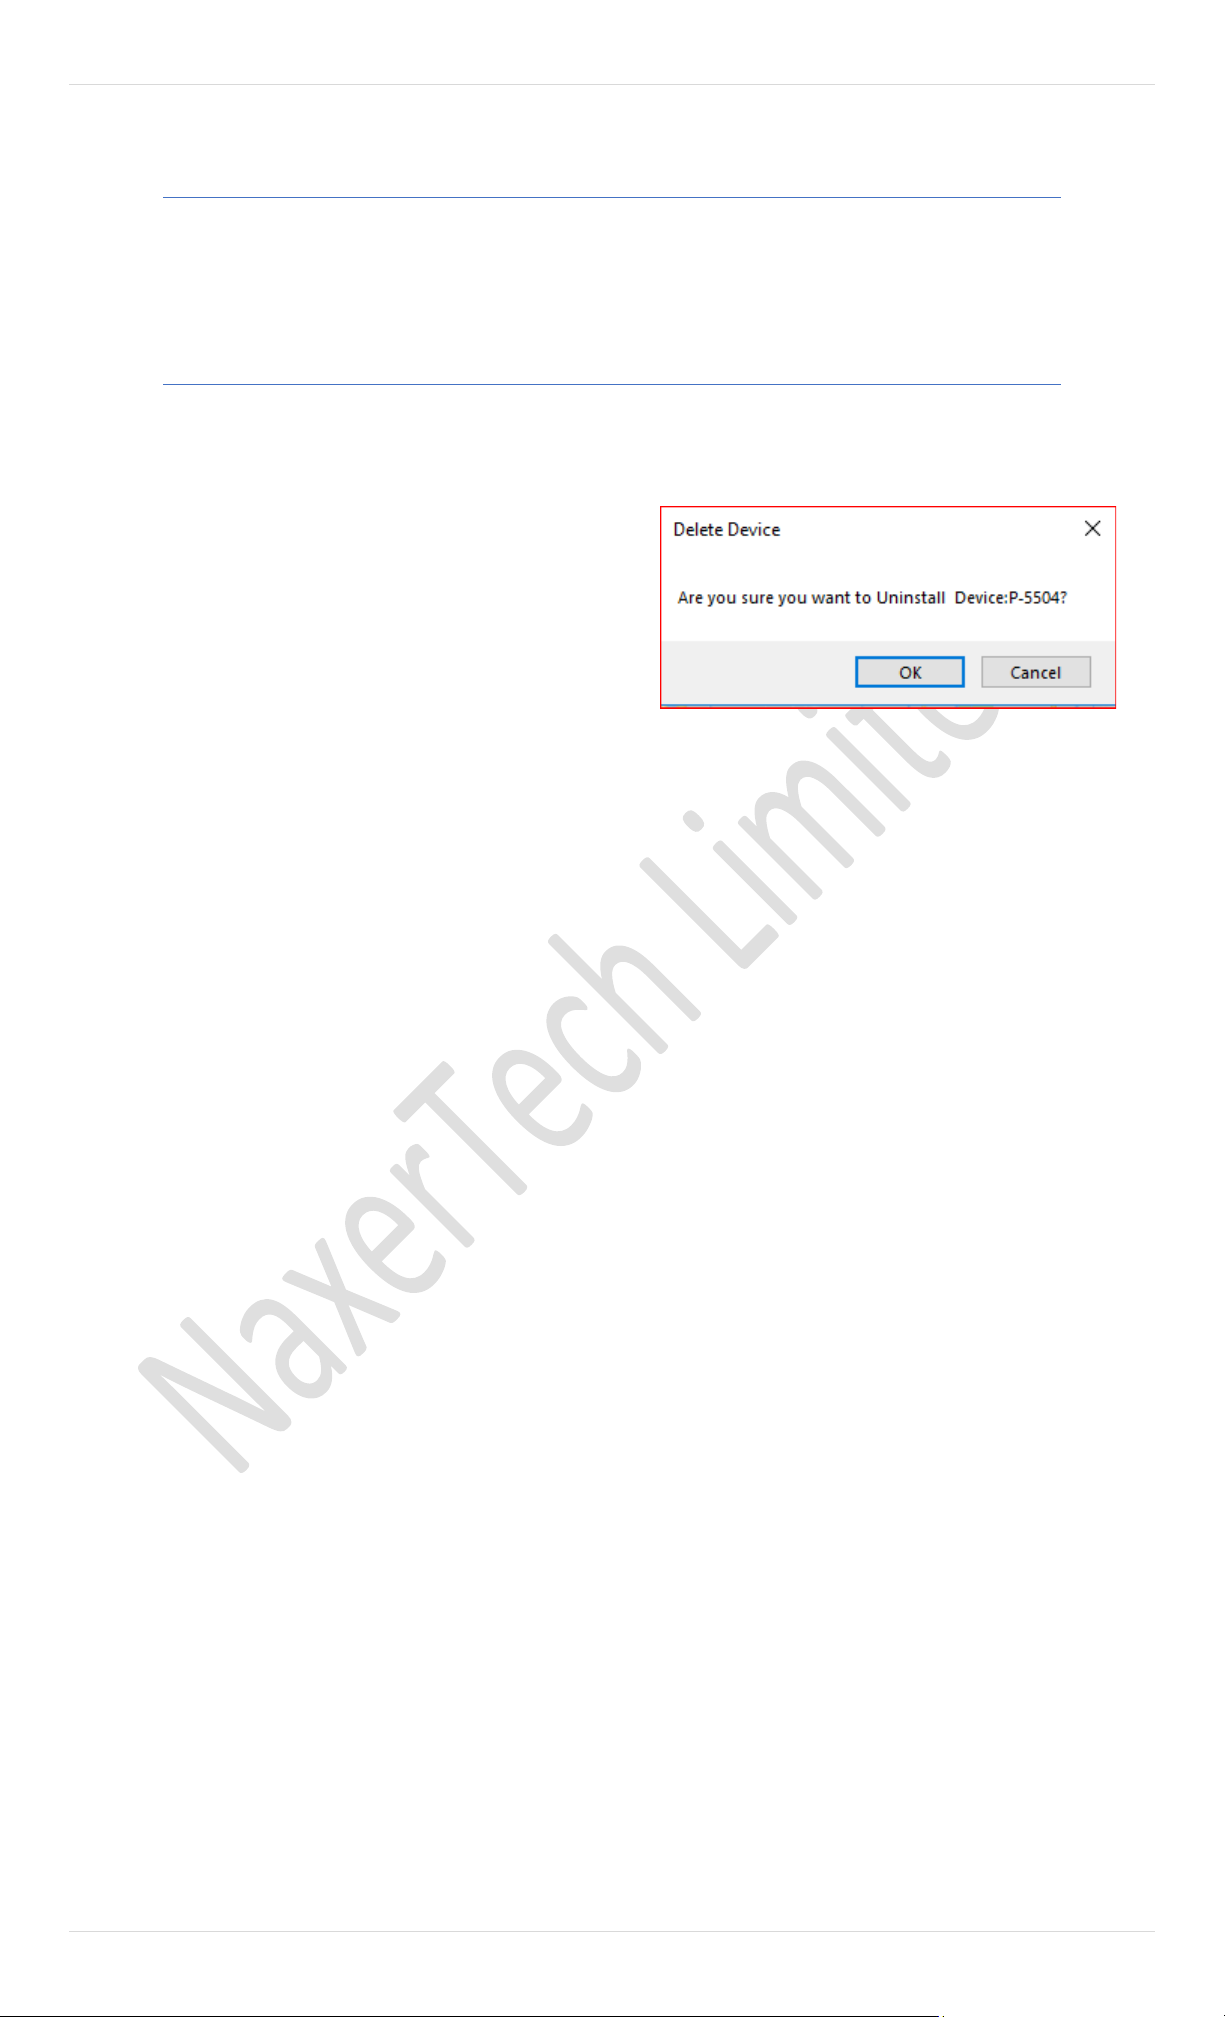
36 | P a g e
Log Back to Master
Pegasus offers different level of groups to manage. If you are dealing with sub groups and want to quick exit from it you
can us this feature. If you are not in sub group then it will notify you “You are not logged in Sub account “
Uninstall Device
To remove unwanted devices from Pegasus System. You need to select vehicle from device panel, click on the main menu
of Administration then select Uninstall Device option.
It will ask for confirmation and if you select OK, you will not find
that vehicle anymore in Pegasus.
Note: This will remove it permanently and would not be undo or
revert.
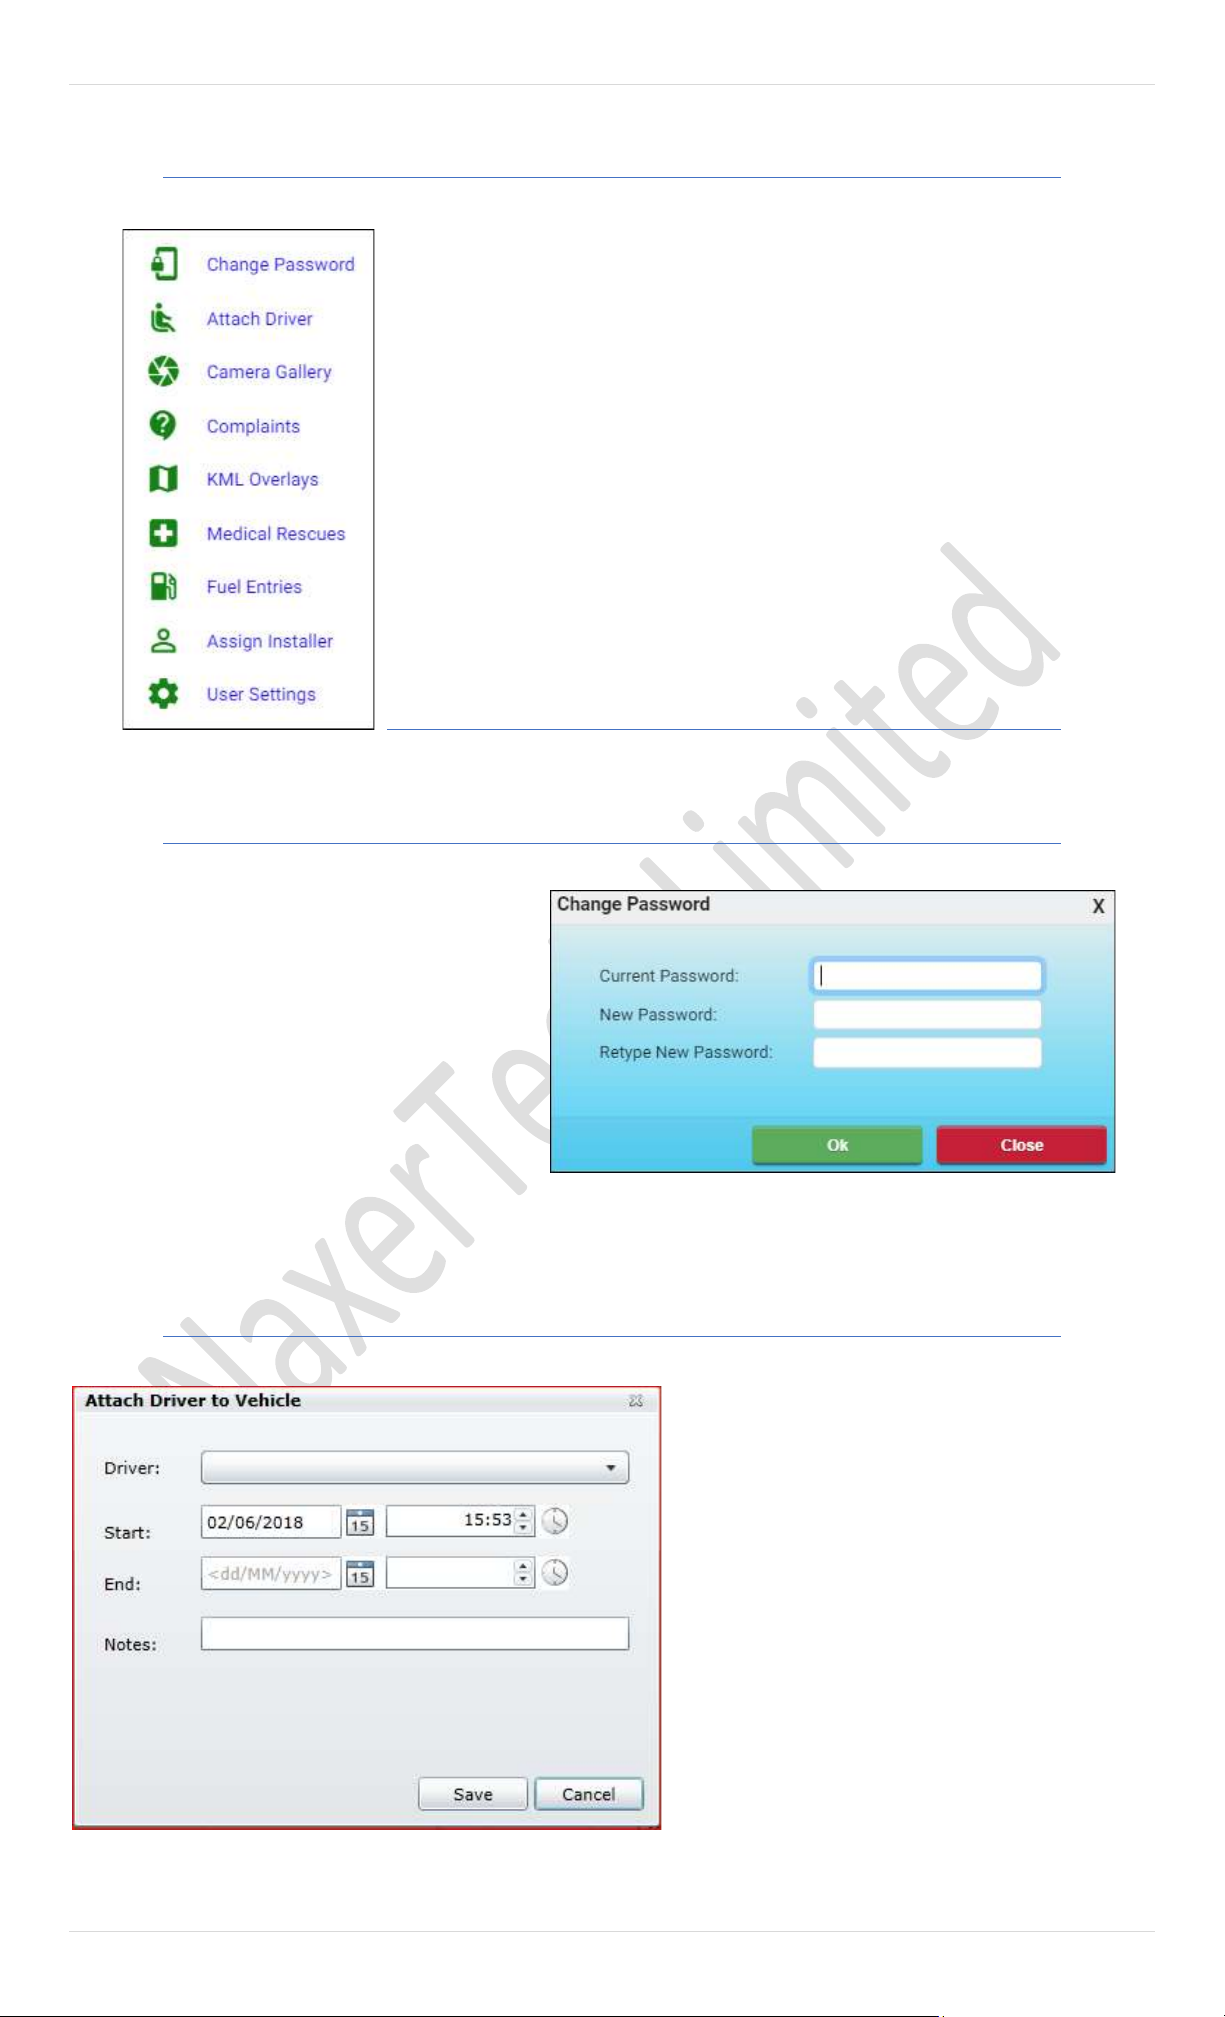
37 | P a g e
Tools
The management of Pegasus System is fulfilled through a special interface – Tools. It is specially
designed for Pegasus users for their Advance solutions needs, which allows you to manage
your Device Profiles, Attaching Driver and Camera Gallery features, Tools tab will only be
operational to Master accounts only and will not be visible to any other user not having
sufficient rights or non-master account.
Clicking the Tools button located on the main GUI of the Pegasus system provides you options
of Device Profiles, Attach Driver, Camera Gallery, Faults Management, KML Overlays, Medical
Rescues and Fuel Entries. Let’s discuss all these options in detail and how it facilitates the
Pegasus user.
Change Password
Click on Change password from Administration menu
Pegasus gives privilege for privacy. You can change
existing password anytime by using Standards of
password change. First give current password and then
apply your desired one with confirmation.
Attach Driver
Attaching a driver to vehicle is just a click away. Just
click and select driver for vehicle and then update their
Start and End timings on the Attach Driver in the Tools
as mention in image.

38 | P a g e
Camera Gallery
Select the option Camera Gallery
which appears on clicking the Vehicle
button available on the main GUI of
the Pegasus system. Clicking Camera
Gallery will open up a Snapshot
Gallery which contains taken images.
This dialog box contains a Take
Snapshot button & Auto Refresh
option at the bottom as shown in the
image above. Snapshots could be
taken, viewed and downloaded from
the Pegasus system. An image of the
Snapshots Gallery is shown the
below:
Complaint
Complaint is a very useful tool in Pegasus
system. Through complain form you can well
manage your large fleet and can fix the problem
with its logs.
Vehicle You only need to select vehicle from
drop-down list and mention its problem.
Pegasus will automatically get its further details
i.e., what account, group this vehicle belongs to.
Contact phone: would be customer or
concerned number.
Contact Email: Mention email here of the
concerned department such as
support@naxertech.com
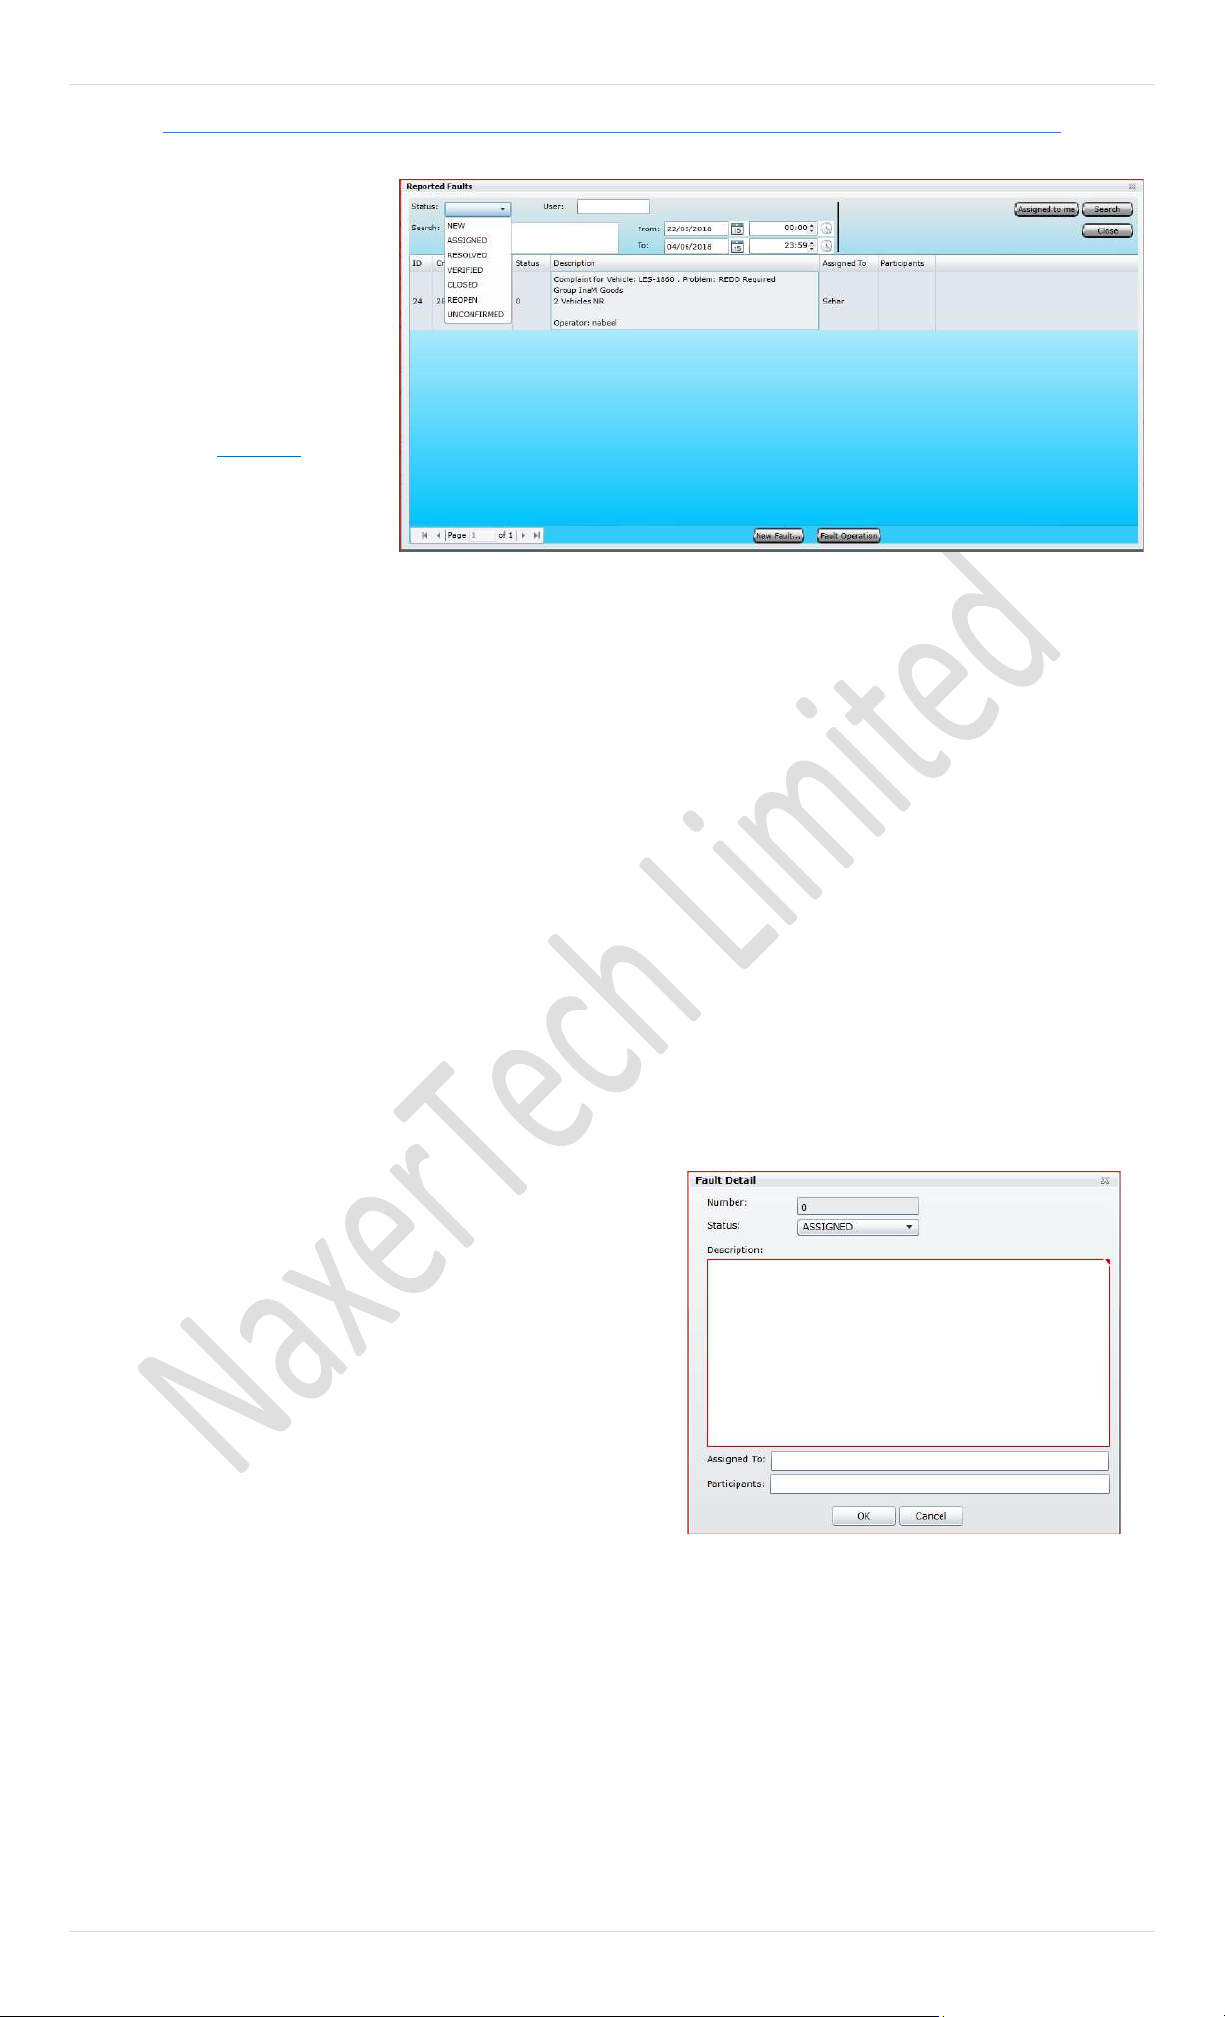
39 | P a g e
Faults Management
Pegasus provides complete
mechanism for what type of faults are
reporting and who is dealing with
reported faults. You can assign these
faults fixing to concerned
departments and can chase it until it’s
not fixed. Reported Faults are the
advanced form of Complaint which we
discussed earlier. Here we can
elaborate Reported faults in details,
Status: You can search reported faults by their recent status. By clicking on Status option, a drop-down menu will be opened and will
give your following options to select:
➢ New: Show you only the newly reported problems, on which no action would be taken yet.
➢ Assigned: Those faults which are assigned to concerned department or a person will be show under this option
➢ Resolved: It will list down resolved problems logs according to set dates.
➢ Verified: Only verified reported faults will be shown according to set criteria with-in desired dates.
➢ Closed: Faults which are fixed and went into closed stat can be shown with this filter.
➢ Reopen: Reopen case can be seen under this filter.
➢ Unconfirmed: Unconfirmed or unassigned reported cases can be view with in desired dates.
User: Reported faults can be search by User Name.
ID: This represents numbers of reported faults in figures.
Created On: Mentioned date of reporting.
Status: Current status of reported fault.
Description: Description of reported fault.
Assigned To: This will show assigned person, who would be
responsible to fix this problem
Participant: List of participants which can actively play role to
sort out the fault or even well updated regarding it. #
Assign to me: This option depends on privilege assigned in
Pegasus system. This is a shortcut to assign a fault to currently
logged in User to fix. However, you can assign fault to given list
of users and keep updating others in participants.
New Faults: New fault reporting can be done by this button. A
new window will pop up for basic information of the fault /
problem which can be describe in below image.
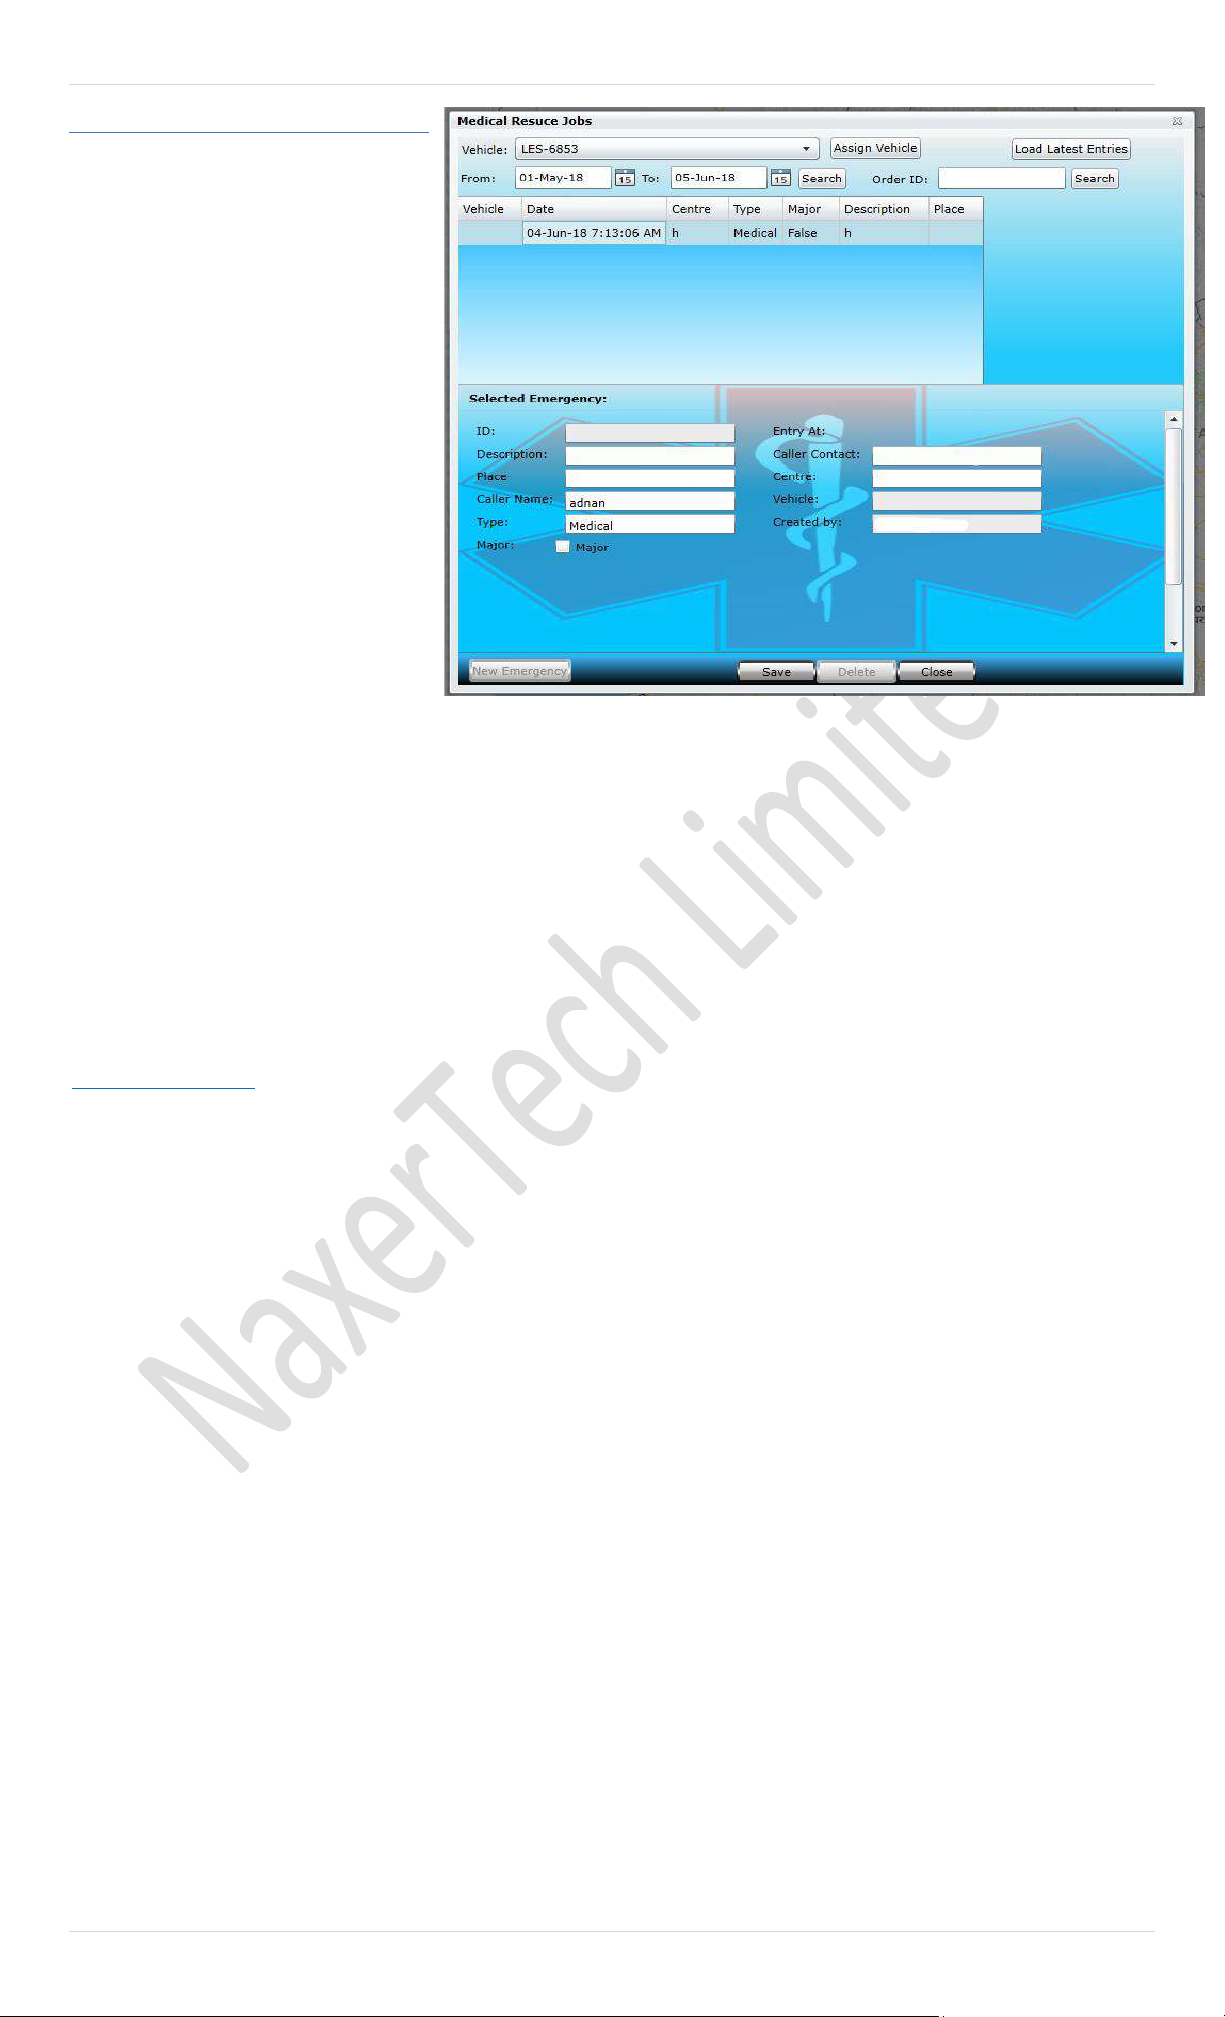
40 | P a g e
Medical Rescue
This module is specially designed for
Medical Rescues and emergency
services. Pegasus can manage all the
emergency queries, give you options for
assigning next available vehicle and
maintain its logs.
There are two parts of this module, one
is to see the existing record for rescue
quires and second belongs to generate
a rescue activity.
Here we would discuss all its options in
detail.
Vehicle: Select vehicle from the
available list and click on Assign Vehicle
to assign a job to particular device.
Search: It will search assigned job for
your requested dates that would be
mentioned in From and To calendar boxes.
Order ID: You can search assigned job by order ID
Load Latest Entries: Regardless of dates, you can find out
most recent job entries by using this tab.
Vehicle: Vehicle Registration number will show here.
Centre: Multiple centres can be managed and you can
select rescue queries along with centre information.
Major: This intimates the level of rescue either a major one
on large scale or low-density accidents.
Description: It will show further details of Rescue activity
with vehicle information.
Place: Name of the place where this rescue operation is
being held.
Selected Emergency
New Emergency: There is button available at bottom of the
dialog box to create form against a new emergency
ID: This is identification number which is given to emergency
quires in ascending order.
Description: Description of the quires can be mentioned in
this box.
Place: Enter the name place where incident is happened and
your emergency service is aiming to help out.
Caller Name: To avoid fake calls, it’s very basic to add caller
name for further record.
Type: what type of emergency is to be declared either
medically, fire or flood
Caller Contact: To get the caller contact number for further
reference and to avoid fake calls
Centre: Enter the rescue centre name
Vehicle: Put the vehicle registration number.
Created by: Enter the name of the person, who initially deal
with the emergency query

41 | P a g e
Fuel Entries
Pegasus system allows saving the fuel filled in a
vehicle. Selecting this option, Pegasus system will
open a Fuel Entry dialog box. Fuel Entry dialog box
is divided into the two halves, upper half of the
dialog box is called Fuel Entry Information Grid
where all the information for previously entered
fuel entries can be viewed. Whereas other half is to
add new fuel entry to the Pegasus system as shown
in the image:
To add a new Fuel Entry to the Pegasus system, click
New Fuel Entry button and a blank Fuel Entry form
will be displayed. Now it’s the time to fill the Fuel
Entry form fields as described below:
A. Fuel Quantity
Enter the amount of fuel filled in the vehicle. The unit of
Fuel Quantity is in litters.
B. Fuel Cost
Enter the cost of the fuel per liters. This field is irrespective
of the currency unit in your country so add the cost in
figures only.
C. Date and Time
Select the date and time of purchase of the fuel from the
associated calendar.
D. Fuel Tank
Enable the check box if the fuel tank is filled full.
E. Odometer
Enter the reading of the Odometer from the vehicle’s
odometer at which the fuel was filled.
F. Filling Station
Enter the name of the Filling Station from where the fuel
was filled. (Optional)
G. Reference
Enter any reference related to the fuel filled. (Optional)
H. Fuel Type
Select the type of the fuel purchased i.e., Petrol/ Diesel or
CNG/ LPG
Assign Installer
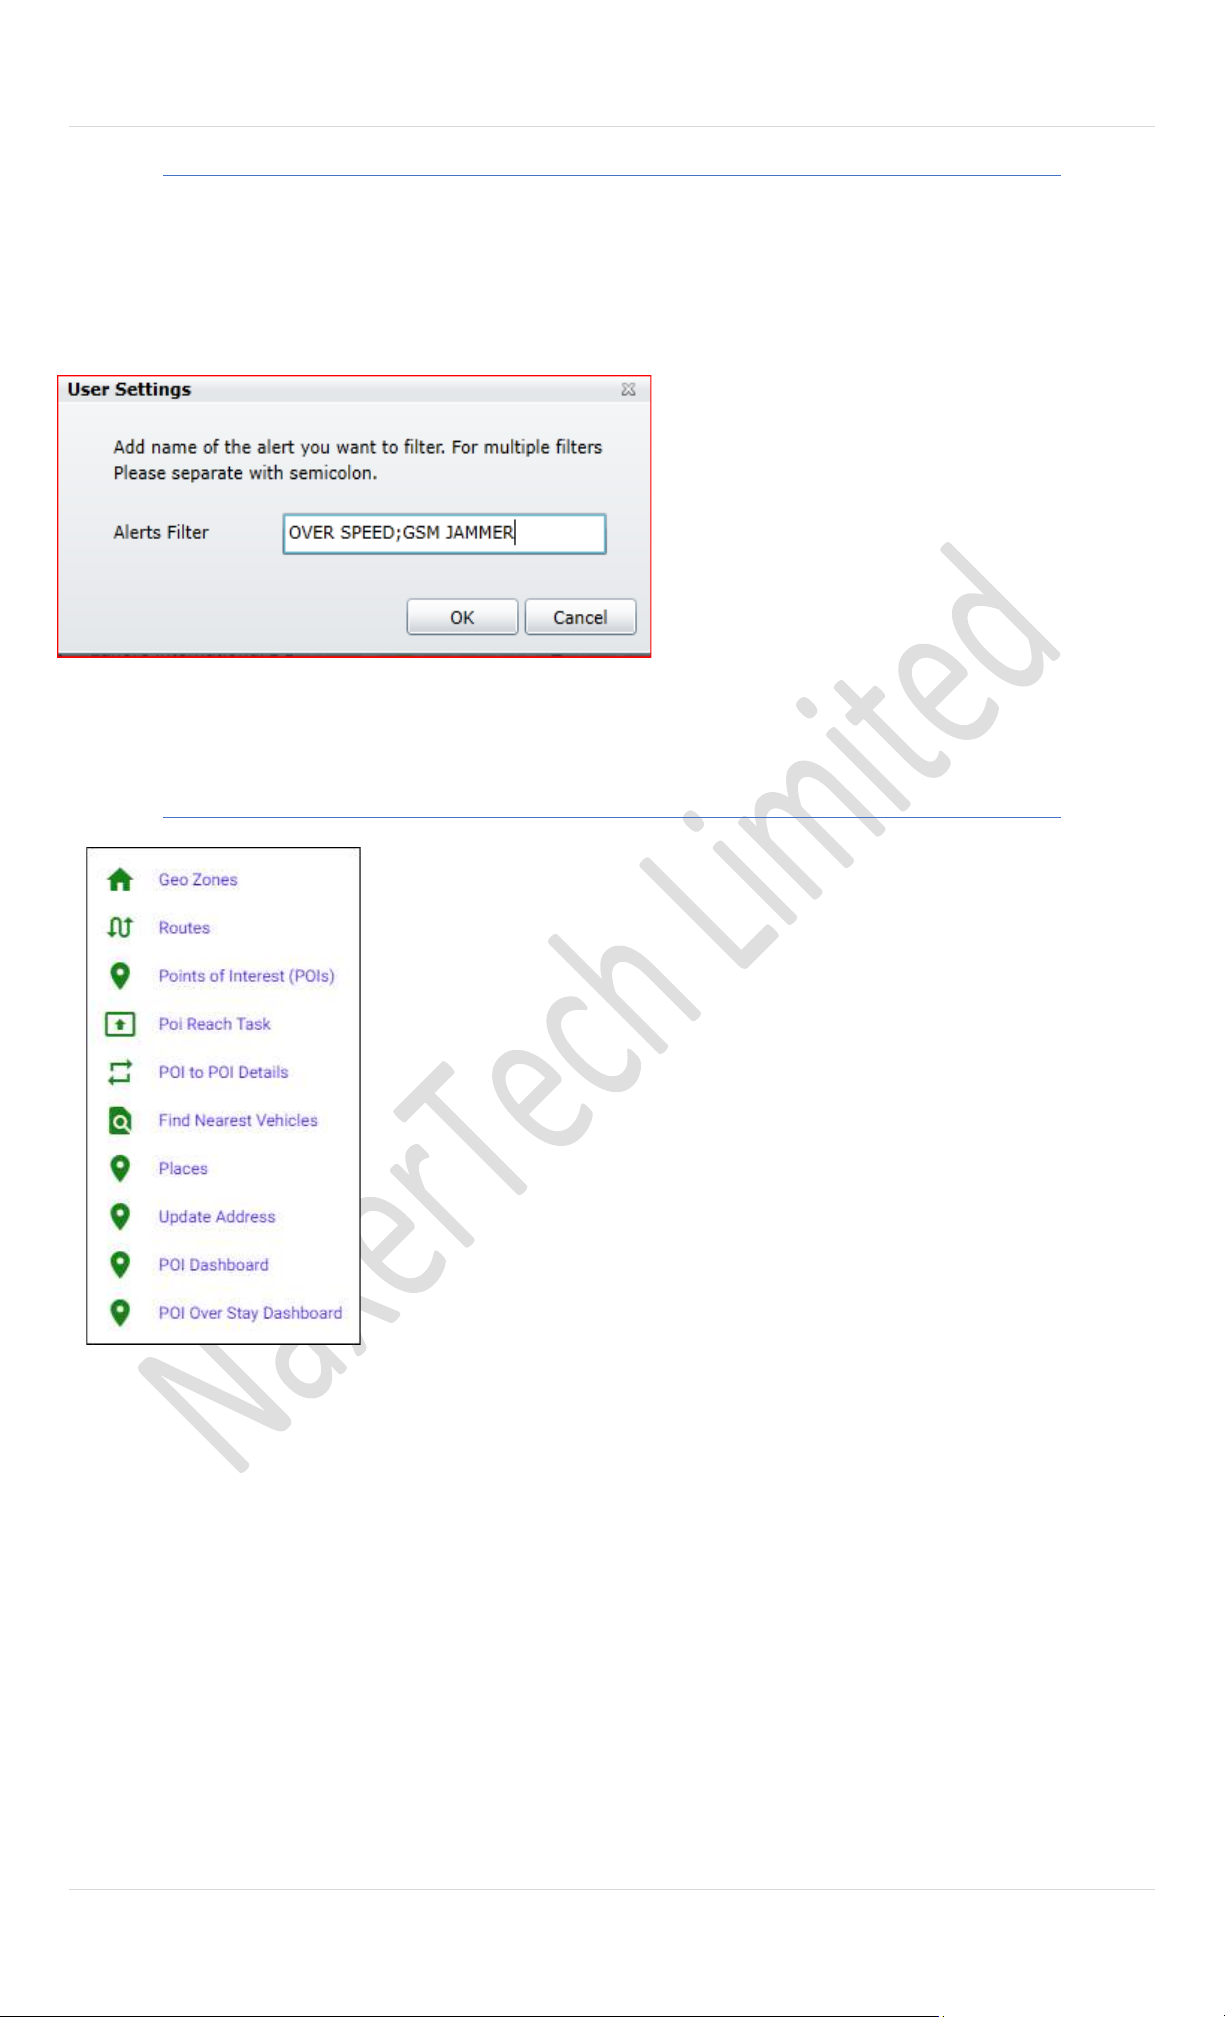
42 | P a g e
User Setting
This is an important tool for live monitoring. Pegasus gives alerts violation intimation in information grid of its bottom of main GUI.
i.e. No power alert, Geo Zone, Over Speed, GSM Jammer, back door opened, outside route …etc.
You can filter such alerts which you or your company think that these are not important. For sample, please see in the image
This is an important tool for live monitoring. Pegasus gives
alerts violation intimation in information grid of its bottom
of main GUI. i.e. No power alert, Geo Zone, Over Speed,
GSM Jammer, back door opened, outside route …etc.
You can filter such alerts which you or your company think
that these are not important. For sample, please see in the
image:
Zones
Geographical zone is some area on the map that is important for your tracking purposes.
Geofences can be used to control unit activity in these areas or, on the contrary, outside
them. Zones button provides two options to set Geo zone and POIs (Points of Interest) for
your unit/ vehicle.
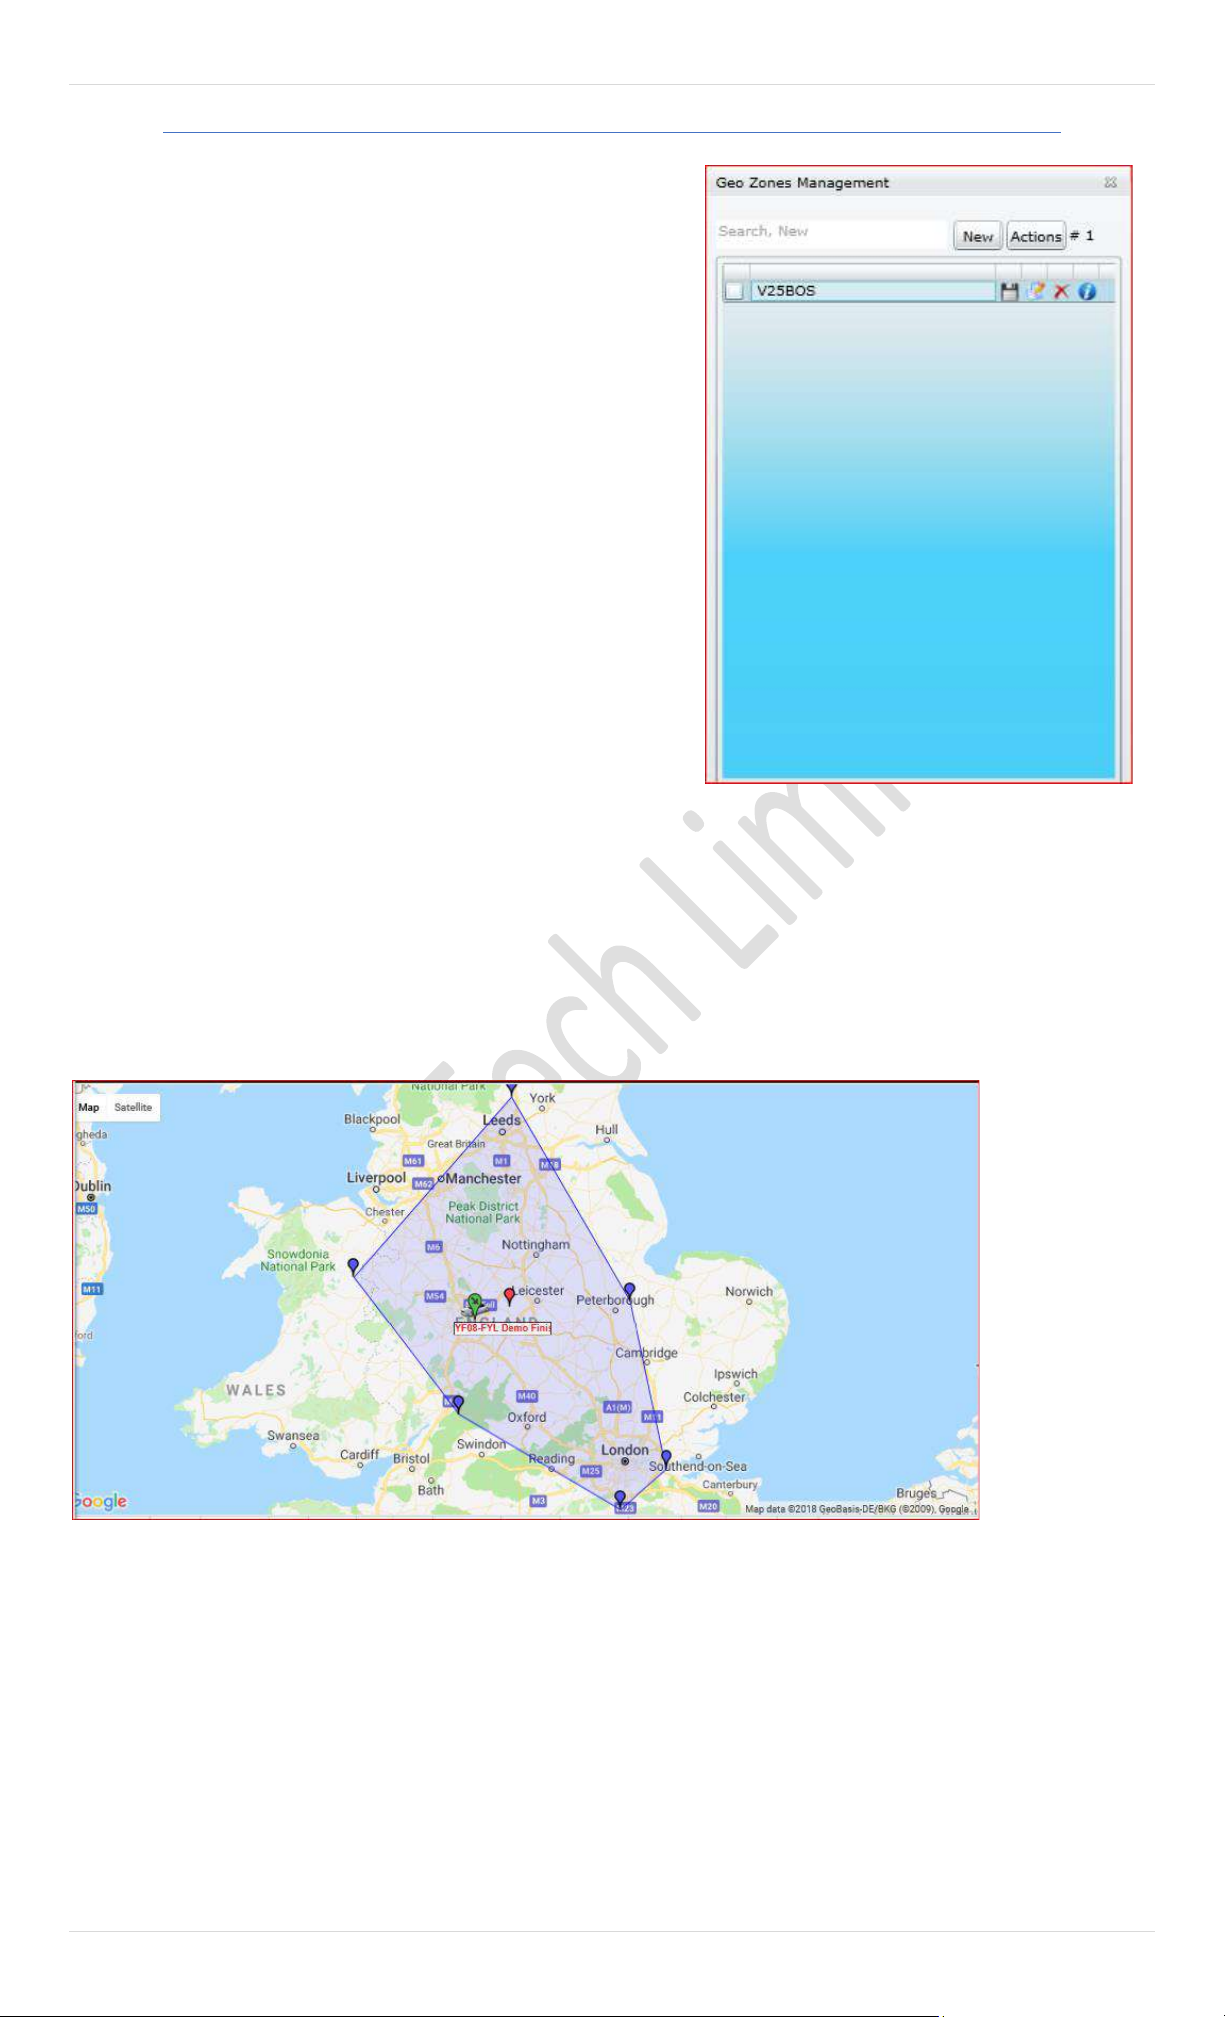
43 | P a g e
Geozone
Pegasus system offers two types of Geo zones: Polygon Zone and Route
Zone. A Polygon Zone can be defined around any reference point
whereas Route Zone can be on a route to track a unit/ vehicle.
Movement of vehicle in and out of that Zone (Polygon or Route) will
generate an alert.
Geo zone window appears on screen by clicking the Zones button
available on the main GUI of the Pegasus system (overlapping the
Devices Panel). Geo zone window is divided into two main portions;
upper half of the window is for Polygon Zone whereas the other half is
for Route Zone. A sample image of the Geo zone Window is shown
below:
To create a Polygon Zone for a Unit/ vehicle follow the given below
simple steps:
A. Type in a suitable name in the text box labelled as Geo Zone
ID and click New Polygon Zone button.
B. The name will appear in the list of the Polygon Zones, select the newly created polygon zone.
C. Now it’s time to define a zone on the map, zoom in to the location where you want to specify the zone.
D. Double click to add a marker to zone.
E. Drag a marker to change location.
F. Right click a marker to remove.
G. Drag the red marker to move the entire zone.
H. Once the Zone is defined click Save icon available next to the newly created Polygon Zone in the list.
POIs lying inside a GeoZone can now be exported to Excel file. Use Actions in Geo Zone Window. A sample image of a Polygon
Zone around the London city is as below:
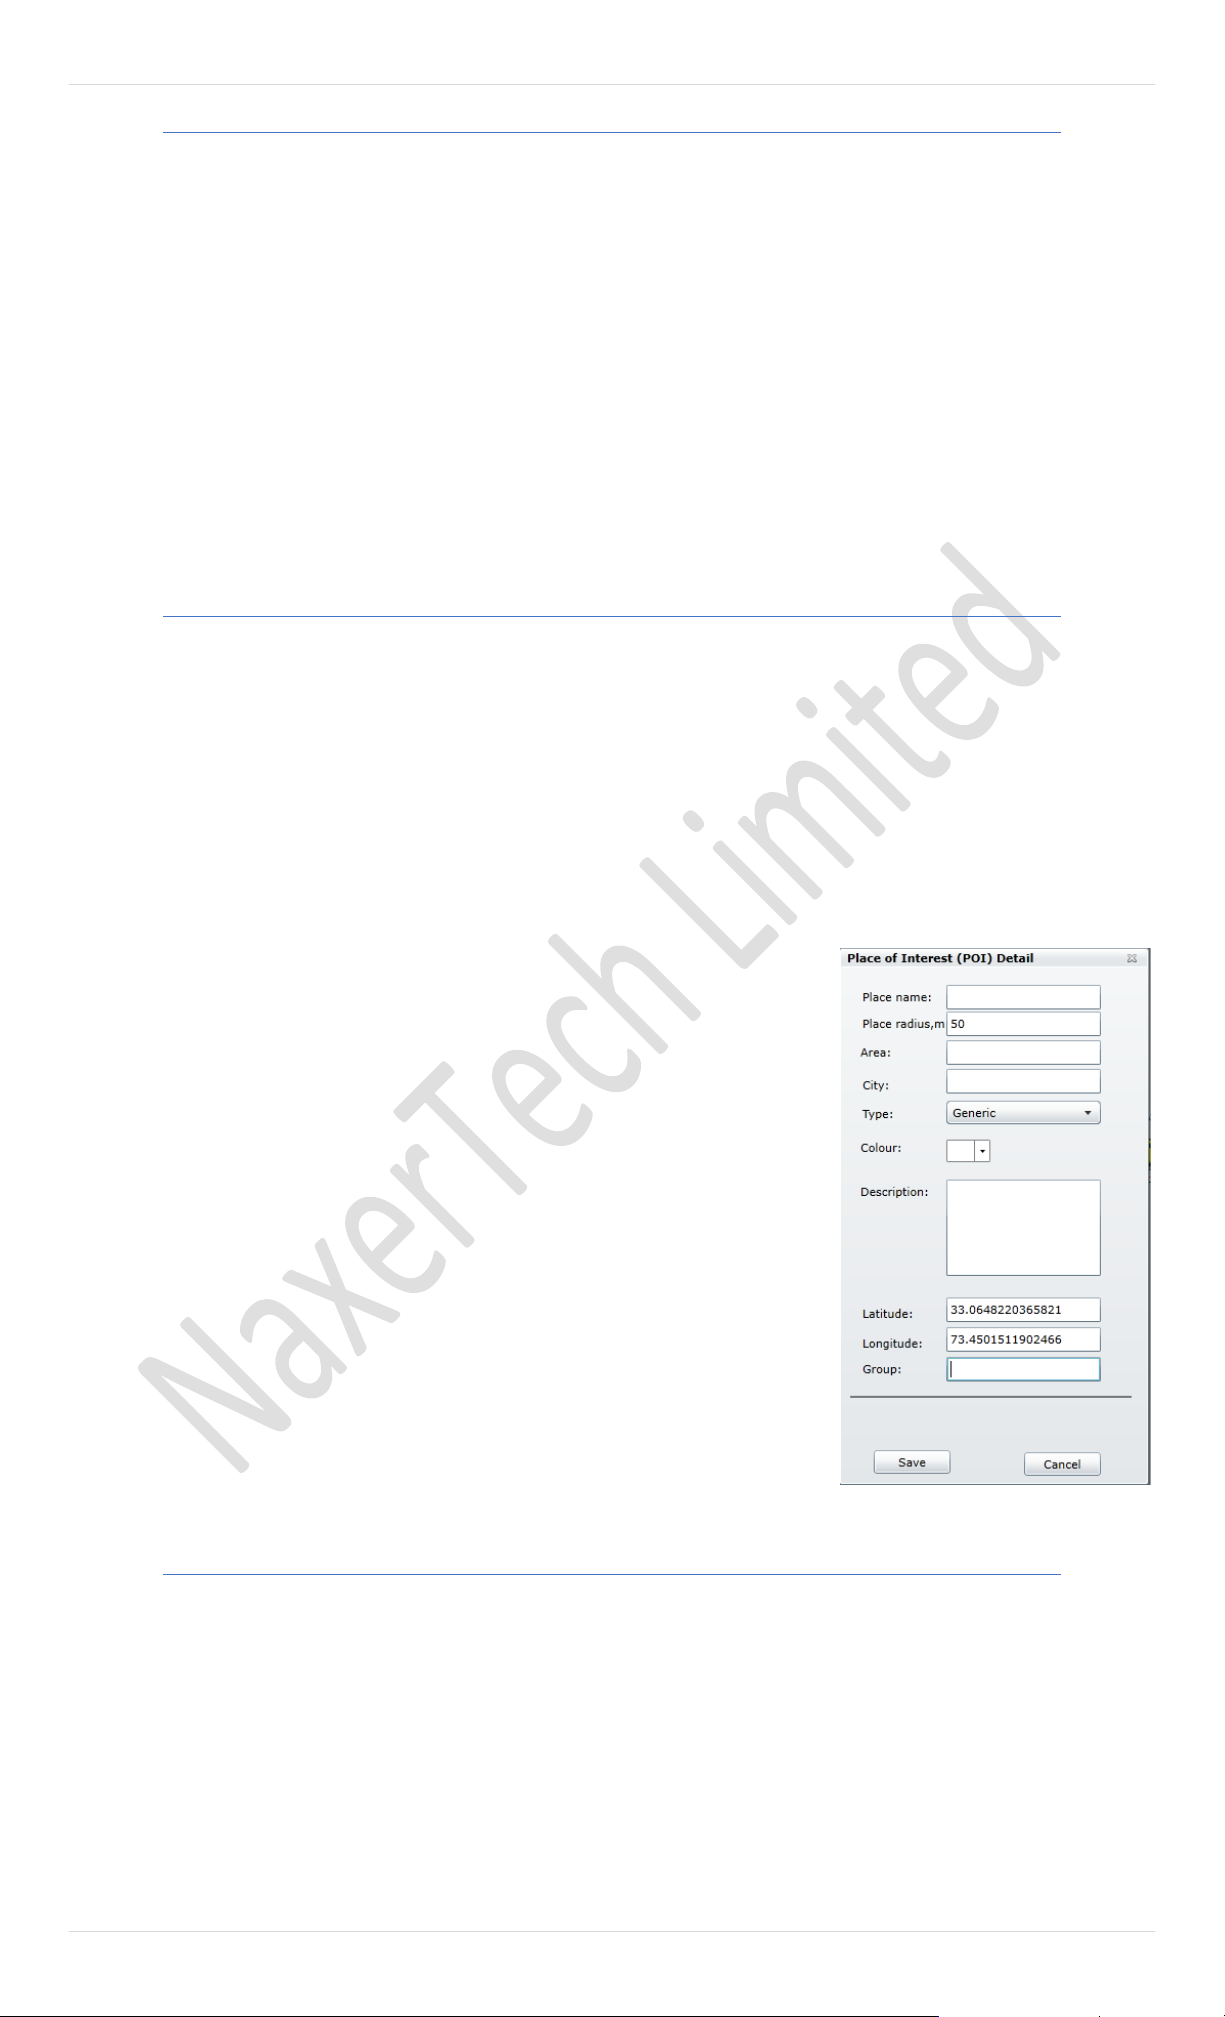
44 | P a g e
Routes
Route Zone is to create a Route Zone for a unit/ vehicle, follow the given below simple steps: Type in a suitable name in the
text box under Route Zone and click New Route Zone button.
• The name will appear in the list of the Route Zones, select the newly created route zone.
• Now it’s time to define a route on the map, zoom in to the location from where you want to start the route.
• Double click on the map to add a marker from the start of a route to the end.
• Drag a marker to change the location.
• Right click on a marker to remove.
• Once the route has been defined click Save icon available next to the newly created Route Zone list.
• You can also generate route from points which could save lot of your labour. Simple click on this button and it will
generate points from device history.
Note: If a specified zone is not saved, no marking will appear on the map when selected.
POIs (Points of Interest)
POI (Point of Interest) is a dataset containing GPS coordinates that represents interesting and important locations in
navigation applications. The most popular POI categories are for example speed cams, accommodation locations, restaurants,
petrol stations, parking lots, Wi-Fi hotspots, attractions, etc. POI contains the name and address of the Point of Interest,
phone number in international format (that can be dialed from an appropriate navigation device), and of course geographic
coordinates: latitude and longitude, Way points can also be added as POI. POIs lying inside a Geo Zone can be exported to
Excel file.
Pegasus system allows user to insert POIs and also upload a suitable image of your own choice. To add a POI, follow the given
below steps:
A. Click the Zones button on the main GUI and a drop-down menu option will
appear.
B. Select POI and a POI dialog box will appear overlapping the Devices Panel.
C. Double click the point on the MAP where POI is required.
D. A dialog box will appear to save the POI, type in a suitable name and click Save
button.
E. Now it could be noticed that the POI which is just saved is now available in the list
of POIs.
F. POI Group can be also created by group tab.
Find Nearest Vehicles
Pegasus system allows you to find the closest vehicle(s) to an area or to another vehicle in a fleet. It is a very useful feature to
shave off re-routing time and increase efficiency by sending the closest available vehicle. By saving time on the road and
reducing distances travelled, this feature can help to reduce your fuel bill as well. In addition to location data, our s ystem
provides current status and direction of the vehicles found within the specified radius.
Pegasus system provides two ways to find the nearest vehicle; one is to select a vehicle. Second is to pinpoint a location or
provide latitude/ longitude.
To find the nearest vehicle, follow the given below steps:
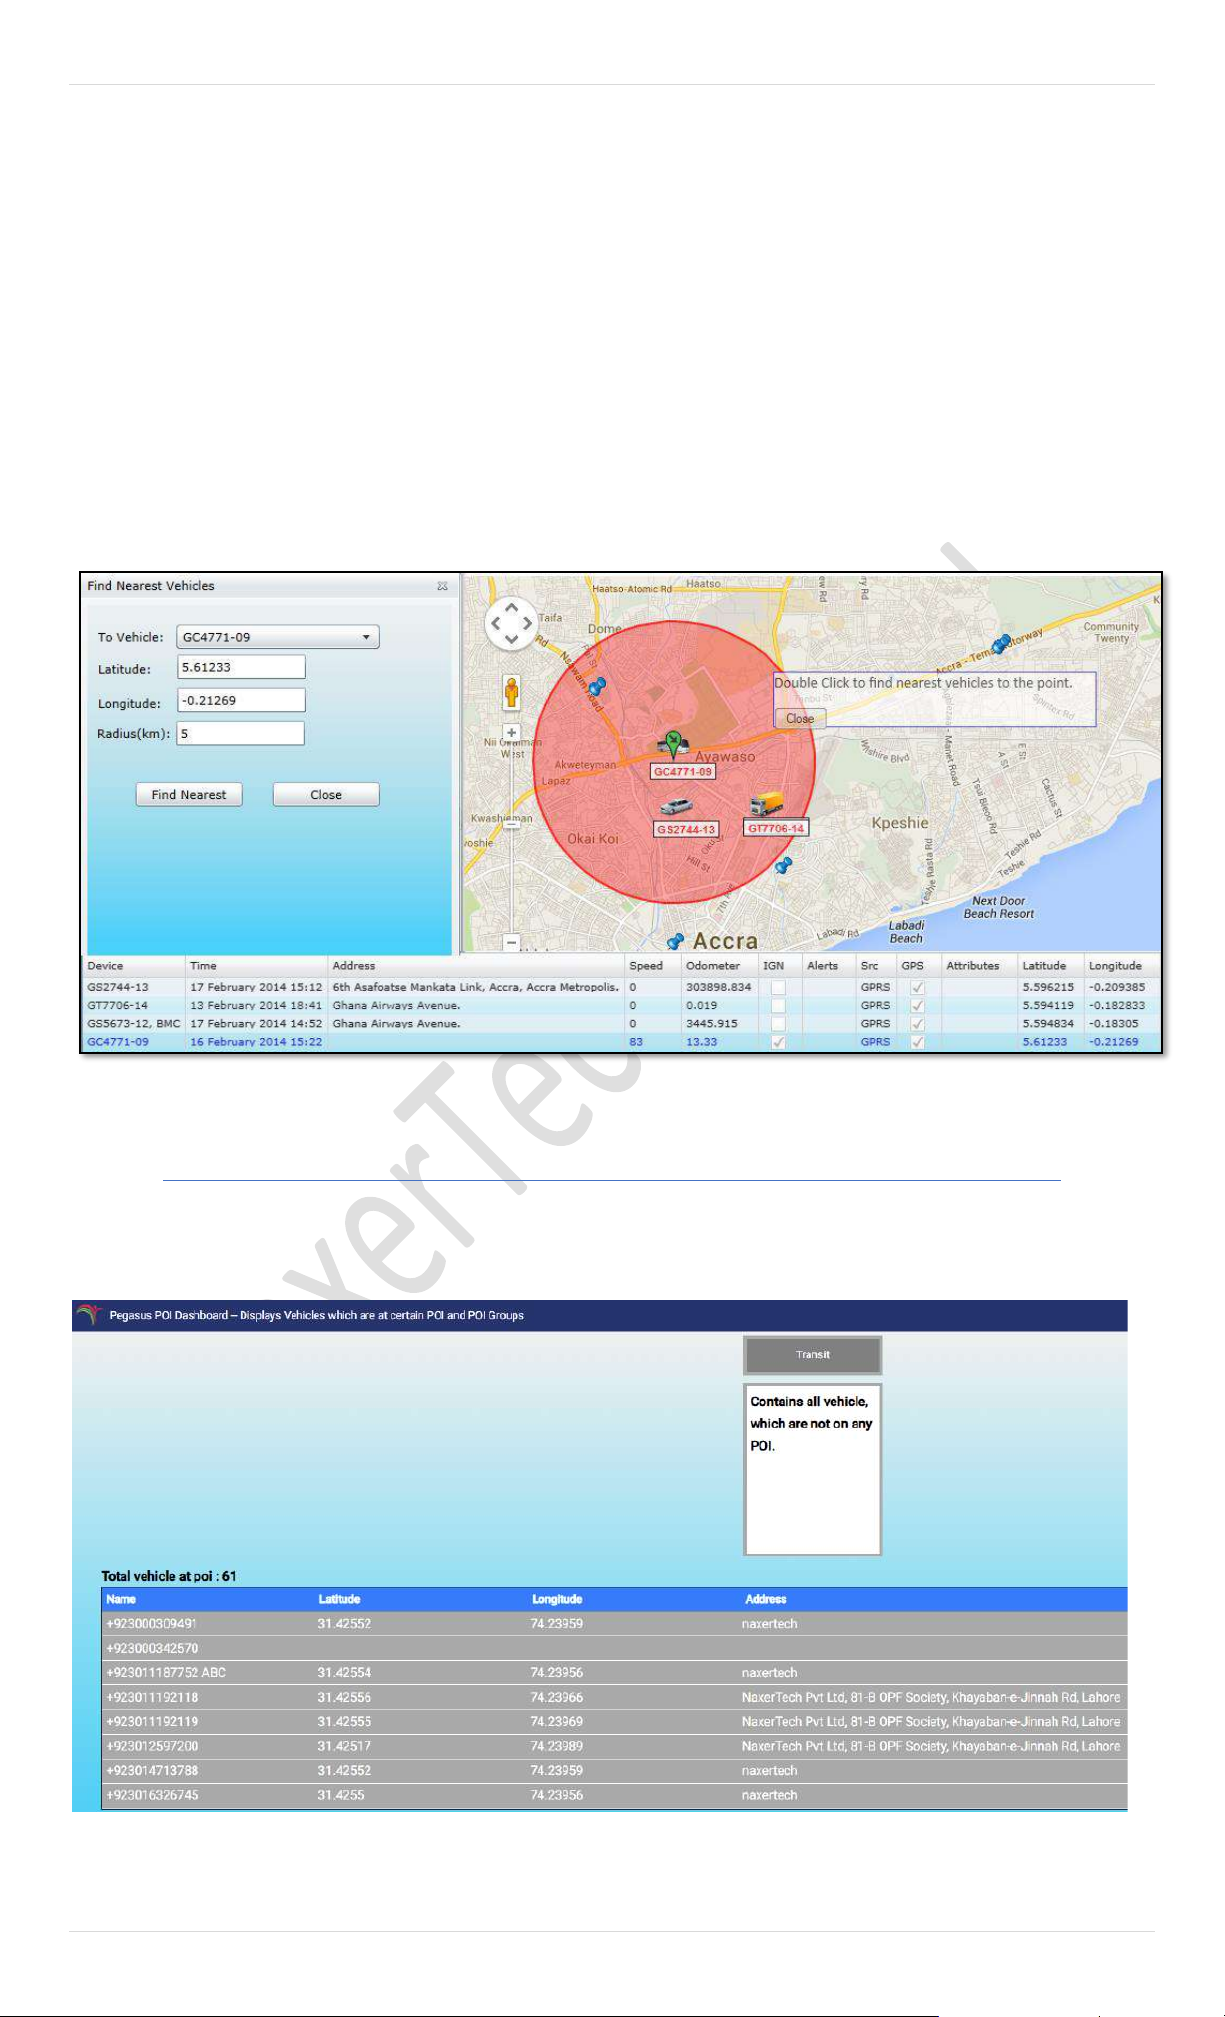
45 | P a g e
A. Click the Zones button on the main GUI and a drop-down menu option will appear.
B. Select Find Nearest Vehicles and a dialog box will appear overlapping the Devices Panel.
C. Select a vehicle from the drop-down list labelled as To Vehicle or input Latitude/ Longitude values or double click on the
MAP to pinpoint a location (if latitude/ longitude values are not available) around which nearest vehicle needed to be found.
D. Input values in the text box labeled as Radius (KM). Notice a radius would be drawn around the selected vehicle or a location
on the MAP in red color,
E. Now click the button Find Nearest and MAP will be updated with the vehicles that are found within the specified radius.
List of all the vehicles found will appear in the grid below updated with the last location, ignition status, current odometer and Latitude/
Longitude of the vehicle.
A sample image of vehicles found nearest to a vehicle is shown below:
POI Dashboard
Pegasus POI Dashboard displays vehicles which are at particular POI (Points of Interest) or POI Group. It displays
assets at POI as well as this dashboard has a separate section to show all vehicles which are not on any POI. POI is shown
in the table as below, containing Device Name, Latitude and Longitude of the Device and the actual Address.
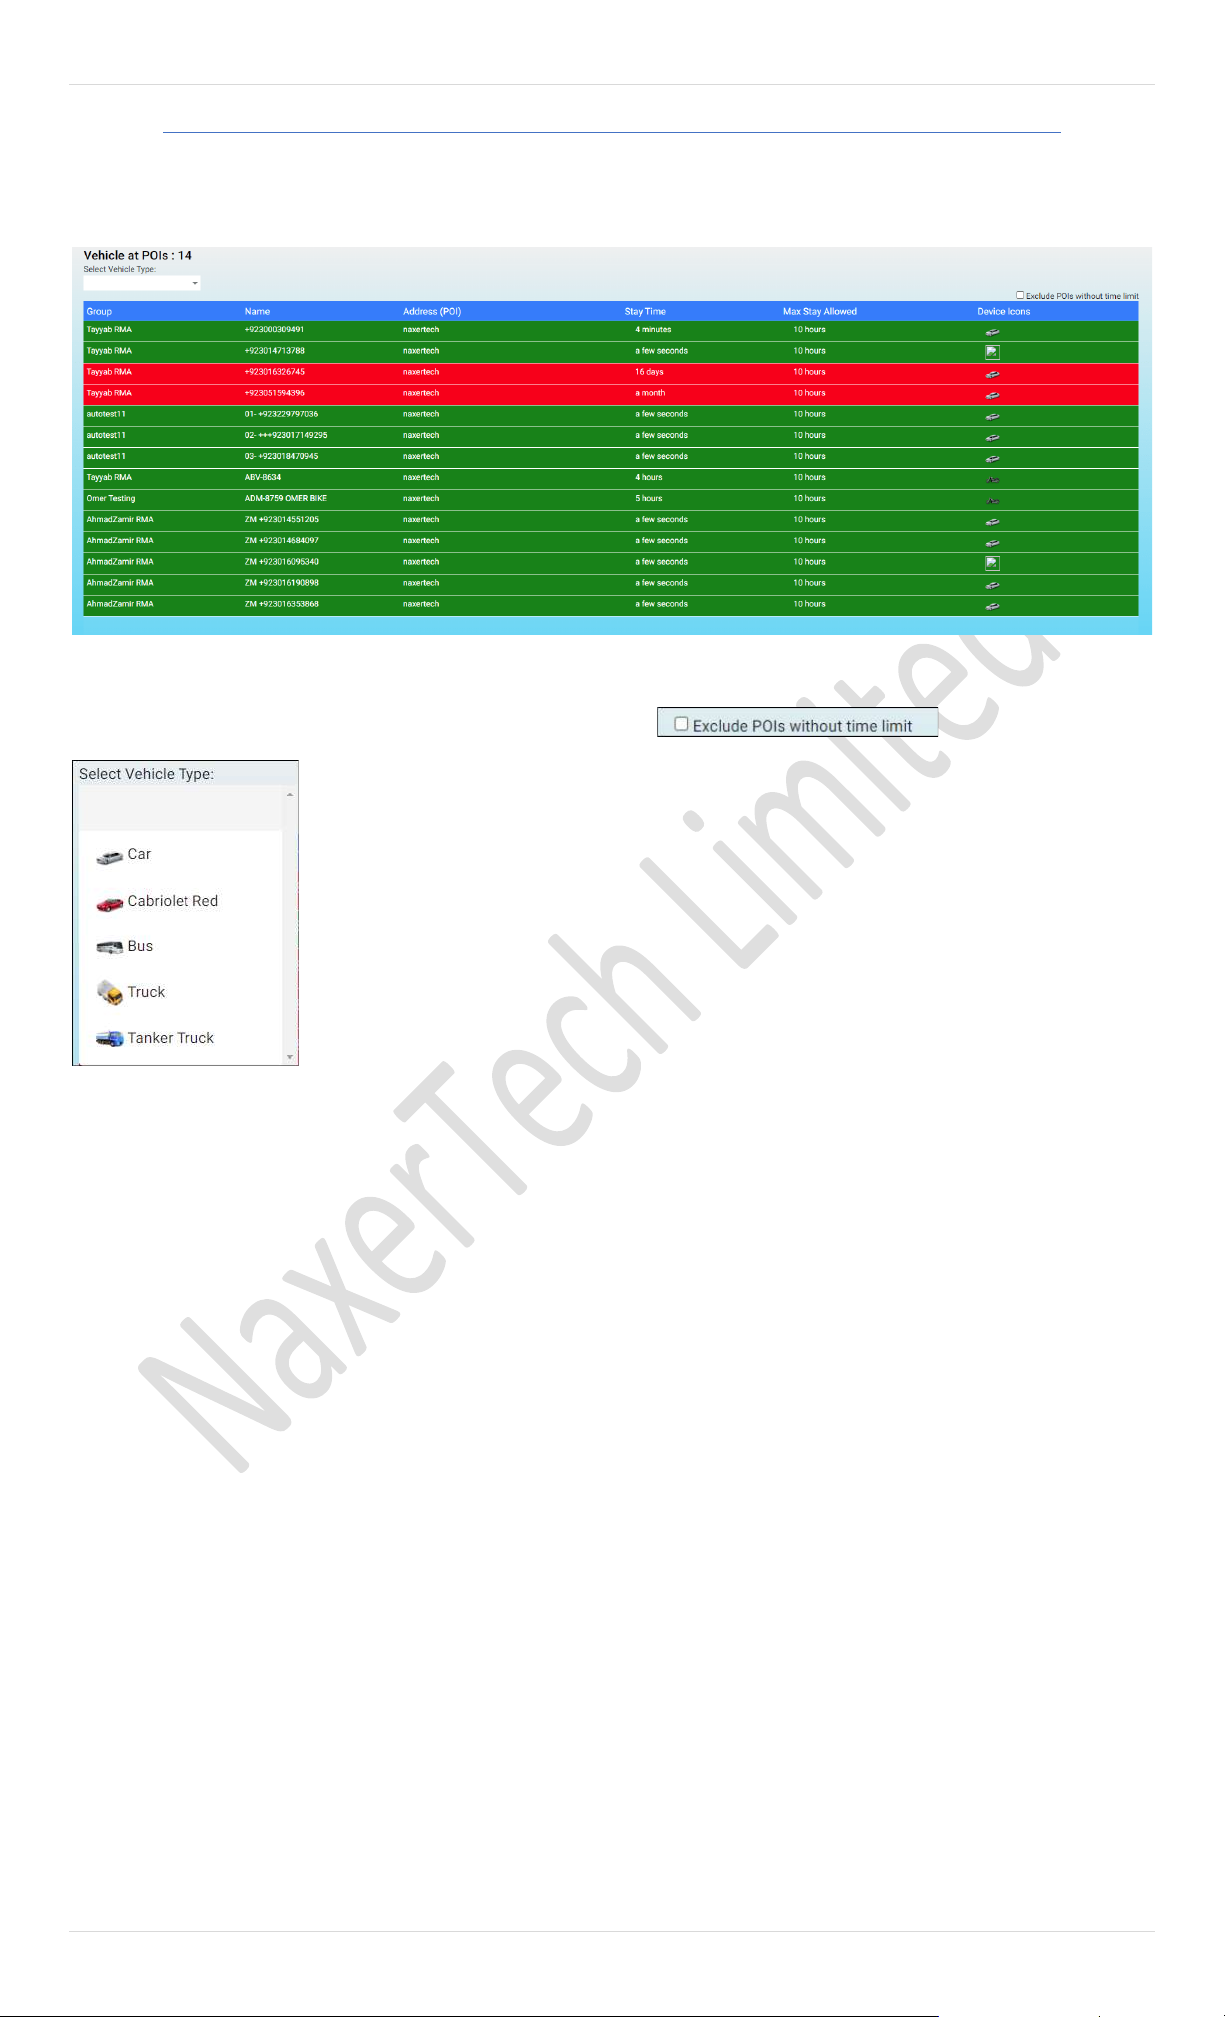
46 | P a g e
POI Overstay Dashboard
POI Overstay Dashboard shows the time taken by a Device/Group at certain POI. Total number of vehicles at POI are
shown as well as it shows Stay time and Maximum stay allowed at certain POI. If the Device/Group stays longer than the
Maximum Stay Allowed, the field will turn red indicating a warning.
There are filters as well which can be used to filter the type of Vehicle.
User can exclude those vehicles which are not given any time limit.
Select Vehicle type will give you the option to see vehicles of certain type in the table i.e., Car,
Bus, Truck, SUVs, Taxi, Train etc.
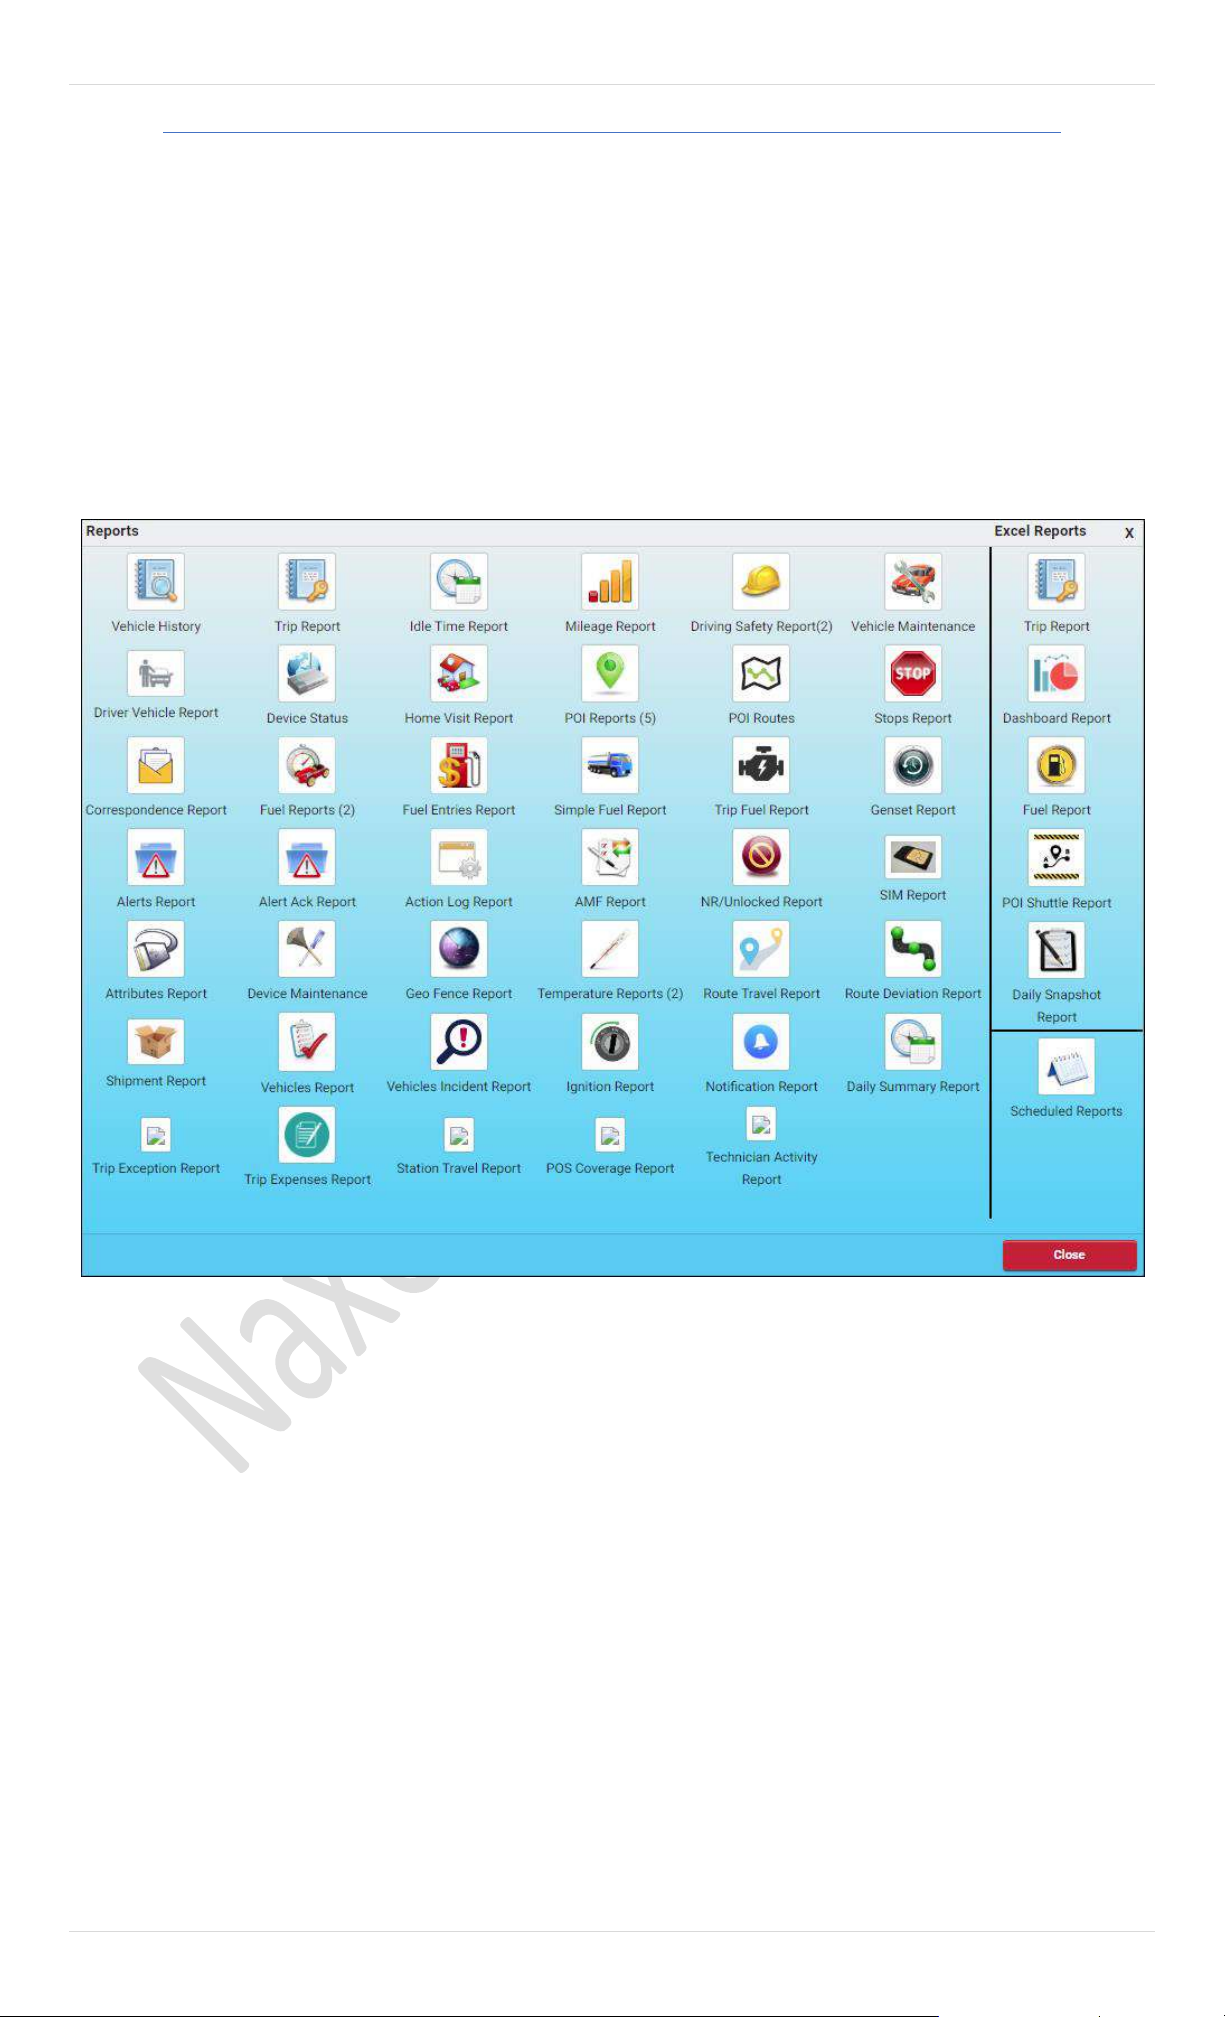
47 | P a g e
Reports
Report dialog box could be accessed by pressing the Report button on the main GUI and a Report dialog box will appear in the
middle of the Pegasus system as shown in the image:
Pegasus system offers a variety of report generation.
In numbers these are up to 36 types of reports which are increas ing by the needs of our valued customers in upcoming
versions of Pegasus.
Pegasus offers you to view reports in built in format (preferred) and also you can extract reports in Excel sheet. Here we wi ll
discuss them in detail.
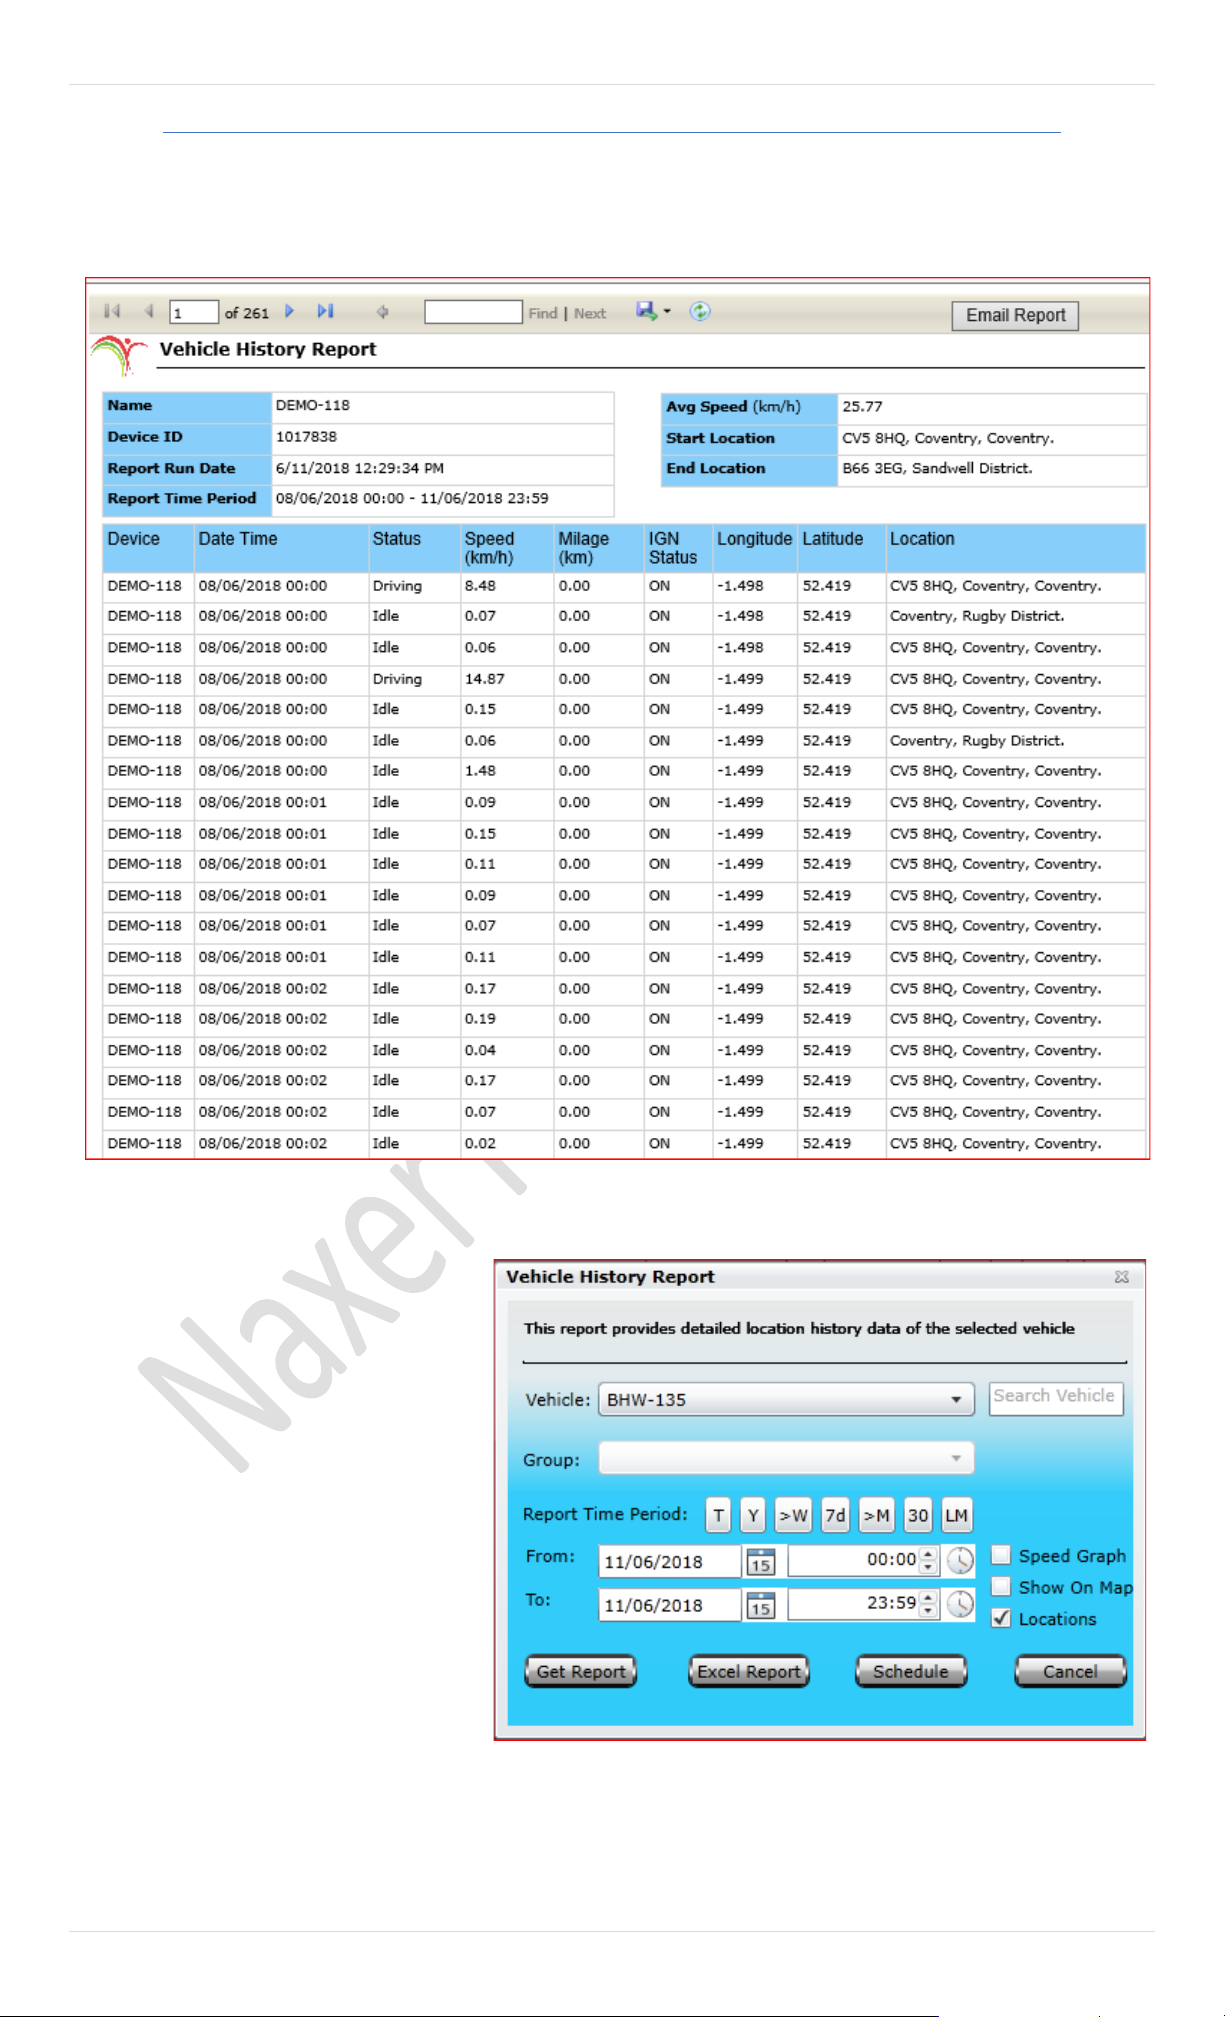
48 | P a g e
Vehicle History Report
Vehicle History Report is a one of the comprehensive reports, which provides history of the vehicle(s) up to last six months.
By Clicking this report will open up a dialog box (Image provided below) which contains a dropdown list labelled as Device, where
you can select a vehicle from the list available, specify Report Time Period which includes Date & Time range and click Get
Report.
Get Report: This will extract report with your
set parameters
Excel Report: You can extract report in Excel
Sheet. Different text colour will distinct moving
status with location.
Schedule: You can schedule report on Monthly,
weekly or daily basses. You can add multiple
email addresses for scheduled reporting.
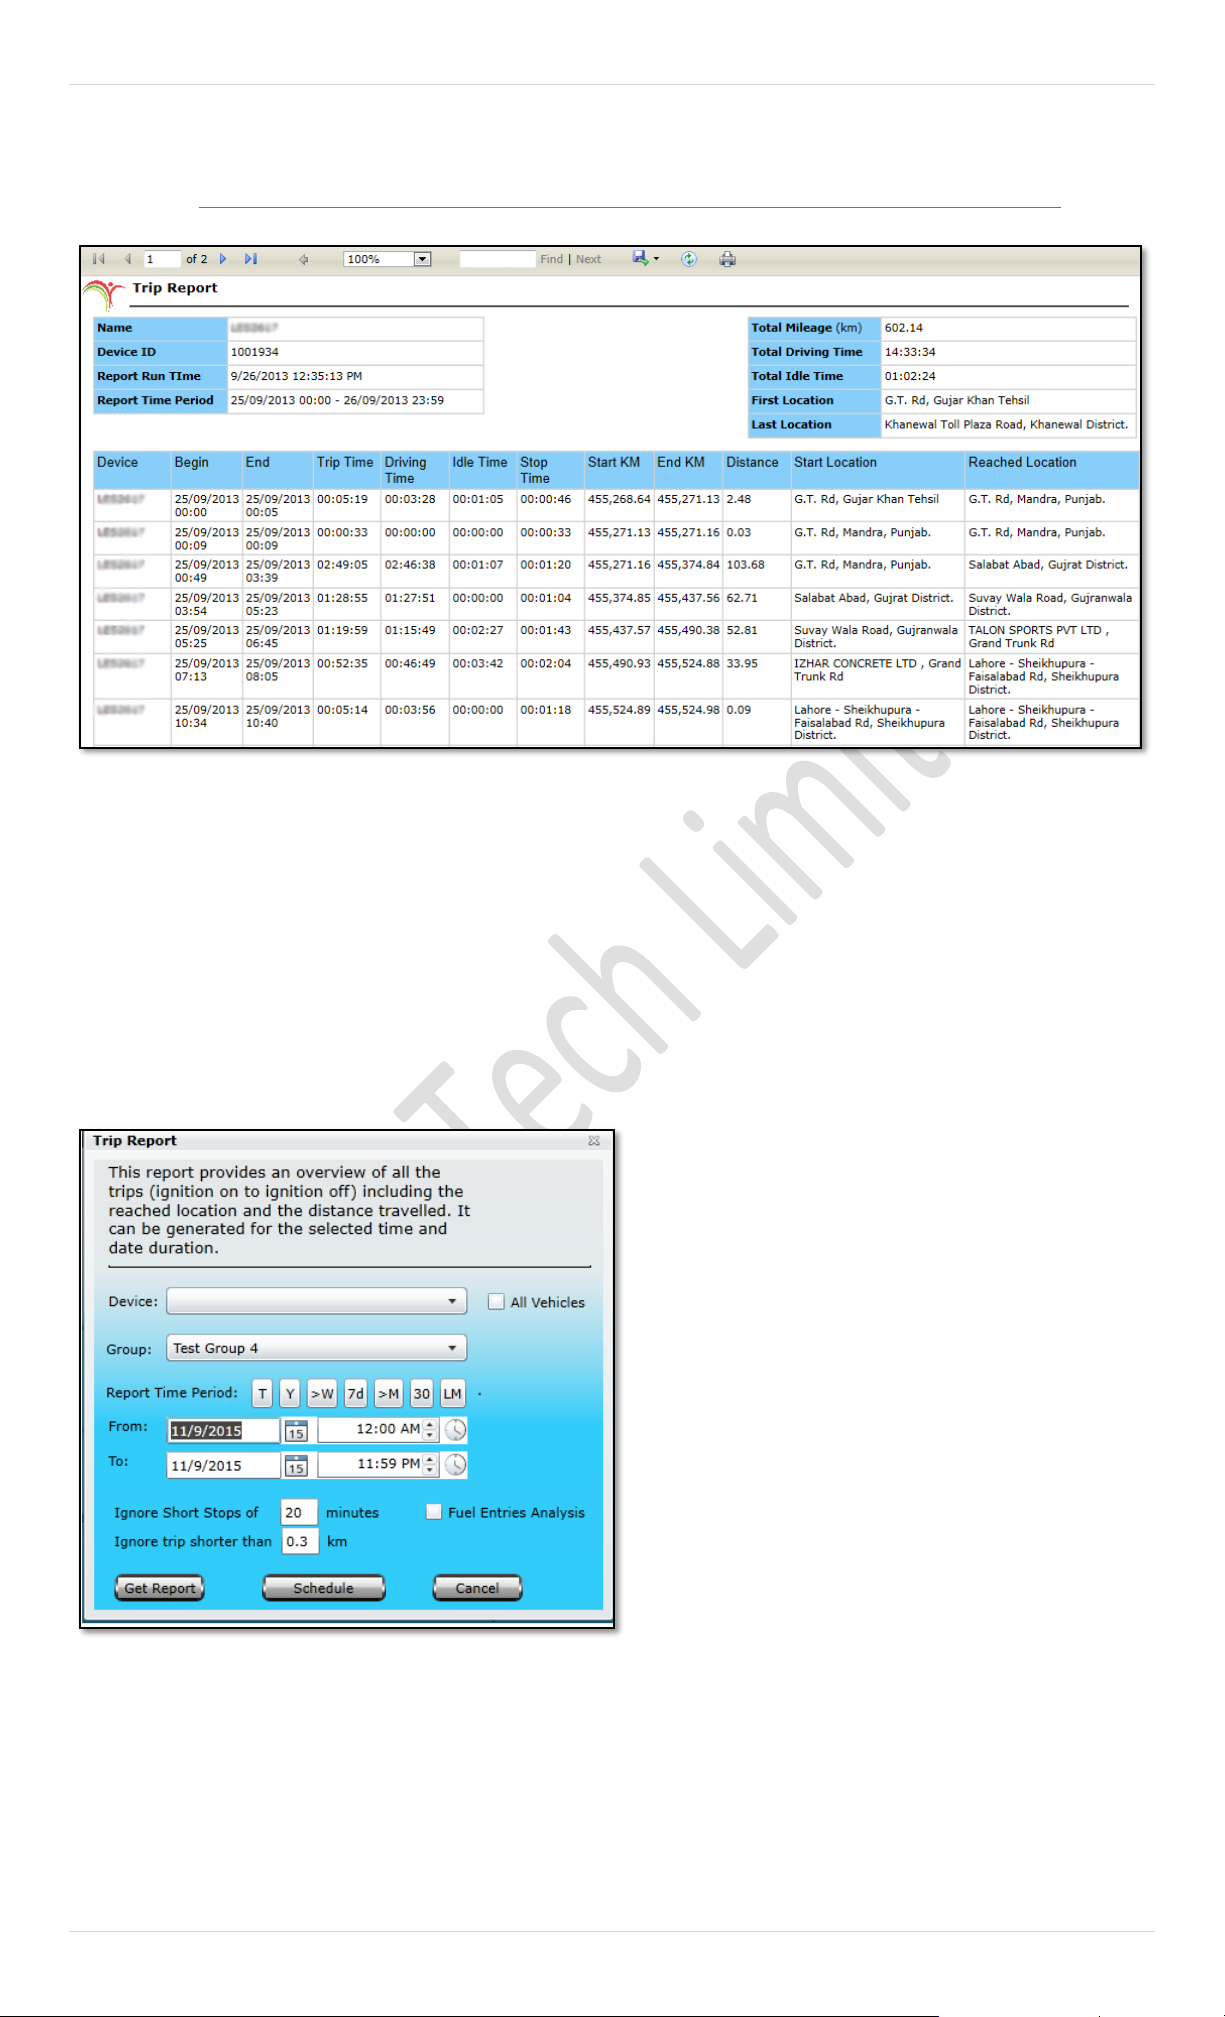
49 | P a g e
Trip Report
• Start – Date & Time of trip start Ignition ON
• End - Date & Time of trip end, Ignition OFF
• Trip Time - Total duration of the trip,
• Driving Time - Total duration in which vehicle
status was driving,
• Idle Time – vehicle was standing still but engine
was running/ ignition was ON,
• Stop Time: This represents time of time ignition
was OFF till it was ON again,
• Start KM: Odometer reading at trip start,
• End KM: Odometer reading at trip end,
• Distance: Distance travelled by the vehicle in a
trip,
• Start Location: Location from where the trip
started.
• Reached Location - Location where the trip
ended.
(Above image shows how a Trip Report looks like)
Trip Report provides you an overview of all the trips made
by the selected vehicle. Report could be generated for a
single vehicle or complete group. Clicking this report will
open up a dialog box (Image provided below) which contains a
dropdown list labeled as Device, where a single vehicle
could be selected from the list available to generate a
report for a specific vehicle. To get a report for the whole
group, select the desired group from the dropdown list
labeled as Group. Enable the check box labeled as All
Vehicles if report is required for all the vehicles that are
under different groups exist under a master account.
Specify Report Time Period which includes Date & Time
range, specify time in minutes to ignore short stops (by
default it is 20 minutes – this value could be increased or decreased as
per requirement) and click Get Report.
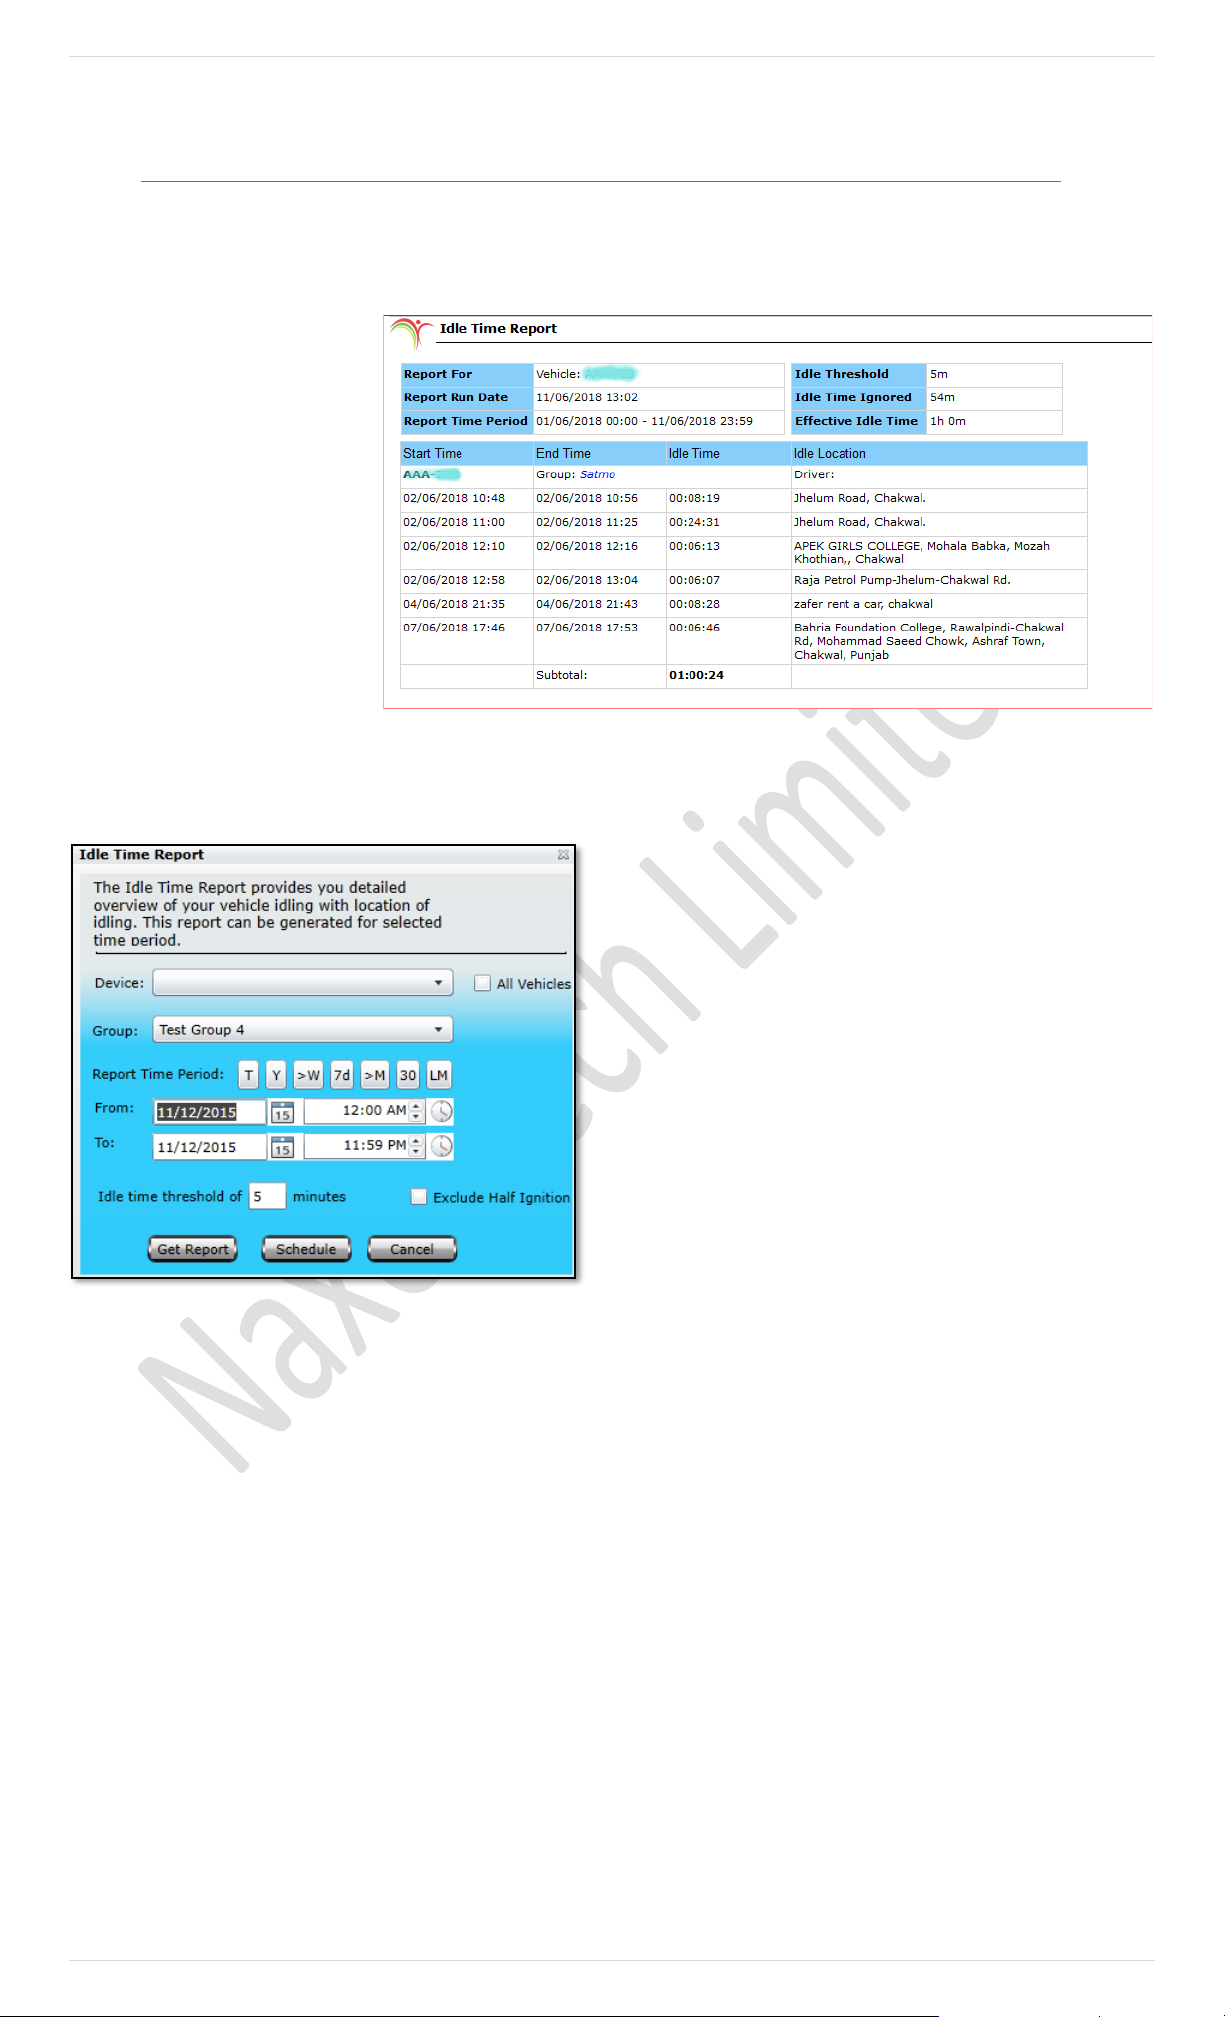
50 | P a g e
Idle Time Report
A report will be generated which will contain data extracted from the database, as per the Date & Time range specified, in a
new tab or window. Events that are reported in this report are as under along with Idle report picture.
Report Run Date
Date/ Time when report is being
generated
Report Time Period
Desired set time period will be shown for
the report.
Idle Threshold
(Less than 5min time will be ignored by
default)
Idle Time Ignored
(Calculated ignored time)
Effective Idle Time
(Calculated Idle Time)
Idle Time Report provides you detail report of vehicle idling.
Clicking this report will open up a dialog box (Image provided below)
which contains a dropdown list labelled as Device, where a
single vehicle could be selected from the list available to
generate a report for a specific vehicle. To get a report for the
whole group, select the desired group from the dropdown list
labelled as Group. Enable the check box labelled as All Vehicles
if report is required for all the vehicles that are under different
groups exist under a master account. Specify Report Time
Period which includes Date & Time range, specify idling threshold
in minutes and click Get Report.
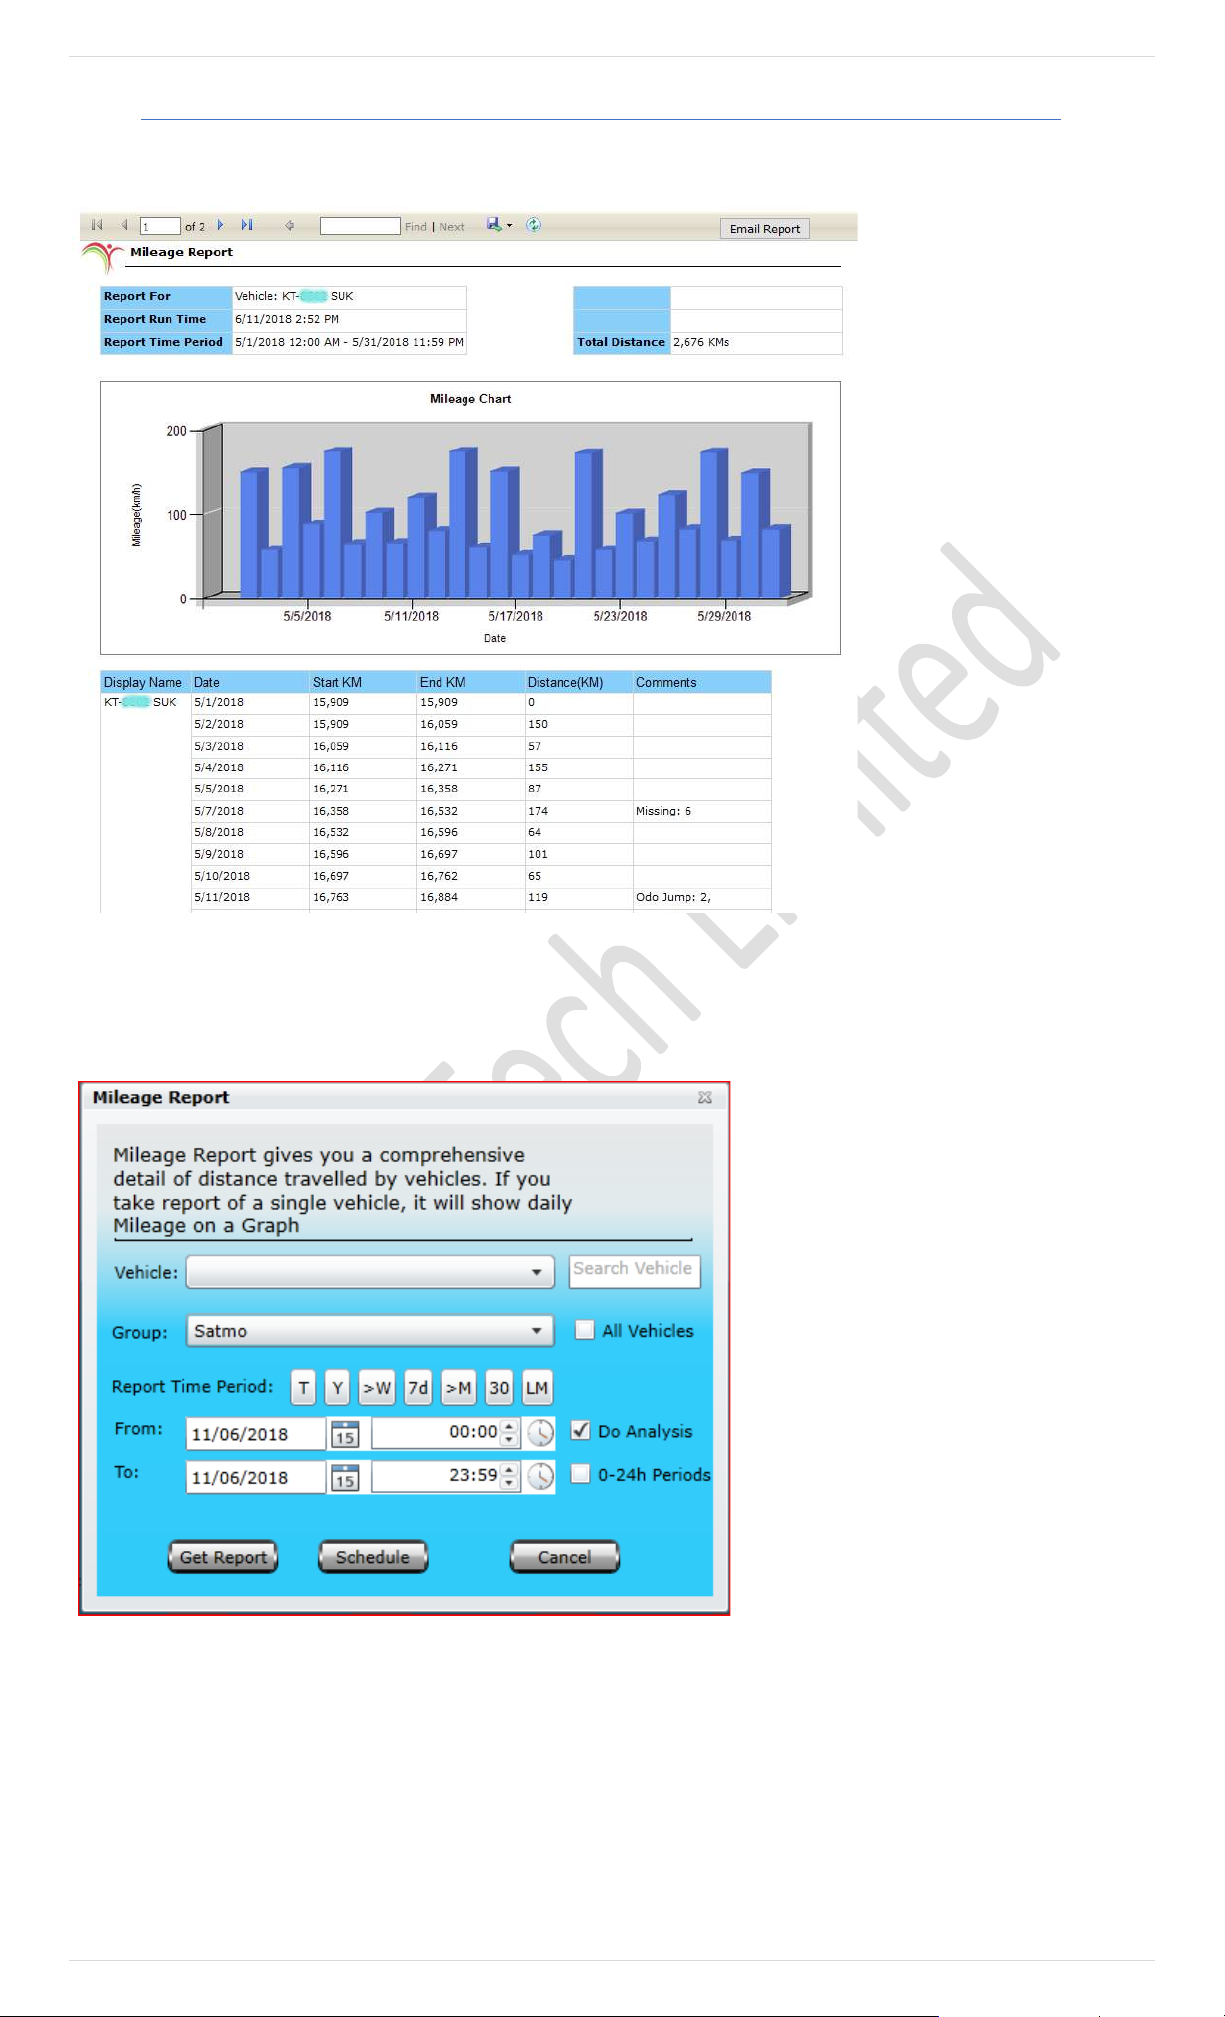
51 | P a g e
Mileage Report
A Mileage Report will extract data from the database, as per the Date & Time range specified, in a new tab or window. Events
that are reported in this report are as under,
Mileage Graph: Graph will be show
as above and you can email to concerns.
Device ID: Device Registration
number will be shown under this tab.
Date Time: will be shown along with
rest of information.
Start KM: Odometer start reading
i.e., when the vehicle starts,
End KM: Odometer end reading i.e.,
when the vehicle is stopped
Distance (KM): Total distance
covered in kilometers.
Comments: If you select DO
Analysis at the time of getting
reports, Pegasus System will do
analysis and show difference in
comments.
Mileage Report provides you the estimated fuel consumption per day and indicates fuel economy of the vehicle. By clicking
this report will open up a dialog box (Image provided below) which contains a dropdown list labeled as Device, where you can
select a vehicle from the list available, specify Report Time Period which includes Date & Time range and click Get Report.
Search Tab: If the vehicle list is bigger, you can
use search vehicle tab for instant search.
All Vehicle: You can select single vehicle or click
on all vehicle check box to select all under the
selected group.
Do Analysis: It will show differences in report
under comment section.
0-24 Periods: You can select report timings
dynamical according to worker’s shift patterns
Get Report: This will extract report with your
set parameters
Schedule: You can schedule report on Monthly,
weekly or daily basses. You can add multiple
email addresses for scheduled reporting
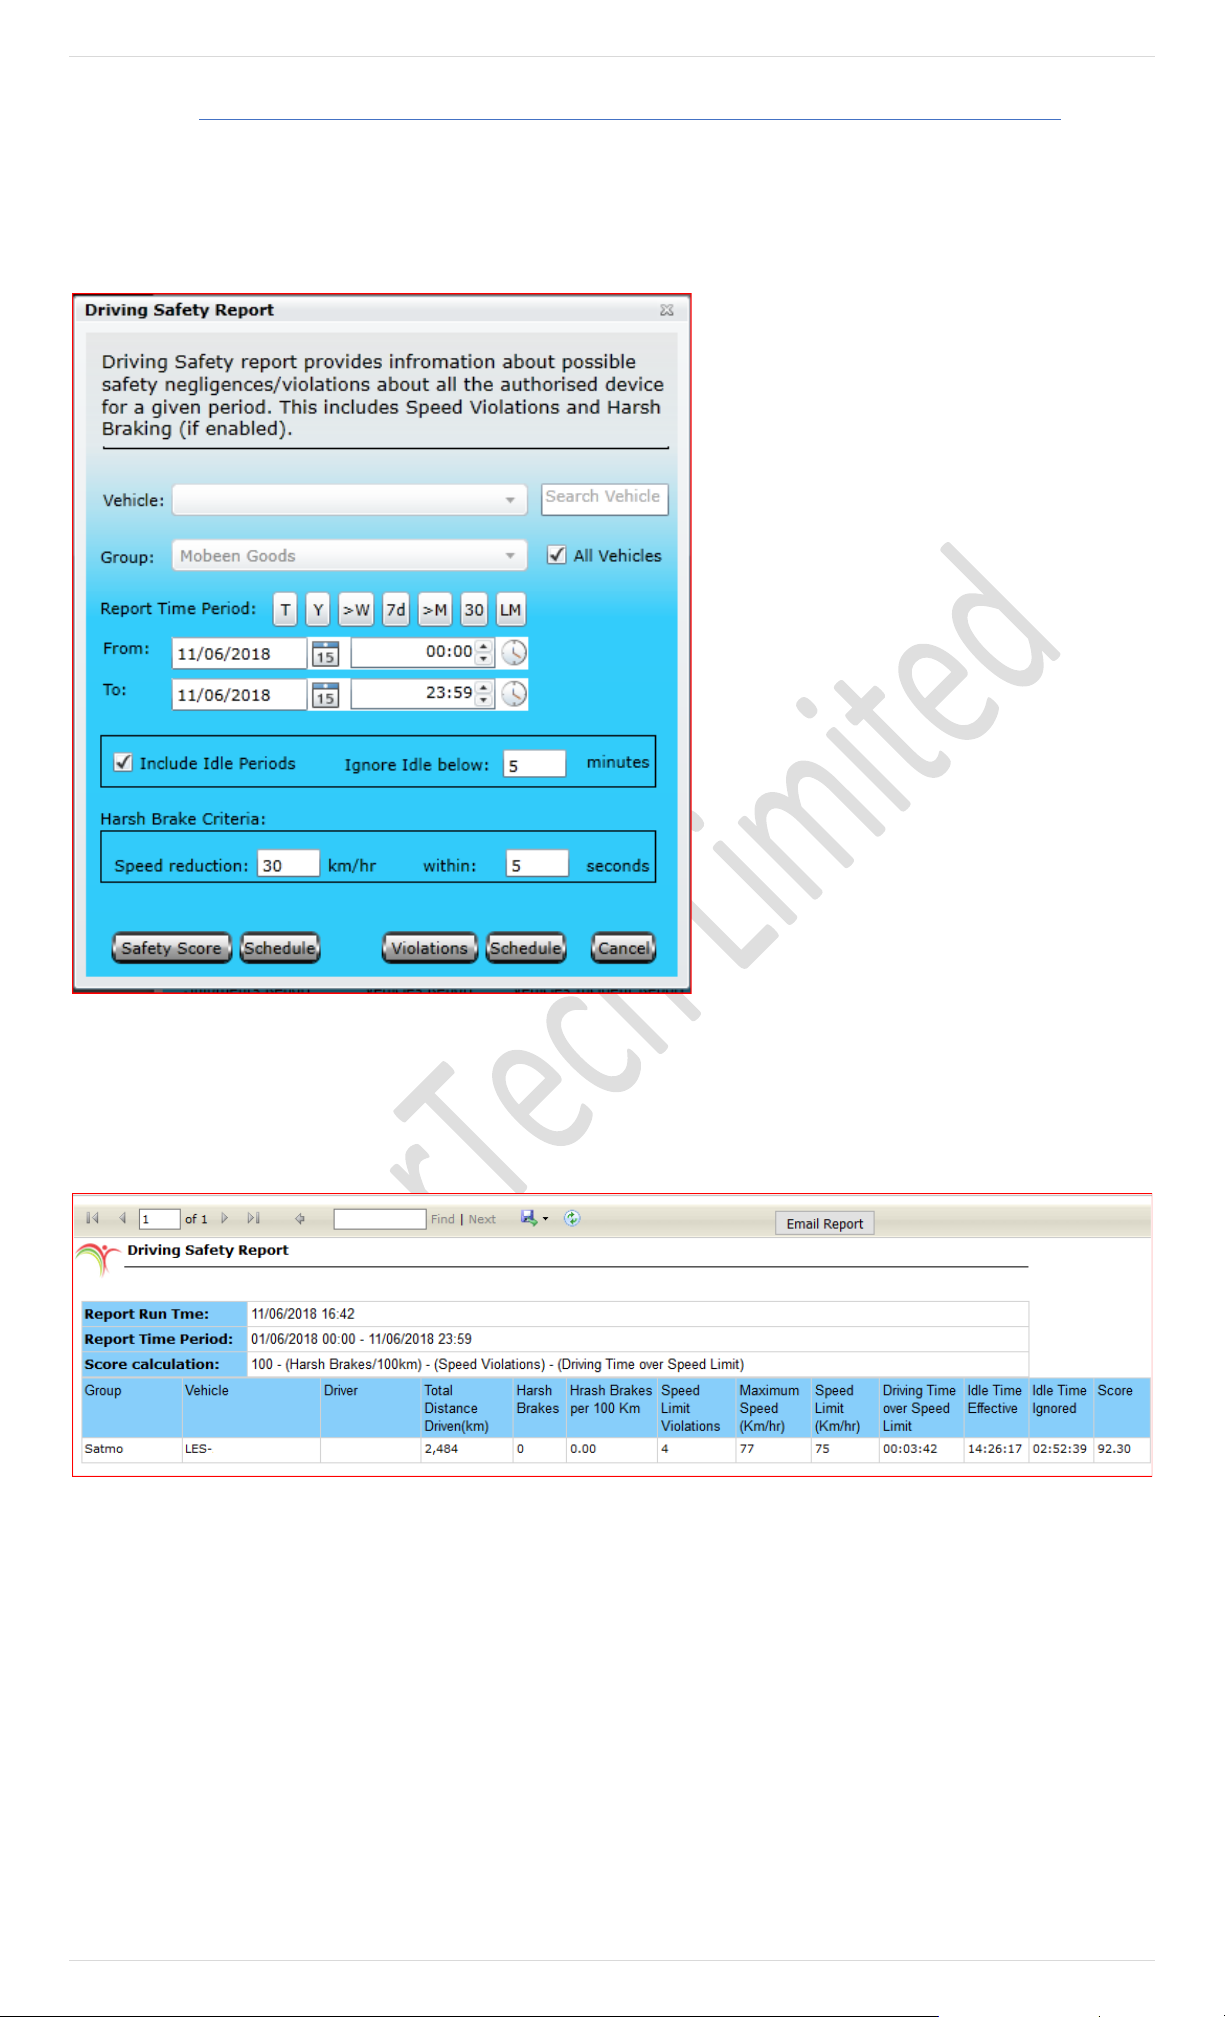
52 | P a g e
Driver Safety Report
Driver Safety Report provides an easy-to-read view of harsh braking, Speed Limit Violation with optional Vehicle Idling summary. It is
supporting targeted feedback and greater understanding of areas of risk.
Pegasus System provides two types of driver safety reports, 1
st
one is belonging to safety score and 2
nd
report is actually details of
violation which are summarized in 1
st
reports. Here we discussed both in details:
Search Tab: If the vehicle list is bigger, you can use
search vehicle tab for instant search.
All Vehicle: You can select single vehicle or click on
all vehicle check box to select all vehicle under the
selected group.
Reported Time Period: There is shortcut available
for selection of time period.
Include Idle Periods: This will include Idle mode of
vehicle with its default threshold time of 5 minute.
You can edit it according to your need.
Harsh Brake Criteria: If the speed reduces up to
30KM in 5 seconds, Pegasus will consider this as
harsh braking and will intimate this in reports.
These entries are editable according to customers
need.
Safety Score: For driving safety score report click on
Safety score
Violations: For violations report click on violations
button.
Note: There are two schedule buttons, one presents
scheduling for safety score which is near by safety score and 2
nd
for violations scheduling which is along with violations button.
Driving Safety Score:
As shown in the picture, safety score is consisting of these attributes with calculated safety score for selected period of
time.
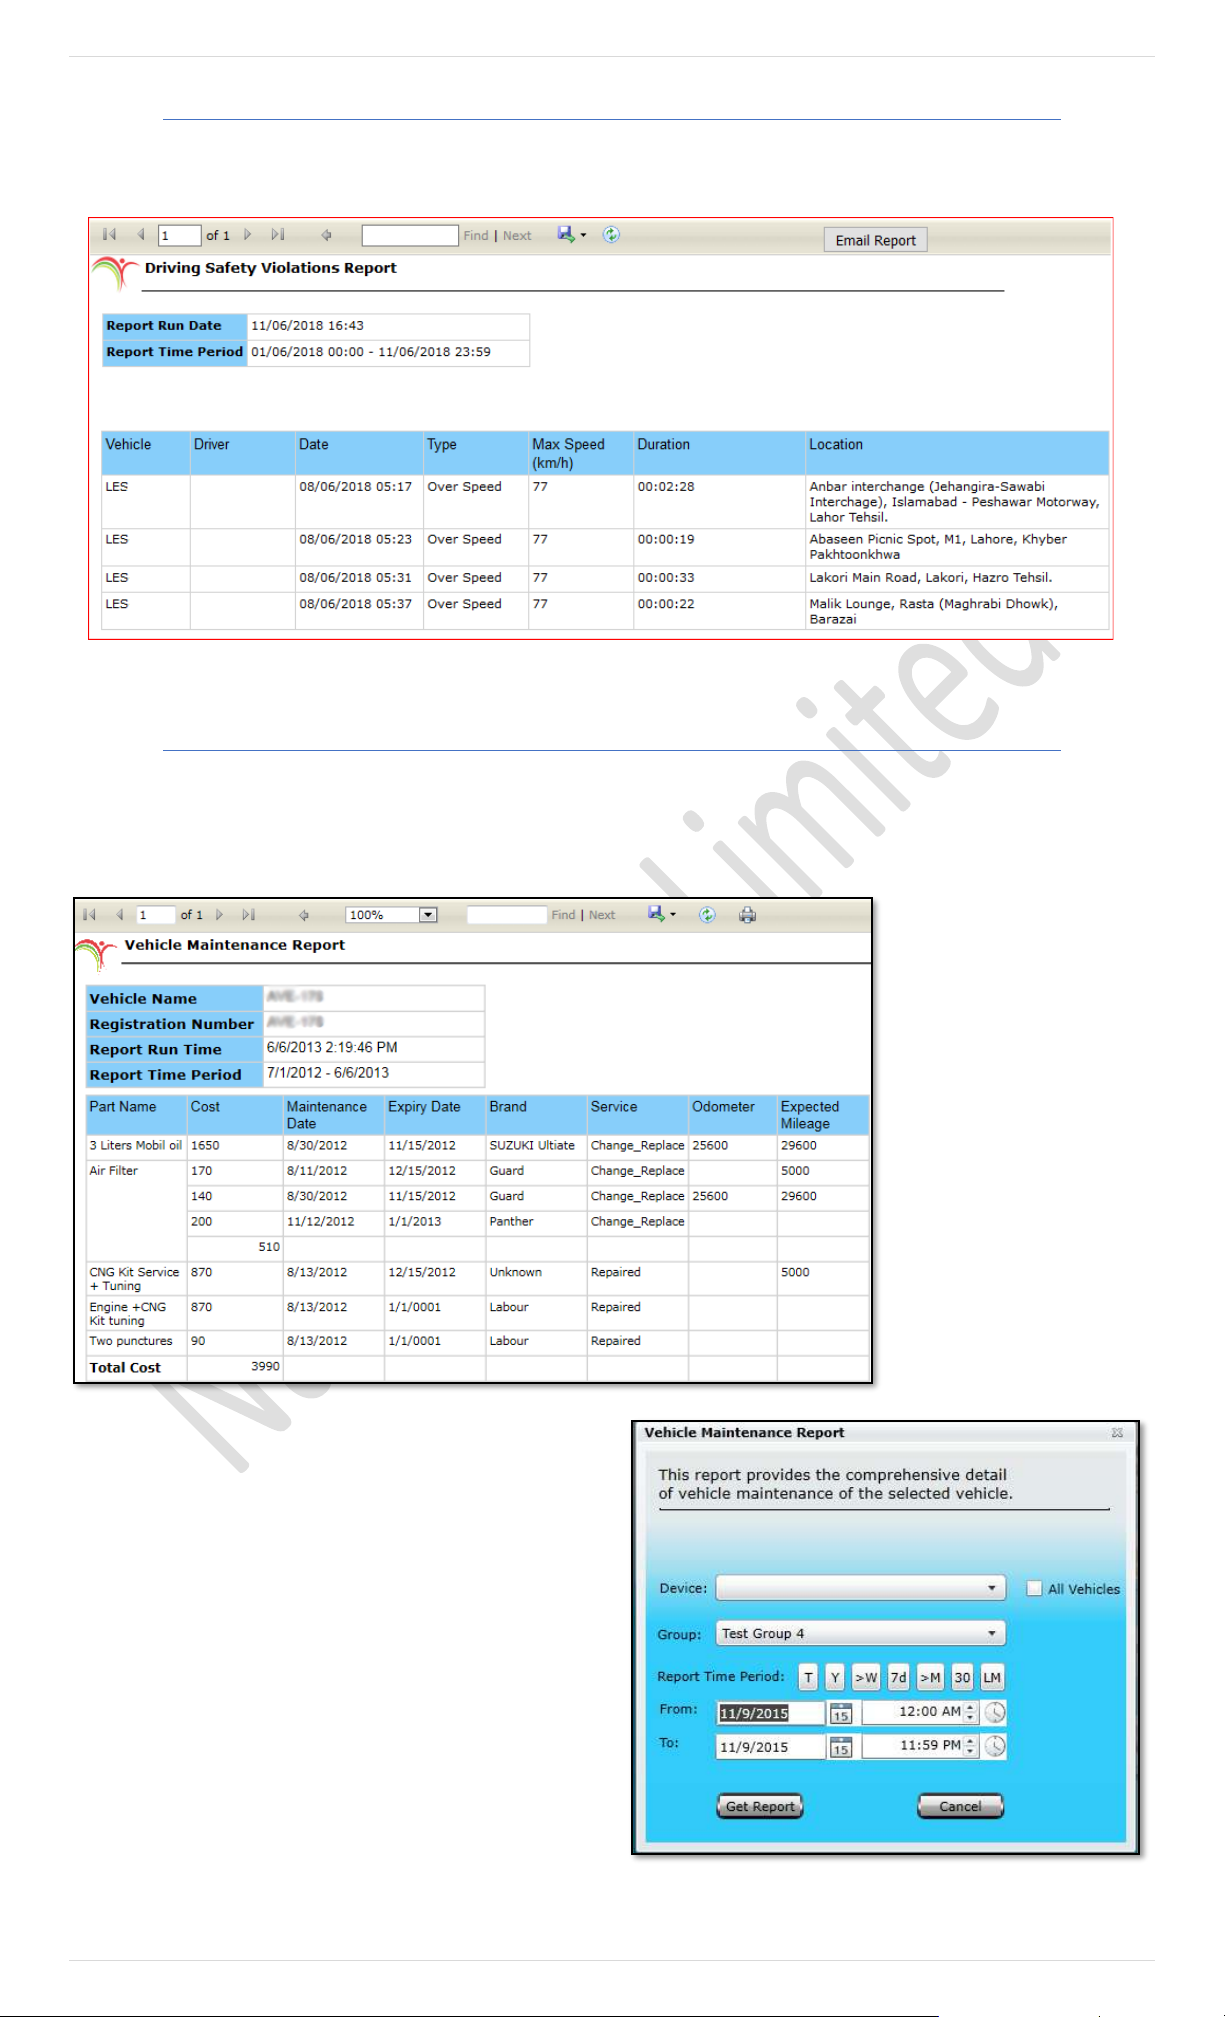
53 | P a g e
Driving Safety Violation Report
As Shown in picture there are 4 violations of vehicle # LES, now when we get violations report it will give details of all 4
violations with date, type of violation, violation duration with location.
Vehicle Maintenance Report
A report will be generated which will contain data extracted from the database, as per the Date & Time range specified, in a
new tab or window. Events that are reported in this report are Part Name, Cost –Price of that specific part. Maintenance Date - Date
when the part was changed or the date when the details of vehicles maintenance was entered into the Pegasus system under Vehi cle – Vehicle Maintenance,
Expiry Date–Displays expiry date specified under Vehicle – Vehicle Maintenance for a specific part, Brand – Name of the brand of the part change
specified under Vehicle – Vehicle
Maintenance, Service – Displays
the type of service selected under
Vehicle – Vehicle Maintenance,
Odometer – Displays the
odometer reading under Vehicle –
Vehicle Maintenance, Expected
Mileage – Displays the expected
mileage of the part change under
Vehicle – Vehicle Maintenance.
Above image shows how a
Vehicle Maintenance Report
looks like.
Vehicle Maintenance Report provides you detailed report of
maintenance of a vehicle and total maintenance cost. Clicking
this report will open up a dialog box (Image provided below) which
contains a dropdown list labelled as Vehicle, where you can
select a vehicle from the list available, specify Report Time
Period which includes Date & Time range and click Get Report.
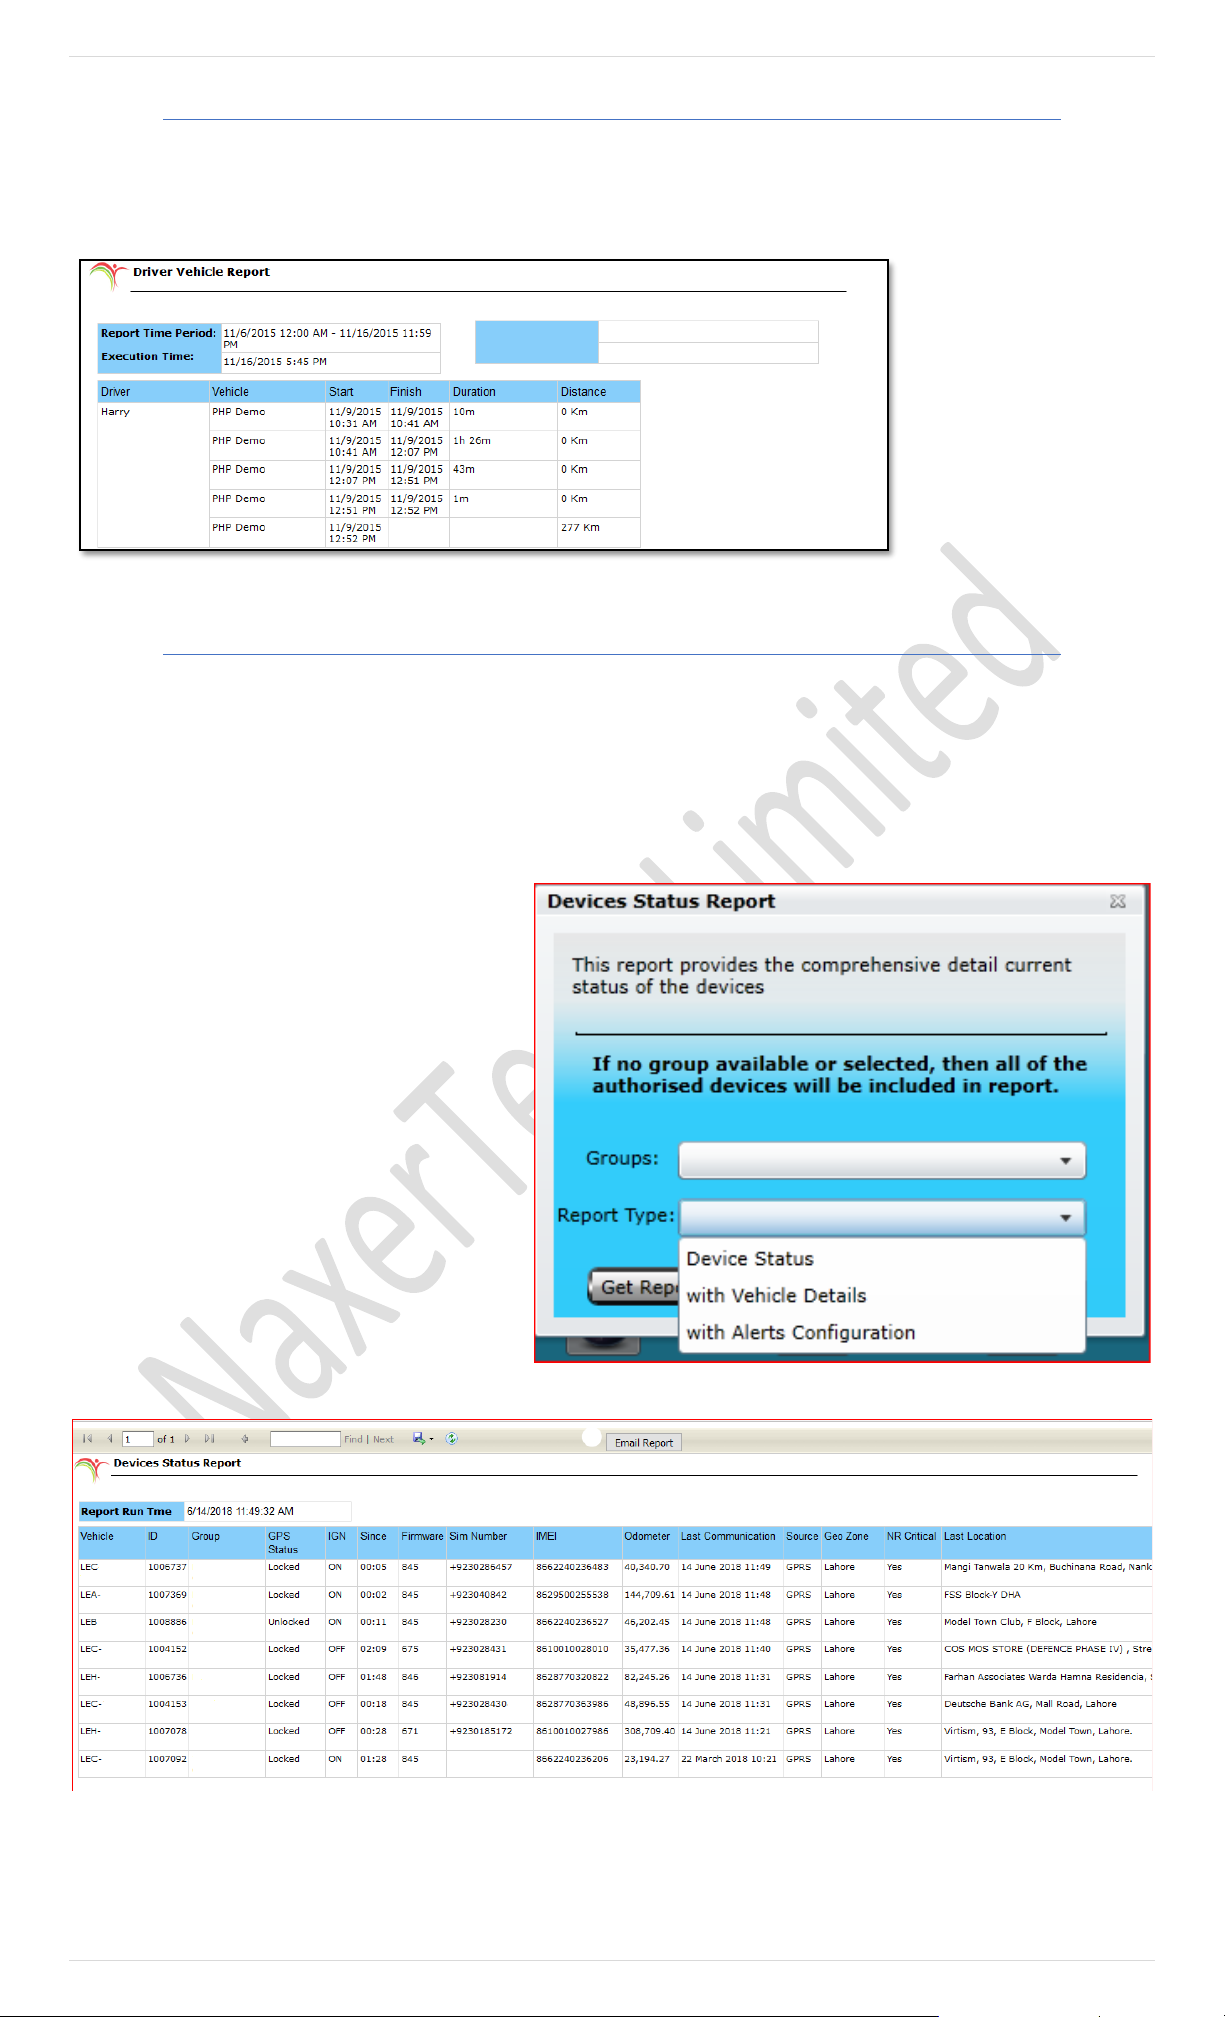
54 | P a g e
Driver Vehicle Report
Driver Vehicle Report – This report provides the details of vehicle trips related to Driver. Clicking this report will open up a
dialog box (Image provided below) which contains a dropdown list labelled as Device, where a single vehicle could be selected from
the list available to generate a report for a specific vehicle. To get a report for the w hole group, select the desired group from
the dropdown list labelled
as Group. Enable the check
box labelled as All Vehicles
if report is required for all
the vehicles that are under
different groups exist
under a master account.
Specify Report Time Period
which includes Date &
Time range and click Get
Report.
Devices Status Report
Devices Status Report provides you a comprehensive report about the status of all the devices added under a Master account or a
Group. By clicking Get Report button will generate a Devices Status Report containing data extracted from the database in a new tab
or window. Events that are reported in this report are Device Name, Device ID, current GPS Status – Locked or Unlocked, current Ignition
Status – On or Off, IMEI – Firmware version of the firmware installed in the device, SIM Number - number of the SIM currently available in the device,
Odometer - current reading of the Odometer, Last Communication - Date & Time when the device last communicated with the Pegasus system, Source –
Type of source through which device communicated with the Pegasus system i.e. SMS or GPRS and Last Location - Location of the device as per the last data packet
sent by the device to Pegasus system. Above image shows how a Devices Status Report looks like.
By Clicking this report will open up a dialog box
(Image provided below) with a dropdown list
labelled as Groups where you can select a specific
group but if no selection has been made then the
generated report will have the status of all the devices
that exist under a Master account or a group.
There are three types of reports can be extract related
to device status, including device status, device status
with vehicle details and device status with alerts
configuration.
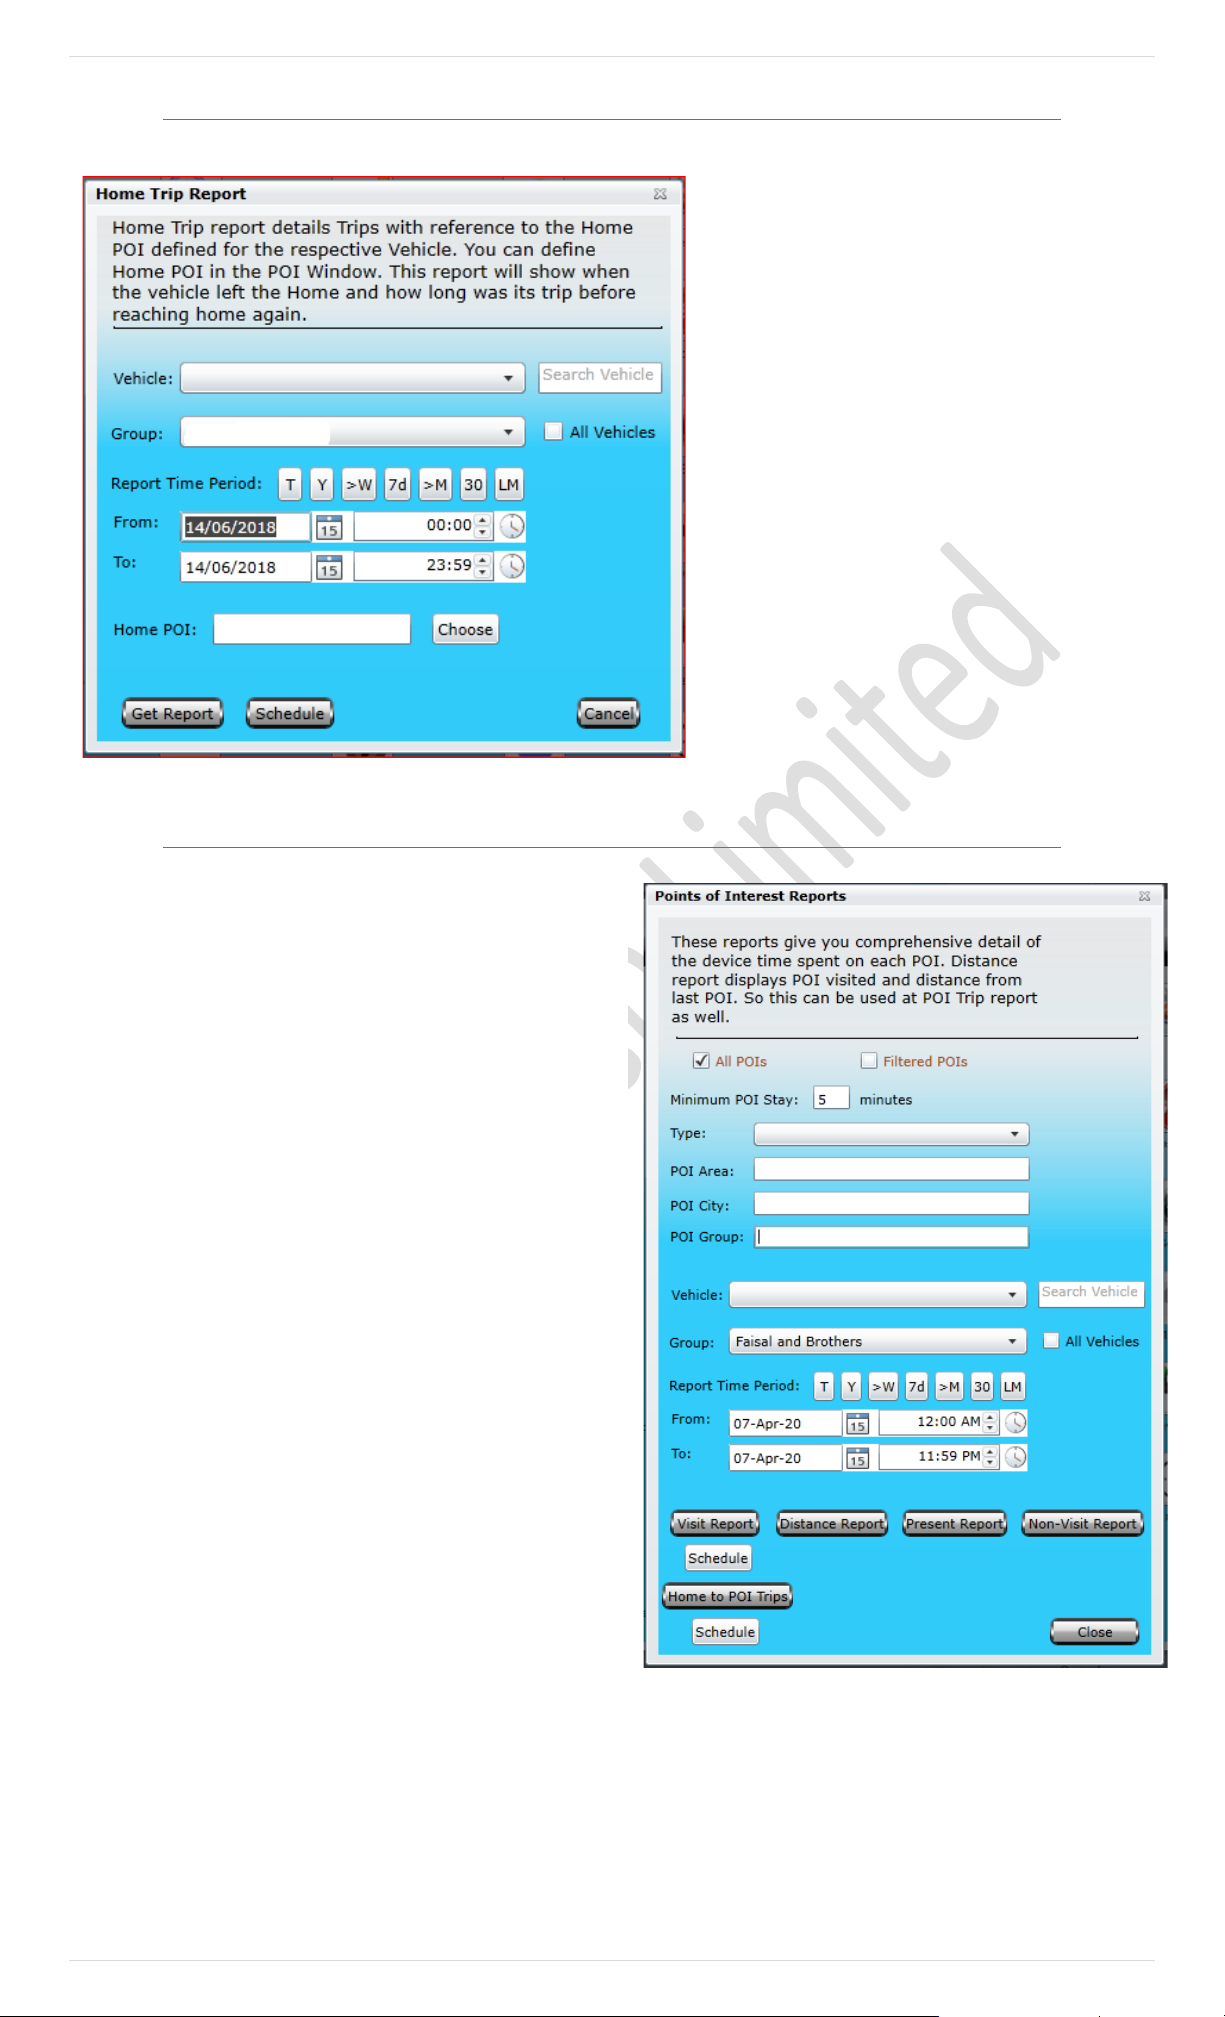
55 | P a g e
Home Visit Report
This report will show when vehicle left the Home and
how long was its trip before reaching home again.
Home Visit Report Details Trips with reference to the
Home POI Defined for the respective Vehicle, Home
POI can be assigned to Device in Device Properties.
Clicking this report will open up a dialog box (Image
provided below) which contains a dropdown list
labeled as Device, where a single vehicle could be
selected from the list available to generate a report
for a specific vehicle. To get a report for the whole
group, select the desired group from the dropdown
list labeled as Group. Enable the check box labeled
as All Vehicles if report is required for all the vehicles
that are under different groups exist under a master
account. Specify Report Time Period which includes
Date & Time range and click Get Report.
POI (Points of Interest) Report
The Points of Interest (POI) feature lets you easily create
named sites for places you regularly visit. Once you have
created POI, you can extract report on which of your vehicles
entered and left that site during a particular date and time
range, Type of POI, POI Area, POI City wise, POI Group (for
number POI at the same time)
By default, the check box labelled as All POI will be
enabled. Disable the check box if report is required to be
generated for specific POI(s). A list of all the POIs created
under a Master account will appear by disabling the
checkbox (All POI) where specific POI(s) could be selected
Enter vehicle name or search it in search box of vehicle, you
can select a group with its all vehicle or can only strict with
single one.
Pegasus is offering five types of different POI reports and
some of them can be scheduled for daily, weekly or monthly
via email in Ms excel or PDF formats.
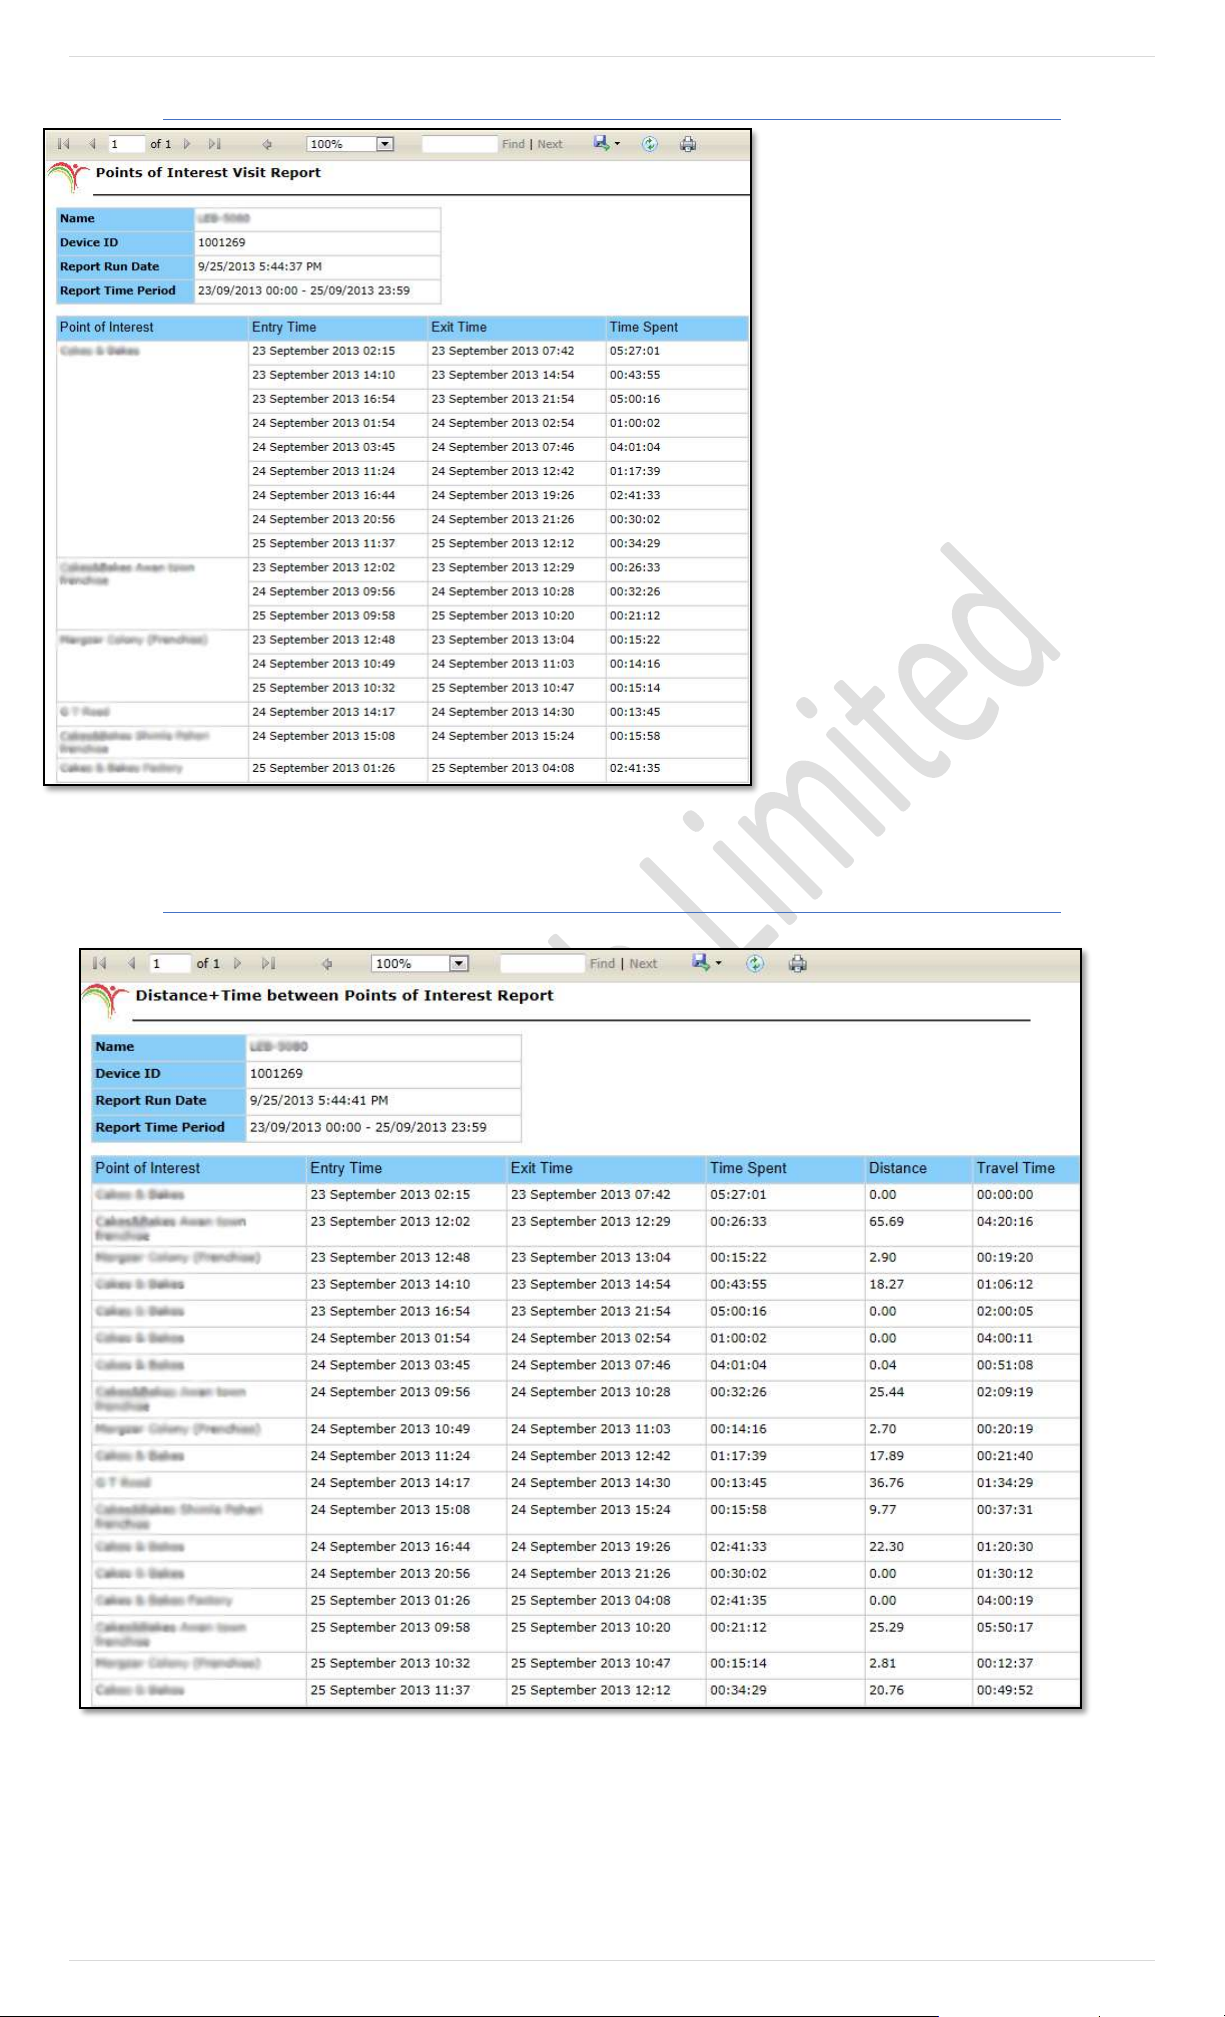
56 | P a g e
POI Report – Visits Report:
Provides you a detailed report of visits of a
vehicle to a specific or all POI added under
a Master account. A report will be
generated containing data extracted from
the database as per the Date & Time Range
specified in a new tab or window. Events
that are reported in this report are POI
Name, Date & Time of Entry of the vehicle
to a specific POI, Date & Time of the
vehicle at which it exists from a specific POI
and total Time spent at each POI on each
visit. Image shows how POI Report - Visits
Report looks like.
POI Report – Distance Report
POI Report – Distance Report provides you a detailed report of distance travelled by a vehicle from one POI to other POI or all
POIs added under a Master account. Clicking this report will open up a dialog box (complete details about the dialog box are given above
under POI Report) and click Distance Report.
A report will be generated containing data extracted from the database as per the Date & Time Range specified in a new tab
or window. Events that are reported in this report are POI Name, Date & Time of Entry of the vehicle to a specific POI, Date &
Time of the exit from a specific POI, total Time spent at each POI on each visit, Distance travelled from one POI to other - in
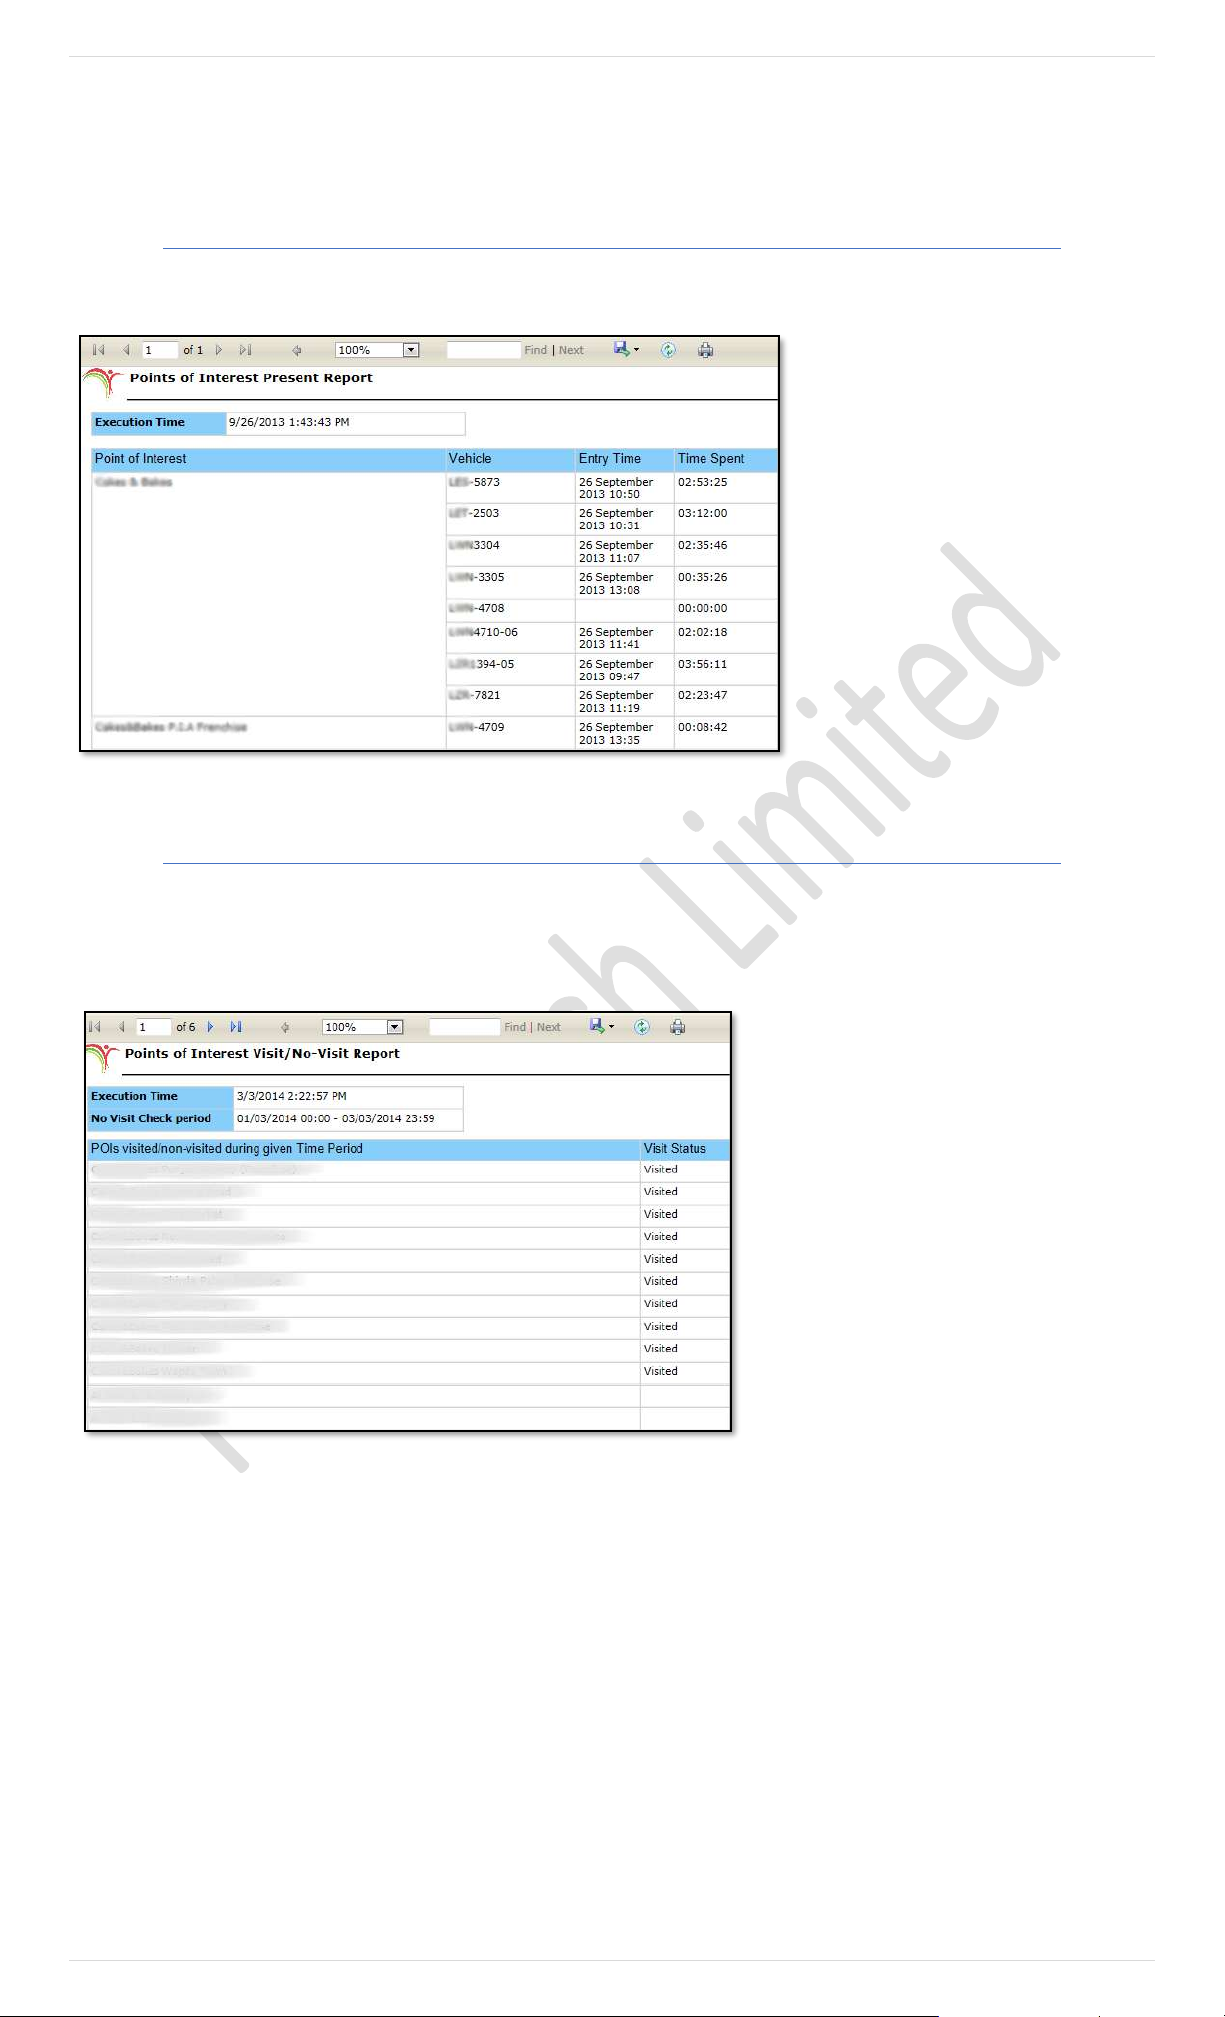
57 | P a g e
kilometres and Total time spent on Travel from one POI to other. Above image shows how a POI Report - Distance Report looks
like.
POI Report – Present Report
POI Report – Present Report provides you a detailed report of those vehicles that are currently parked/ available in any of the
POI that exist under a Master account or Group. Clicking this report will open up a dialog box (complete details about the dialog box
are given above under POI Report) and click Present Report.
Events that are reported in this report are
POI Name, Device Name, Date & Time of
Entry of the vehicle to a specific POI and
Time Spent – Total duration of the vehicle
parked at POI till the report run time/
current time. Image shows how a POI
Report - Distance Report looks like.
Note: In this report selection of vehicle and
date/ time have no effect. It will only those report
POI(s) and Vehicles which are currently parked at
any of the POI (All or Selected from the list).
POI Report Non-Visit Report
This Report provides you a detailed report of those POIs which have not been visited by any vehicle in the group in specified
date/ time. Clicking this report will open up a dialog box (complete details about the dialog box are given above under POI Report) and click
Non-Visit Report.
A report will be generated containing data
extracted from the database as per the Date &
Time Range specified in a new tab or window.
Events that are reported in this report are POI
Name and Visit Status. POIS that are visited by the
vehicles of the group will have the Visit Status as
Visited whereas a blank Visit Status indicates not
visited. Above image shows how POI Report Non-
Visit Report looks like.
Note: In this report selection of vehicle and date/ time
have no effect. It will only those report POI(s) and
Vehicles which are currently parked at any of the POI (All
or Selected from the list).
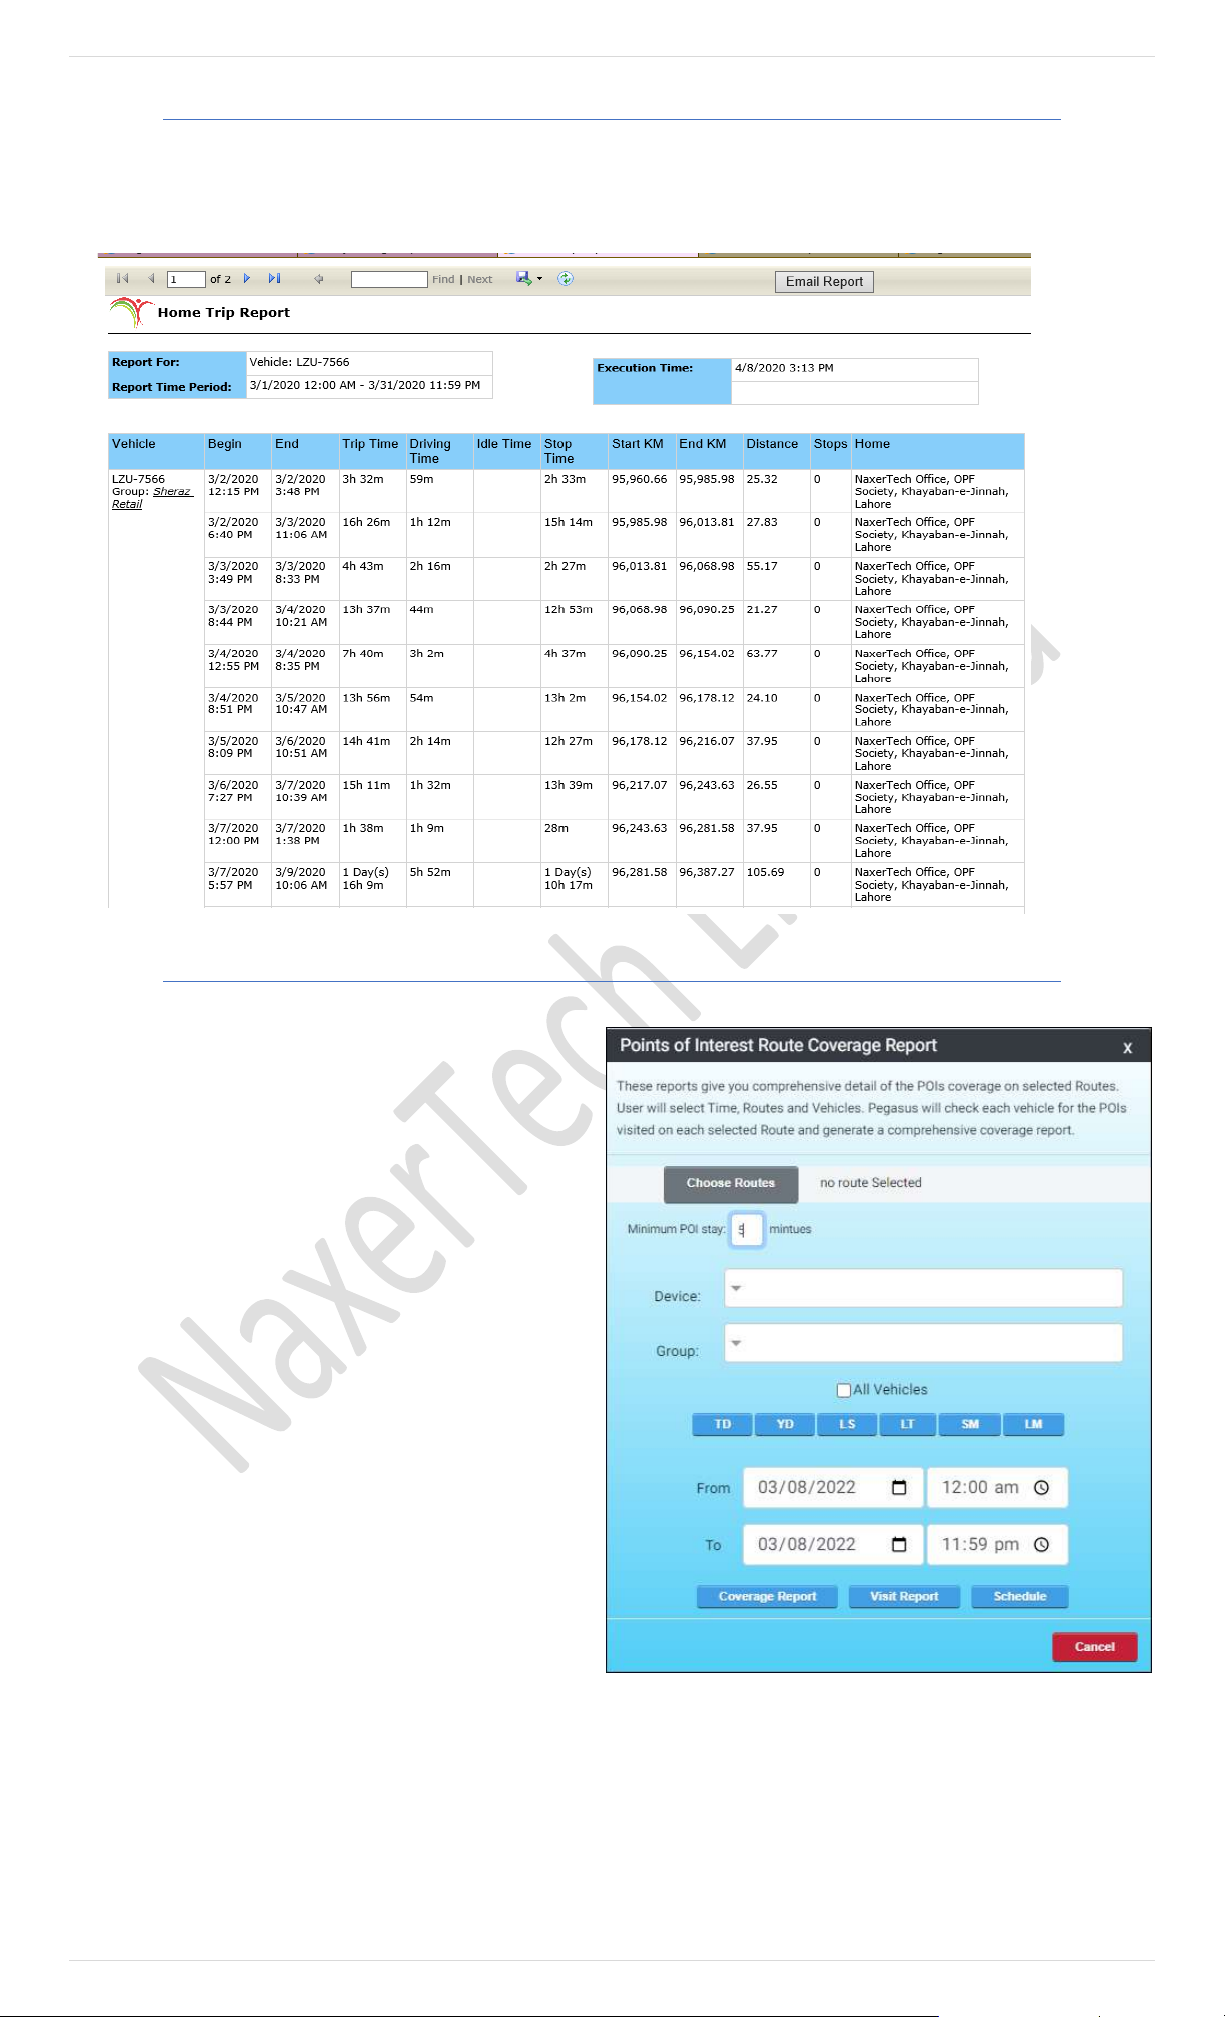
58 | P a g e
POI Report Home to POI Trips
This Report provides you a detailed travel timing From and To Home POI visited by selected vehicle or group. Select this report
from POI report (complete details about the dialog box are given above under POI Report) . This report consists of Vehicle /Group Name,
Start/End time, Total trip time distinct with driving, Idle, stop time. Starting / Ending KM with total distance also make this
report viable.
POI Routes
POI Routes will give the user comprehensive detail of the
POIs coverage on selected routes.
User will select Time, Routes and Vehicles for generating
the report. Pegasus will check each vehicle for the POIs
visited on each selected Route and generate a
comprehensive coverage report.
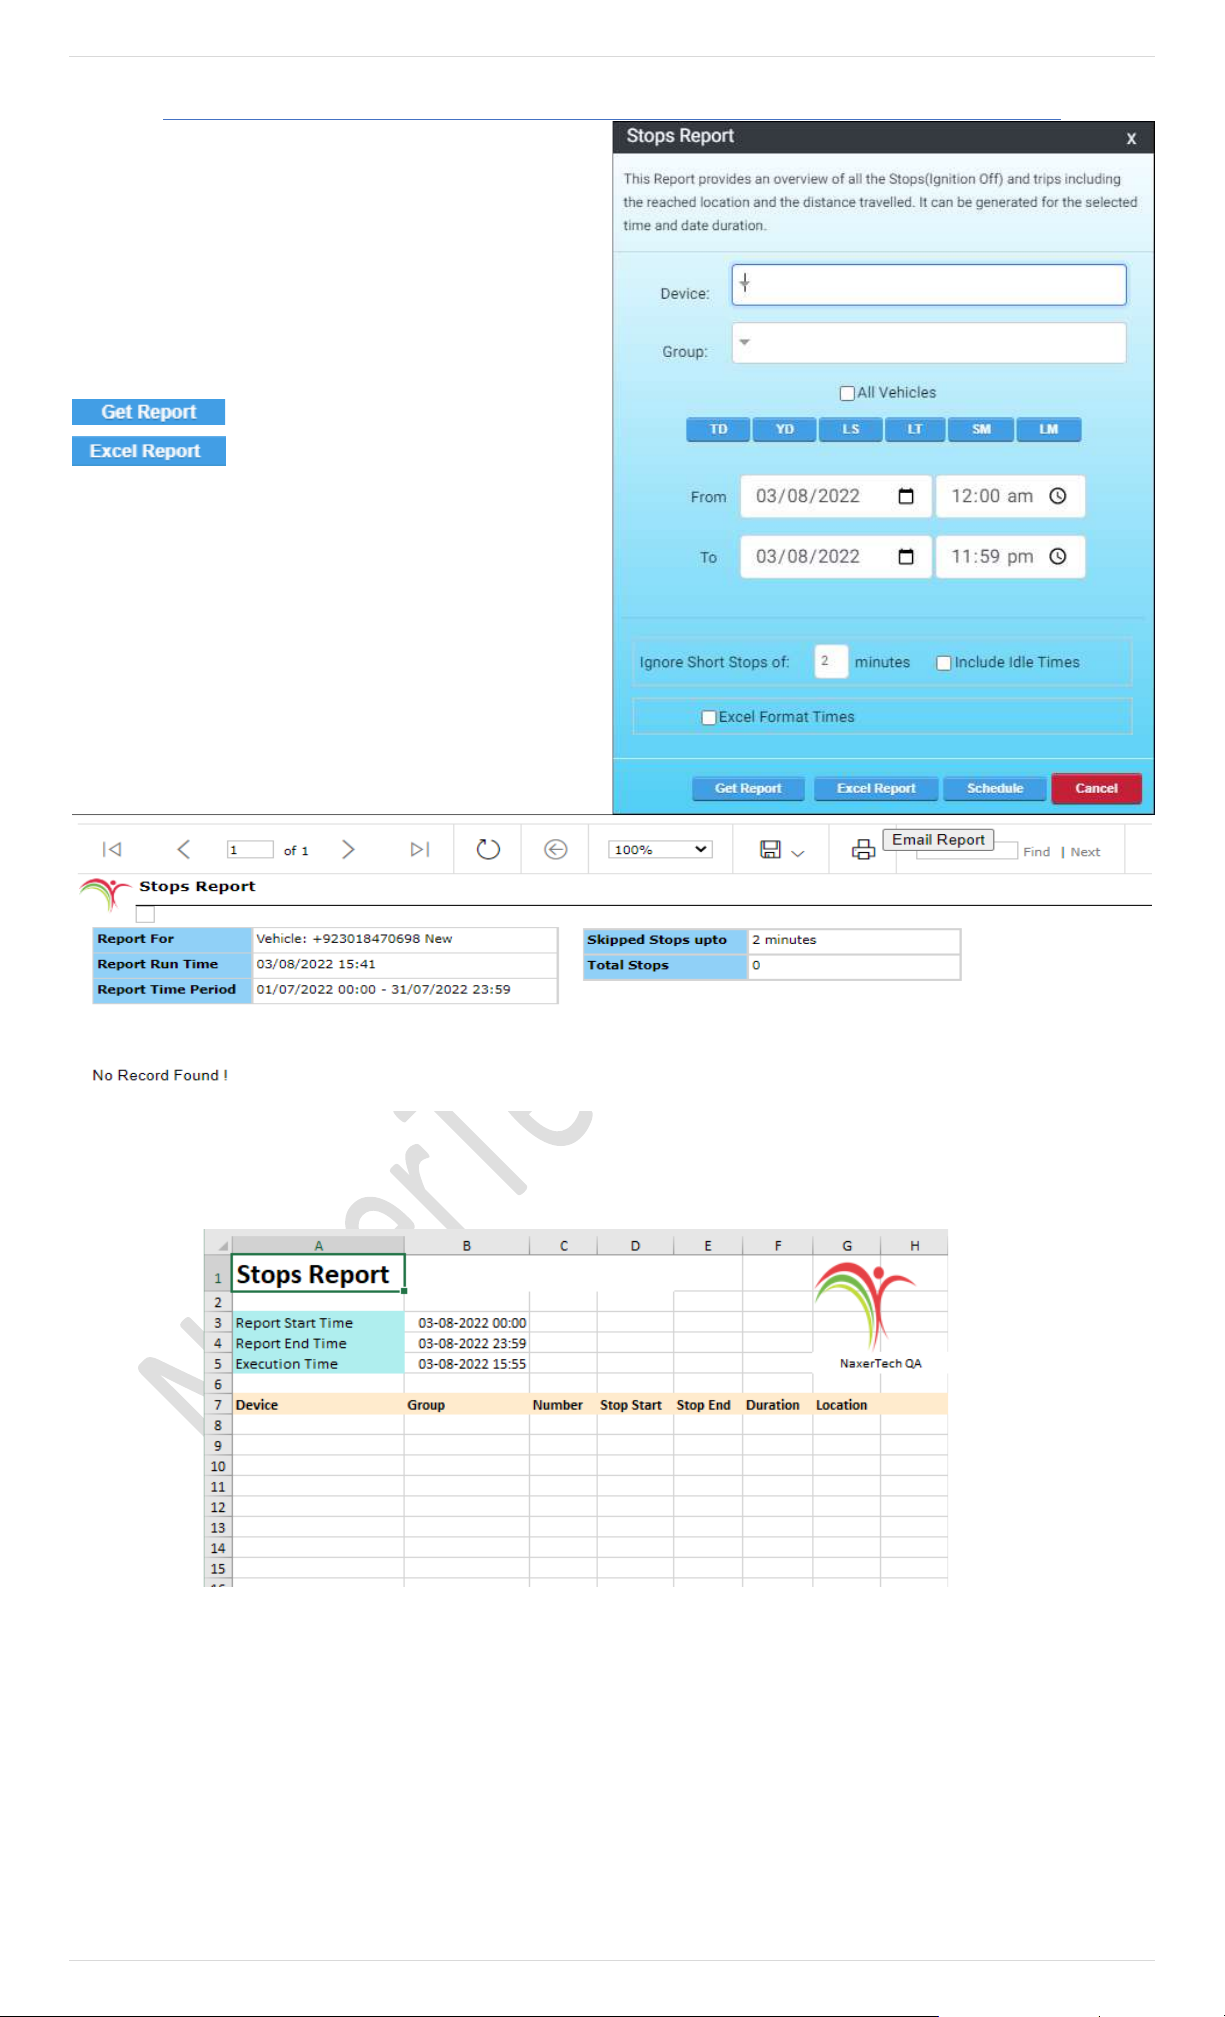
59 | P a g e
Stops Report
This Report provides an overview of all the Stops (Ignition
Off) and trips including the reached location and the
distance travelled.
User needs to select a device/group he intends to
generate a report for.
After selecting a device or a group, time needs to be
selected for the duration he wants to extract a report for.
These reports can be generated right away by clicking
, for Excel Report user needs to click on
The reports can be scheduled to be sent in an email on
monthly, weekly or daily basis. With different formats like
PDF, EXCEL or DOC.
Report generated on a webpage
Below is the template of the Stop "EXCEL” Report
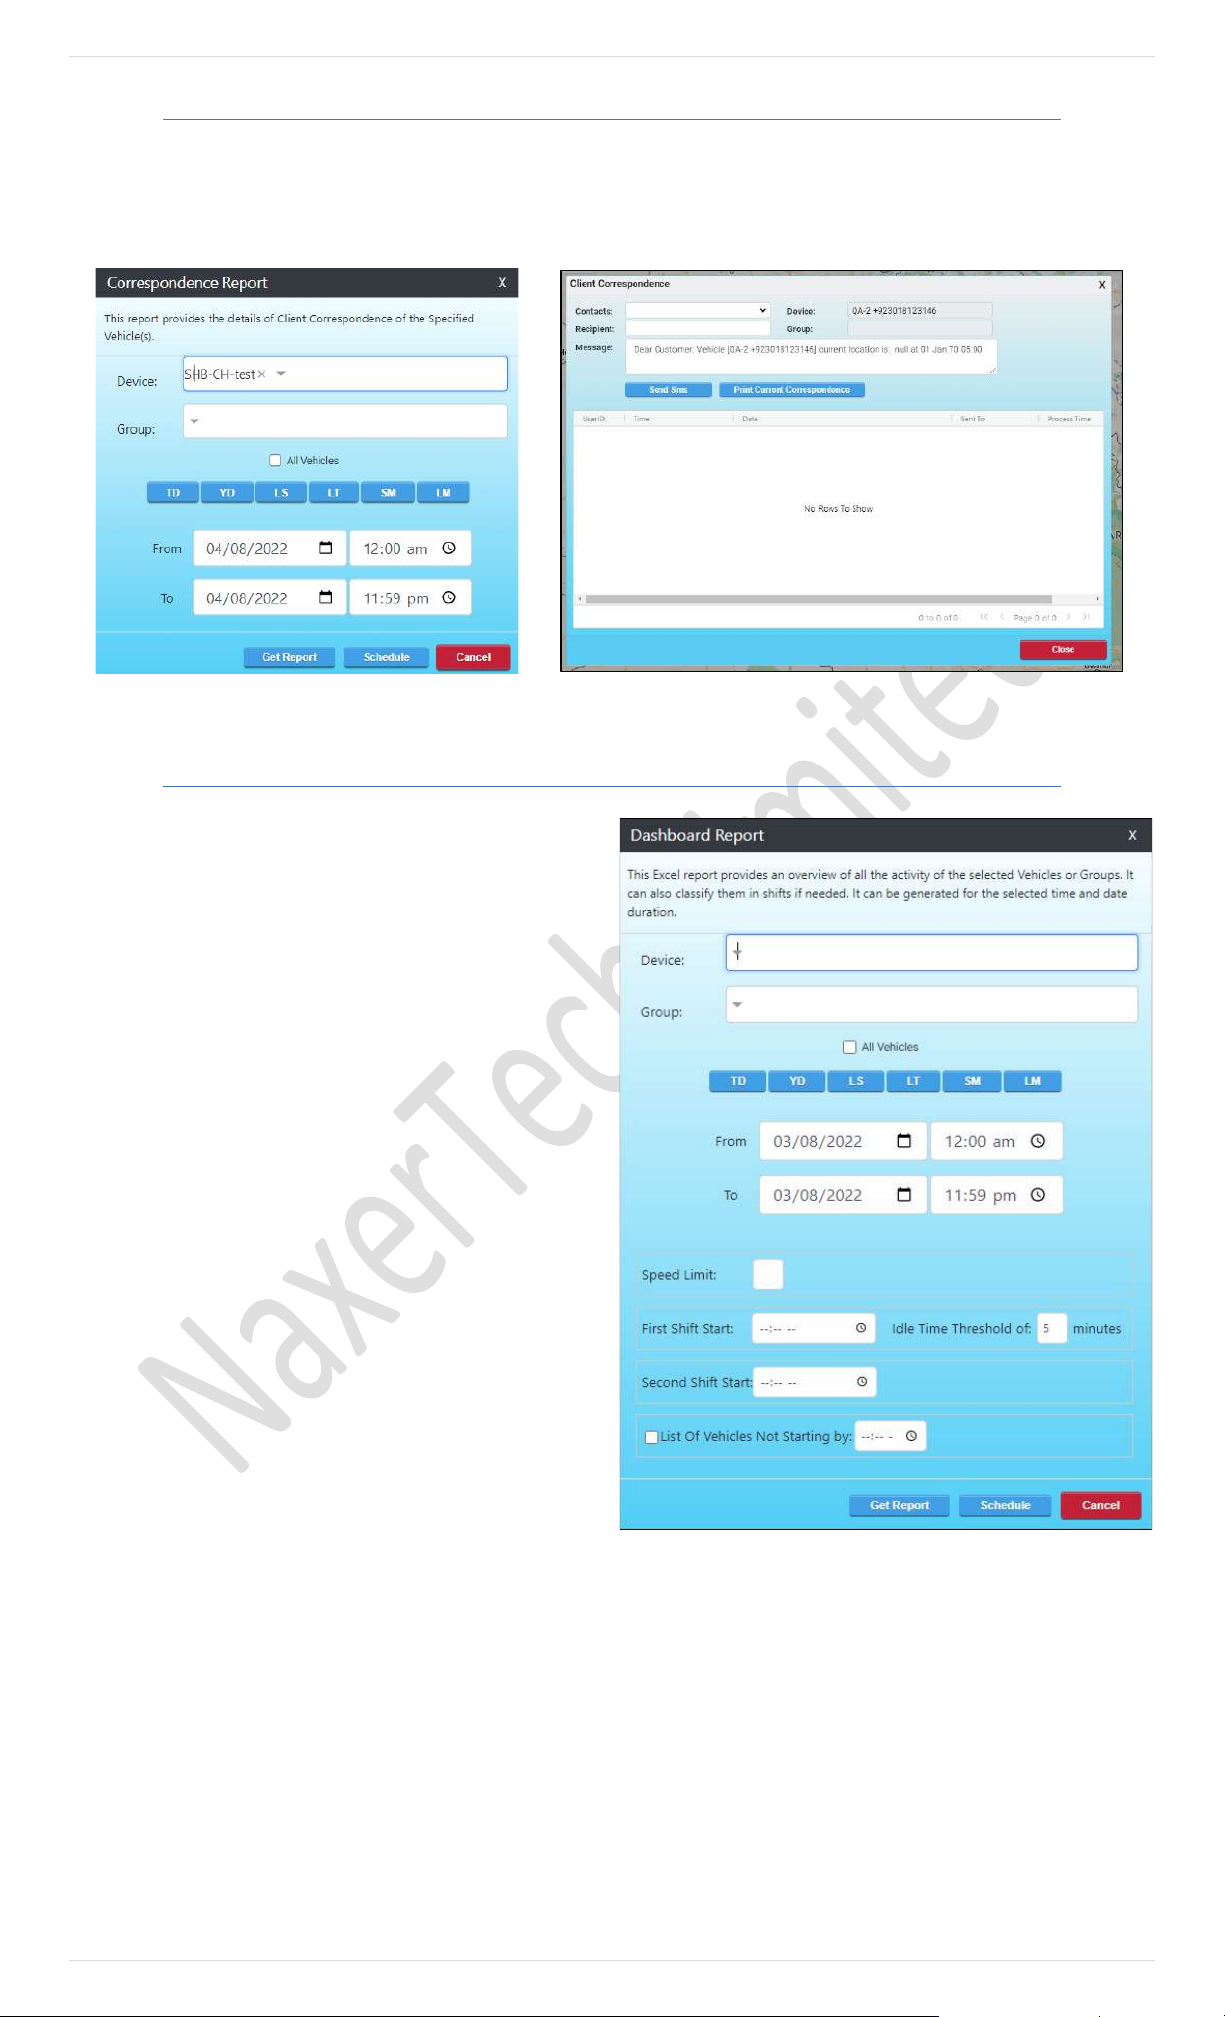
60 | P a g e
Correspondence Report
Client correspondence report works after Custom messages were sent to the client or a device/group.
After the message is sent, client correspondence report takes hold of all the messages in a report and saves it in a log
which can be generated using the correspondence report option.
Dashboard Report
The dashboard report is an overall view of the selected
vehicle or a group, a detailed report that can be generated
for the selected time and date.
It can also classify selected vehicles or groups in shits.
Speed limit can also be used to generate reports of devices
with selected speed limit.
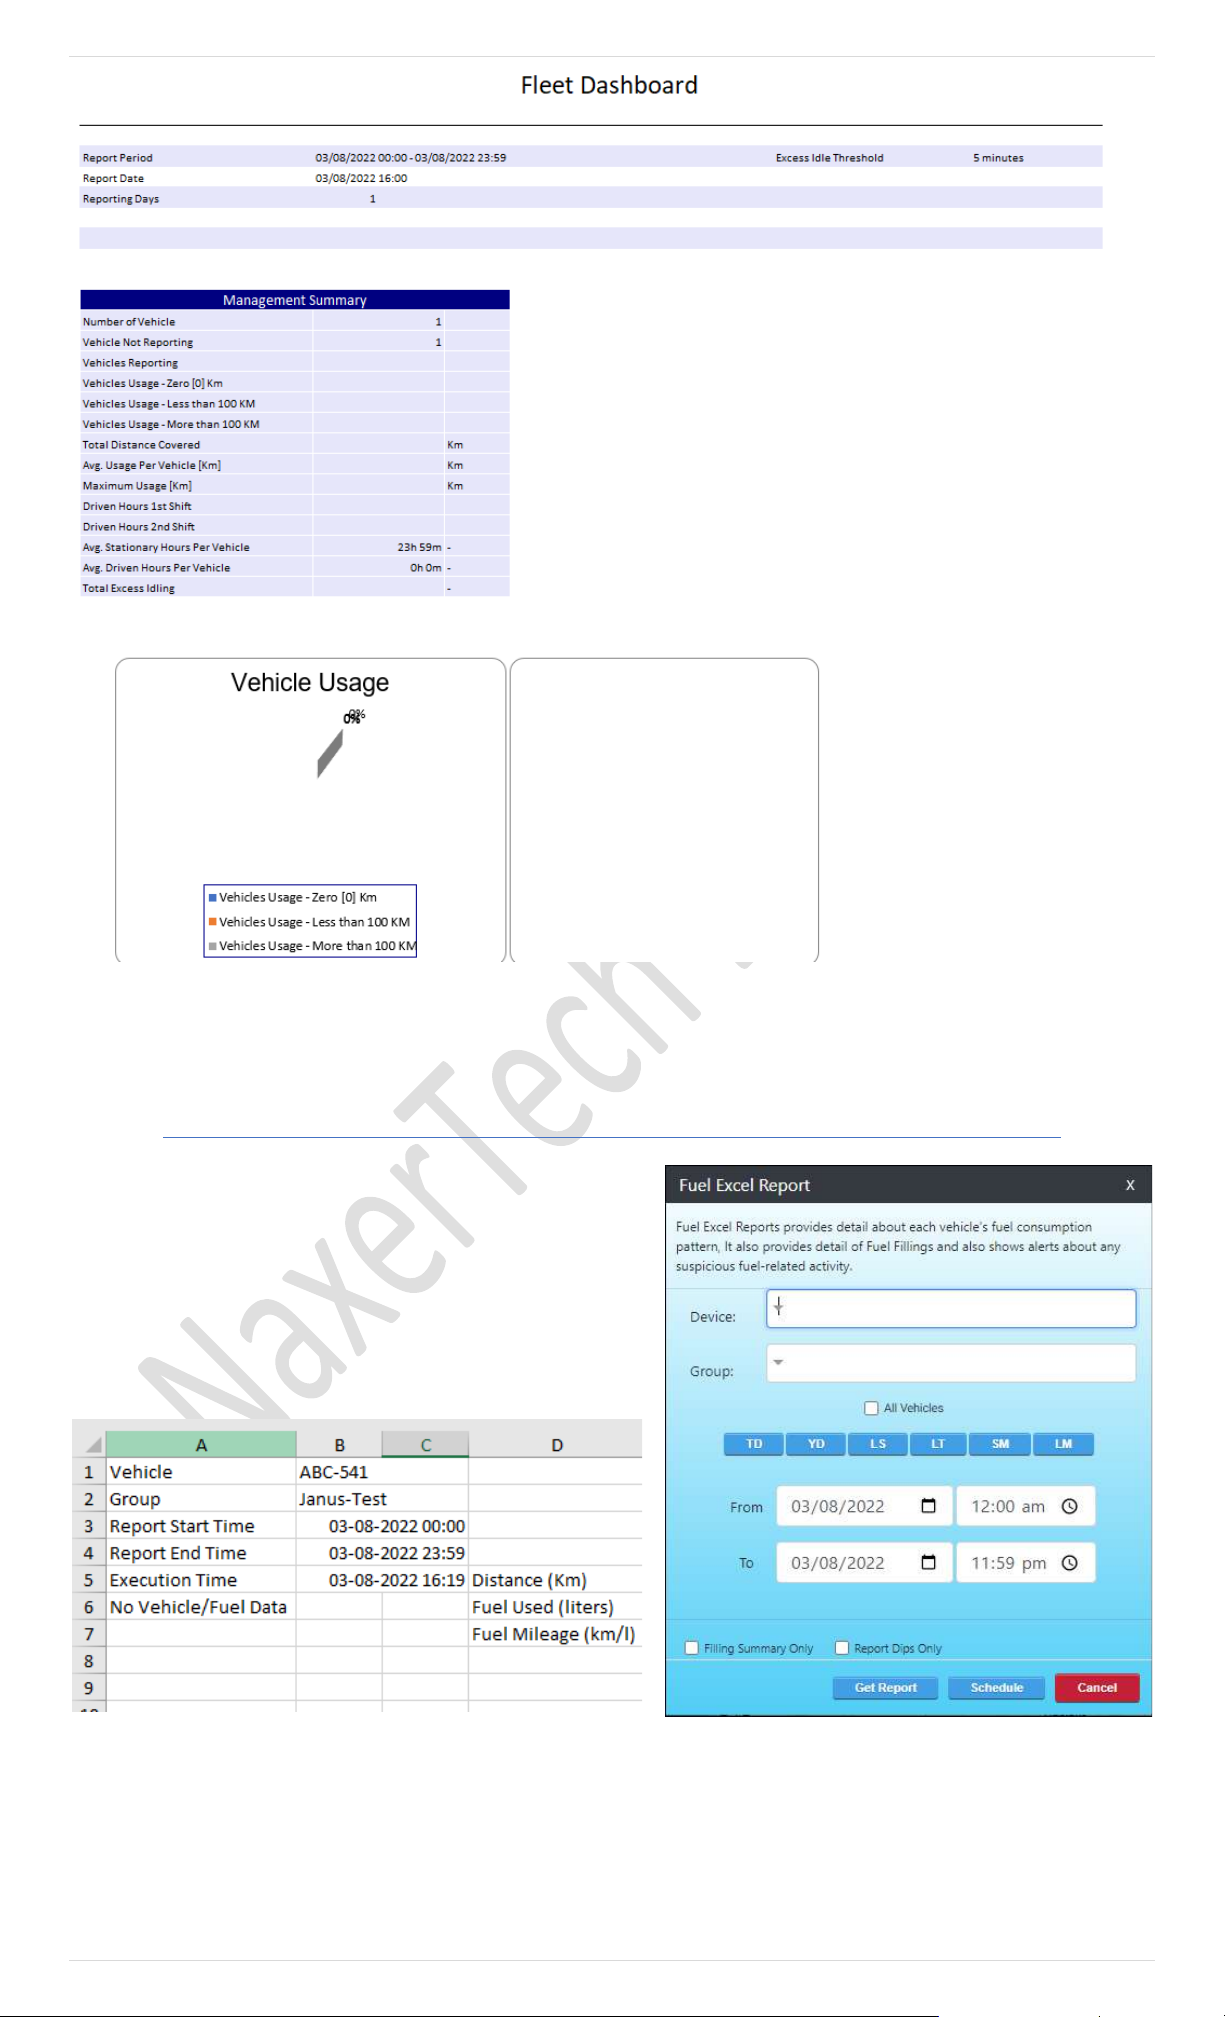
61 | P a g e
Above is the overview of how the dashboard EXCEL report will look like for the vehicle or a group
Fuel Report
Fuel excel Report provides detail about each vehicle’s group
consumptions as well as for groups. Also provides details of Fuel
Fillings and Alerts regarding any suspicious fuel-related activity.
The Above excel sheet shows the template of the generated report
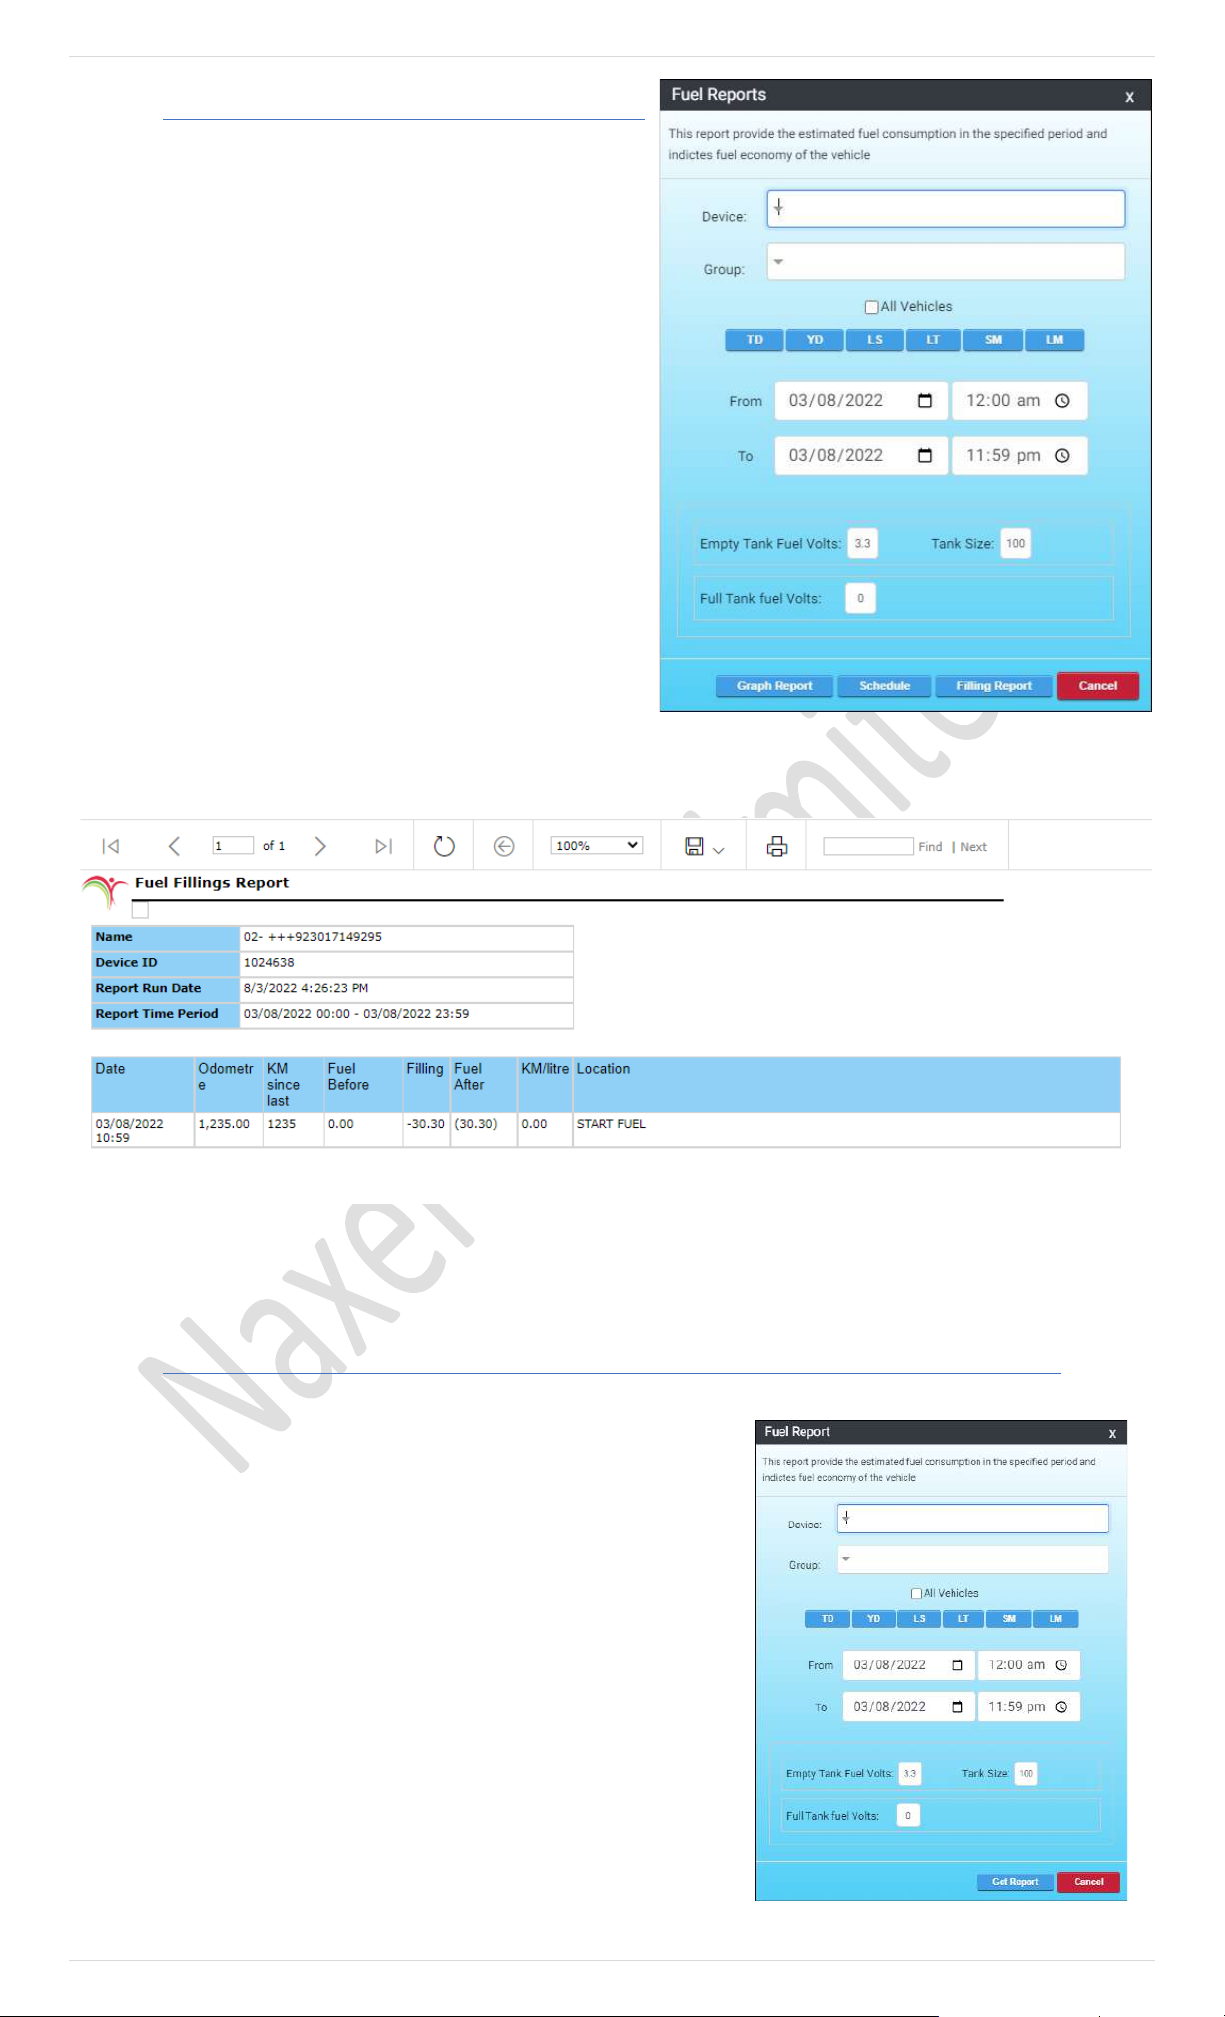
62 | P a g e
Fuel Report (2)
Fuel report (2) gives user the estimated fuel consumption
during the specific time period and it indicates the fuel
economy of the vehicle.
Fuel reports are important as they help the user or a client to
monitor the situation of their assets regarding fuel
consumption or any suspicious fuel-related activity and saves a
great amount of fuel as a whole.
Like other reports the user needs to select a vehicle, time
frame and generate a report
The report above is fuel report generated which shows how the data will be presented by the report and how the user
can benefit from it.
Simple Fuel Report
Simple fuel report is responsible for generating report for estimated fuel
consumptions. Report generated will show information about fuel
consumption using graph
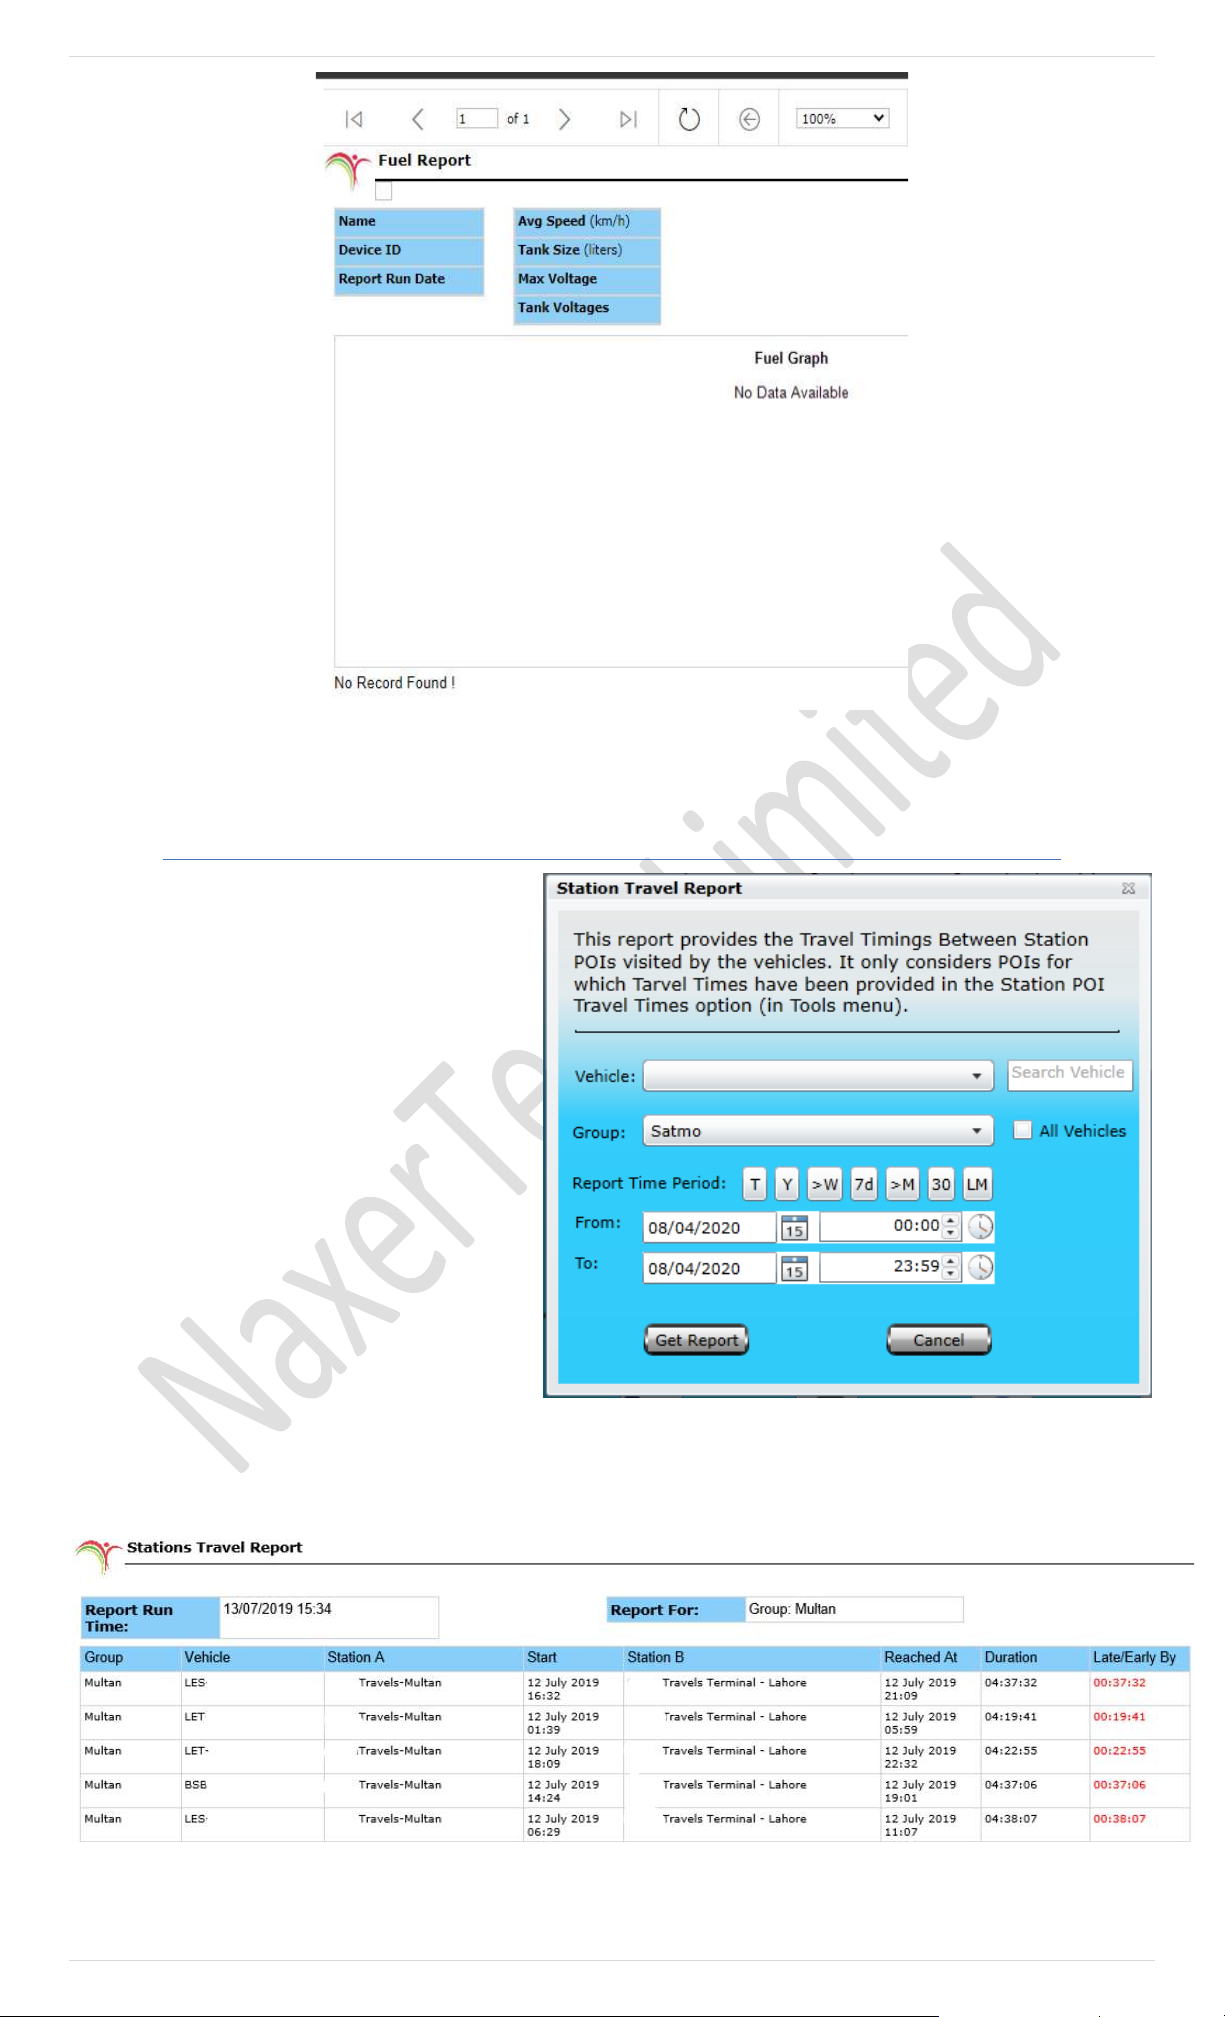
63 | P a g e
Station Travel Report
It Provides you a detailed report of visits in between
two POI. A report will be generated containing data
extracted from the database as per the Date & Time
Range specified in a new tab or window. Events that
are reported in this report are Group Name, Vehicle
Reg., Station A with its start time, Station B with
Reached time, total duration and analysis its late or
early.
This report will automatically detect travel between
stations and generate report with highlighting delays
in specified duration.
Image shows how POI Report - Visits Report looks like.
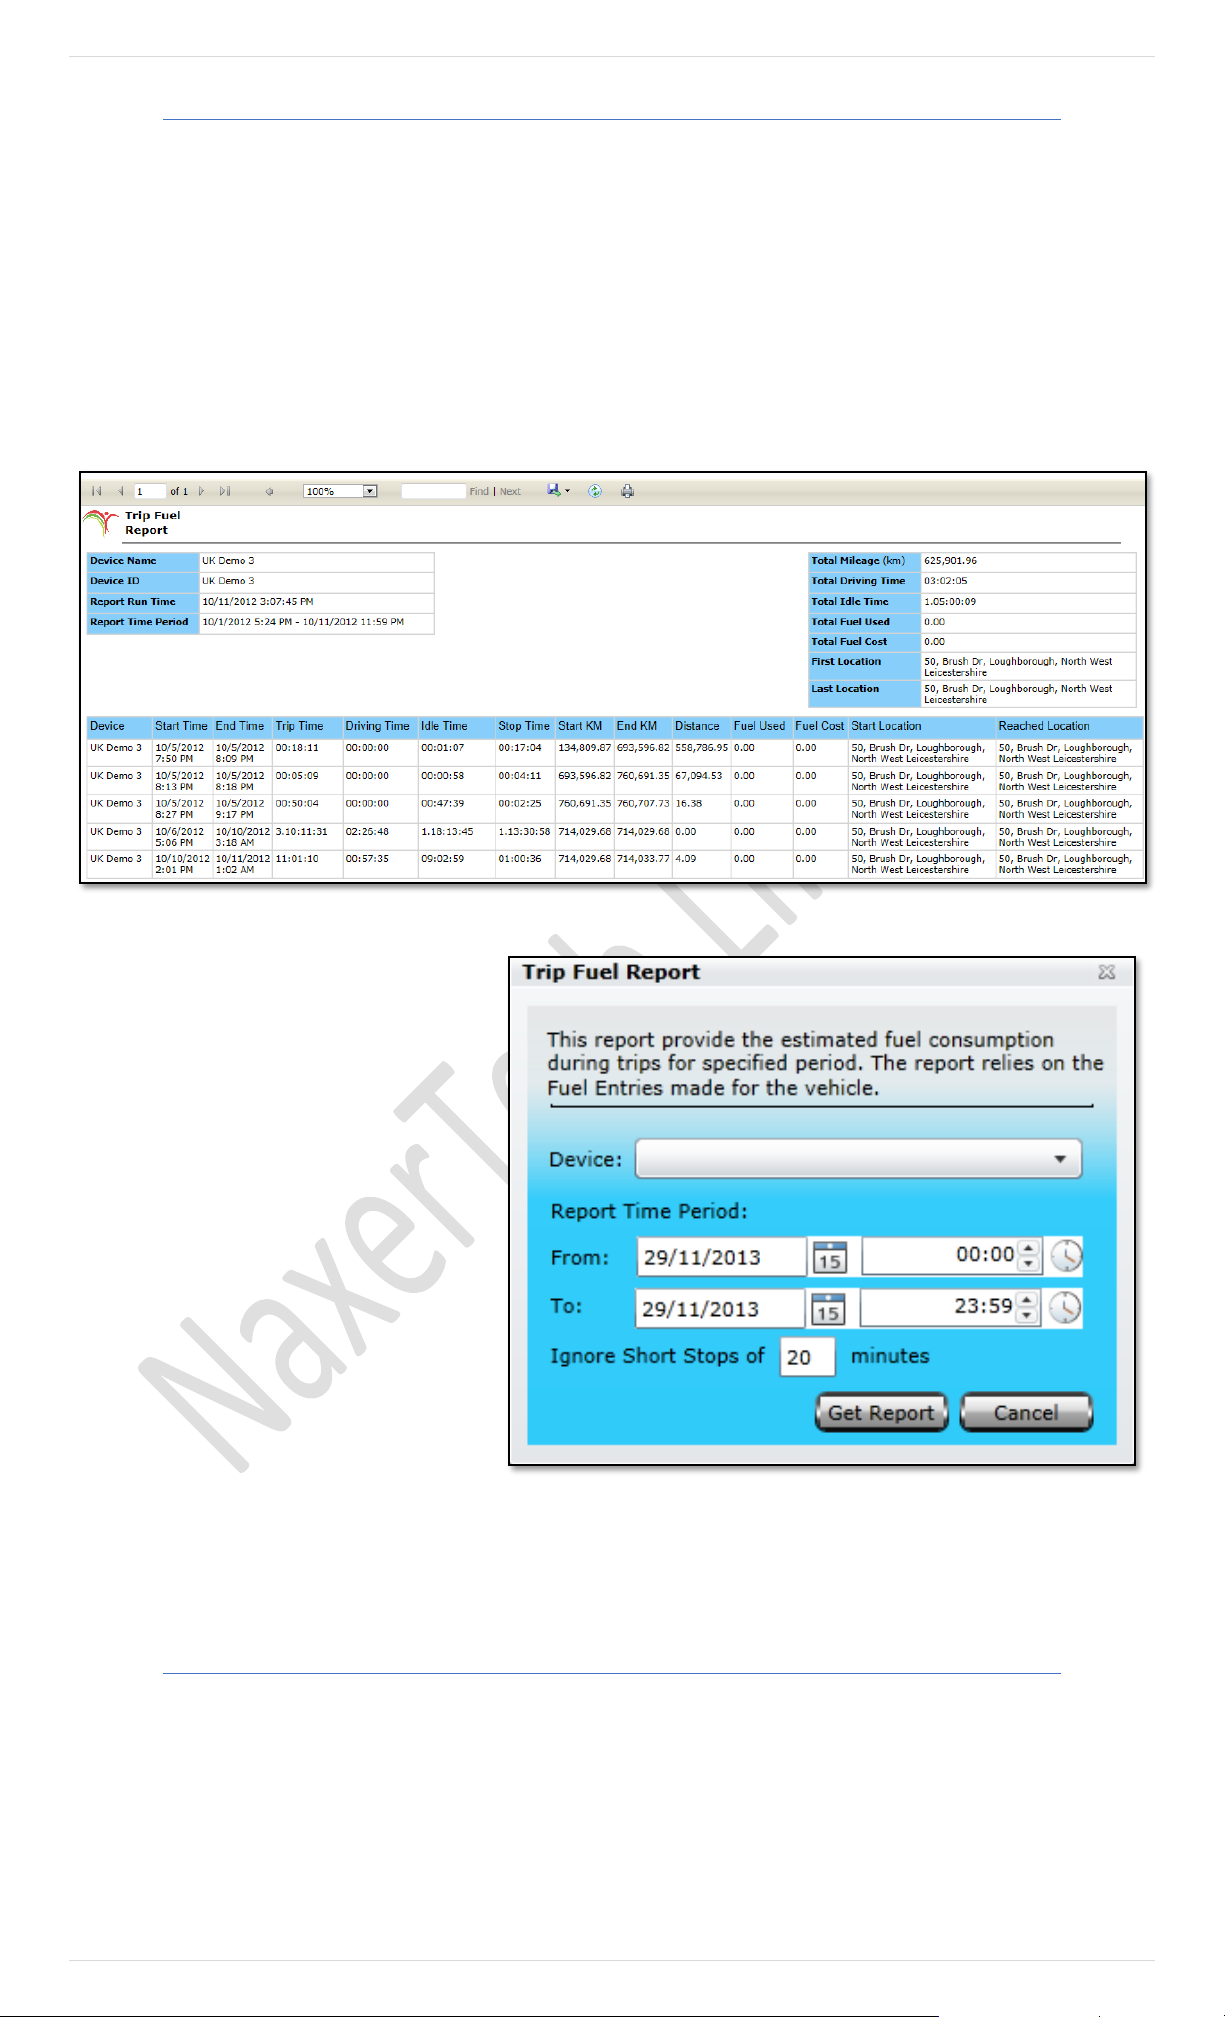
64 | P a g e
Trip Fuel Report
A report will be generated which will contain data extracted from the database, as per the Date & Time range specified, in a
new tab or window. Events that are reported in this report are Device Name/ ID, Trips Start Time - Date & Time, Trips End Time
- Date & Time, Trips Time - Total duration of the trip, Driving Time - Total duration in which vehicle status was driving, Idle Time, Stop Time - It
is the total duration for which Engine was off during a trip. i.e., From the time ignition was Off till it was ON again, Start KM - Odometer reading at trip
start, End KM - Odometer reading at trip end, Distance, Fuel Used - Fuel consumed by the vehicle per trip per litre, Fuel Cost, Start Location -
Location from where the trip started and Reached Location - Location where the trip ended. Above image shows how a Trip Fuel Report
looks like.
Trip Fuel Report provides you an overview of
all the trips made by the selected vehicle.
Clicking this report will open up a dialog box
(Image provided below) which contains a dropdown
list labeled as Device, where you can select a
vehicle from the list available, specify Report
Time Period which includes Date & Time range
and click Get Report.
GenSet Report
Genset Report provides you the estimated fuel consumption in the specified period and indicates fuel economy of the genset.
Clicking this report will open up a dialog box which contains a dropdown list labeled as Device, where you can select a gense t
from the list available, specify Report Time Period which includes Date & Time range, input the Tank Size in liters, provide the
minimum volts when the fuel tank is empty, provide maximum volts when the fuel tank if full and click Get Report.
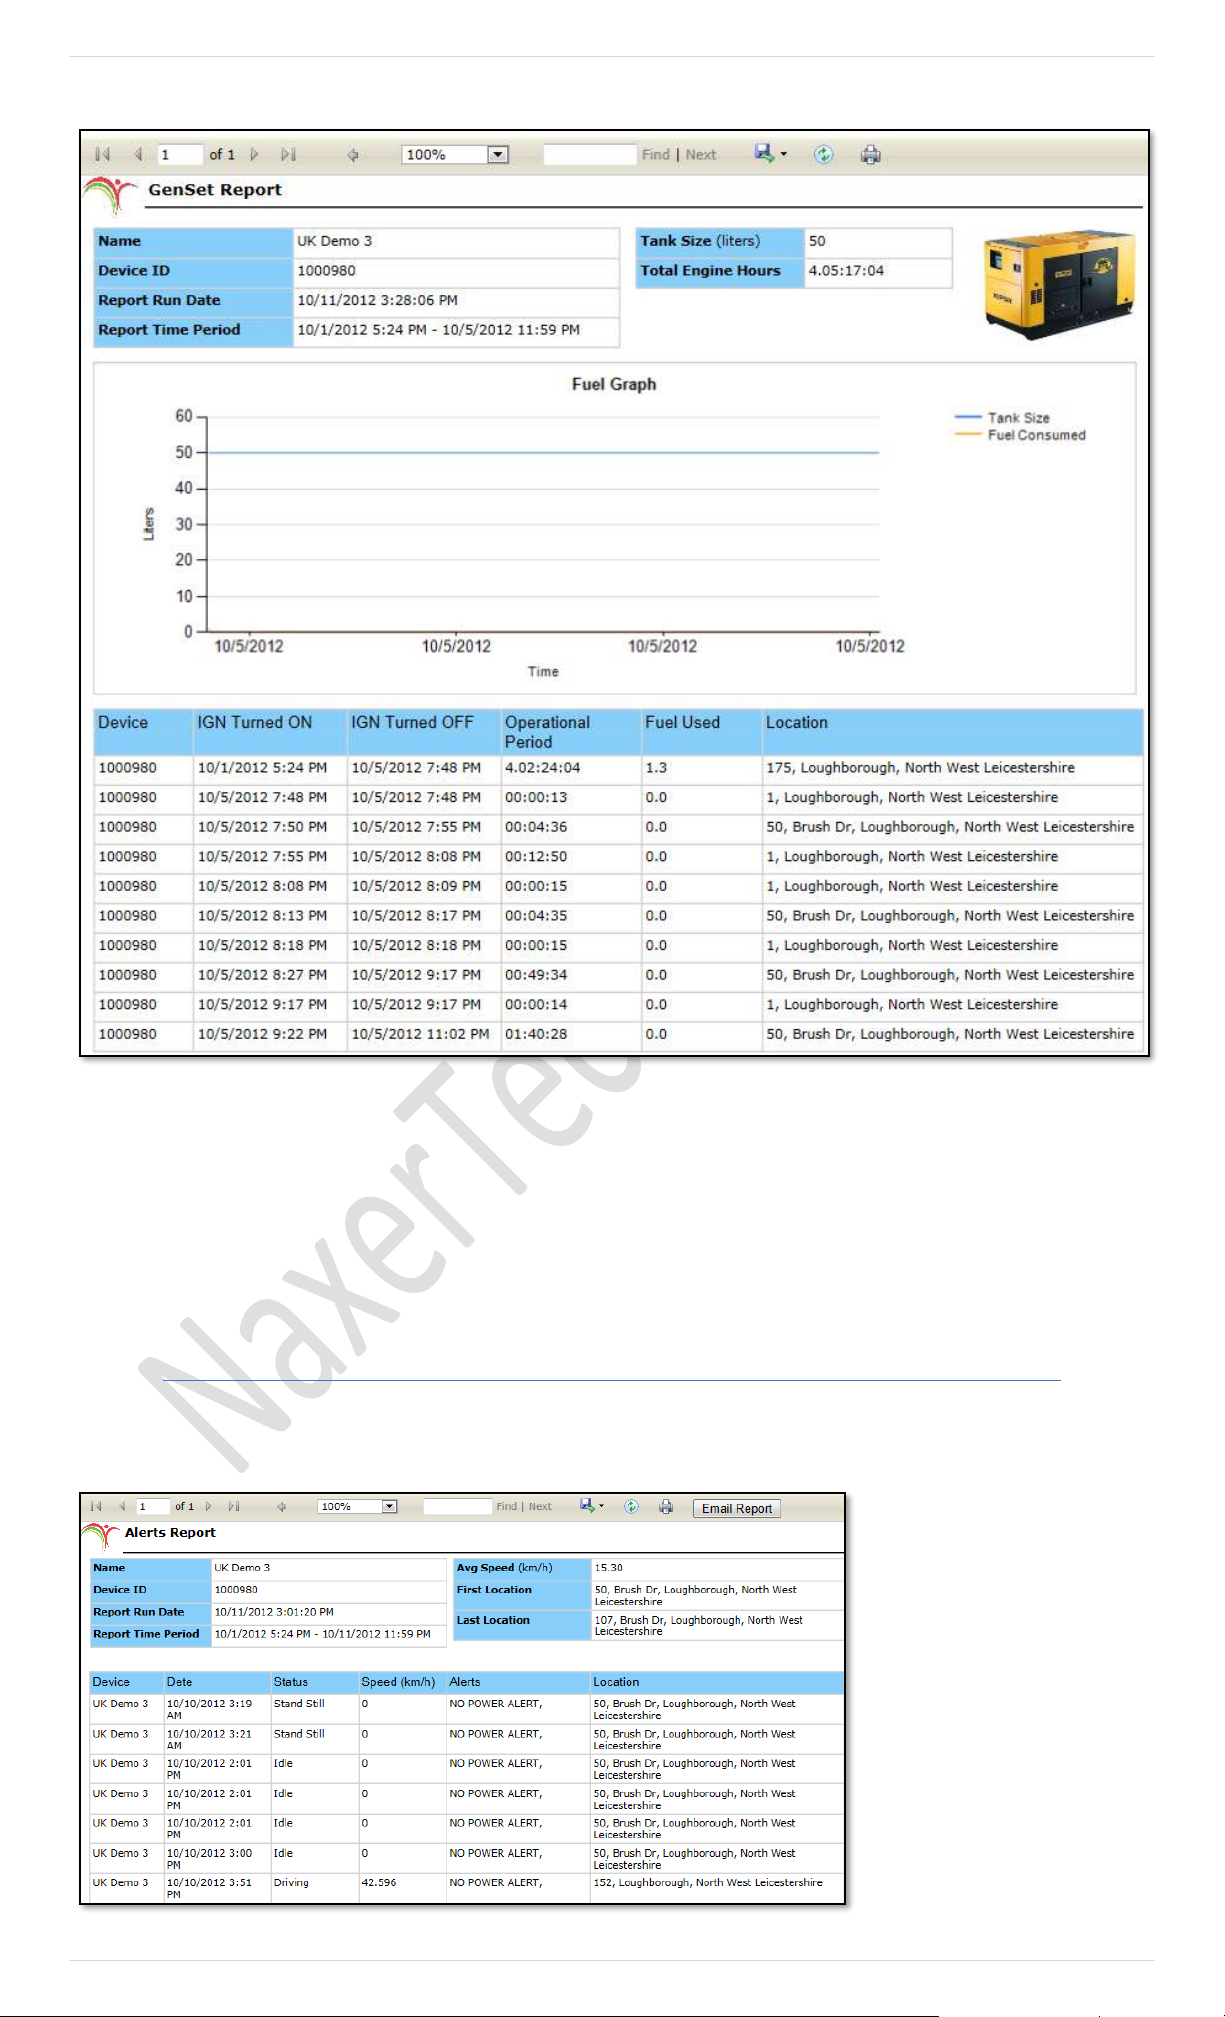
65 | P a g e
A report will be generated which will contain data extracted from the database, as per the Date & Time range specified, in a
new tab or window. Events that are reported in this report are a Device ID, Ignition ON Time - Date Time, Ignition Off Time -
Date & Time, Operational Period - Time period in hh:mm:ss:ms, Average Fuel Consumption per Liter and Location - Current location of the
genset. Above image shows how a Genset Report looks like.
Alerts Report
Alerts Report provides you a detail report of all the alerts generated by the tracking device. A report will be generated which
will contain data extracted from the database, as per the Date & Time range specified, in a new tab or window. Events that
are reported in this report are,
Device ID, Date Time - Date & time
when the alerts generated, Status -
Idle, Driving or Stand Still, Speed -
Speed gained by the vehicle, Alert -
What alert generated by the tracking
device and Location - Location of the
vehicle when the alert was generated.
Above image shows how an
Alerts Report looks like.
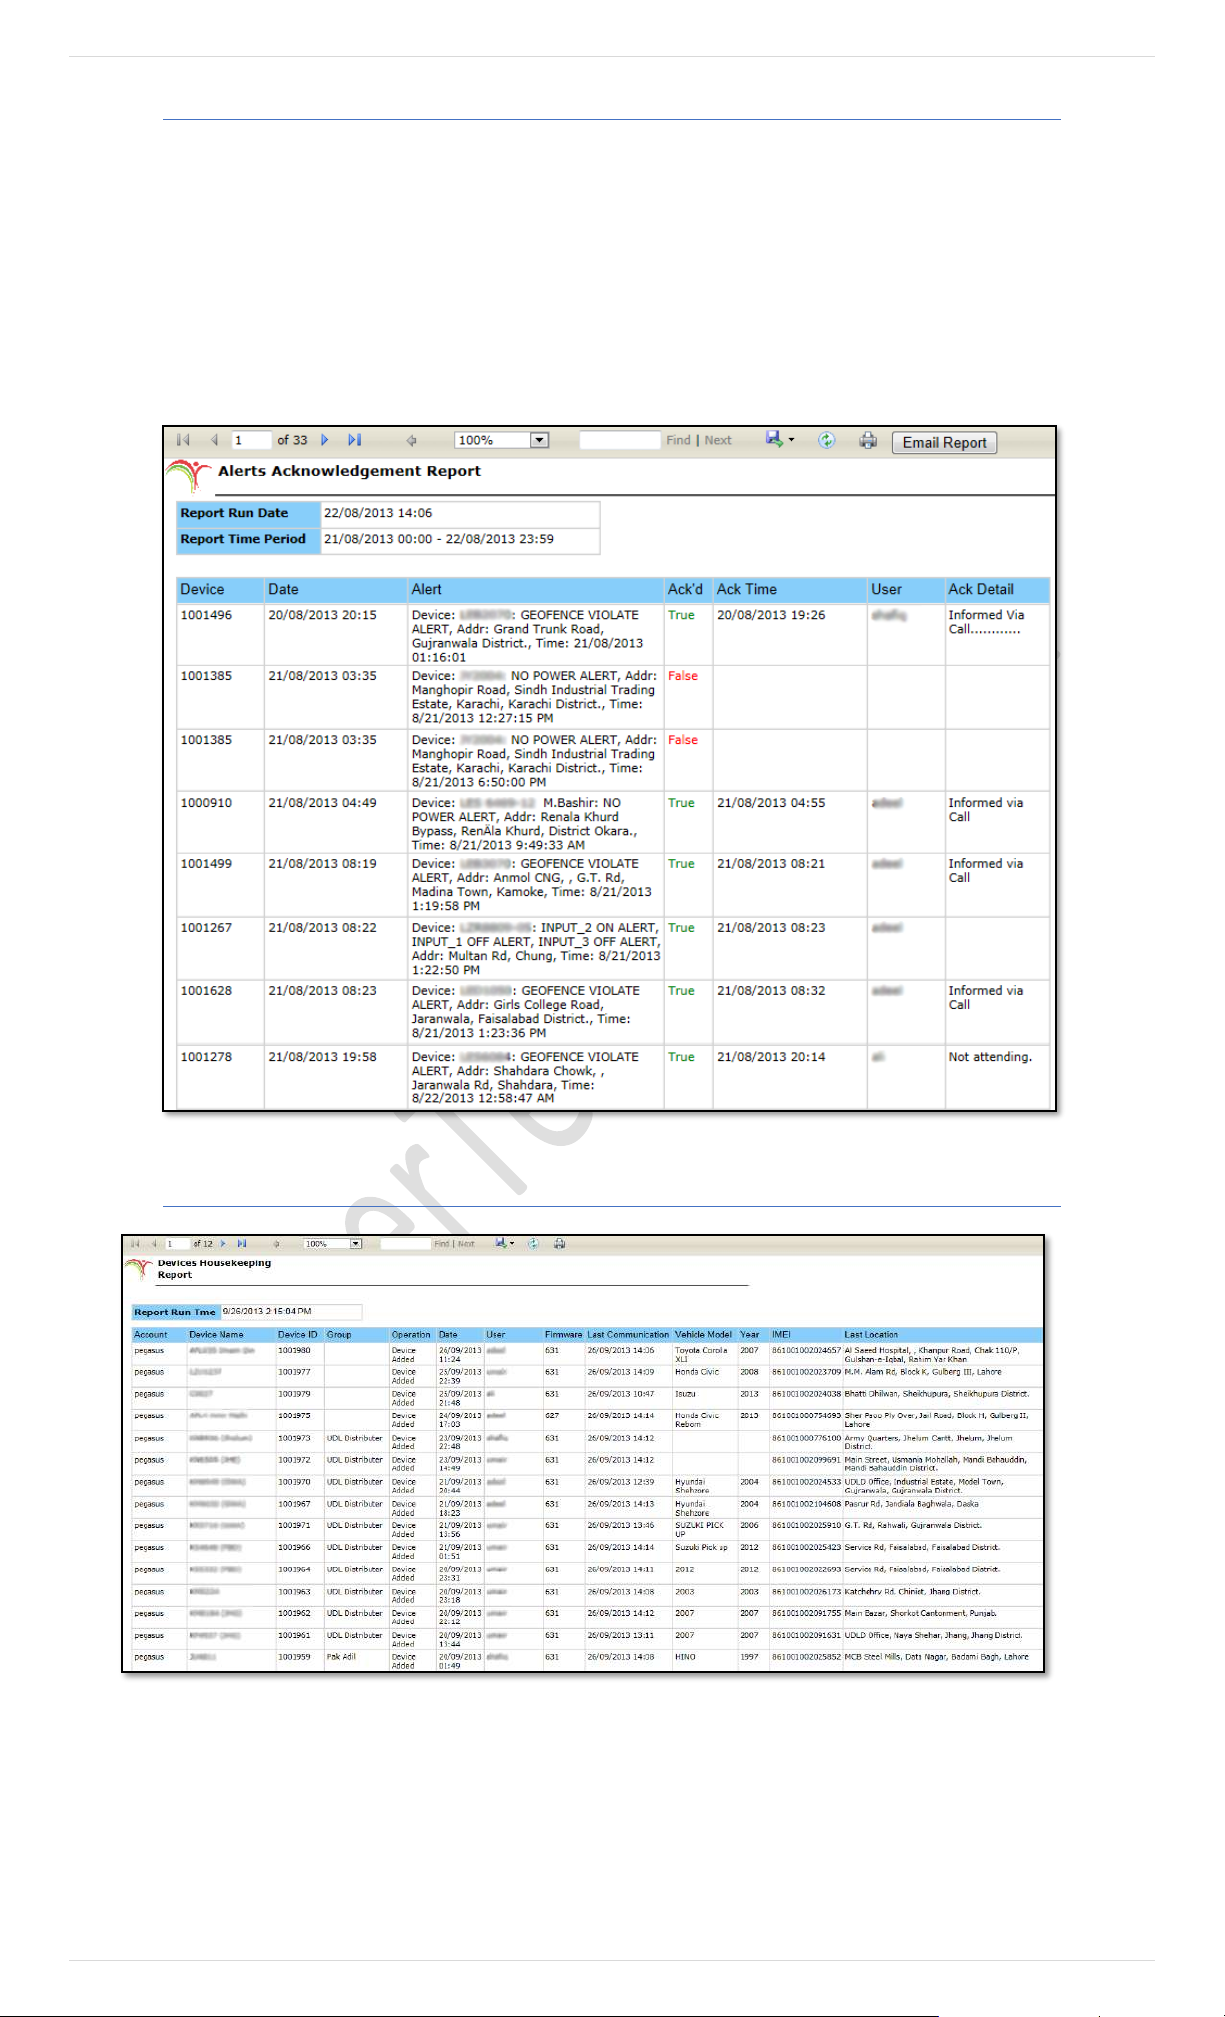
66 | P a g e
Alert Ack Report
Alert Acknowledgement Report provides a comprehensive report of all the alerts generated by the device and the action taken against
each alert. Clicking this report will open a dialog box where Date & Time range could be specified and click Get Report button.
A report will be generated which will contain data extracted from the database, as per the date & time range specified, in a new tab
or window. Events that are reported in this report are Device ID, Date & Time – Date & Time when the alert was generated, Alert – Description of
the alert generated, Ack’d – Displays the status of the acknowledgment True if acknowledged & False if not acknowledged, Ack Time – Date & Time when the alert
was acknowledged, User– Displays the name of the user who acknowledged the alert and Ack Detail– Displays the action taken by the user. Above image
shows how an Alert Acknowledgement Report looks like.
Action Log Report
Action Log Report provides a comprehensive report of actions performed on a device. Events that are reported in this report are
Account – Name of the Master account, Device Name, Device ID, Group – Group name will be reported if the device belongs to a certain group, Operation
– Operation performed on a device i.e. Added or Deleted, Date & Time – Date & Time when the operation performed on the device, User – Name of the user who
performed the operation under Pegasus system, Firmware – Version of the firmware installed in the device, Last Communication– Date & Time of the Last
Communication of the device with the Pegasus system, Vehicle Model – Model of the vehicle, Year – Make year of the vehicle, IEMI – IEMI number of the device
and Last Location – Last location sent by the device to the Pegasus system. Above image shows how an Action Log Report looks like.
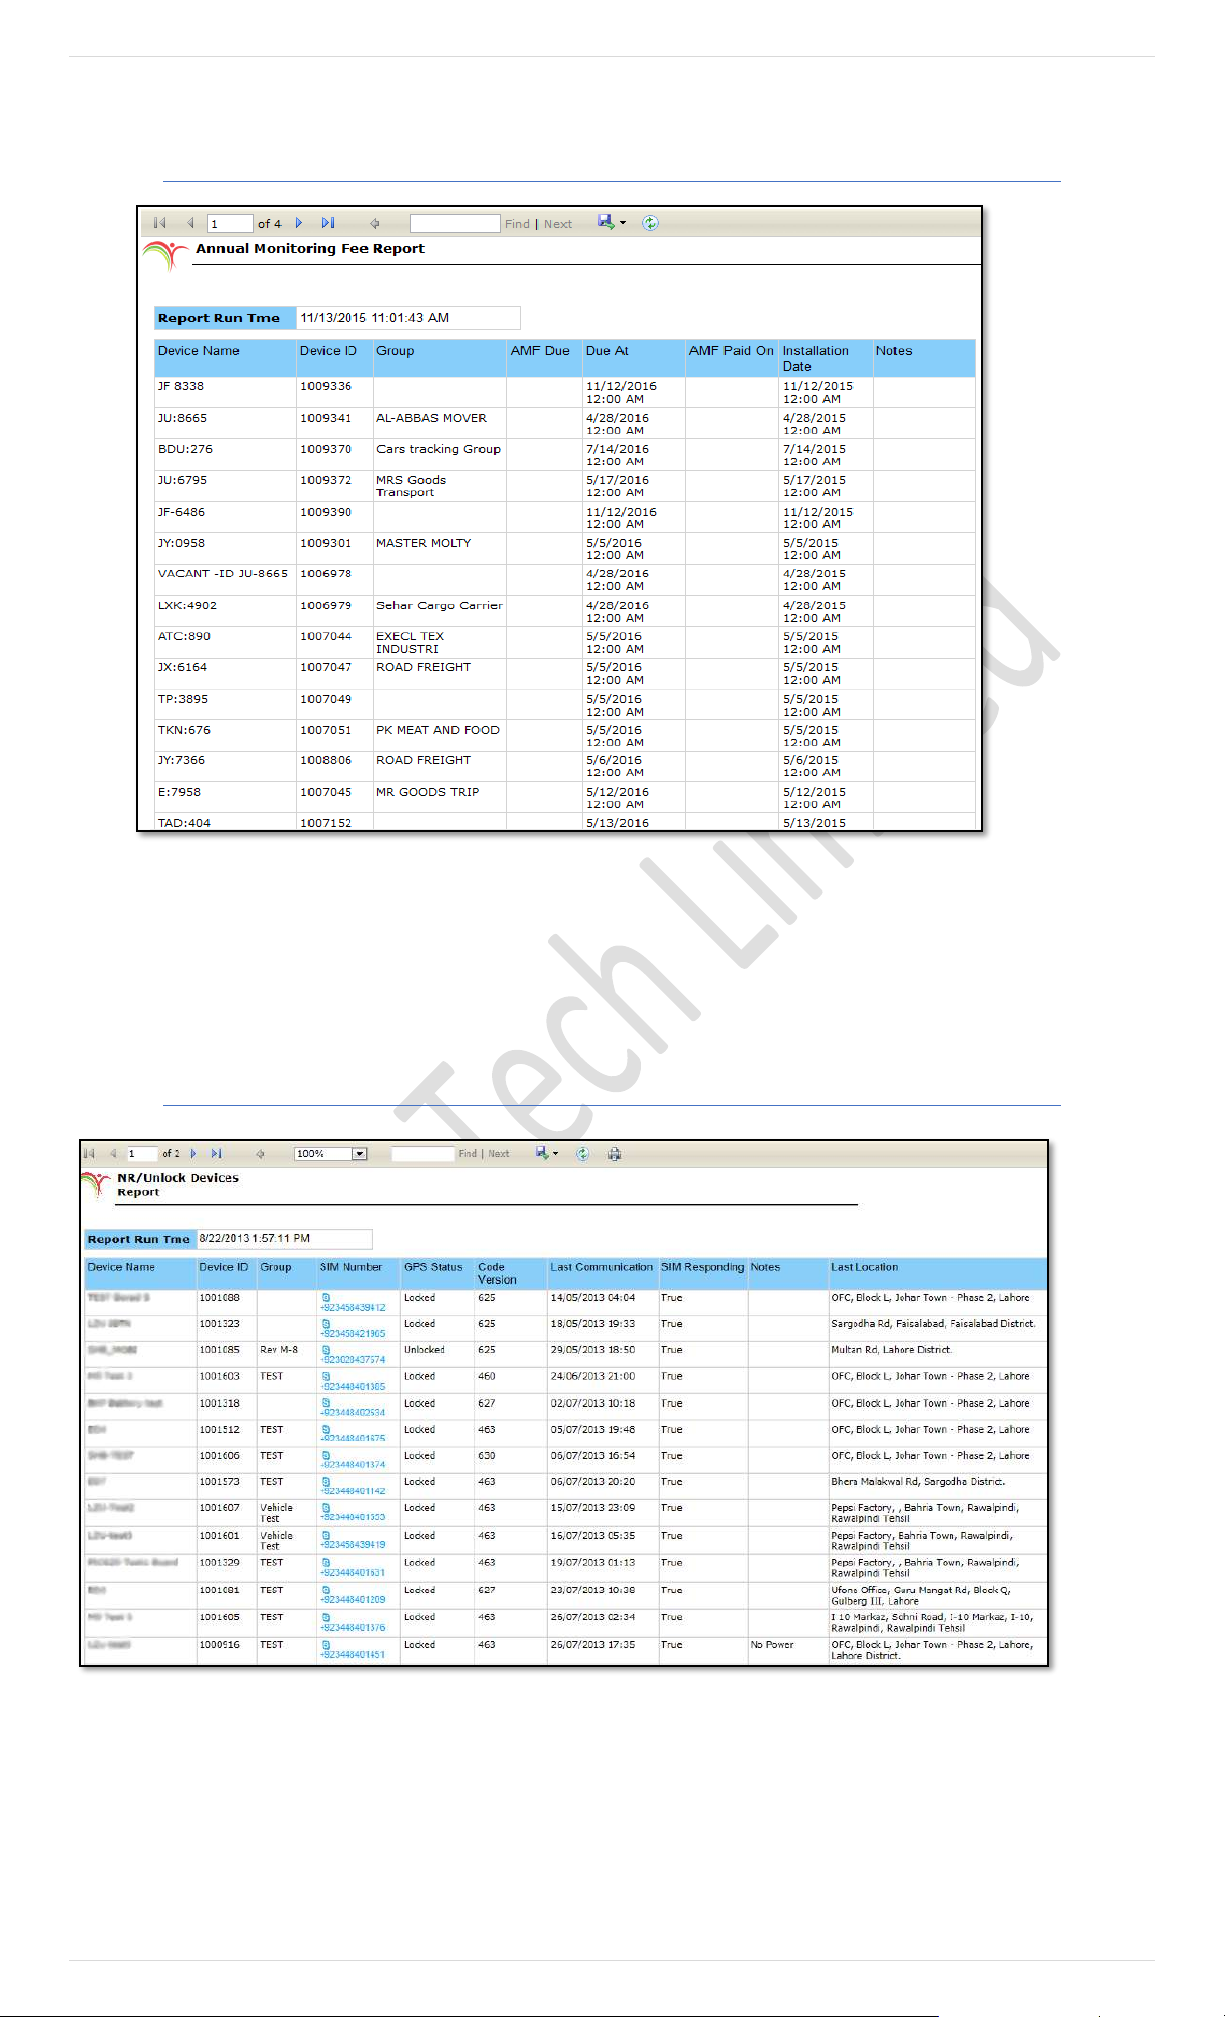
67 | P a g e
AMF Report
AMF Report – is designed for Corporate Groups including Insurance Companies, Rental companies, Banks and Fleet
Management Services providers who are handling a complete fleet of vehicles and requires a comprehensive report of Annual
Monitoring Fee for their dues and their accountability. This report will be fetched from Master Accounts through clicking AMF
Report icon on ‘Reports Window’.
NR/ Unlocked Devices Report
NR/ Unlocked Devices Report provide you an overview of all the devices in the Pegasus system under an A ccount head. Clicking
this report will open up a dialog box (Image provided below) which contains text boxes to input the period of time in hours. Specify
the time for such devices which were not responding from a given period of time in “Not Responding fr om”. Devices could
also be excluded from the search which were not responding from the given period of time in “Exclude NR for more than”
and it is an optional. A check box to include the GPS status of the devices that will appear under the given period of timings
and click Get Report.
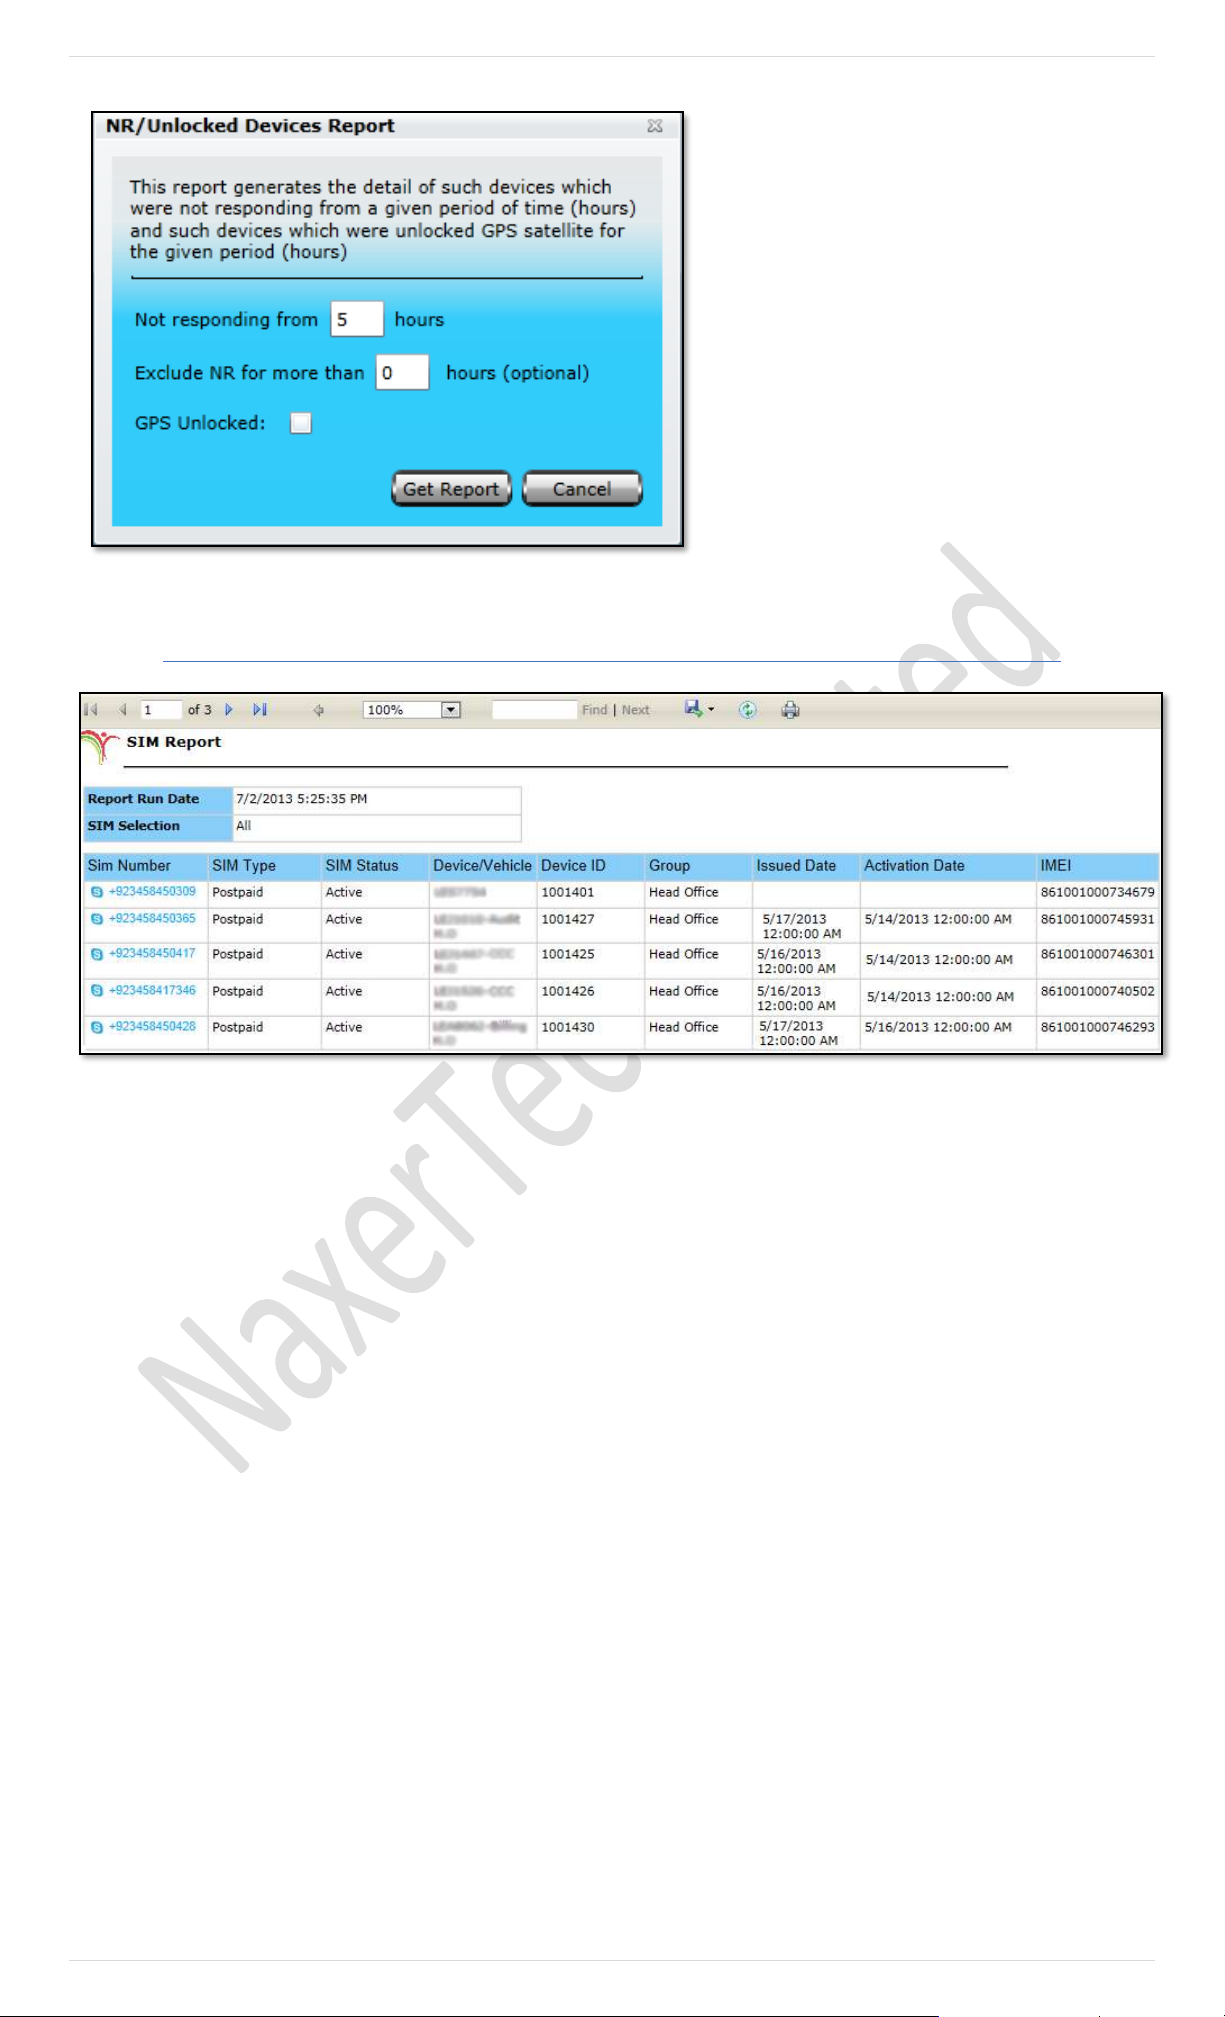
68 | P a g e
A report will be generated which will contain data
extracted from the database, as per the Time range
specified, in a new tab or window. Events that are
reported in this report are Device Name, Device ID,
Group – group name will be displayed if the device belongs to
any group, SIM Number, GPS Status – Lock/ Unlock,
Coder Version - Firmware version currently installed, Last
Communication - Date & Time when the device
communicated with the Pegasus system for the last time,
Notes and Last Location - Location sent by the device
when communicated for the last time. Above image shows
how a NR/ Unlocked Devices Report look like.
SIM Report
SIM Report provides a comprehensive report of all the SIMs added into the Pegasus system SIMs module. Clicking this report will open
up a dialog box where you can select All, Assigned SIMs or Unassigned SIMs from the SIM Mode dropdown box and clicking Get Report
button.
Events that are reported in this report are SIM Number – Number of the SIM, SIM Type – Type of SIM i.e. Prepaid or Post-paid, SIM Status – Status
of the SIM either its activated or de-activated, Device – Name of the device with which it has been added to the Pegasus system, Device ID – Displays the ID of the
device, Group – Displays the name of the Group if the device is added under a specific group, Issued Date – Displays the date & time of SIM issued by the
operator, Activation Date– Date & Time of the SIM when activated and IMEI– Displays the IMEI number of the device to which the SIM is attached in SIM
management module. Above image shows how an Action Log Report looks like.
Note: Please note that all the columns of SIM Report depend on the records created under SIM management module, available on the main GUI of the
Pegasus system.
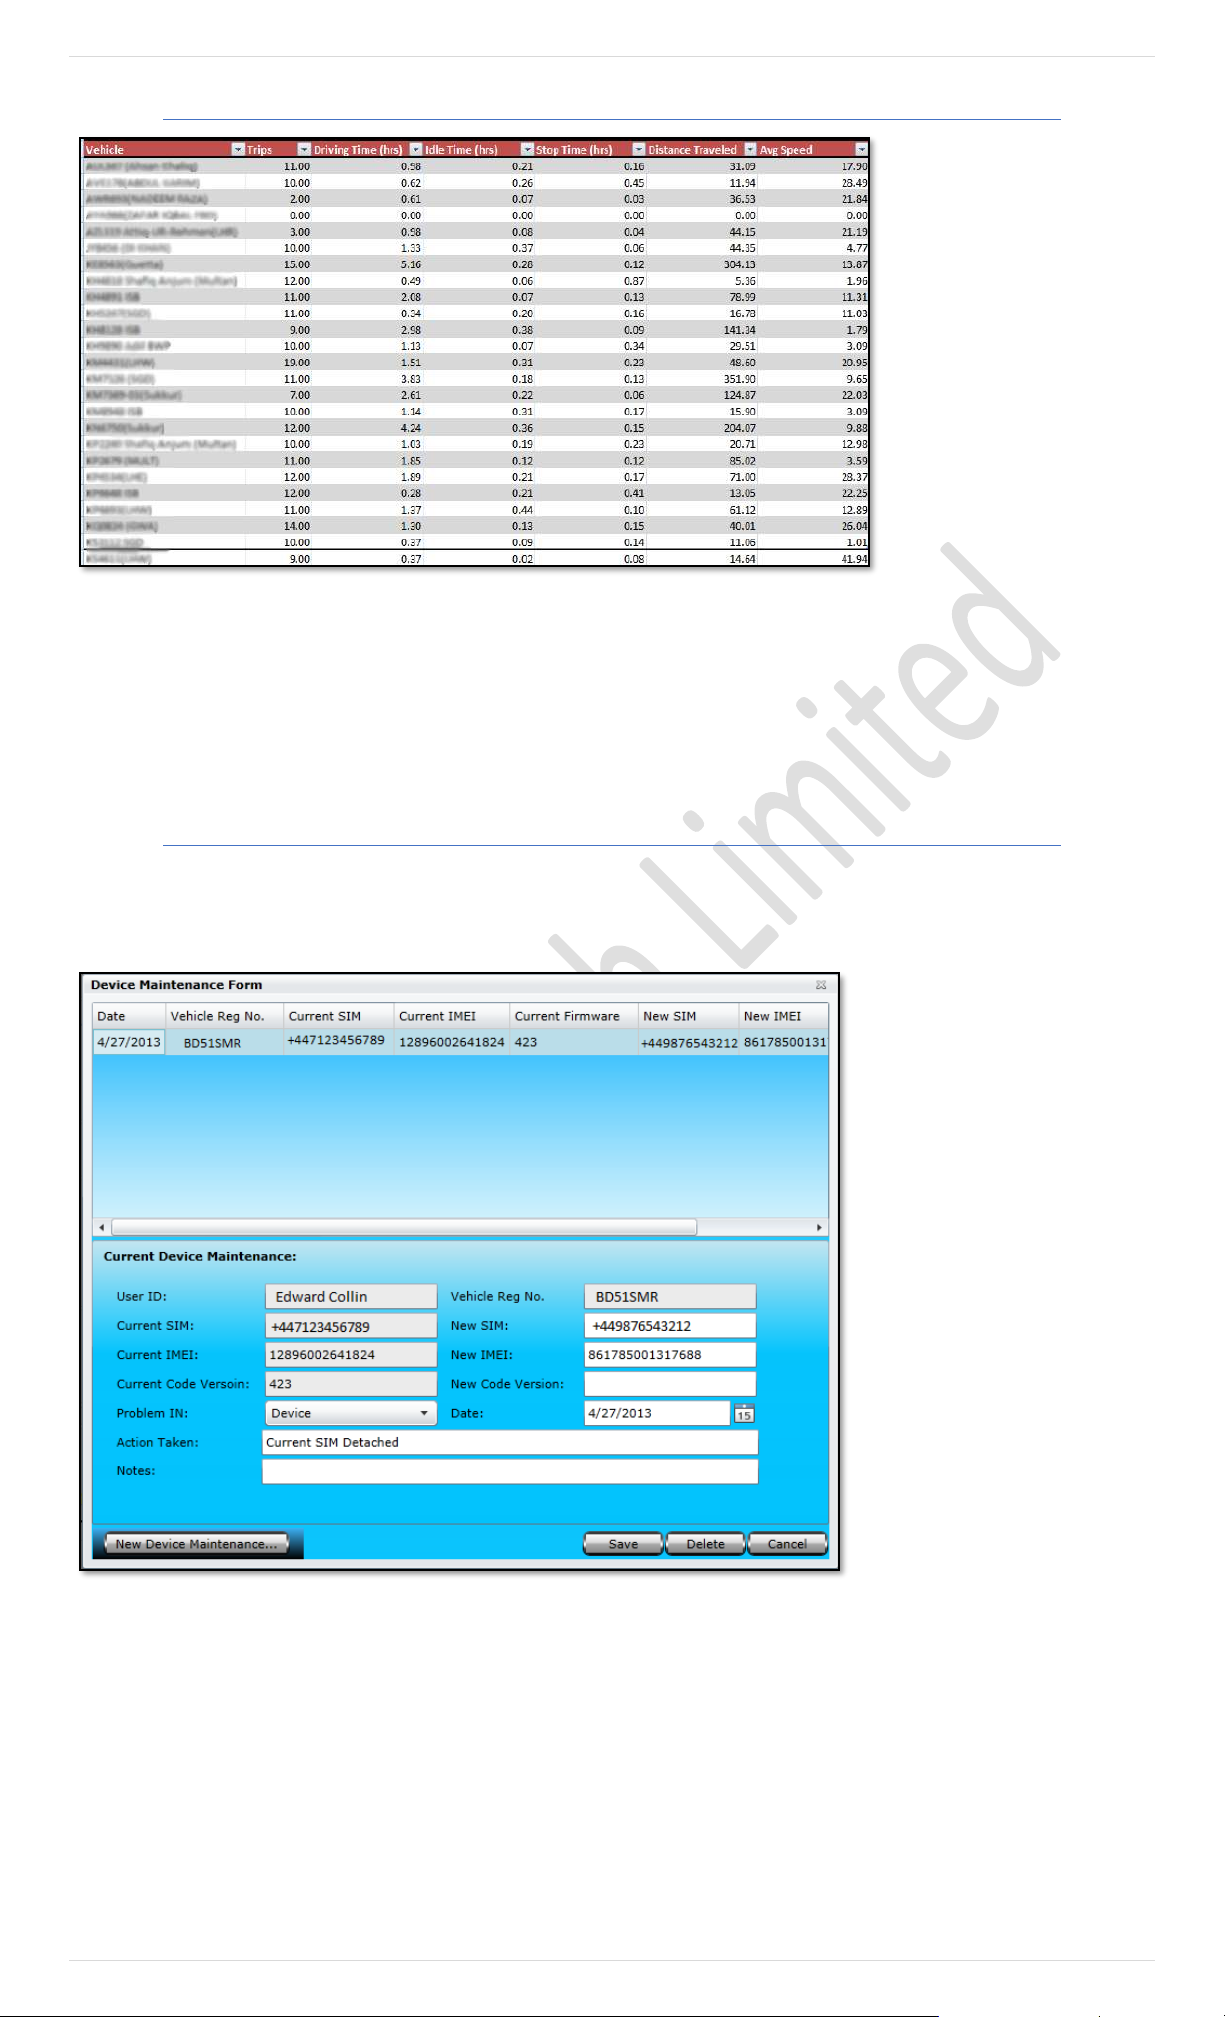
69 | P a g e
Attribute
Attribute Report – is designed
for such users who are
handling a complete fleet of
vehicles and requires a
comprehensive report of
events which has specific
device attribute like ‘Door
open’ or ‘Safe Open’ made by
all the vehicles that are in a
group/ fleet. Clicking this
report will open up a dialog
box (Image provided below) which
contains a dropdown list labelled as Device, where a single vehicle could be selected from the list available to generate a report
for a specific vehicle. To get a report for the whole group, select the desired group from the dropdown list labelled as Group.
Enable the check box labelled as All Vehicles if report is required for all the vehicles that are under different groups exist under
a master account. Specify Report Time Period which includes Date & Time range, Select Input and it’s on/Off state and click
Get Report.
Device Maintenance
Complete maintenance history of a device could also be saved in the Pegasus System which is mostly needed by such companies
maintaining a large fleet of vehicles. Selecting this option will open Device Maintenance dialog box as shown in the below image:
Device Maintenance Form dialog
box is divided into two segments;
the upper part of the Device
Maintenance Form dialog box is
called Device Maintenance Grid
where all the details of a device
maintenance history could be
viewed. The rest of the part is
meant to add new maintenance
details or edit any previous details.
Let’s create a new Device
Maintenance and we will go
through all the input boxes in
detail.
Click New Device Maintenance
button and you will notice that an
empty form with different options
will appear in the second half of the Device Maintenance Form. Now it’s time to fill in the rest of the fields as described below:
K. User ID
User ID text box will populate automatically and it will
be same user ID with which you have logged in to the
Pegasus system.
L. Vehicle Registration Number
Enter the Vehicle Registration Number for which the
device maintenance is performed
M. Current SIM
Current SIM text box will populate automatically and
will show the SIM number currently used in the
device.
N. New SIM
Enter the New SIM number if current SIM has been
replaced. Leave blank if not.
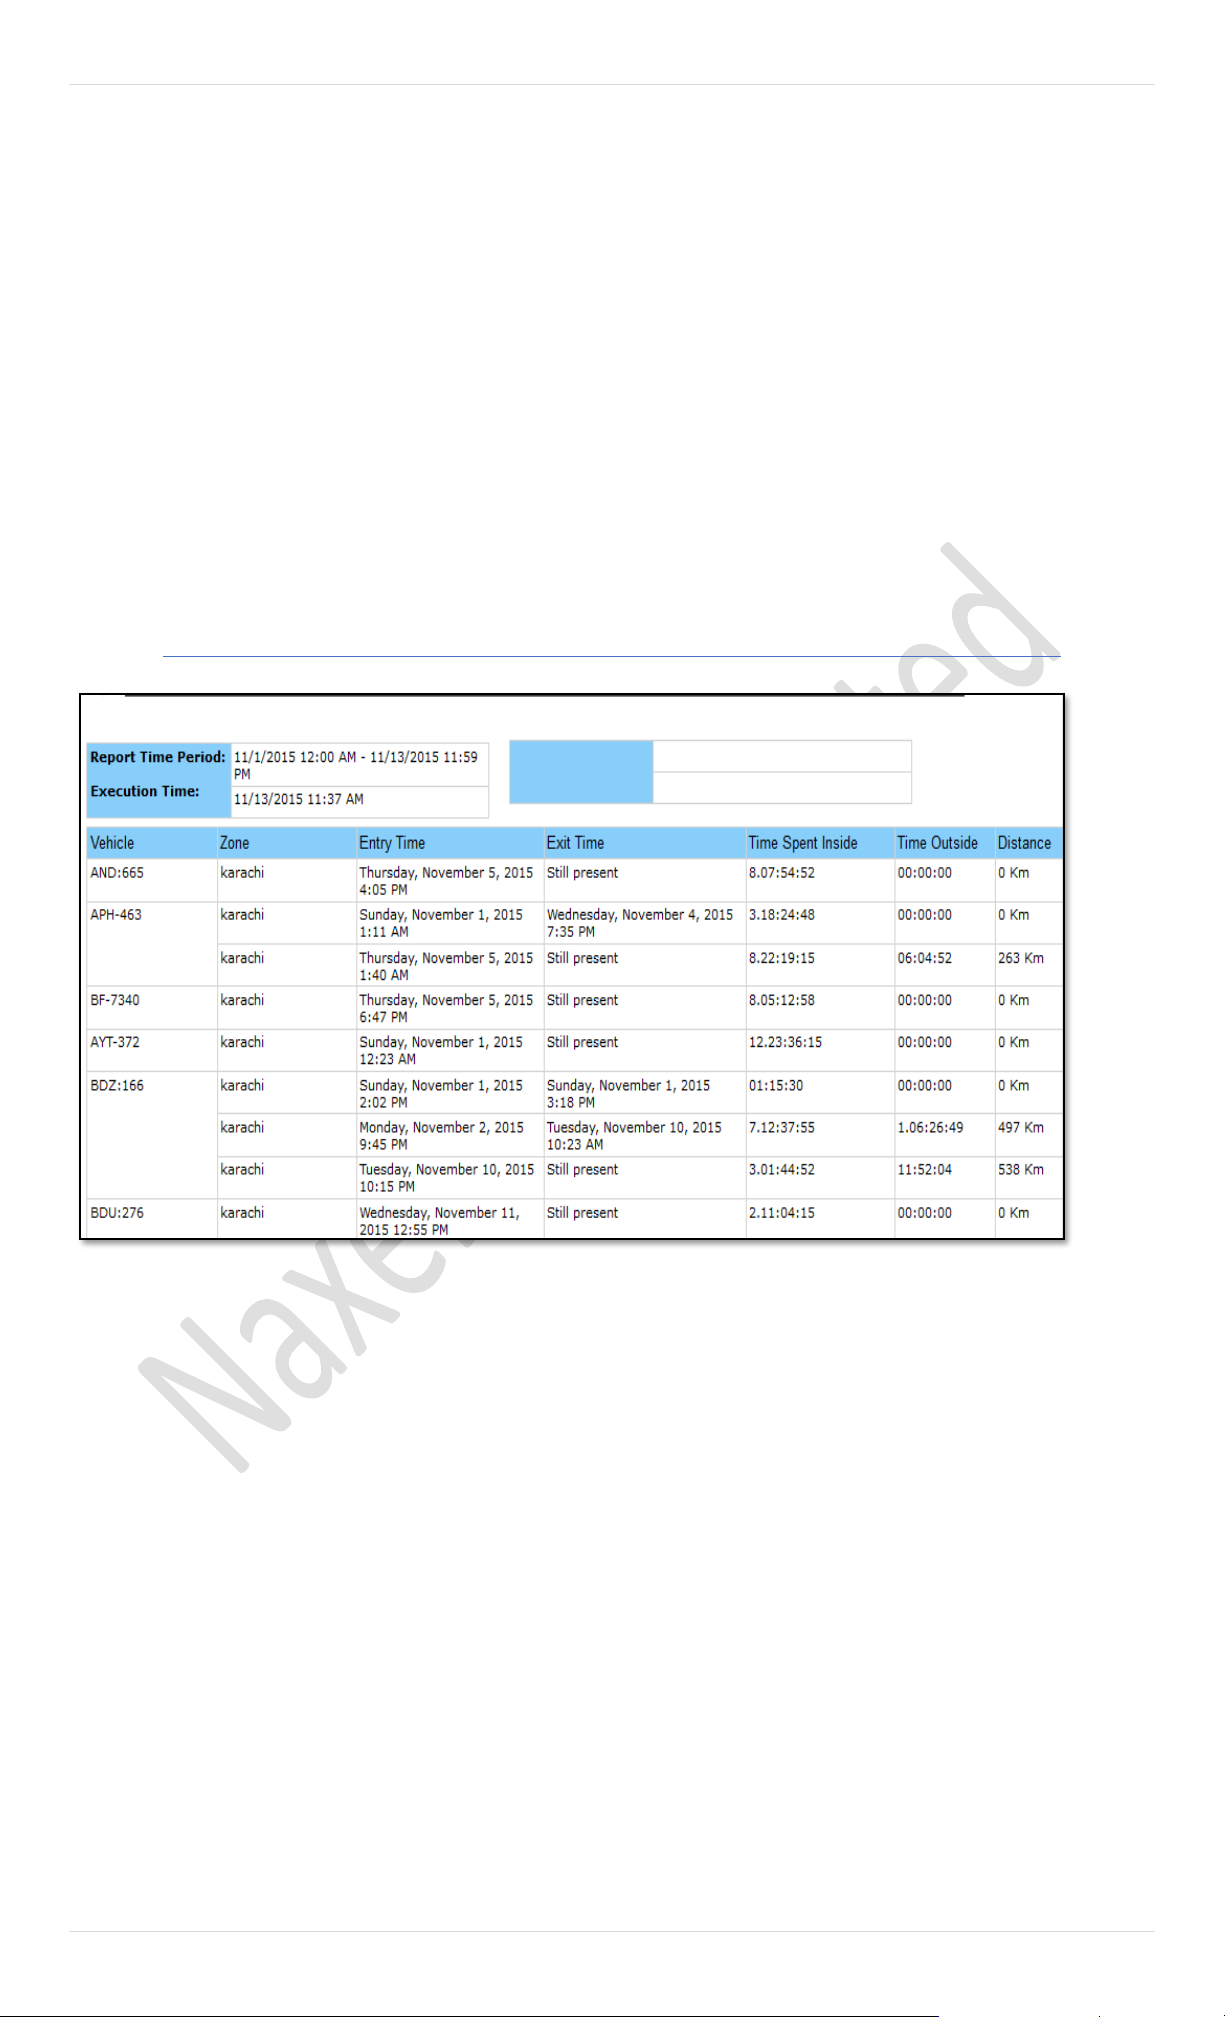
70 | P a g e
O. Current Code Version
Current Code Version text box will populate
automatically and will display the version of the
firmware currently installed in the device.
P. New Code Version
Enter the New Code Version if the firmware of the
device is updated.
Q. Problem In
Select the appropriate options for problem area from
the dropdown list for which the device maintenance
has been performed.
R. Date
Select the date from the associated calendar when
the device maintenance has been performed.
S. Action Taken
Write the Action Taken against the problem
detected while performing device maintenance.
T. Notes
Write Notes in this field and these notes could be
related to the part changed in the device or
according to the device maintenance performed.
GEO Fence Report
GEO Fence Report – This report details the entries and exits of vehicles inside and outside of the defined GEO Fences. Clicking
this report will open up a dialog box (Image provided below) which contains a dropdown list labelled as Device, where a single
vehicle could be selected from the list available to generate a report for a specific vehicle. To get a report for the whole group,
select the desired group from the dropdown list labelled as Group. Enable the check box labelled as All Vehicles if report is
required for all the vehicles that are under different groups exist under a master account. Specify Report Time Period which
includes Date & Time range, Select Route/Zone from side window and click Get Report.
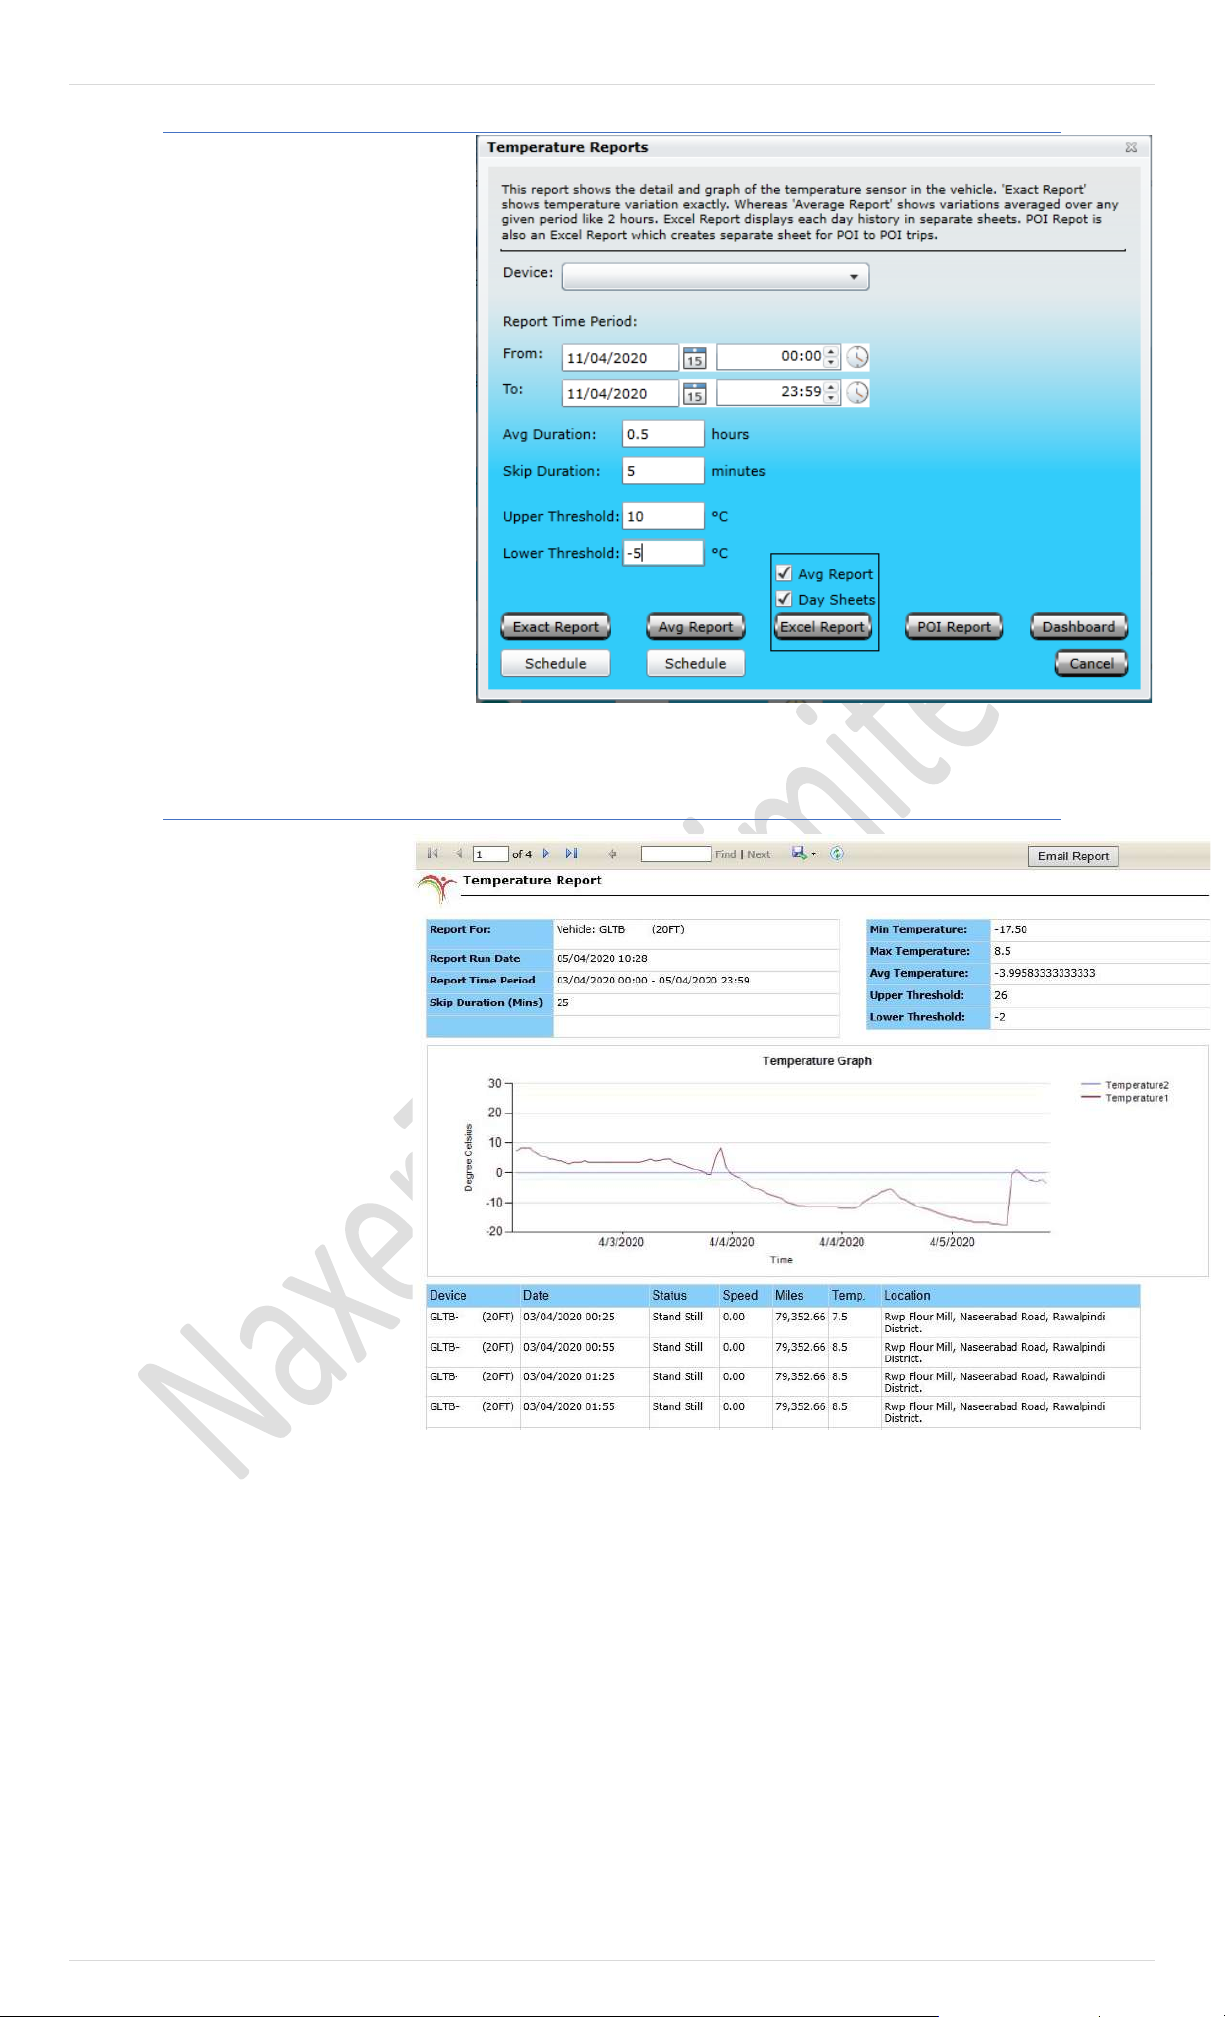
71 | P a g e
Temperature Report
Pegasus allows you to get several types of
reports to monitor and analysis temperature
sensor.
Avg. Duration. Enter the number of hours or
if you want to get report for half or quarter
hour you can put value i.e., .5 or .25
Skip Duration. This is threshold time which
you want to skip in selected report.
You can set threshold temperature limit from
Maximum to Minimum.
By Clicking on Day Sheets will separate sheet
on daily basses.
There are five (5) types of reports which could
help to manage and maintain your fleet
temperature, which we will discuss one by one.
Exact Report
A report will be generated which will
contain data extracted from the
database, as per the Date & Time,
duration and range specified. Events
that are reported in this report are
Device Name, Date & Time at which
device communicated the
temperature reading, Status of
vehicle, Speed of the vehicle,
Odometer, Temperature reported
and current Location of the vehicle.
A graph is also created as per the
values extracted from the database.
Above image shows how a
Temperature Exact Report looks like.
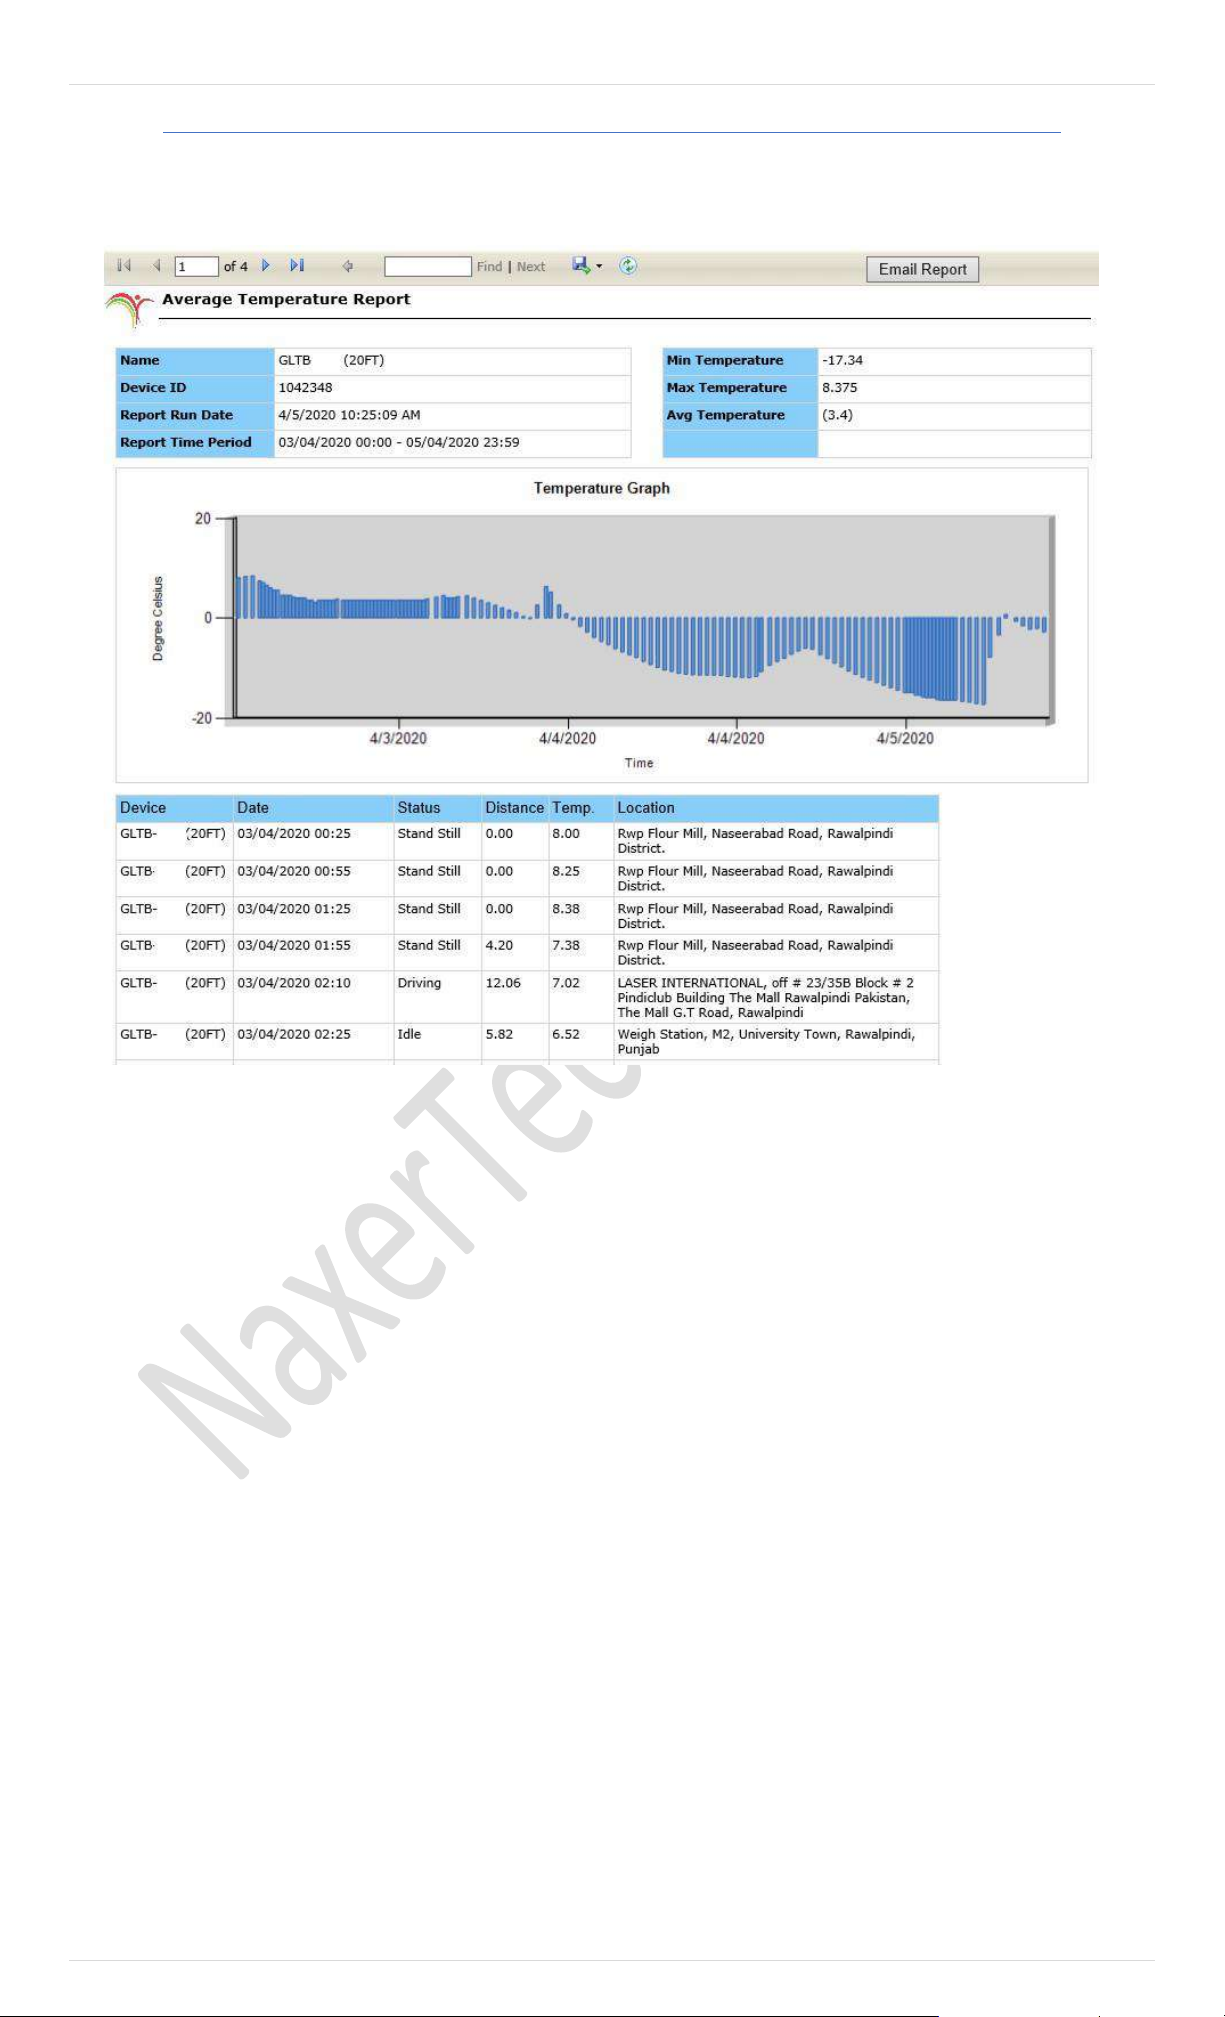
72 | P a g e
Temperature Report – Average Report
Temperature Report provides a detail history and graph of the temperature sensor installed in a vehicle with the device. Clicking
this report will open up a dialog box (complete details about the dialog box are given above under Temperature Report) and click Average
Report button.
A report will be generated which will contain data extracted from the database, as per the Date & Time , Average duration
and temperature range specified. Events that are reported in this report are Device Name, Date & Time at which device
communicated the temperature reading, Status of vehicle, distance, Temperature reported and current Location of the
vehicle. A graph is also created as per the values extracted from the database. Above image shows how a Temperature Report
looks like.
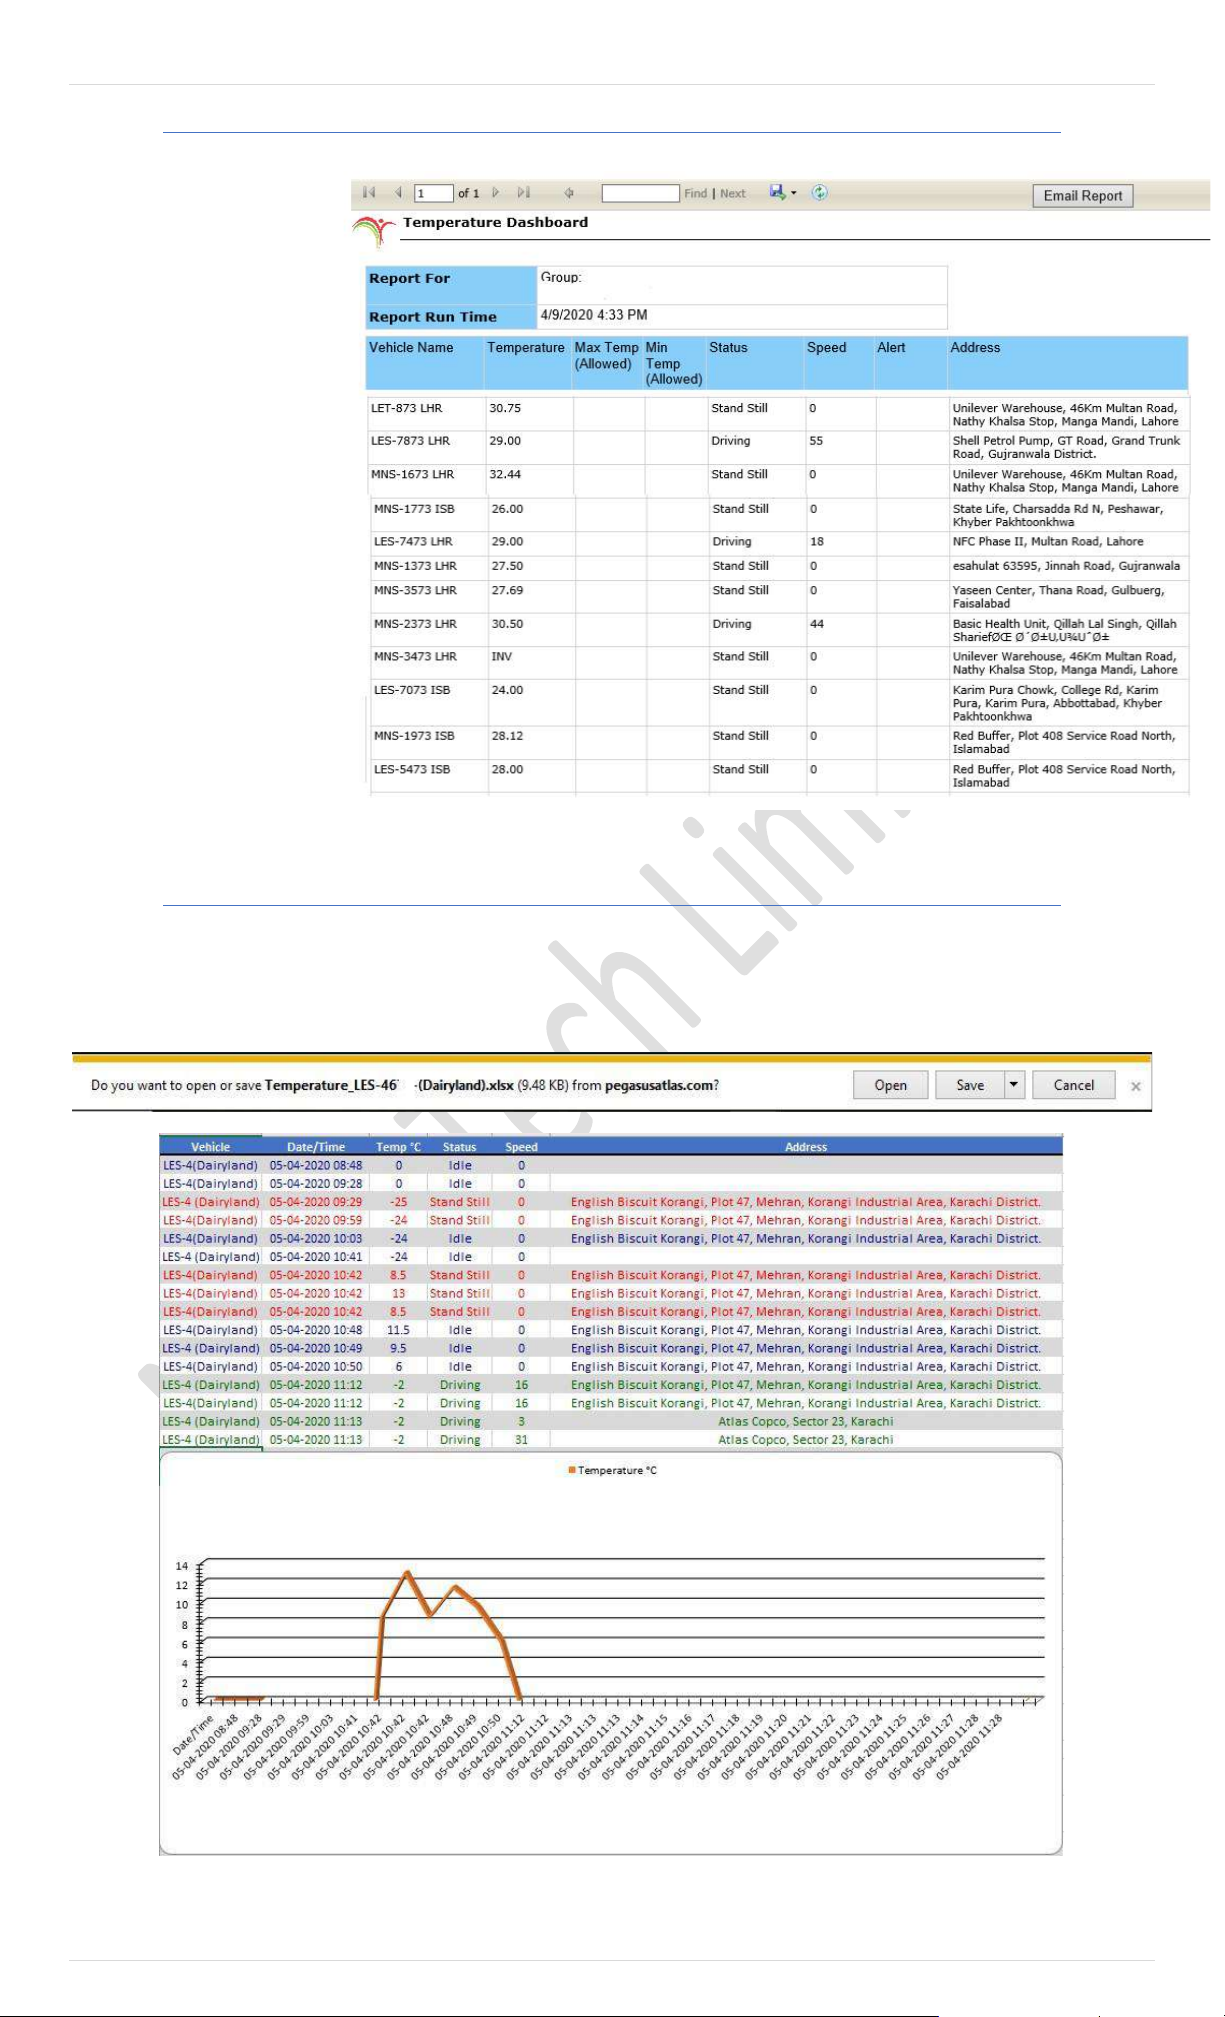
73 | P a g e
Temperature Report – Dashboard Report
Dashboard Report will
provide you real time
vehicle temperature data
for whole Main Group
including its subgroups in
Pegasus. You can identify
current Temperature of
vehicle with its location and
current state of speed
including driving status.
Temperature Report – Excel Report
Pegasus offers you to view reports in built in format (preferred) and also you can extract reports in Excel sheet for its further
customization…etc. By clicking on Excel Report in Temperature Report window it will extract information from the database,
as per the Date & Time, Average duration and temperature range specified.
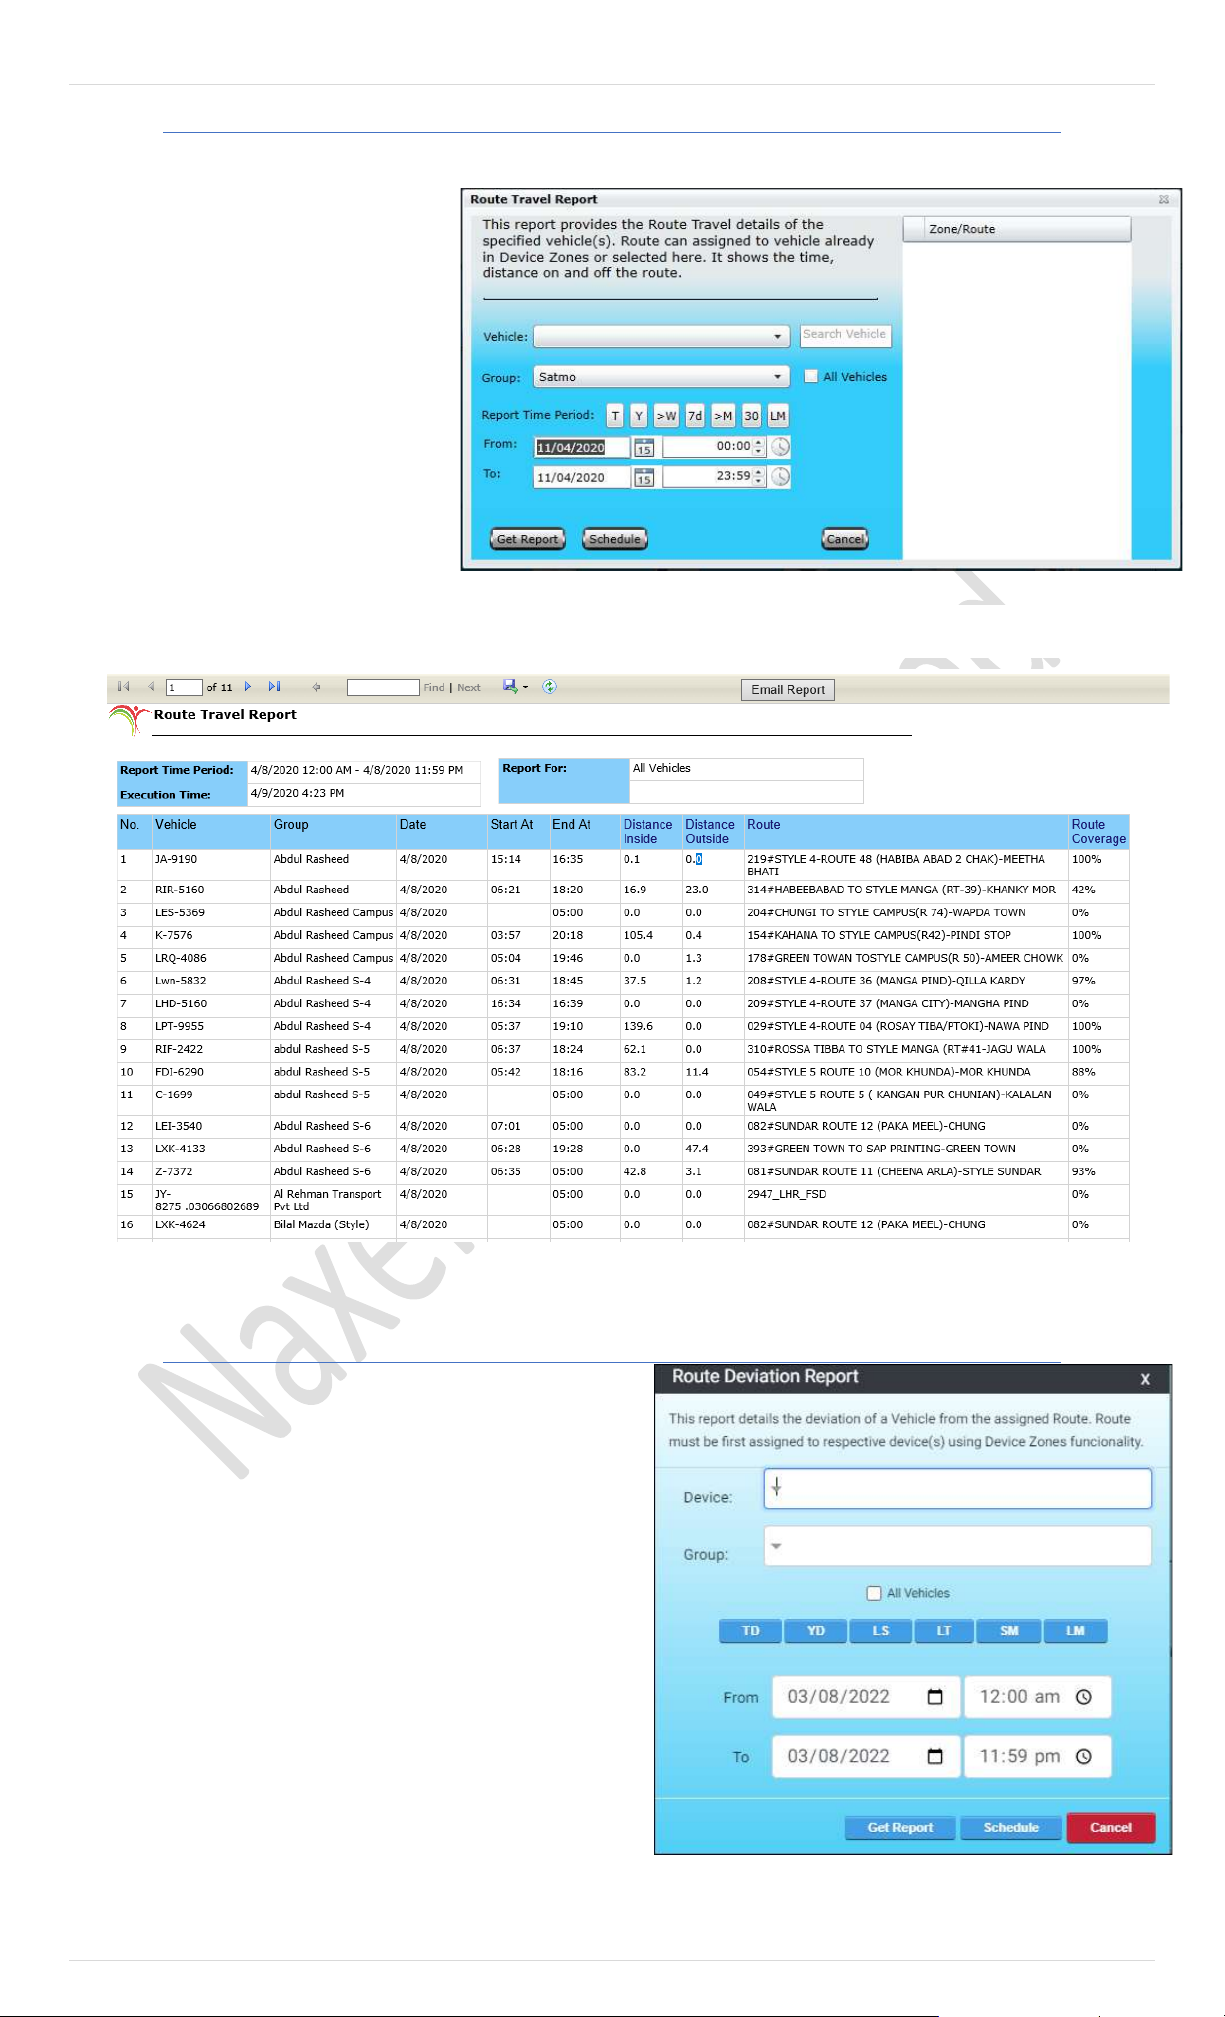
74 | P a g e
Route Travel Report
Route Travel Report provides you an
overview of all the trips made by the
selected vehicle or a group on a specific
selected route. Clicking this report will
open up a dialog box which contains
option to select or search vehicle, Group
with selected device or enable check box
to select all vehicle in specific group.
Use your desire date and time and get
Report.
This report analyzes list of routes (These can be selected from Route travel Report dialog box or in Device Zone) and measures travel distance
inside and outside of routes with detailed vehicle / group name and present route coverage summary in percentage.
Route Deviation Report
Devices/Vehicles which are assigned certain routes should
not deviate from the given route. If so, the route deviation
report will let the user know if the vehicle is deviated or
not. This report provides the details of the deviation of a
Vehicle from the assigned Route. Route must be first
assigned to respective device(s) using Device Zones
functionality.
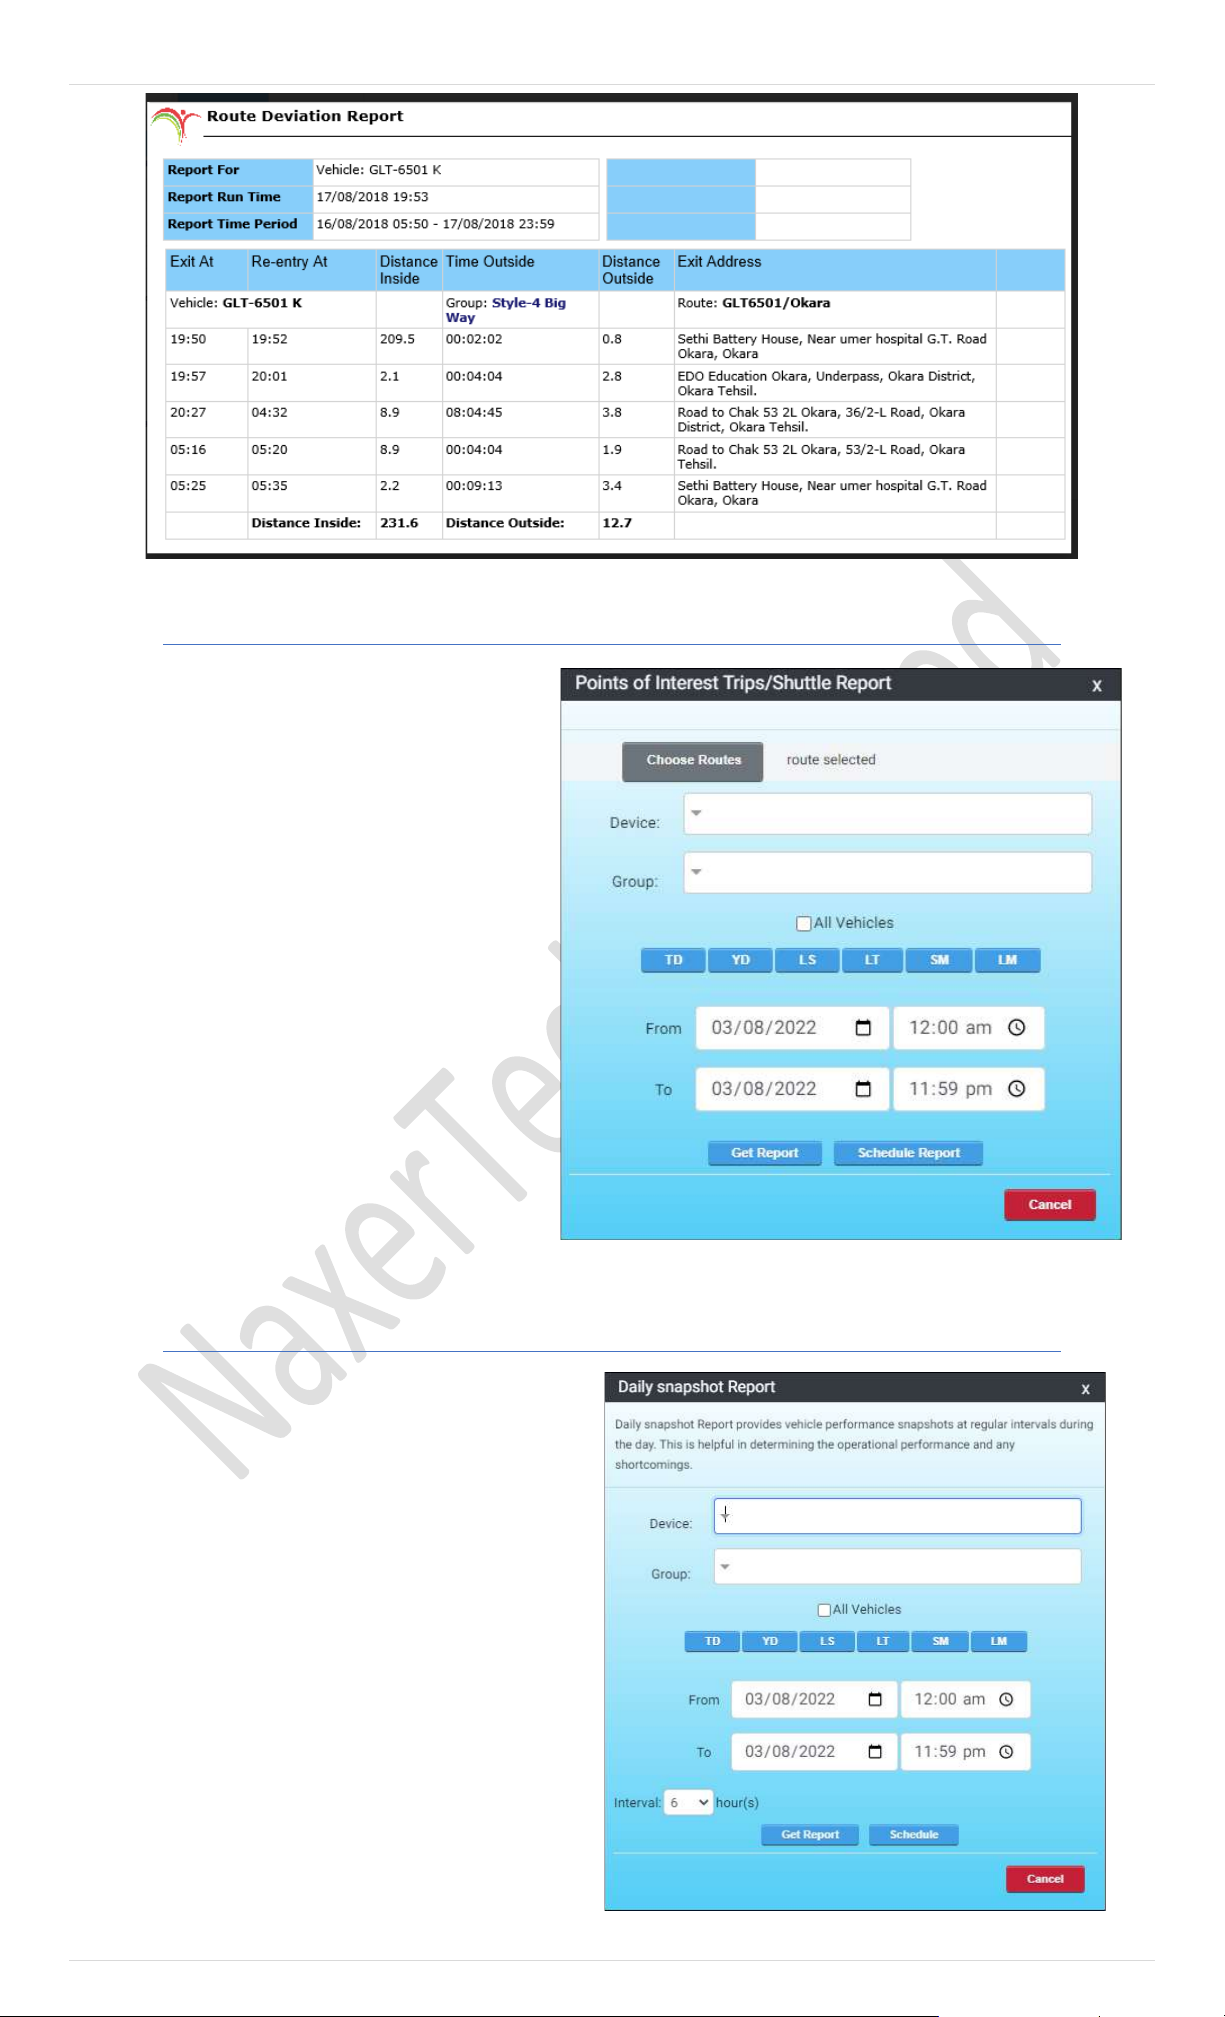
75 | P a g e
POI Shuttle Report
Daily Snapshot Report
Daily snapshot report provides vehicle performance
snapshots at regular intervals during the day. This is
helpful in determining the operational performance
and any shortcomings. With the daily report
user/client can know the condition of the vehicle and
its performance daily.
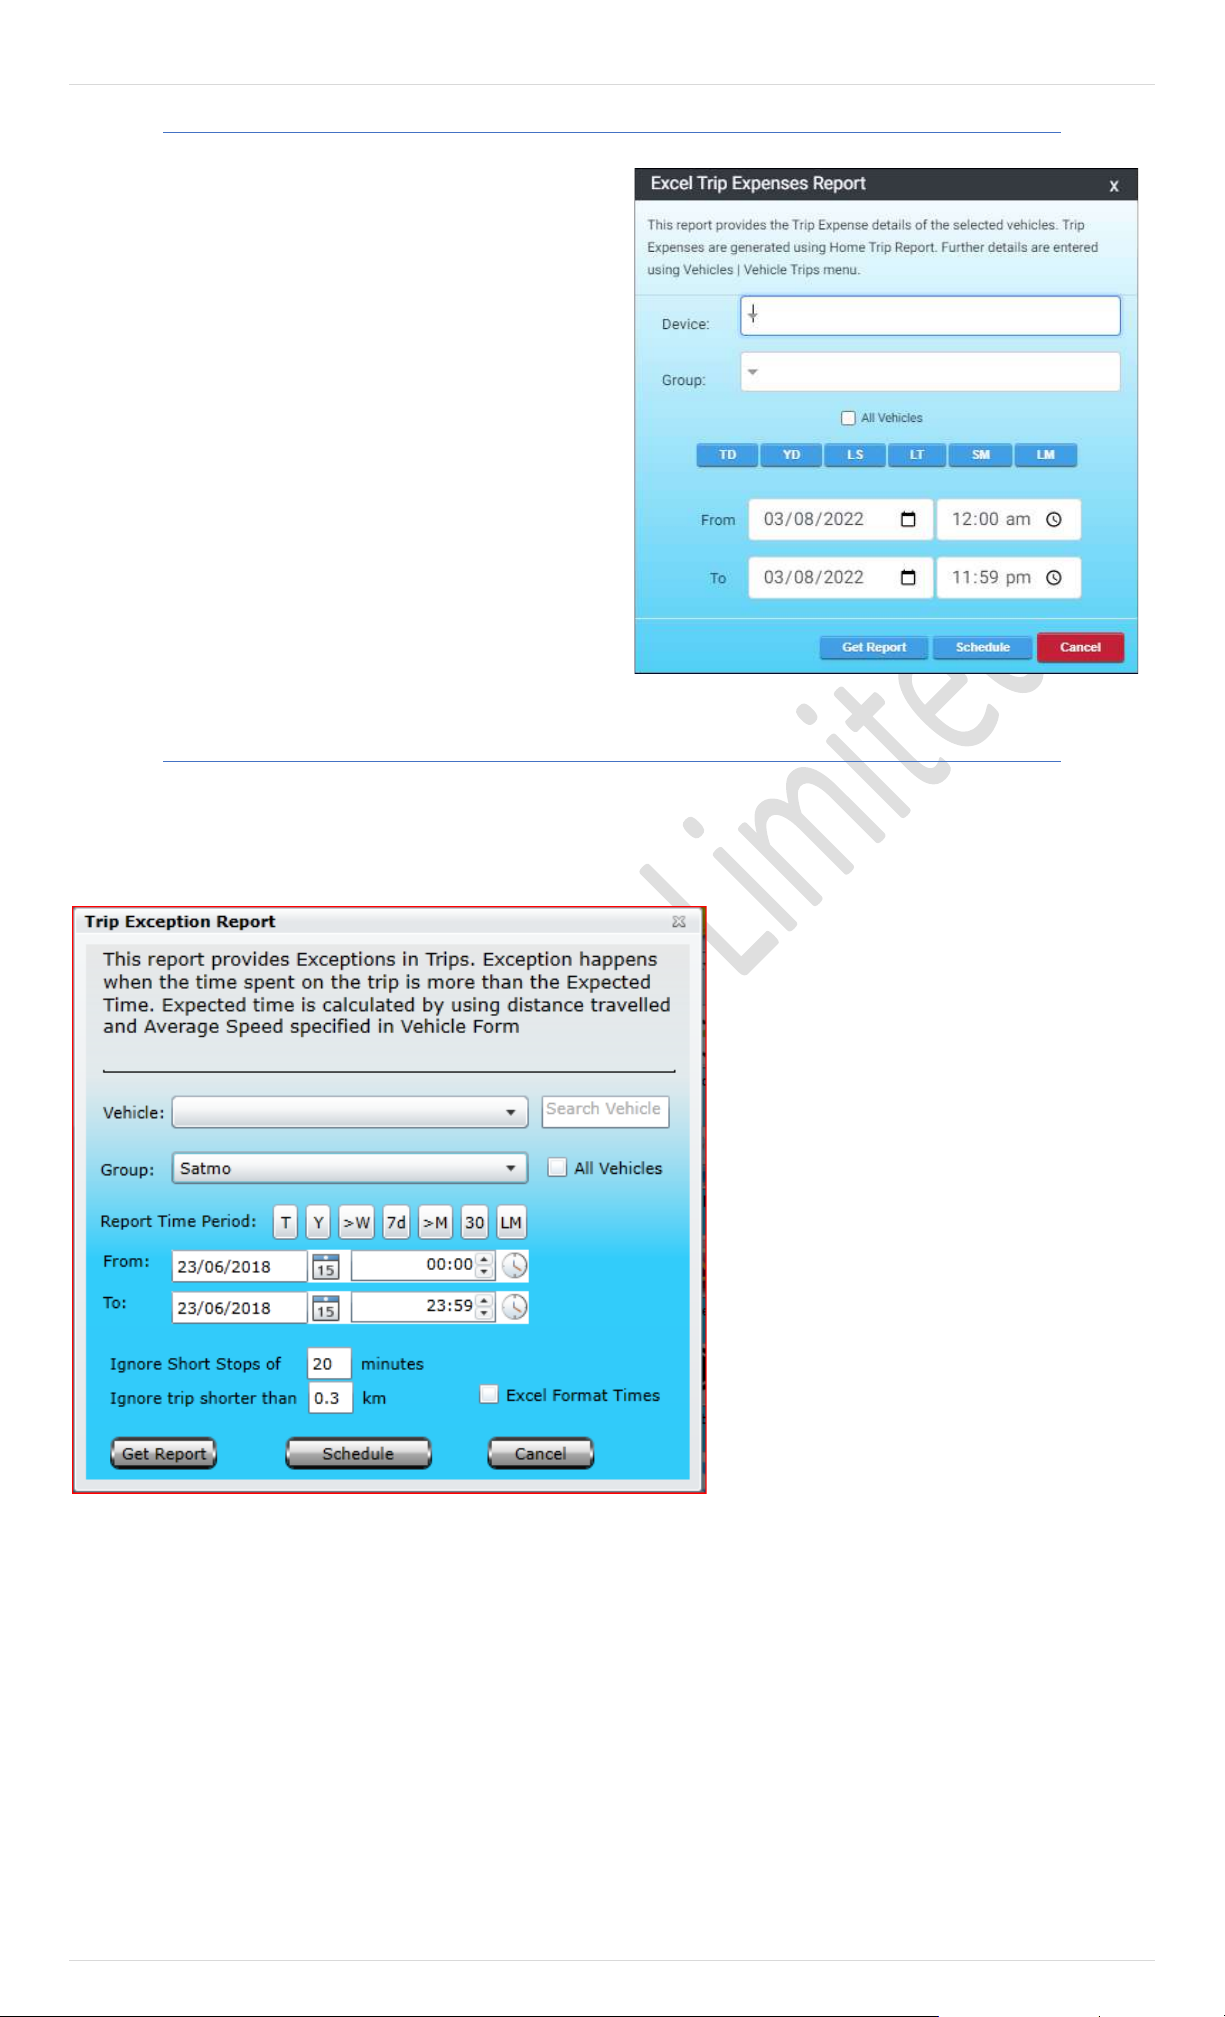
76 | P a g e
Trip Expenses Report
Trip expenses report provides the details of each trip
expenses of each vehicle/device. Trip expenses are
generated using Home Trip Report. Further details are
entered using Vehicles l Vehicles Trips menu.
Trip Exception Report
This report will provide you analysis of a vehicle or group when your trip time is more important. This report will analysis total
travelled distance with trip time and expected time. More importantly if vehicle gets late from expected time, it will be
highlighted in difference of time. Start location with reached location along with exact timing makes this report worthy.
For getting this report you need to select vehicle
or group from the available dropdown list or you
may find it by search vehicle option.
Report time period will offer you short cuts to
specify time frame.
Ignore short stops and Ignore trip shorter than
options are available for customization according
to the need of report.
The report will be generated which will contain
data extracted from the database, as per the Date
& Time range specified, in a new tab or window.
Events that are reported in this report are Device
Name, Date & Time, travelled distance, trip time,
expected trip duration, calculate difference
between trip time and expected time if any along
with trip locations details.
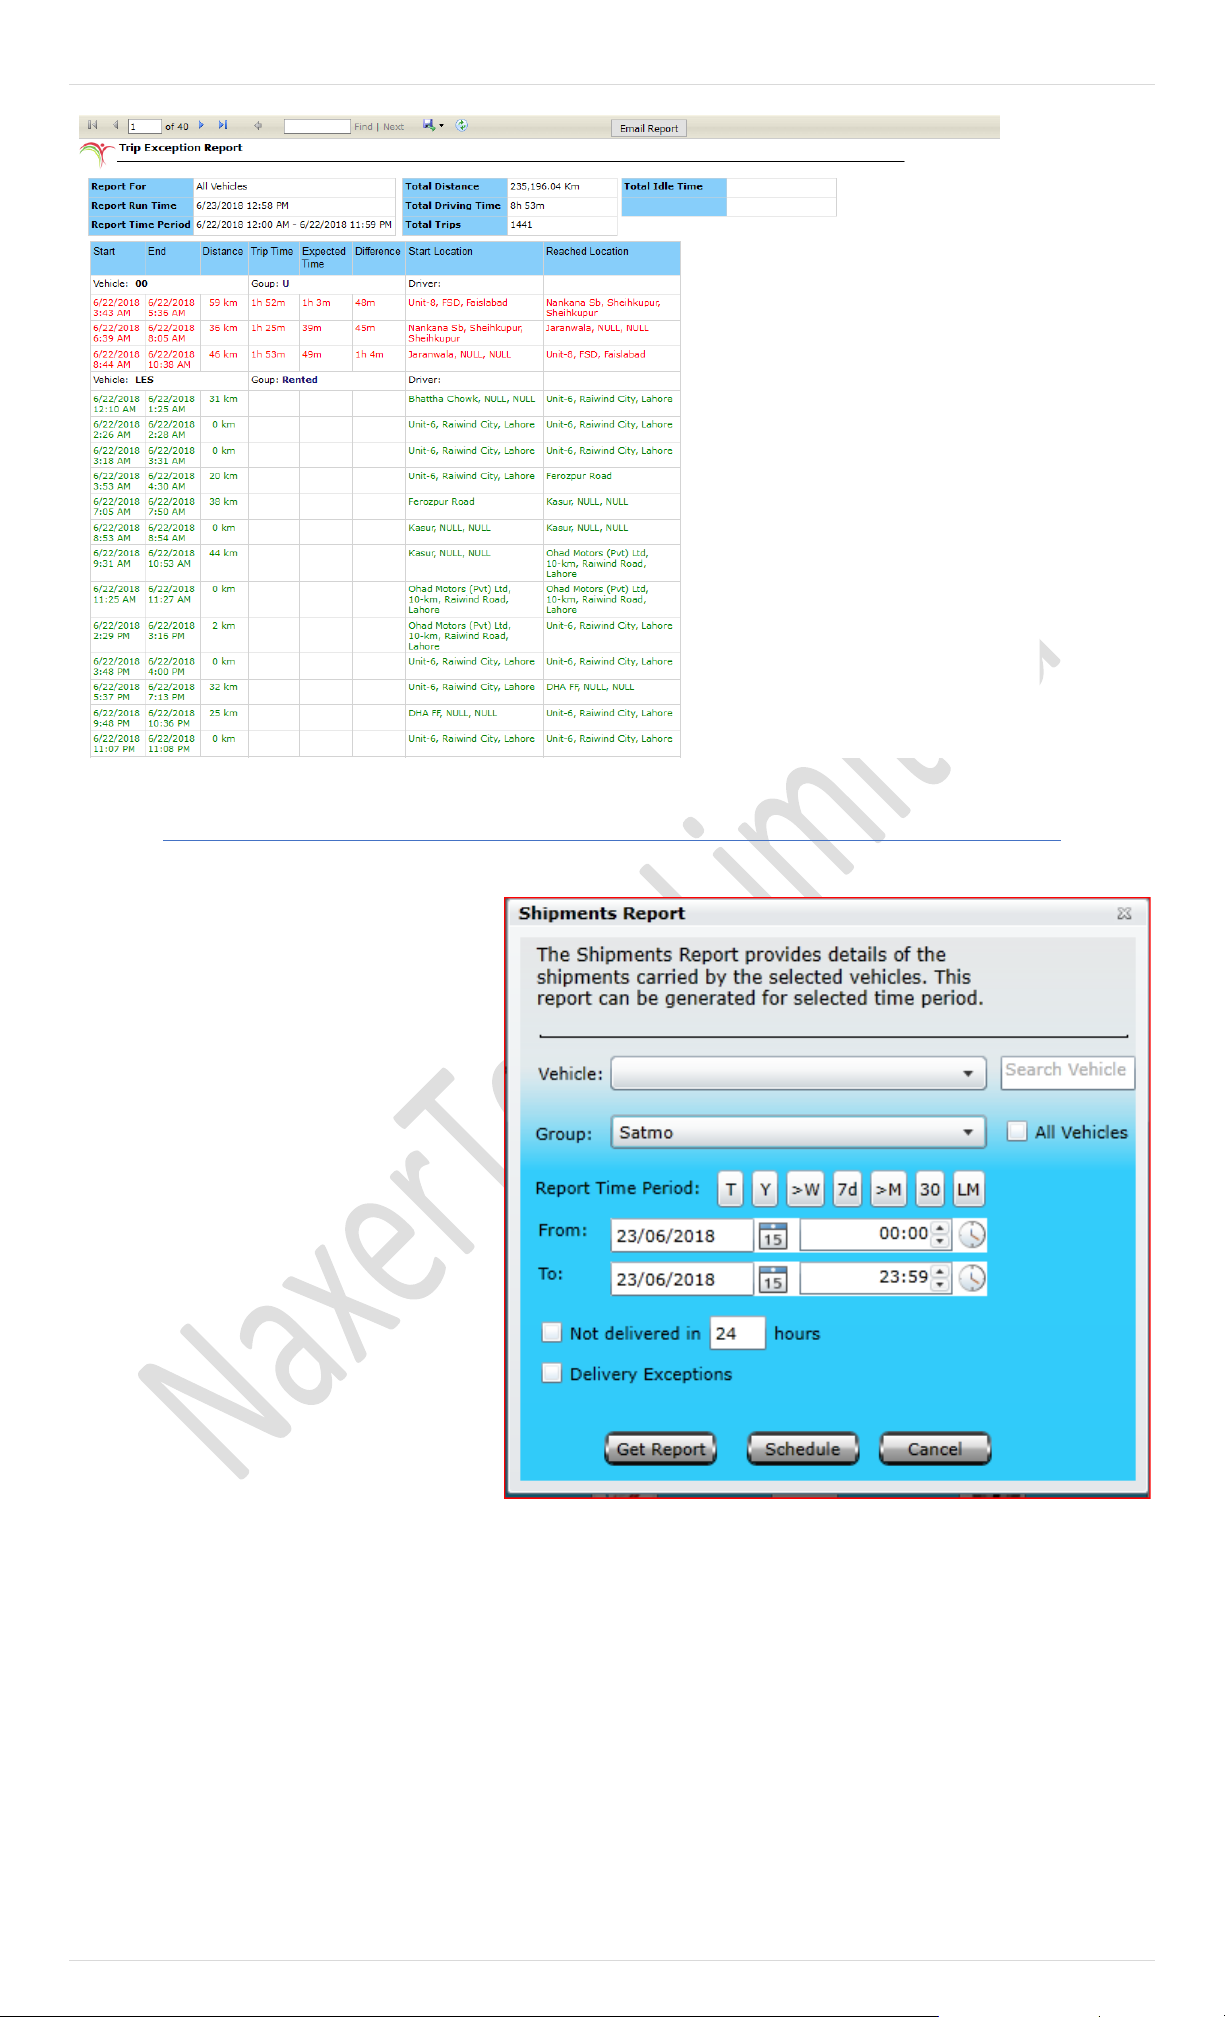
77 | P a g e
Shipment Report
New shipment details along with selected vehicle
information can be set under vehicle tab in main
GUI of Pegasus system.
The report contains comprehensive details such as
shipment order number, selected vehicle number,
source and destination of shipment, status of
shipment, weight of shipment, start time of
loading, end time of loading, delivery time with
finishing up time of the shipment delivery.
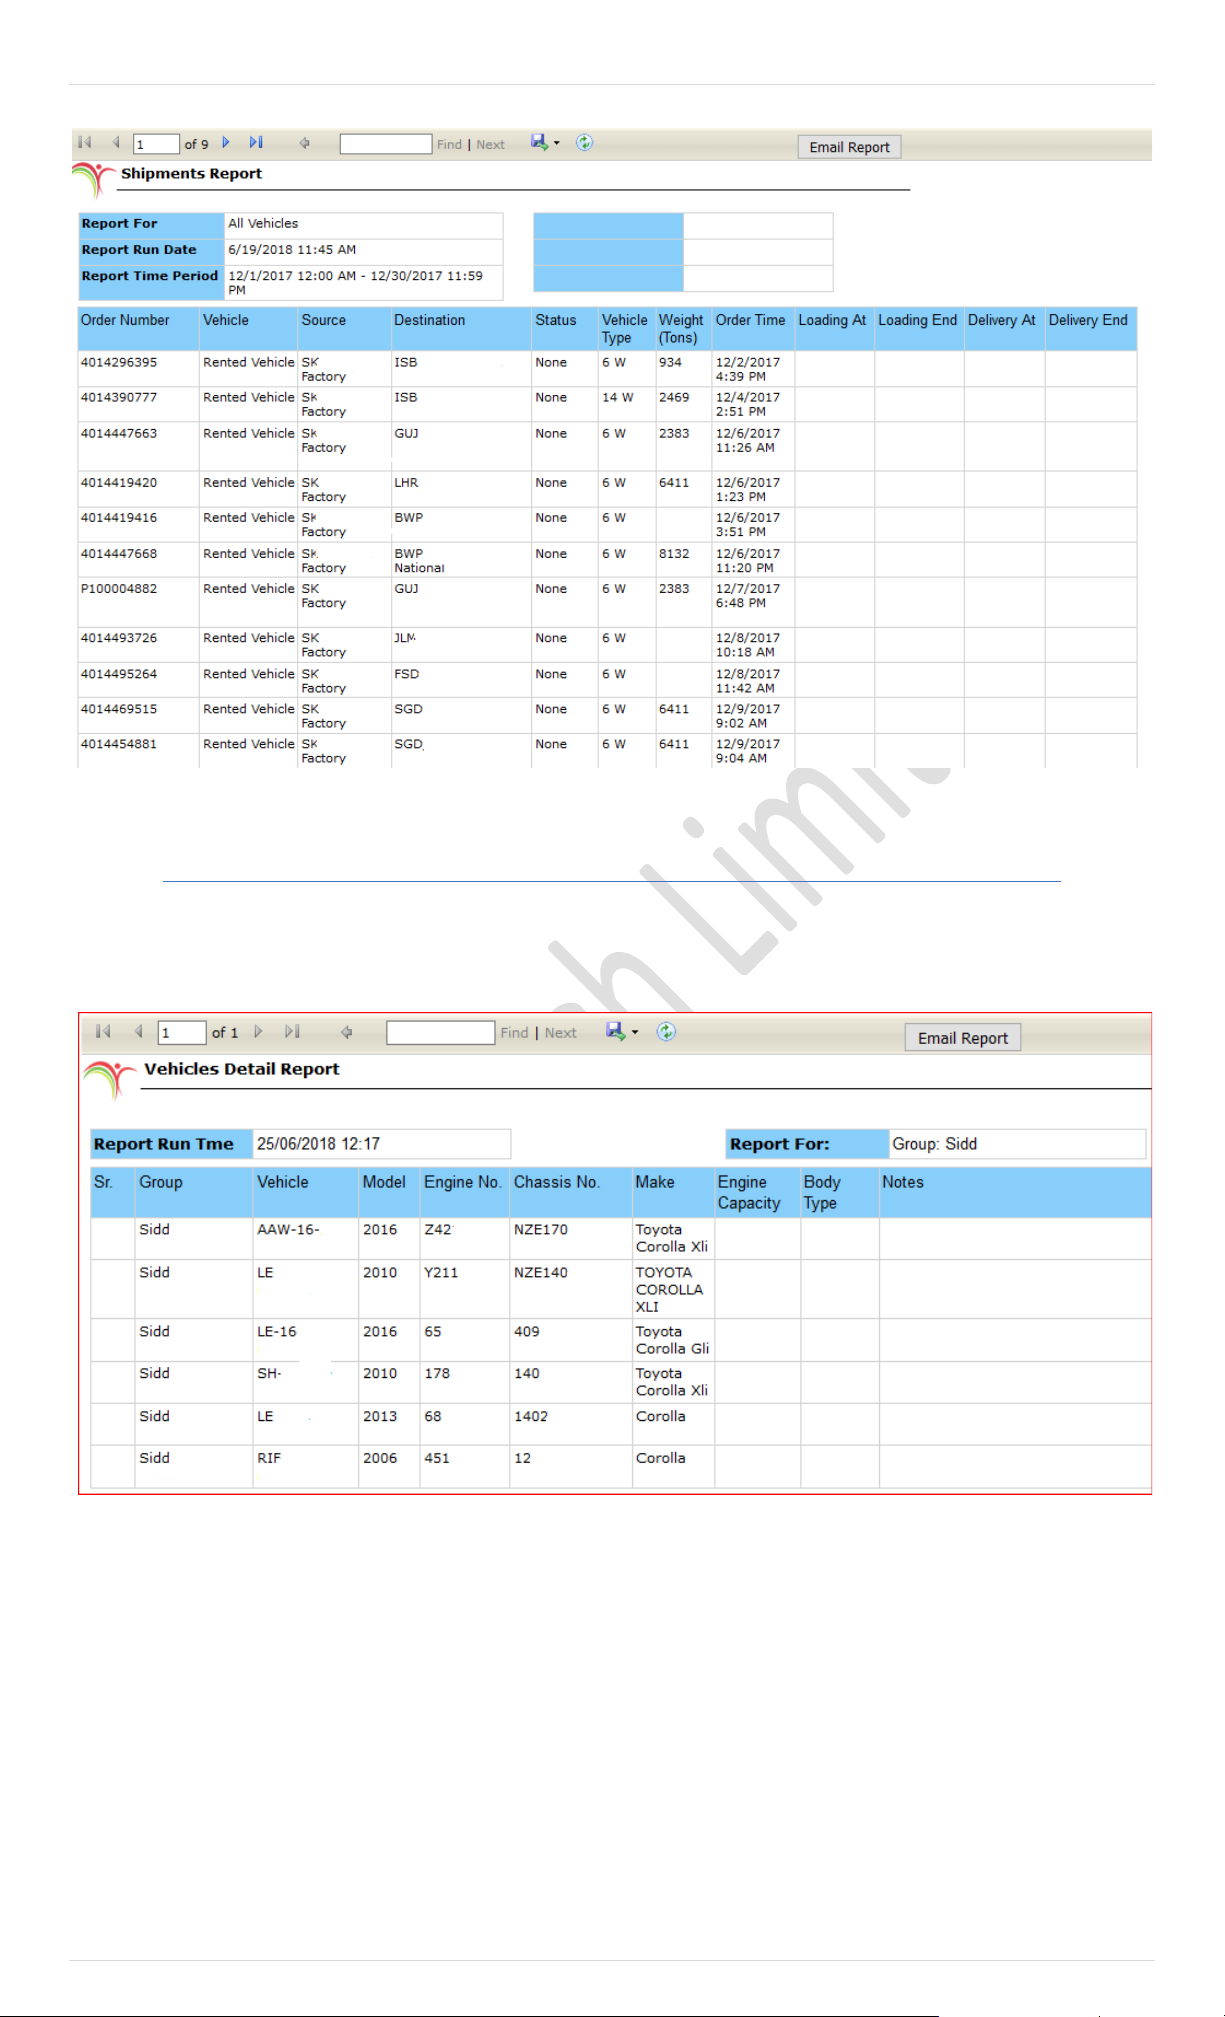
78 | P a g e
Vehicle Report
This report provides vehicle record of each vehicle in the selected group. If no group available or selected, then all of the
authorised devices will be included in report.
All information regarding vehicle can be added in Manage vehicle under Vehicle tab in the main menu. This report will show
Group name, Vehicle registration number with Make / Model, Engine / chassis number with Engine capacity.
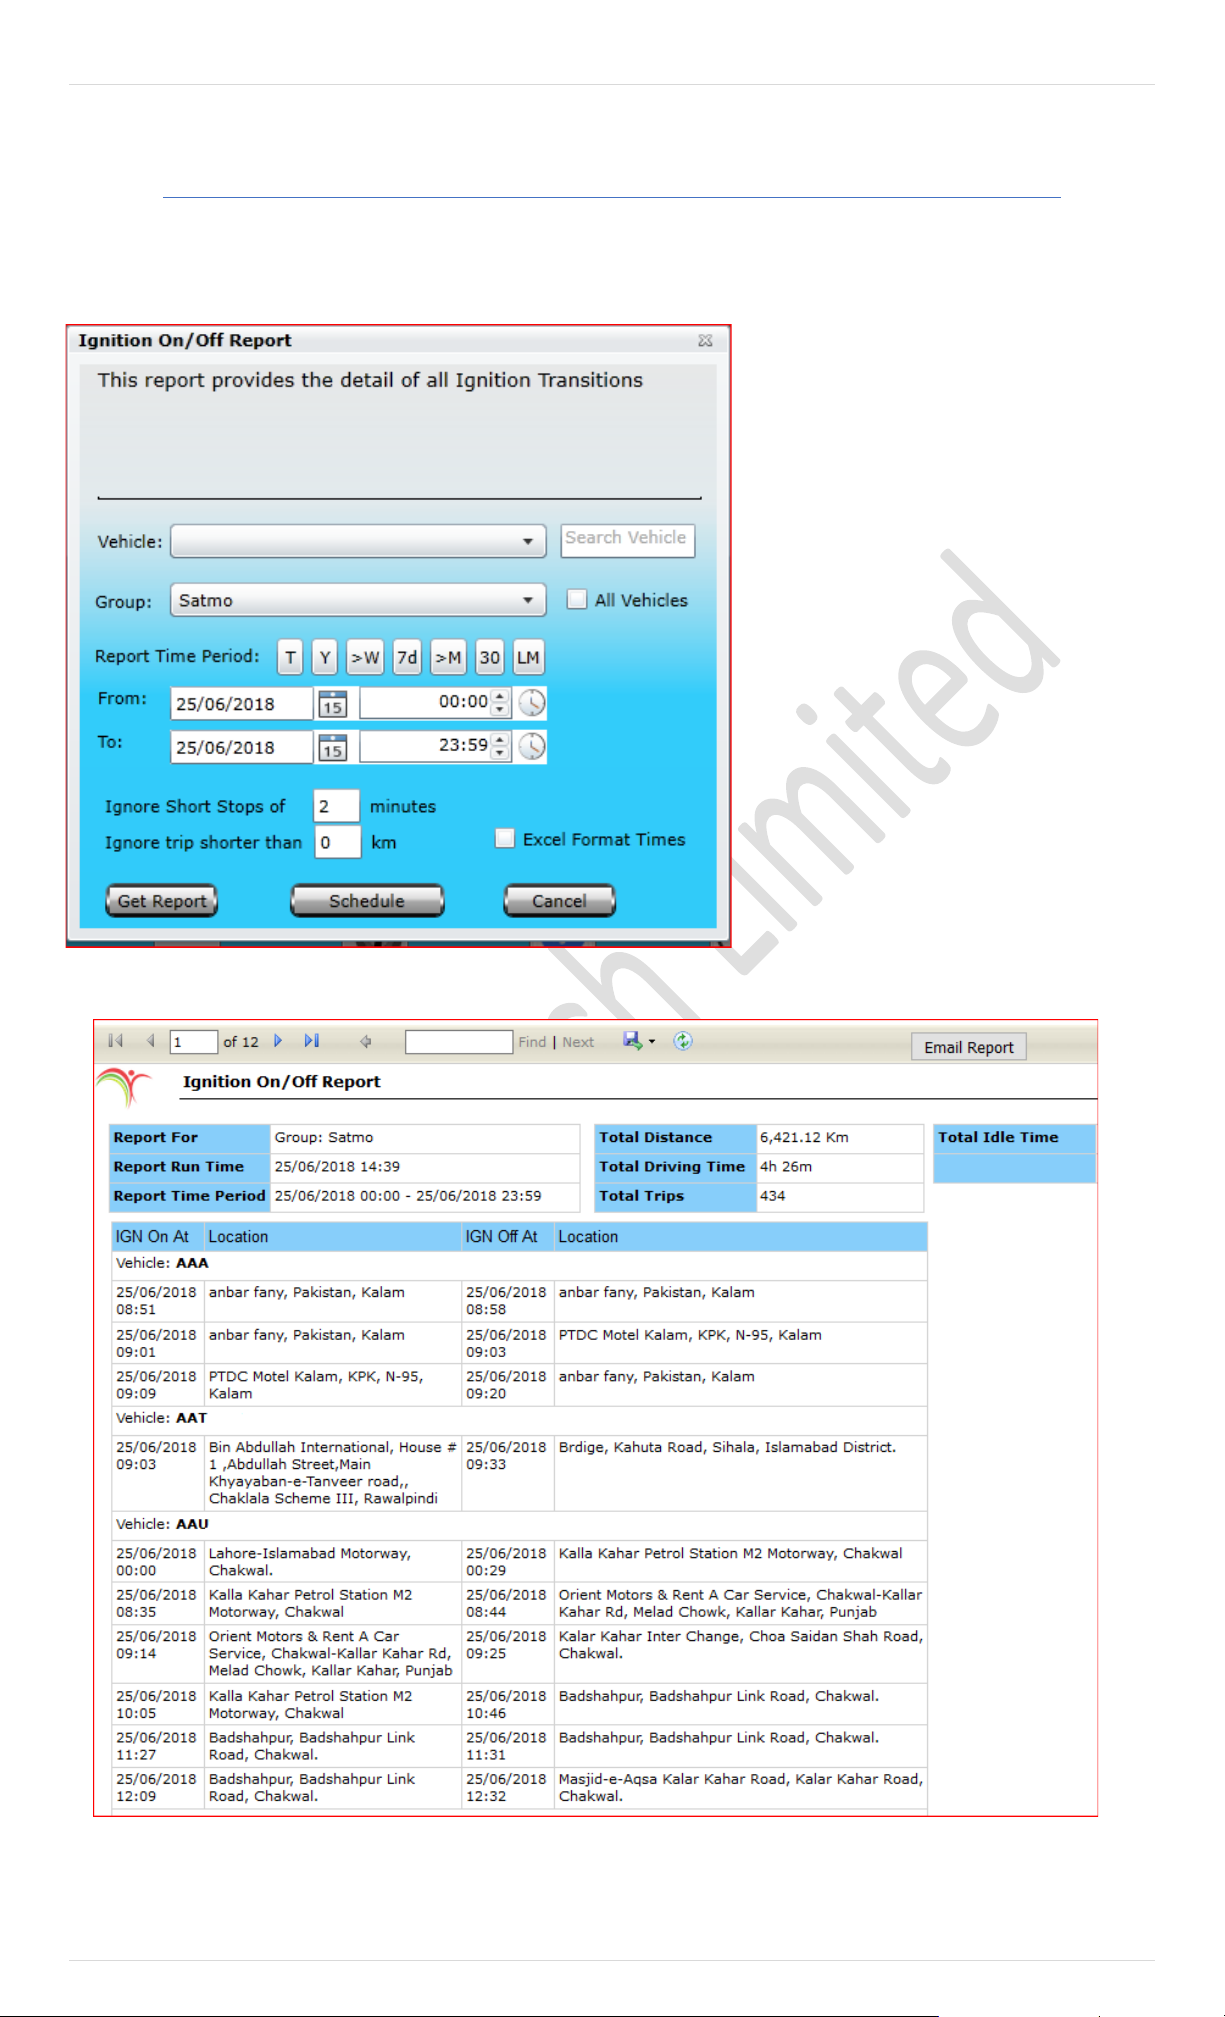
79 | P a g e
Ignition ON / OFF Report
This report will extract information from data base only for IGN ON/OFF with location respectively. You can have this report
for single vehicle or a group. For group selection, it will show you all vehicle IGN ON/OFF vehicle as listed in below pi ctures.
You can select vehicle from the list or group
selection is available in case of master account
is being used for your fleet.
If you select only group without selecting its
vehicle, it will show all the vehicle containing in
specific group.
Time period can be set by using standard
shortcuts or customized according to your
need.
You can set minimum threshold for short stops
and short trips.
Pegasus does support to export your selected
report to excel format as well as email to
multiple recipients. Which will discuss later in
report section.
It will calculate total distance, driving time with
number of trips. In Pegasus System trips are
calculated with combination of ignition
ON/OFF instead of source and destination.
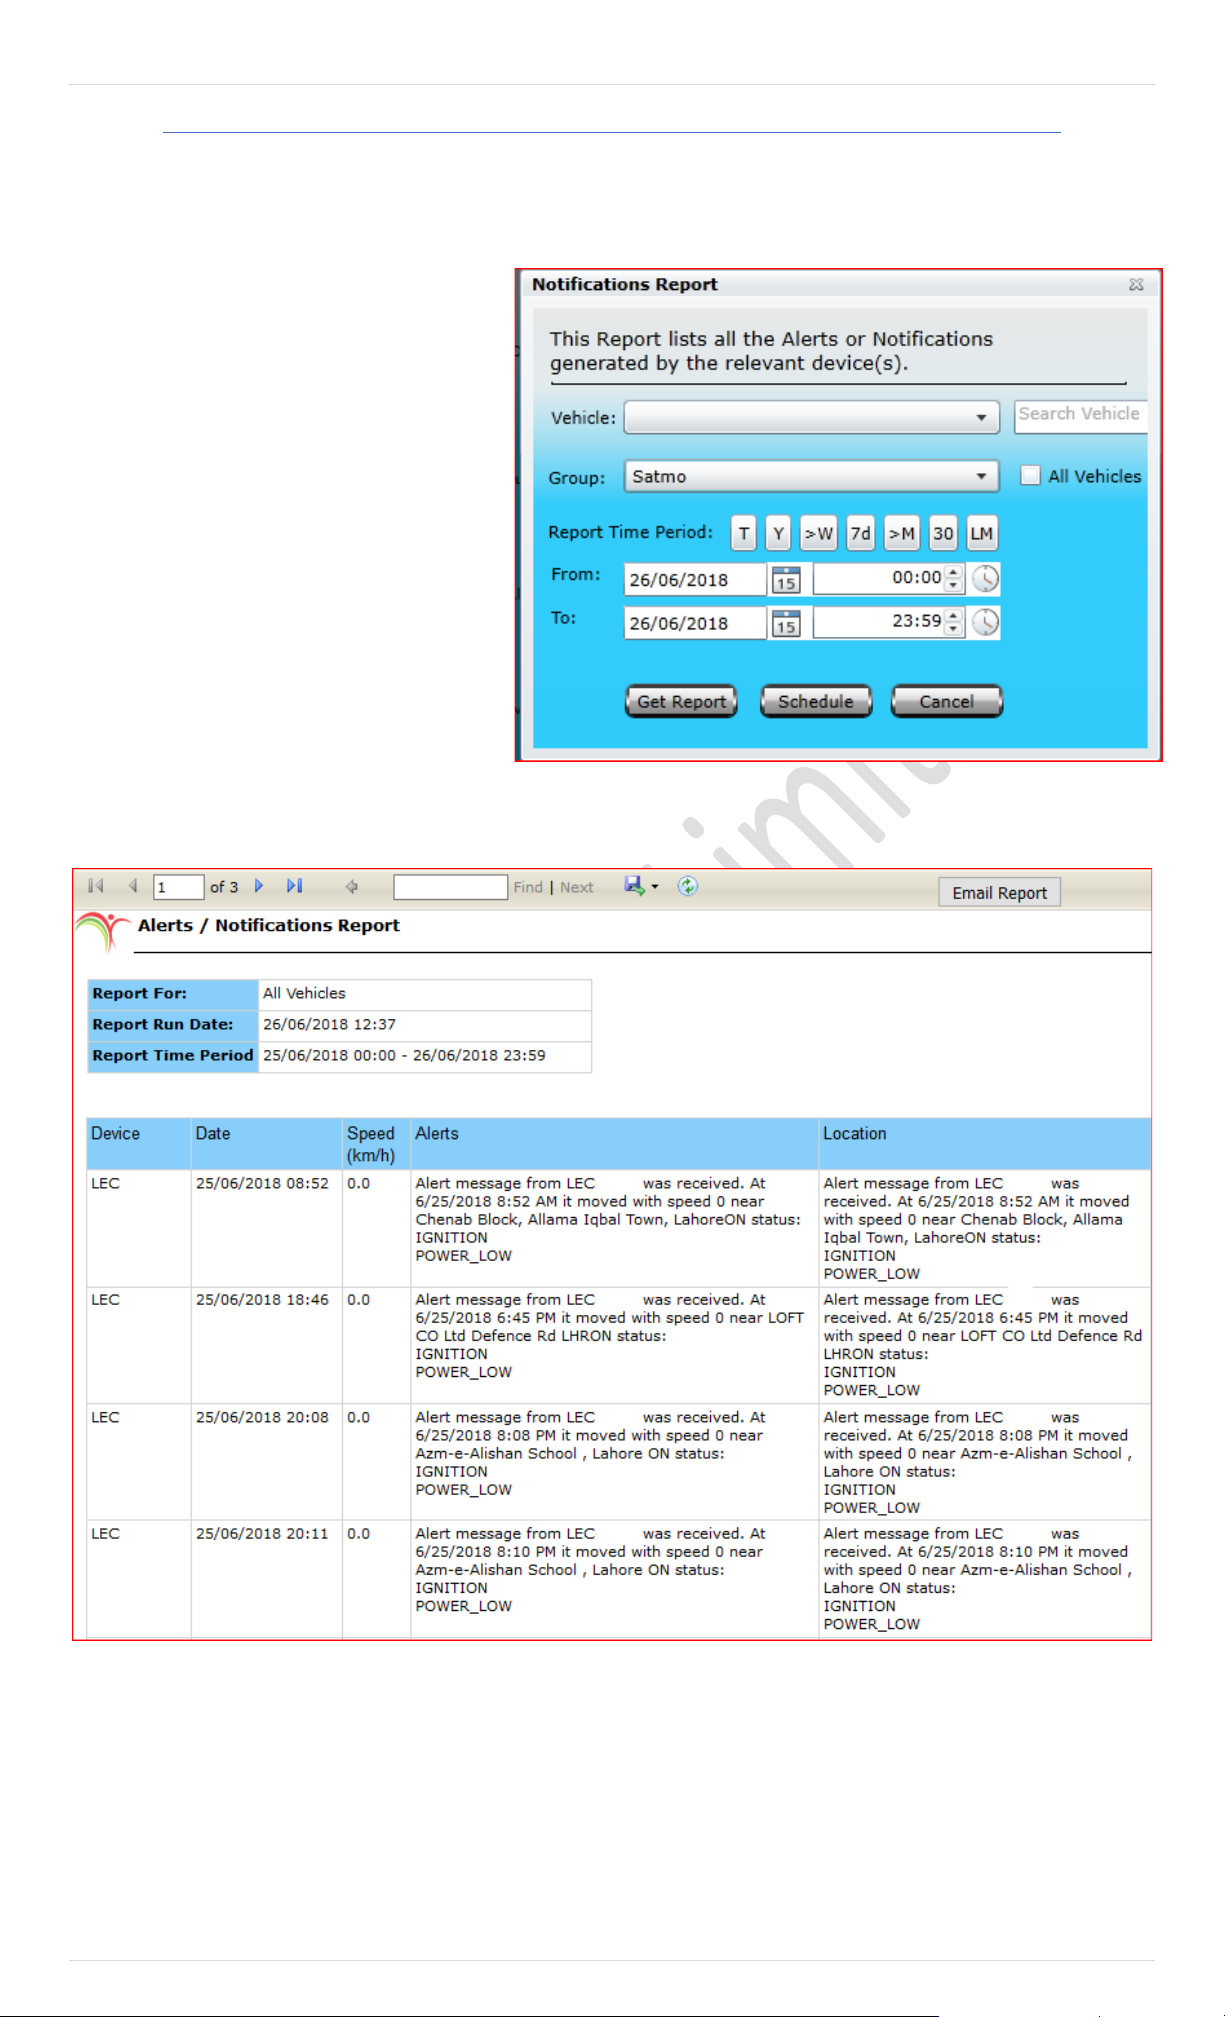
80 | P a g e
Notification Report
Notification report is quite similar to Alerts Report. It shows alerts or notification of the selected vehicles which are configured
for notification from main Menu under Notifications.
A report will be generated which will contain data
extracted from the database, as per the Date &
Time range specified, in a new tab or window.
Events that are reported in this report are Device
ID, Date Time - Date & time when the alerts generated,
Speed - Speed gained by the vehicle, Alert - What alert
generated by the tracking device and Location - Location
of the vehicle when the alert was generated. below image
shows how an Alerts / Notification Report looks
like.
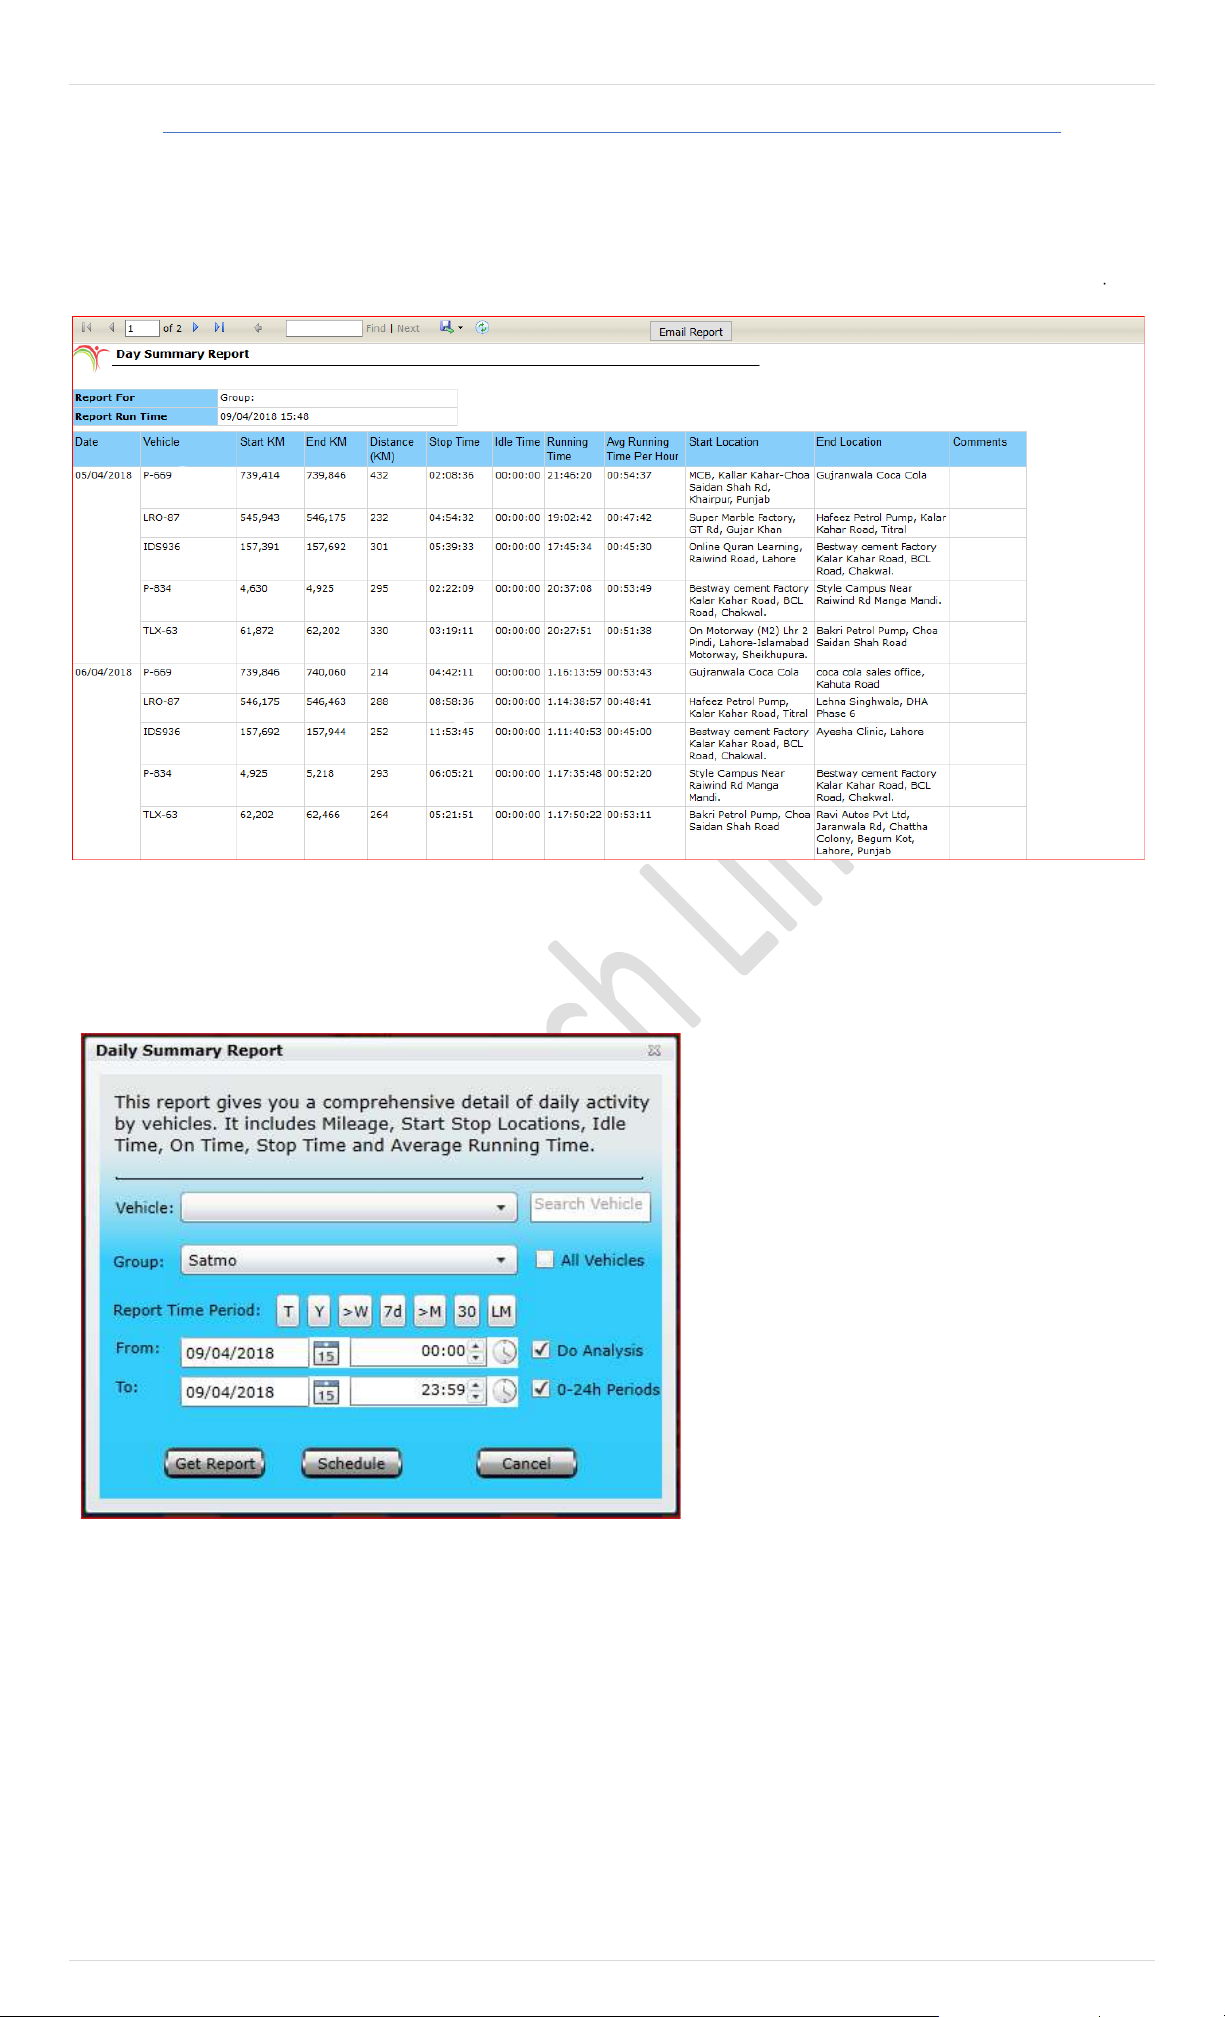
81 | P a g e
Daily Summary Report.
The Report extracts summary of a vehicle distance travelled within a day including starting KM, ending KM with locations.
The report is capable to extract information for a single vehicle or for a whole group.
If you do select a group, it will show summary of all vehicle which are in the group. For example, please see the picture
Activity Summary Report provides you an overview of complete summary of the vehicle activity for each day. Clicking this
report will open up a dialog box (Image provided below) which contains a dropdown list labeled as Device, where you can select
a vehicle from the list available, specify Report Time Period which includes Date & Time range and click Get Report.
A report will be generated which will contain data
extracted from the database, as per the Date & Time
range specified, in a new tab or window. Events that
are reported in this report are Device Name, From -
Start Date & Time of vehicle activity, To - End Date & Time of
vehicle activity, Total Distance - Total distance covered during
vehicle activity, Total Travel Time - Total duration of vehicle
activity, Total Idle Time - Total duration of vehicle idling
during the vehicle activity, Max Speed - Maximum speed
gained by the vehicle during vehicle activity and Average
Speed - Average speed gained by the vehicle during vehicle
activity. Above image shows how an Activity Summary
Report looks like.
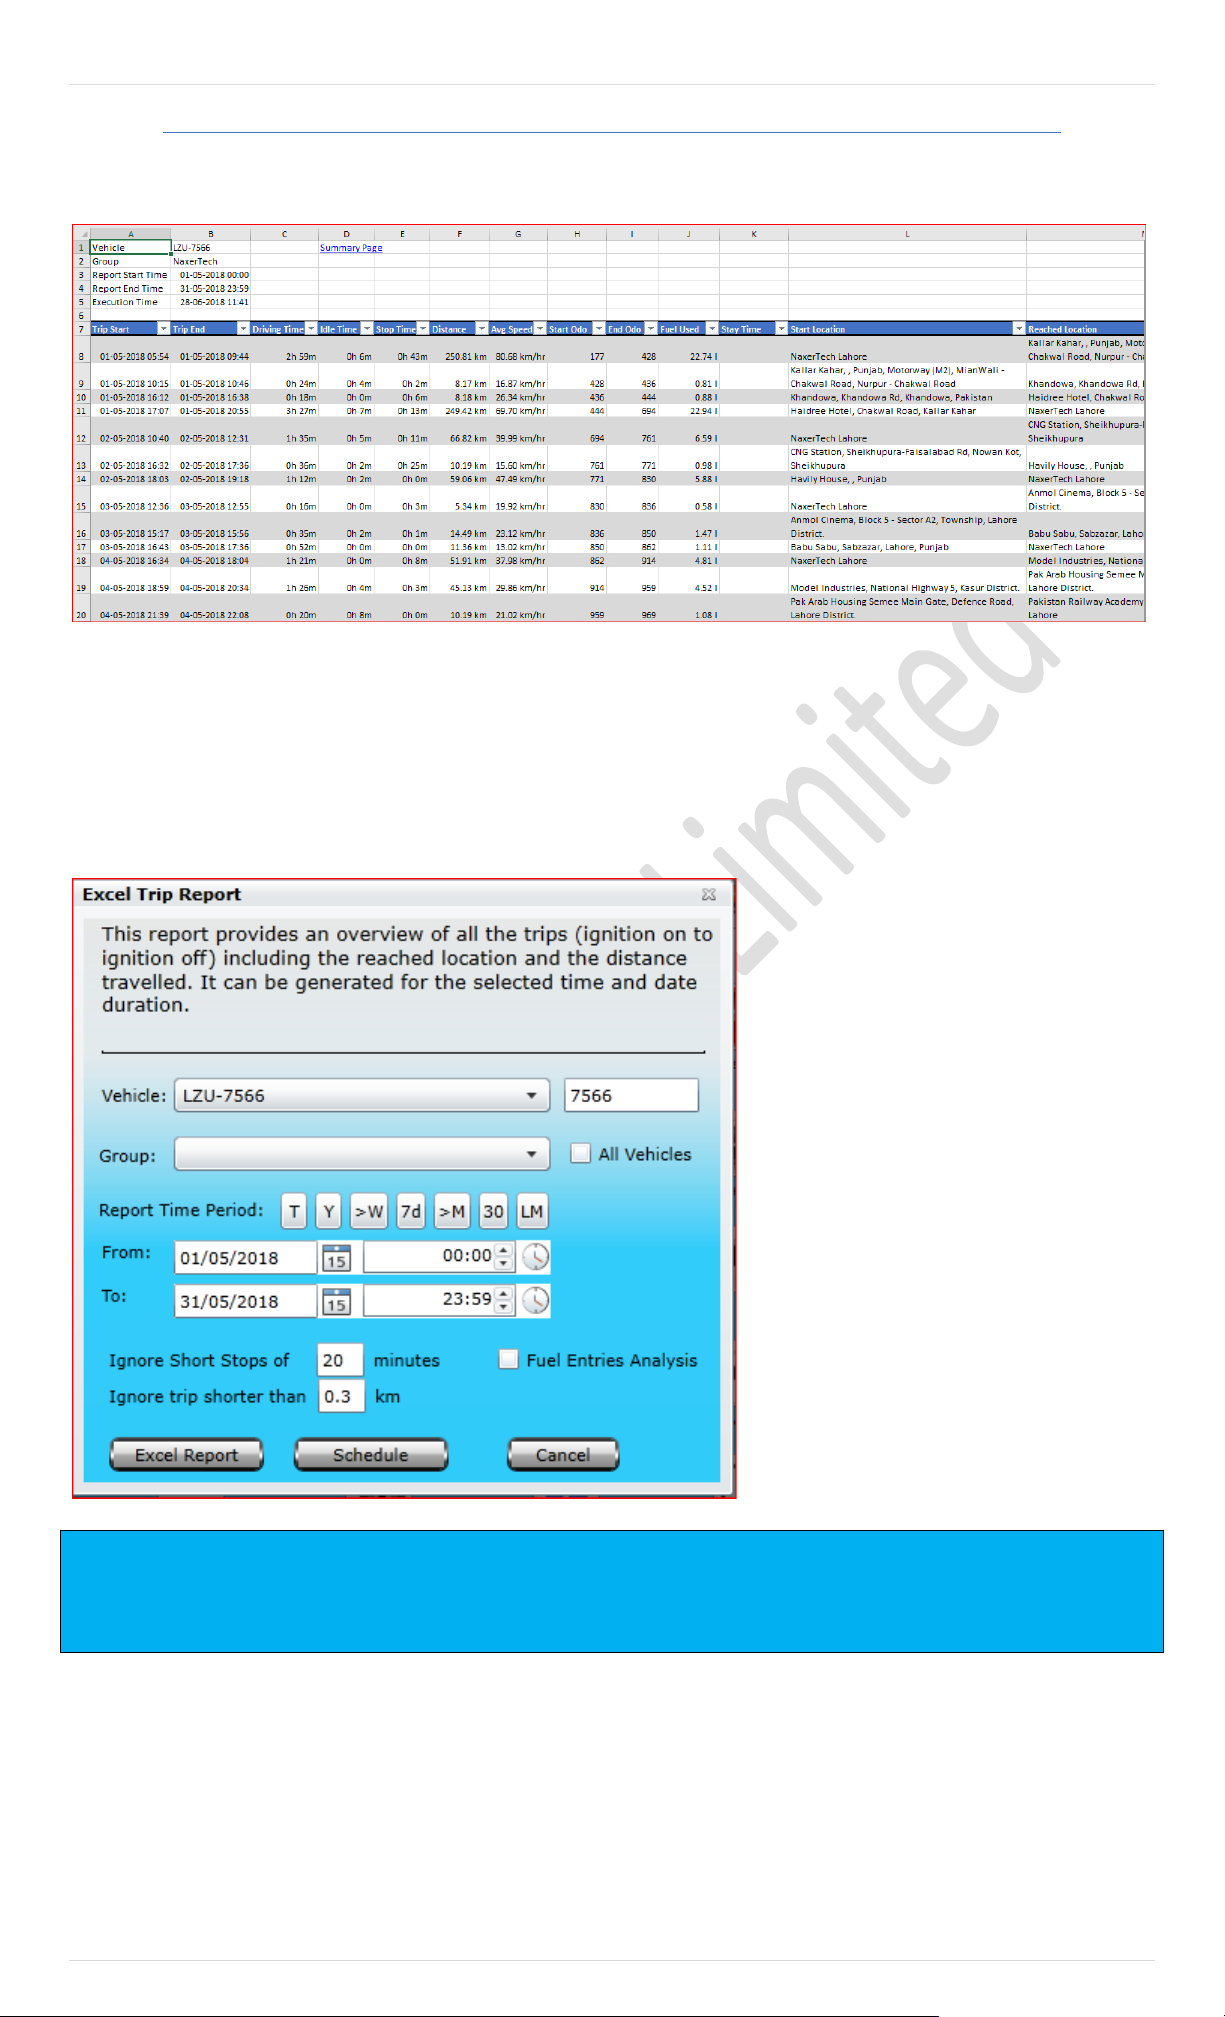
82 | P a g e
Excel Report
A. Trip Report – Excel Sheet
A report will be generated which will contain data extracted from the database with Fuel Entries Analysis as per the specified
Date & Time range in an Excel Sheet. This excel sheet will contain a Summary page at the start where it contains a table
providing a short summary of trips made by each vehicle in a group (Shown in image above), charts for Idle Time Vs Driving Time,
Distance Travelled and Average Speed (Each chart is shown below). Along with all this, it also contains pages for each vehicl e
in a group providing details of every trip made by it.
Trip Report – Excel Sheet is designed for such users who are handling a complete fleet of vehicles and require a comprehensive
report of trips made by all the vehicles that are
in a group/ fleet. Clicking this report will open
up a dialog box (Image provided below) which
contains a dropdown list labelled as Device,
where a single vehicle could be selected from
the list available to generate a report for a
specific vehicle. To get a report for the whole
group, select the desired group from the
dropdown list labelled as Group. Enable the
check box labelled as All Vehicles if report is
required for all the vehicles that are under
different groups exist under a master account.
Specify Report Time Period which includes
Date & Time range, specify time in minutes to
ignore short stops (by default it is 20 minutes – this
value could be increased or decreased as per requirement)
and click Excel Report.
Trips: Any trips in which idle time is less than 5 minutes or distance travelled is less than 300m are skipped in this report to avoid clutter.
Note: This excels workbook contains individual sheets detailing trips for each vehicle. There are also five charts on this sheet. Scroll right to see them if
they are not visible.
You can expand columns to see full vehicle or Group names. You can also resize charts if too many vehicles.
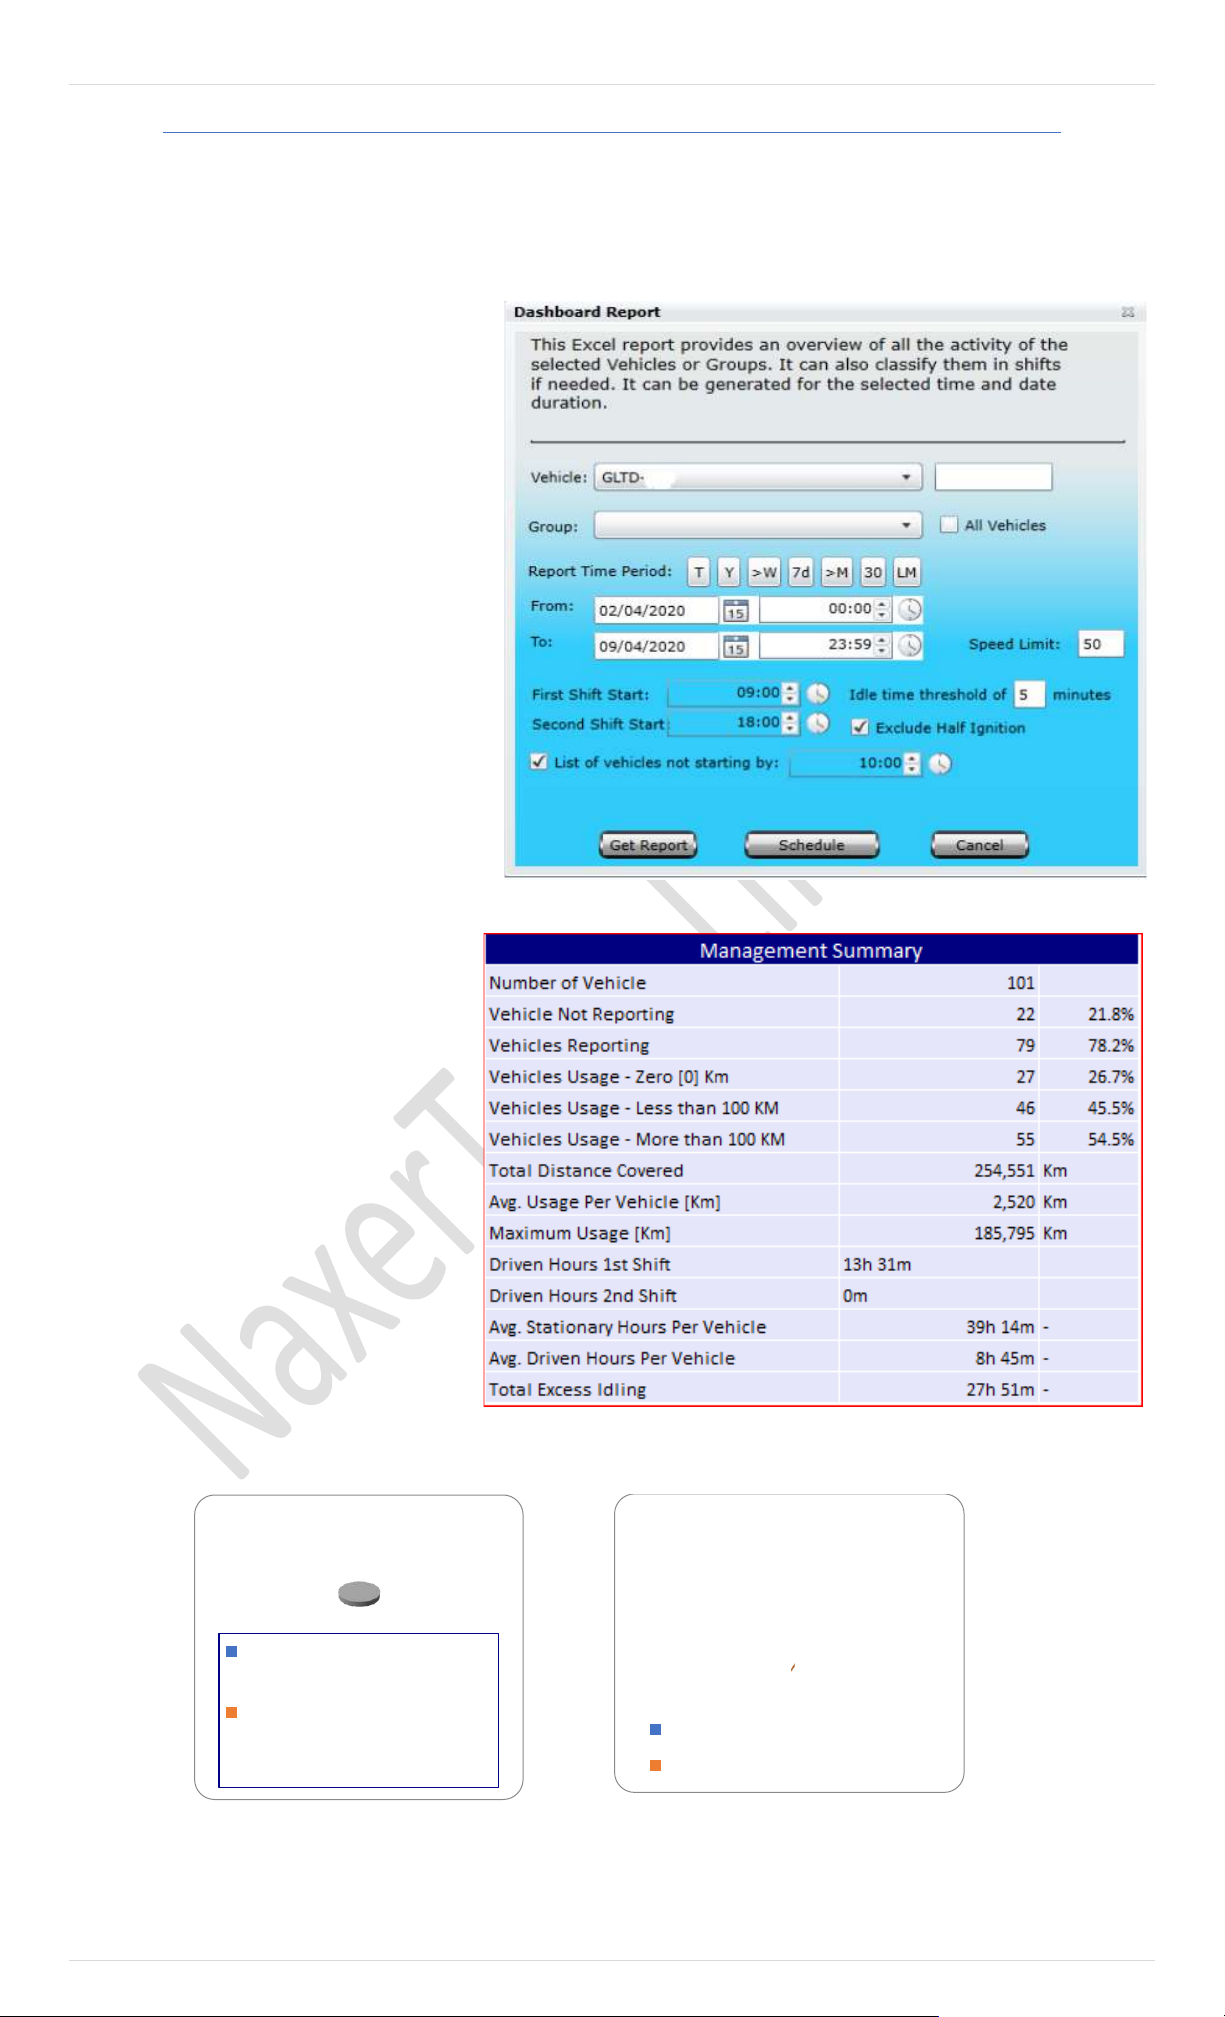
83 | P a g e
Dashboard Report
Dashboard report will extract data from Pegasus System to provide an overview of all activities of selected vehicle or group.
The report can be extracted according to your customized time and can distinct with customized working shift order. Idle time
threshold and speed limit can be also set in this report.
Enable check box if you want to get vehicle list not starting by a particular time, it also can be more differentiate by enabling
option exclude half ignition.
Report will be extracted in excel sheet according
to your set parameters. It consists of four sheets
which will gather data separately and provide a
comprehensive analysis for your fleet.
Management Summary
This summary will provide you are necessary
information of your select group including
number of vehicles, vehicle which are not
reporting, number of vehicles which are
reporting properly, vehicle usage, total
distance covered by selected group, driven
hours in 1
st
shift and driver hours in 2
nd
shifts.
Average stationary hours and driven hours per
vehicle with more importantly total excess of
idling.
Idling threshold can be set when report is
initially extracting, Pegasus system will
automatically sense when vehicle become
stationary, if the stationary state will excess
the limited time, it will automatically consider
excess if idling.
Management.
Vehicle usage and driving hours with ShiftWise is also presenting in graph mode .
0%0%
Driving Hours
Comparison-
Shift wise
Driven Hours 2nd Shift
Avg. Stationary Hours Per Vehicle
0%
0%
100%
Vehicle Usage
Vehicles Usage - Zero [0] Km
Vehicles Usage - Less than 100
KM
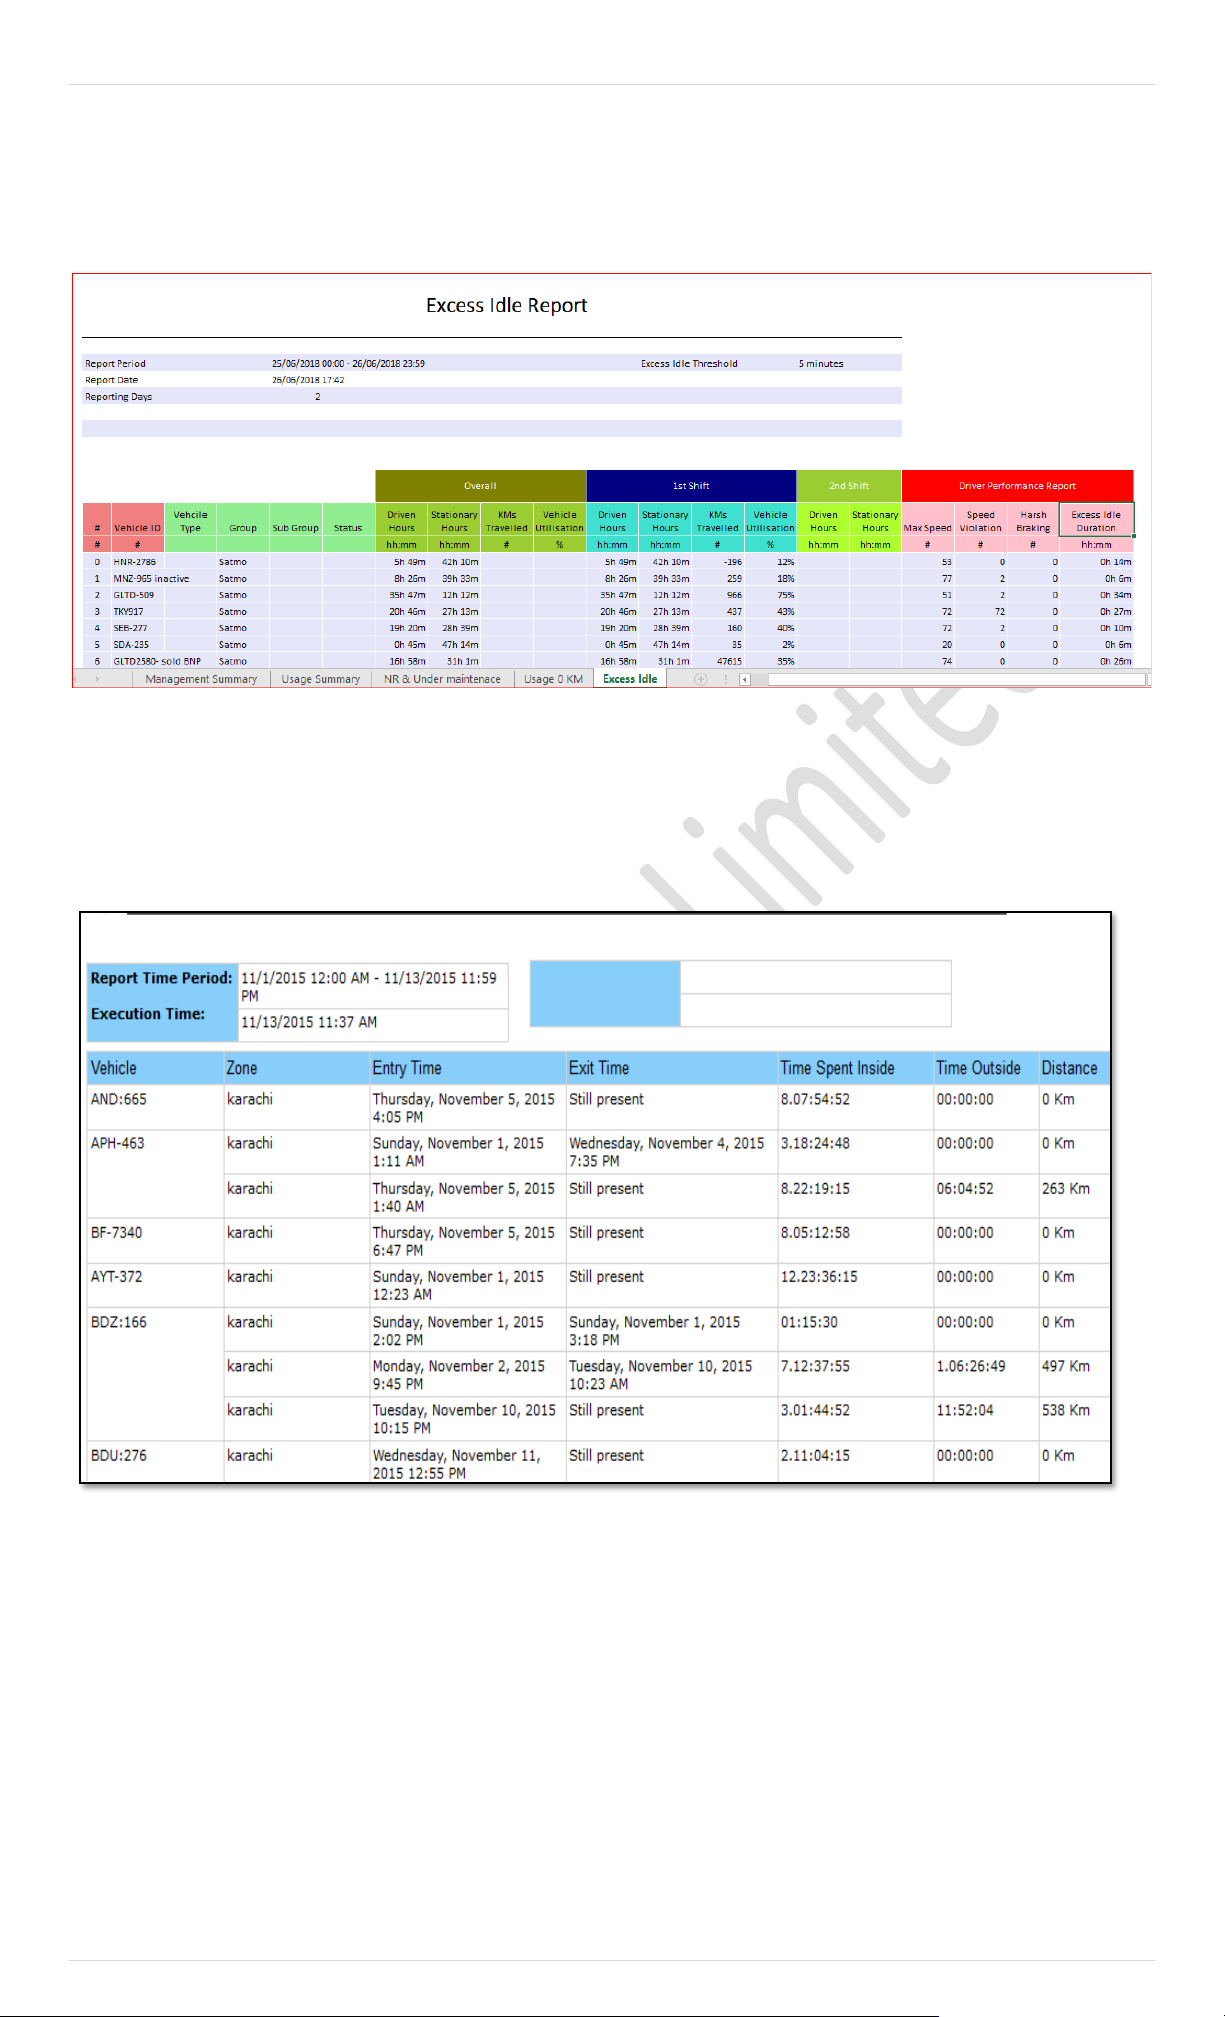
84 | P a g e
Usage Summary
This sheet will provide you complete summary including list of vehicles with overall performance and with shift details, vehi cle
type, group name, sub group (if any), driven hours, stationary hours means when vehicle is started but not moving, total distance
travelled. Driver performance can be also identified in the shape of speed violation, harsh braking with excess idle duration.
NR & Maintenance: NR stands for Not Responding, this sheet will provide you list of vehicles which are requiring maintenance.
Note: You can inactive vehicle from device panel under Edit device, this sheet will consider inactive vehicles in NR state a nd prompt you for maintenance.
Usage 0 KM
This sheet provides number of vehicles which are not being in used or stand by in your selected group.
A. Fuel Entries Report
Fuel Entries Report – This report provides the details of Fuel Entries in the vehicle. Clicking this report will open up a dialog
box (Image provided below) which contains a dropdown list labelled as Device, where a single vehicle could be selected from the
list available to generate a report for a specific vehicle. To get a report for the whole group, select the desired group fro m the
dropdown list labelled as Group. Enable the check box labelled as All Vehicles if report is required for all the vehicles that are
under different groups exist under a master account. Specify Report Time Period which includes Date & Time range and click
Get Report.
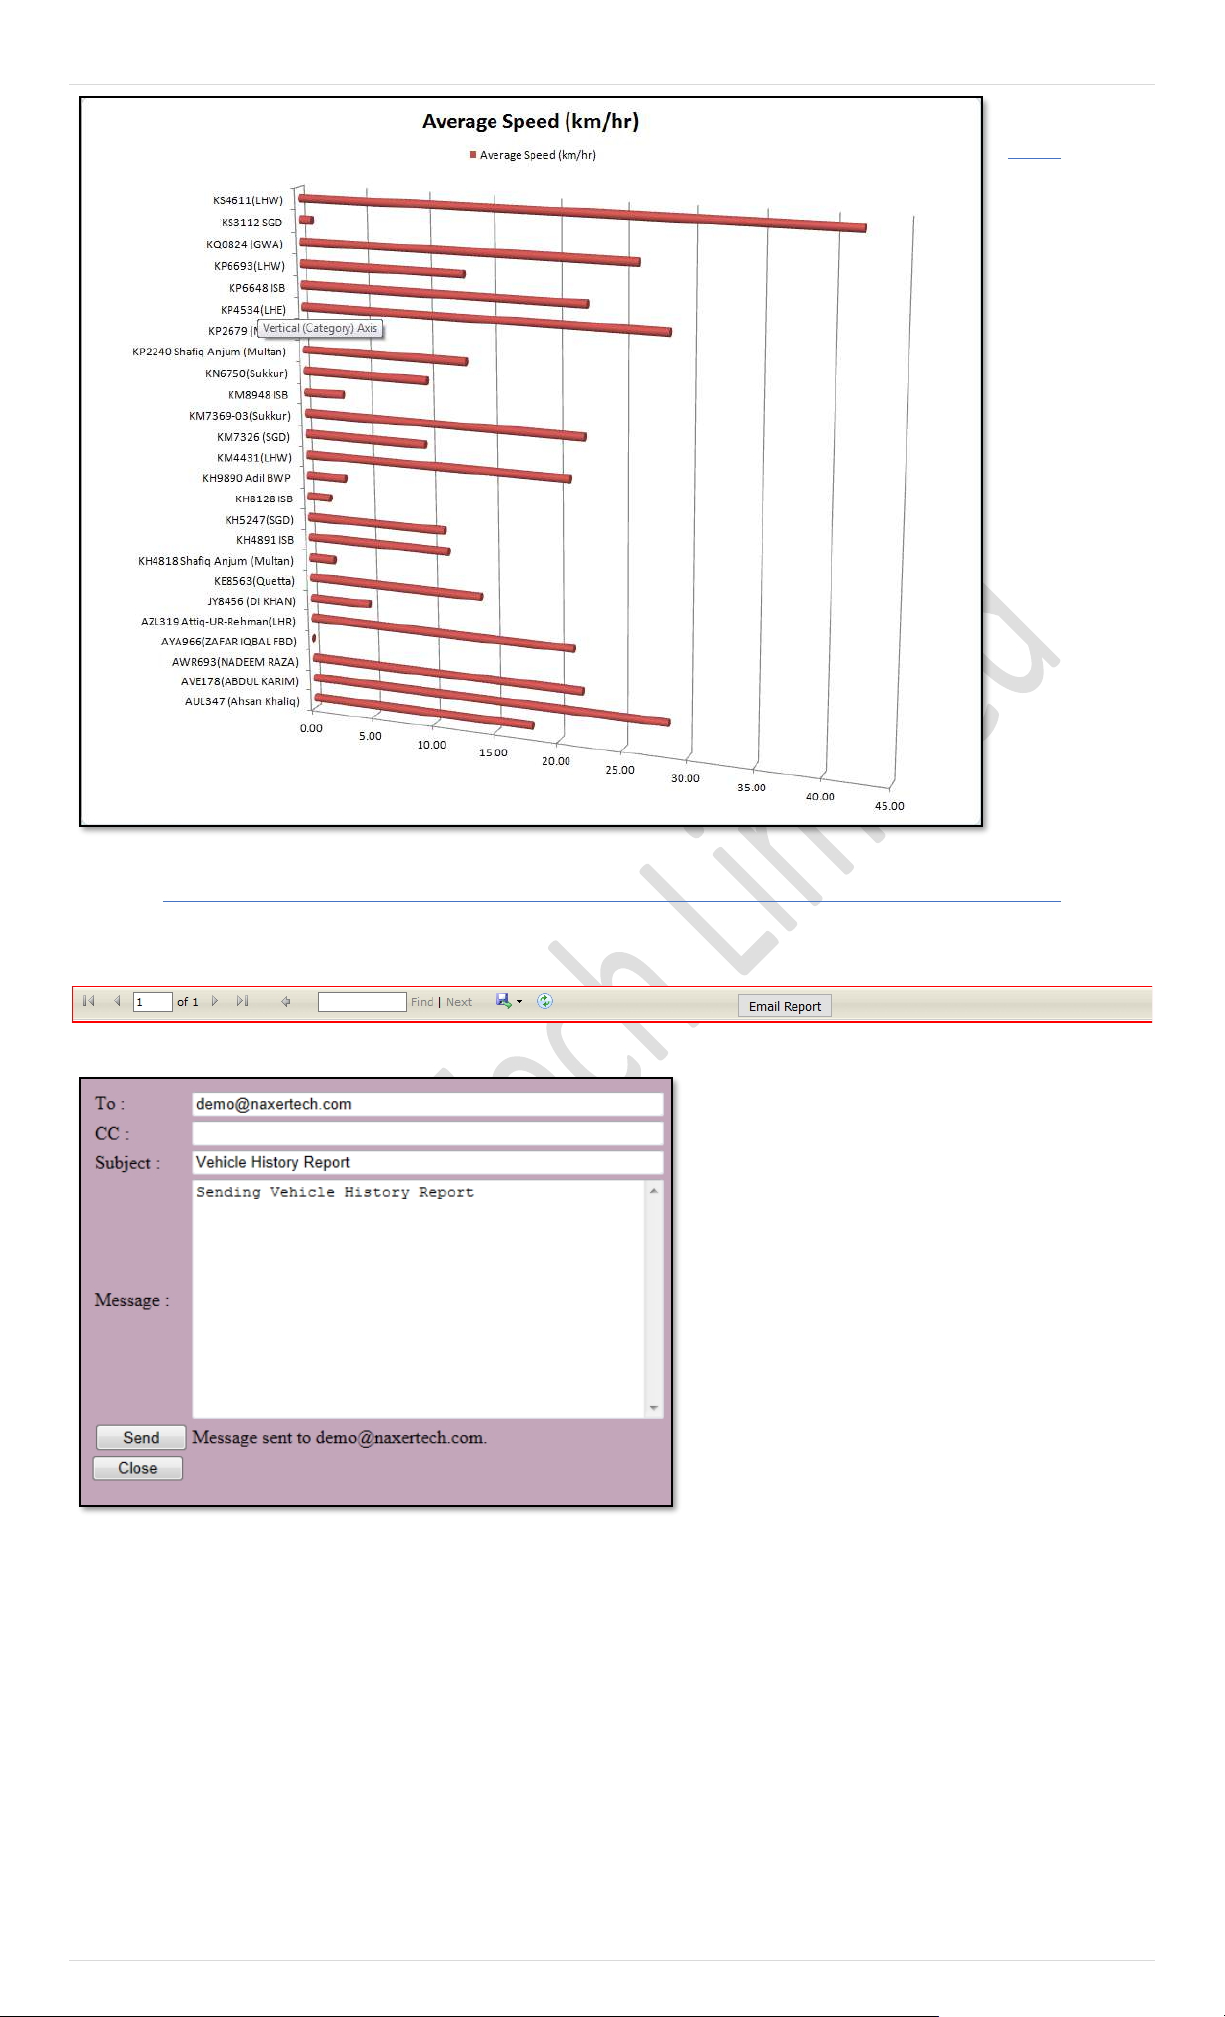
85 | P a g e
Report Emailing
Every Report provided by Pegasus system could be emailed as an attachment to any email ID. Such reports have a button Email Report
available in the header section.
Click the Email Report button, a blank form will appear
with text boxes, TO: CC. Enter email IDs to which the
email has to be sent, Message – to enter a customized
message to the email recipient(s). Once all the fields are
filled with the required information, press Send button
to send email. When the email is sent to the recipients
its status is updated at the bottom of the email form as
shown in the image:
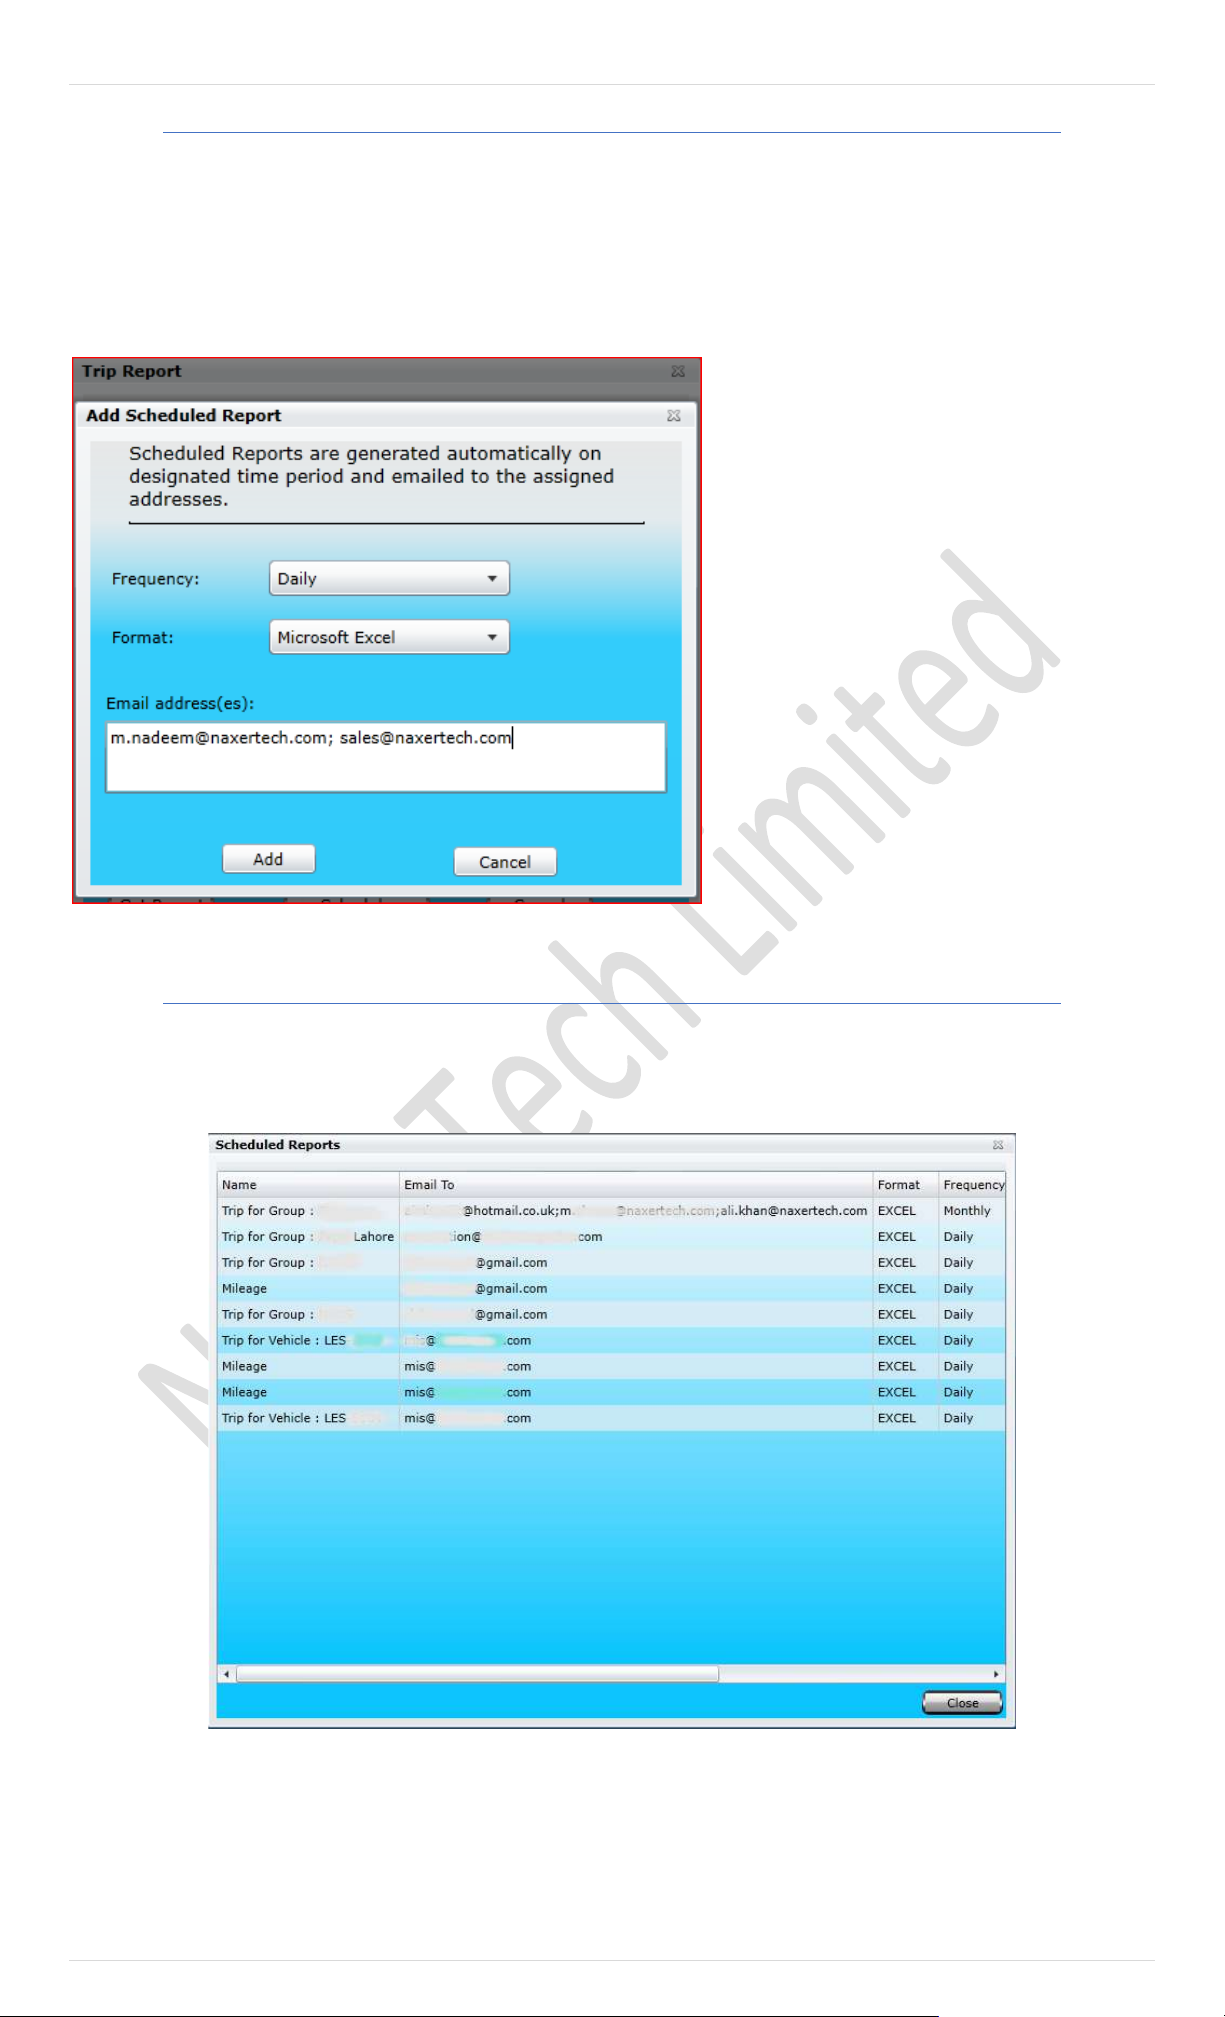
86 | P a g e
Scheduling Reports
Reports could be scheduled on Daily, Weekly and Monthly basis. These reports could be generated in Microsoft Excel/ Word, PDF
formats and emailed to the specified email ID(s). Pegasus system will automatically generate the report as per the selected frequency
in the selected format and will email to the specified recipient. Multiple email ID(s) could be specified separated by semicolon (;). This
functionality has been provided in Trip Report, Idle Time Report, Alerts Report, POI Report and Driving Safety Report only.
In the below steps we will be scheduling Alerts Report on Monthly basis in Microsoft Excel format and email it:
1- Select the desired vehicle/ device from the
list of devices available in the dropdown list labeled as
Device or enable the check All Devices if report is
required to be generated for all the vehicles/ devices
that are under a master account.
2- Click Schedule button and it will open
schedule dialog box.
3- Set the Frequency of the report i.e., Daily,
Weekly or Monthly.
4- Select the desired format in which the report
to be generated from the dropdown list labeled as
Format.
5- Specify the email ID(s) and click Add button.
Click on add button will open dialog box showing the characteristics of currently/ all scheduled reports.
Scheduled Reports
As we discussed earlier for scheduling reports, every report in Pegasus System can be scheduled. To know how many
reports are scheduled under the specific account and group with recipient email, you need to click on scheduled reports
under the Reports tab from the main menu of Pegasus.
Name:
Name of the selected report will be shown in this field.
Email To:
Configured Email address will be shown to whom this report
is scheduled.
Format:
Microsoft Excel, Word and PDF files are supported and
selected option will be shown here.
Frequency:
How frequent select report should be delivered
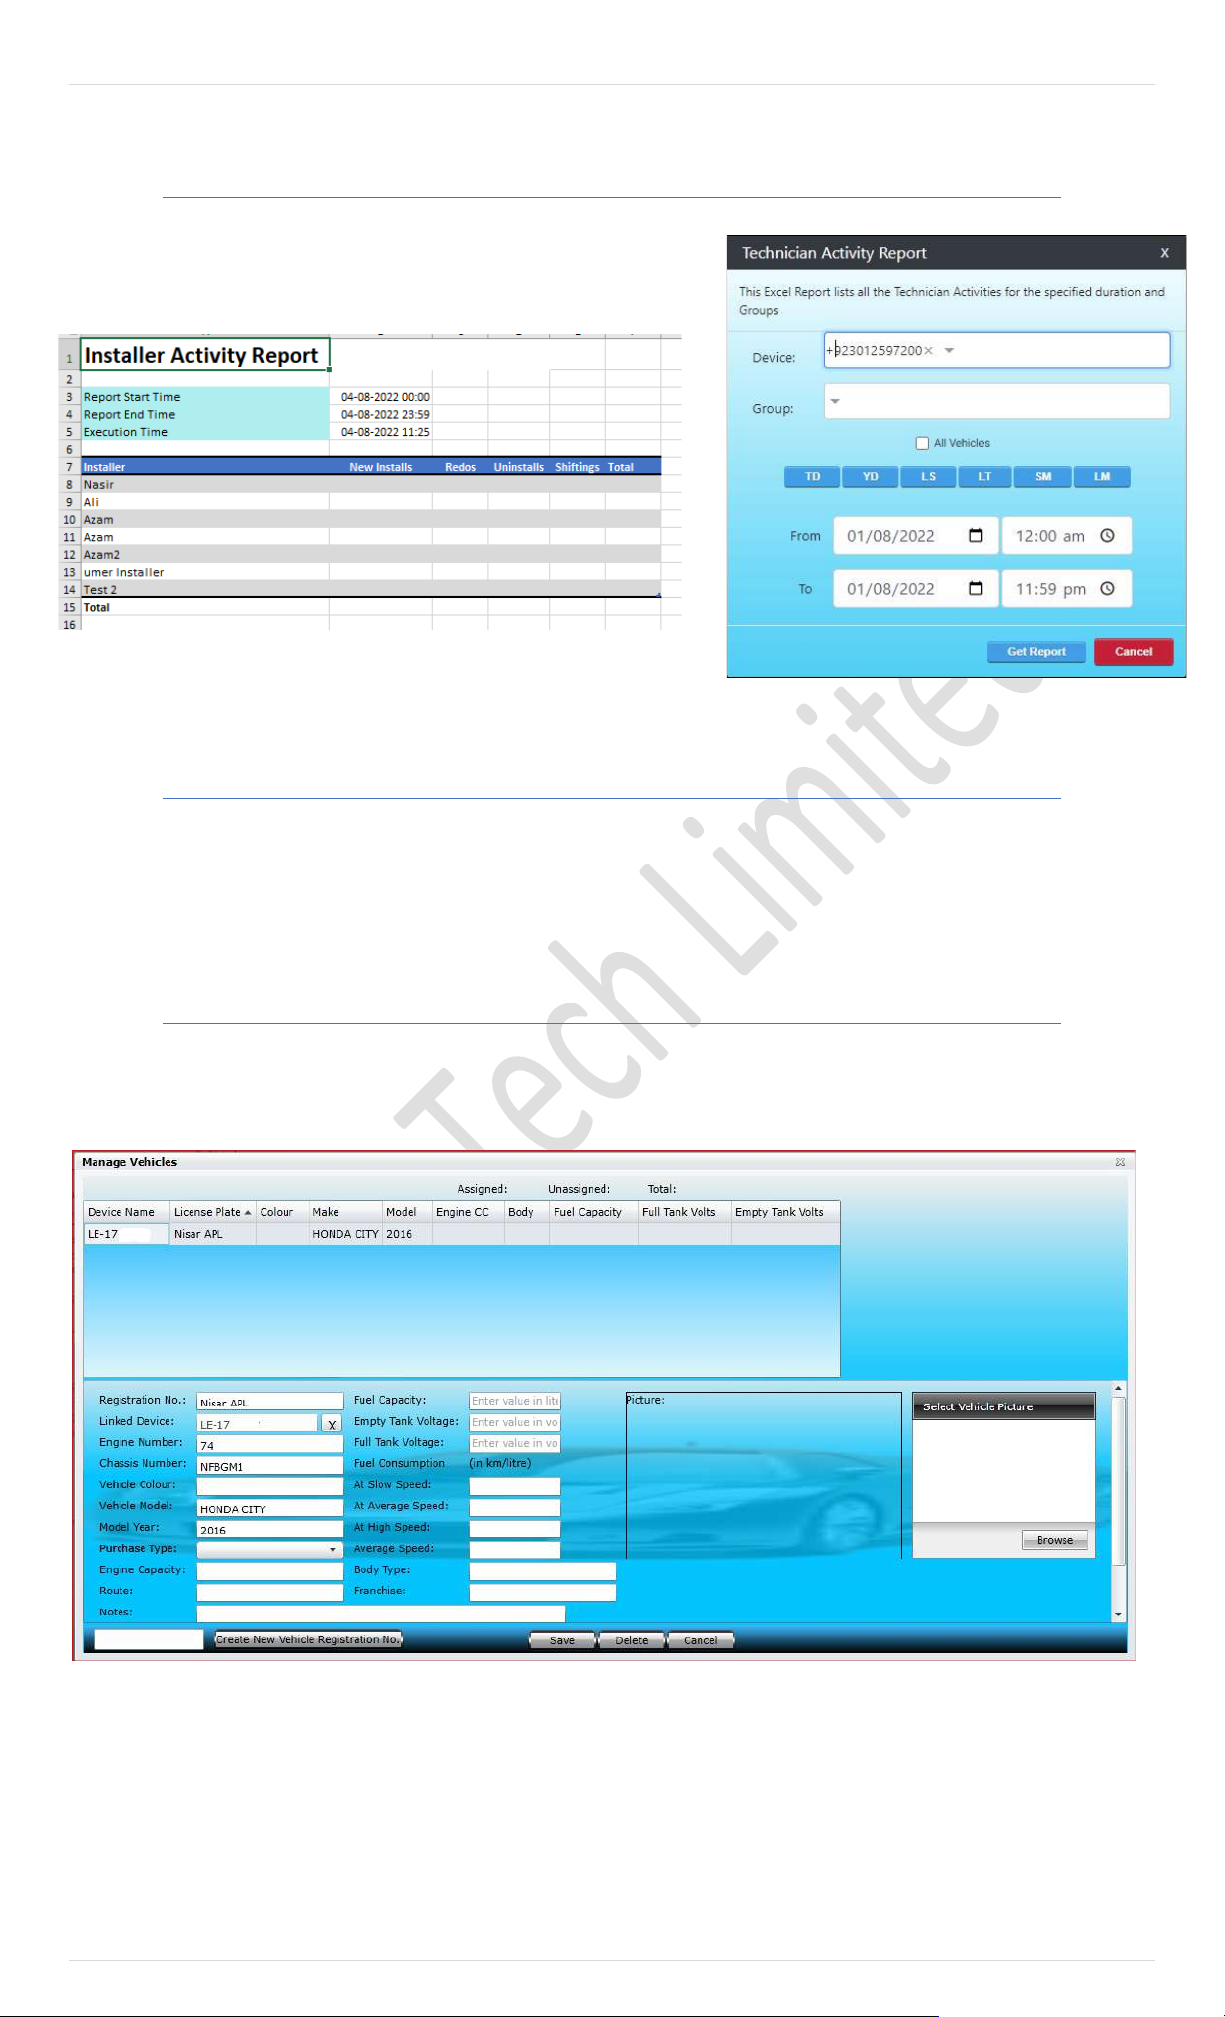
87 | P a g e
Technician Activity Report
Technician activity report provides us the report of all technicians and their activities for specific time and group.
The Report will give the name of installer with New Installs done by specific
installer. Redos, uninstalling of devices or shifting of devices.
Vehicles
Vehicles button opens up a new set of features in which complete history of a vehicle in which device is installed, could be
maintained and is available on the main graphical user interface of the Pegasus System. It allows you to Add a vehicle, edit a
vehicle’s details, delete a vehicle and maintain vehicle maintenance history within the Pegasus System.
Add/ Edit Vehicles
Adding a vehicle to the Pegasus system will be the third step for a newly created Account. Select the Add/ Edit Vehicle optio n
from the drop-down menu by clicking the Vehicles button which will open a Vehicle Form in which basic information has to be
filled that is required to add the vehicle to the Pegasus database and only then you will be able to attach it to a device ad ded
to the Pegasus System. Let’s discuss the Vehicle Form that opens up when you select Add/ Edit Vehicle option.
Vehicle Form dialog box is divided into two segments; the upper part of the Vehicle Form dialog box is called Vehicle Grid
where all the details of a vehicle can be viewed. The rest of the part is meant to add a new vehicle or edit any vehicle’s details.
Let’s create a vehicle and we will go through all the input boxes in detail.
First, we should have the Vehicle Registration Number to enter in the text box available at the bottom of the Vehicle’s Form
dialog box and click the button New Vehicle Registration Number. When the New Vehicle Registration Number button is
pressed, notice that the same Registration Number will appear in the Registration Number text box. Now it’s time to fill in the
rest of the fields as described below:
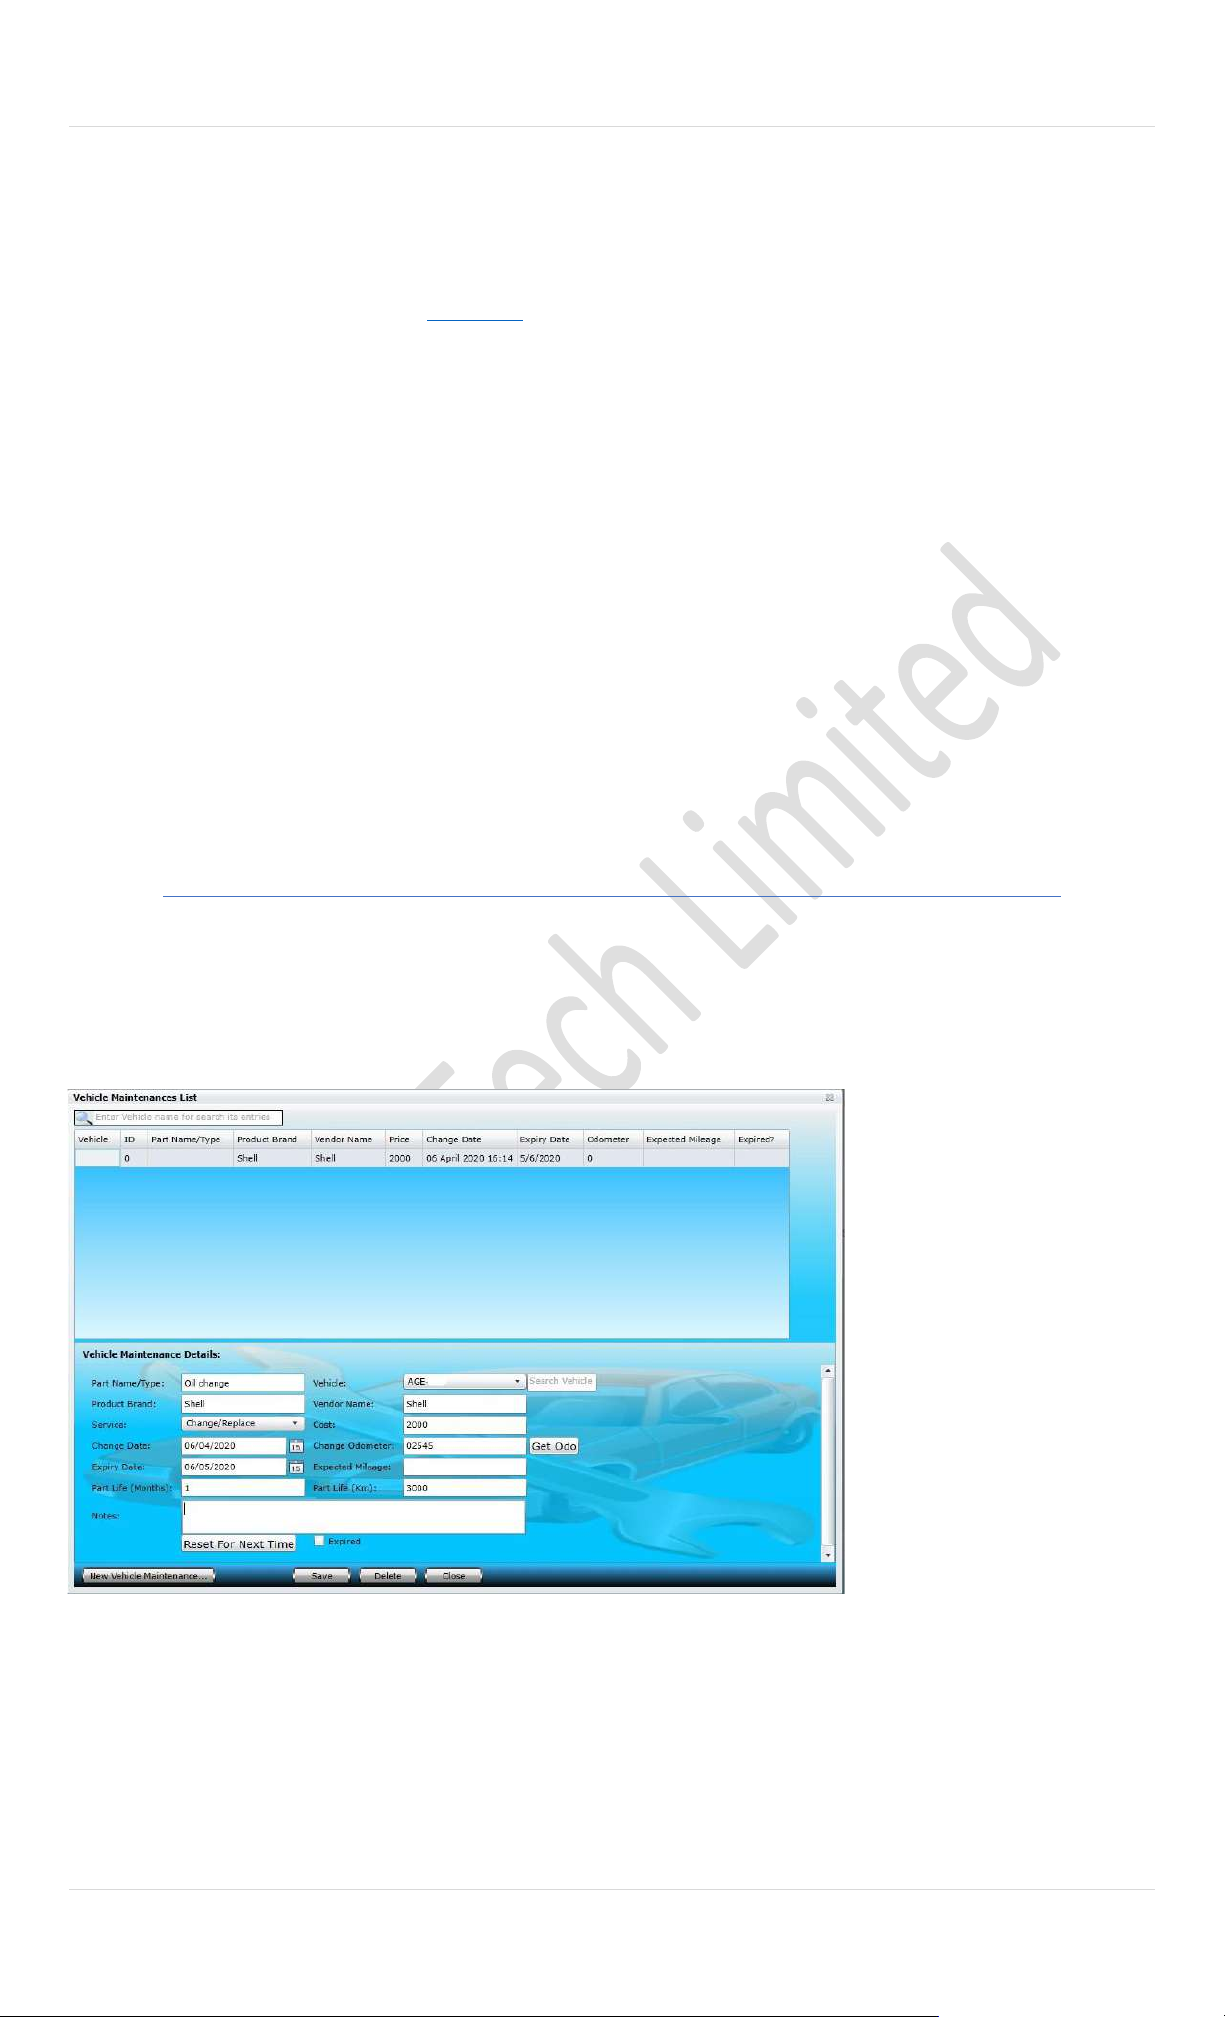
88 | P a g e
A. Registration No.:
Registration Number will appear automatically and
would be the same as which was provided at the
time of creating a new vehicle.
B. Linked Device:
This will be assigned automatically by the Pegasus
System, please read more under Add Device.
C. Engine Number:
Enter complete Engine Number of the vehicle in
which tracking unit has to be deployed.
D. Chassis Number:
Enter complete chassis Number of the vehicle.
E. Vehicle Color: Enter the Color of the vehicle in
which tracking unit has to be deployed.
F. Vehicle Model:
Enter the brand of the vehicle in which tracking
unit has to be deployed e.g., Toyota Avensis.
G. Model Year:
Enter the manufacturing year of the vehicle in
which tracking unit has to be deployed e.g., 2012.
H. Purchase Type:
Select the appropriate purchase type of the vehicle
from the drop-down list.
I. Notes:
Write Notes in this field which are related to the
tracking unit or about a specific customer which
has a tracking unit installed in his/ her vehicle.
J. Fuel Capacity:
Enter Fuel Capacity of the vehicle (claimed by
vehicle manufacturer).
K. Empty Tank Fuel Voltage:
Enter the Empty Tank Fuel Voltage i.e., 3.3.
L. Full Tank Fuel Voltage:
Enter the voltage when the fuel tank is full.
M. Fuel Consumption
Pegasus allows entering the vehicle’s fuel
consumption manually and this helps to generate
more accurate fuel reports. Enter vehicle’s fuel
consumption at Slow, Average and High speed.
N. Upload Picture
Vehicle’s image could be added to the vehicle
details by uploading an image. Maximum file size
should not exceed 500KB.
Click Save button to save that information to the Pegasus System database and close the Add Vehicle Form.
Vehicle Maintenance
Complete maintenance history of a vehicle could also be preserved in the Pegasus System which is mostly needed by such
companies maintaining a large fleet of vehicles. Select the Vehicle Maintenance option available when Vehicle button is clicked
available at the main graphical user interface of the Pegasus System. Let’s discuss the Vehicle Maintenance Form that opens
up when you select Vehicle Maintenance option and is shown in the image.
Vehicle Maintenance Form dialog
box is divided into two segments;
the upper part of the Vehicle
Maintenance Form dialog box is
called Vehicle Maintenance Grid
where all the details of a vehicle
maintenance history could be
viewed. The rest of the part is
meant to add new maintenance
details or edit any previous
details. Let’s create a new vehicle
Maintenance and we will go
through all the input boxes in
detail.
Click New Vehicle Maintenance
button and you will notice that an
empty form with different options
will appear in the second half of
the Vehicle Maintenance Form.
Now it’s time to fill in the rest of the fields as described below:
A. Part Name/ Type:
Enter the part name or type of part that is being
changed in a vehicle.
B. Product Brand:
C. Service:
Select the appropriate option from the drop-down
list i.e., Change/ Replace, New Install or Repair.
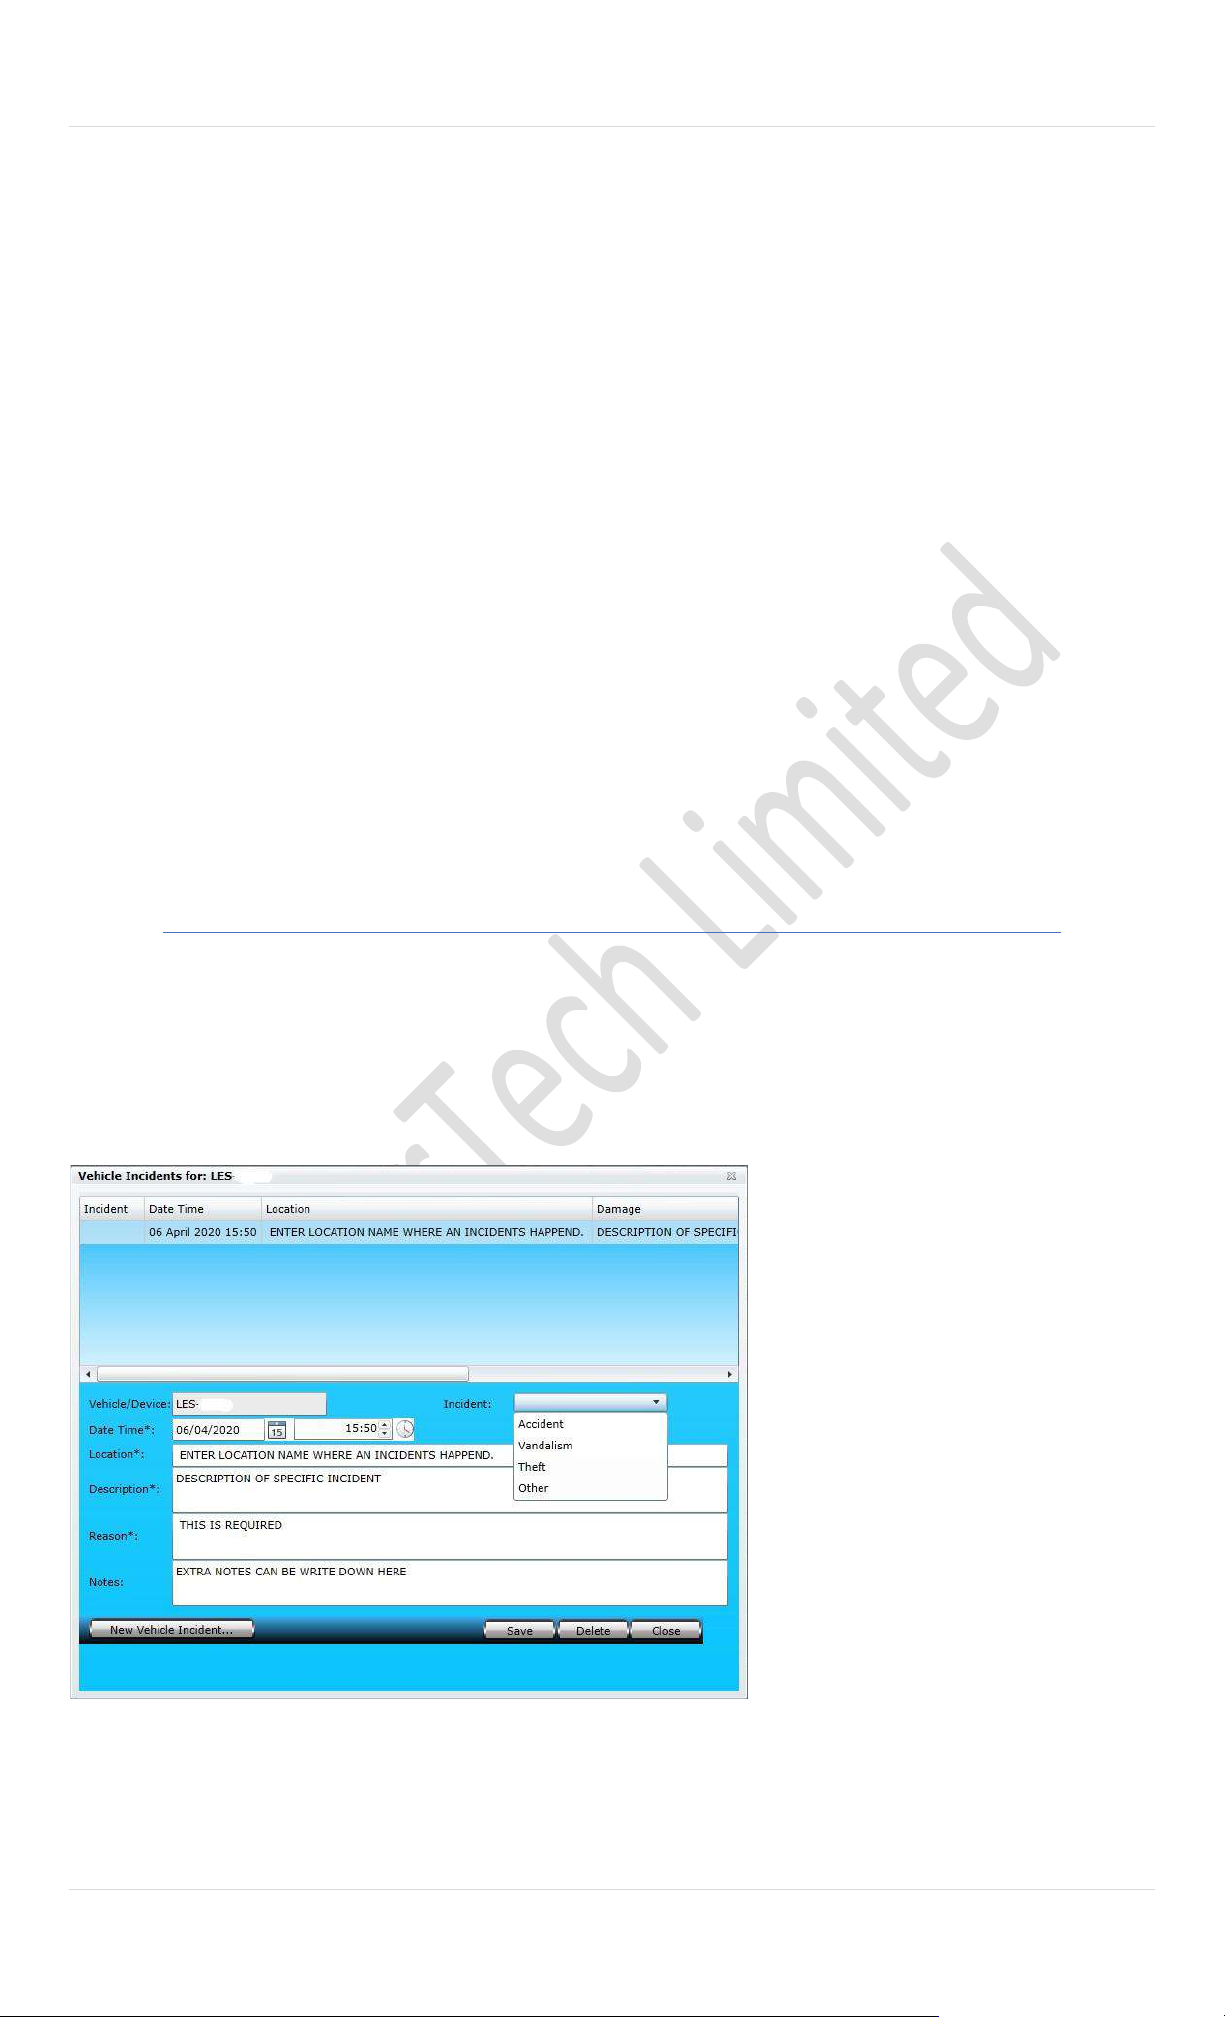
89 | P a g e
Enter the brand name of the part that is being
changed.
D. Current Date:
Enter the date when the part being changed in the
vehicle.
E. Expiry Date:
Enter the estimated date of expiry of the part that
has been changed in a vehicle.
F. Vehicle License Plate:
Select correct vehicle license plate number from
the drop-down list or you may find it by using
Search Vehicle option.
G. Vendor Name:
Enter the name of the vender from whom the part
has been purchased from.
H. Price:
Enter the price of the part and which can be only
in digits.
I. Current Odometer:
This option is updated with Get ODO. Enter the
current odometer reading that is available on the
vehicle’s odometer or Get ODO feature will
automatically get ODO figures from selected
vehicle.
J. Expected Mileage:
Enter the expected mileage of the vehicle after
which the part has to be changed again.
K. Notes:
Write Notes in this field and these notes could be
related to the part changed in the vehicle.
➢ There is Check box of Expired. Which can be used if you have an absolute Entry / Information of the vehicle
which can be maintained under this vehicle logs.
Click Save button to save the information to the Pegasus System database and close the Vehicle Maintenance Form.
Vehicle Incident
Incidents related to a vehicle(s) can be saved in Pegasus system. It is provided to maintain a complete record of incident(s)
history which is mostly required by such companies running large fleet of vehicles. Incident options such as Accident, Theft or
Vandalism are provided under Vehicle Incident. Let’s discuss the Vehicle Incident Form that opens up when you select Vehicle
Incident option under Vehicles button available on the main GUI of the Pegasus system. An image of the Vehicle Incident Form
is shown the below:
Vehicle Incident Form dialog box is divided
into two segments; the upper part of the
Vehicle Incident Form dialog box is called
Vehicle Incident Grid where complete details
of the vehicle incident could be viewed. The
rest of the part is meant to add new incident
details or edit details of any previous
incident(s). Let’s create a new vehicle
Incident and we will go through all the input
boxes in detail.
Click New Vehicle Incident button and you
will notice that an empty form with different
options will appear in the second half of the
Vehicle Incident Form. Now it’s time to fill in
the rest of the fields as described below:

90 | P a g e
A. License Plate:
List of all the vehicles that are under an account
will appear in the drop-down list box labeled as
license plate. Select the desired vehicle from list.
B. Incident:
Clicking the drop-down list box labeled as incident
will provide options of the incident i.e., Accident,
Theft, Vandalism & other. Select desired incident
option.
C. Date Time:
Set the incident date and time.
D. Description:
You can add description about the incident. It
could be the background of the incident like what
happened, why it happened, what steps were
taken when the incident was on progress or any
other useful information regarding the incident.
E. Reason:
Add any possible reason of the incident.
F. Notes:
Add notes in this field and these notes could be
related to the vehicle incident.
Click button to save the information to the Pegasus System database and close the Vehicle Incident Form.
Drivers
Information related to driver(s) can be saved in Pegasus system. It is provided to maintain a complete record of driver(s) at
company level. Let’s discuss the Driver Information Form that opens up when you select Driver’s option under Vehicles button
available on the main GUI of the Pegasus system. An image of the Driver Information Form is shown the below:
Driver Information Form dialog
box is divided into two
segments; the upper part of
the Driver Information Form
dialog box is called Driver
Information Grid where
complete details of driver(s)
could be viewed. The rest of
the part is meant to add new
driver details or edit details of
any previously added driver(s).
Let’s create a new driver, add
details and we will go through
all the input boxes in detail.
First, we need to enter the proper name of the driver in the text box available at the bottom of the Driver Information Form
dialog box and click the button New Driver. When the New Driver button is pressed, notice that the same Name will appear in
the text box labelled as Name. Now it’s time to fill in the rest of the fields as described below:
A. Badge ID:
Enter the badge ID number of the driver. Badge ID
is issued by the company which uniquely identify a
driver.
B. Landline Phone:
Enter the landline contact number of the driver.
C. Cell Phone:
Enter the cell phone contact number of the driver.
D. Contact Email:
Enter the email address of the driver.
E. Address:
Enter the postal address of the driver.
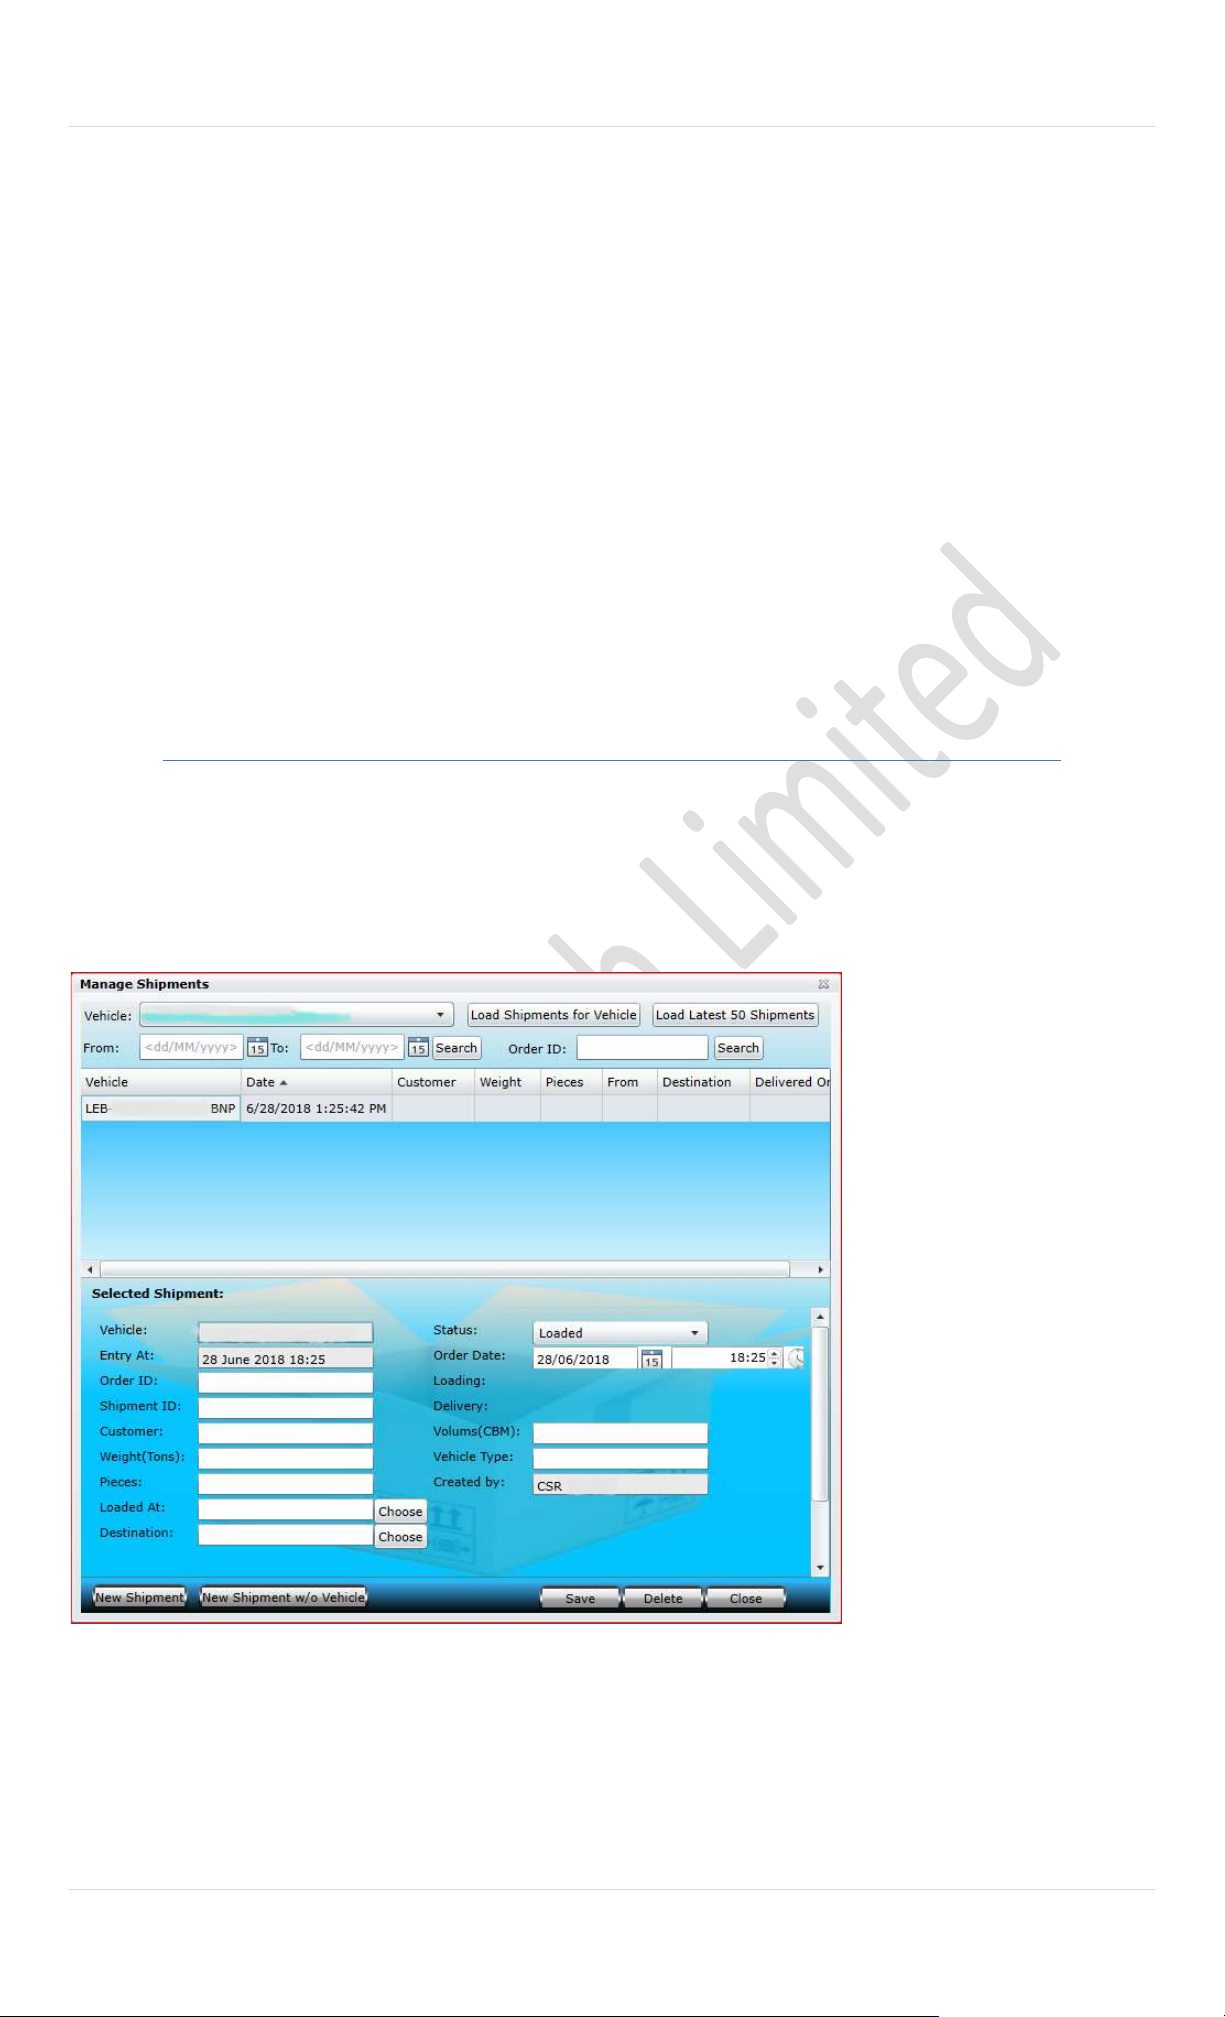
91 | P a g e
F. Vehicle:
List of all the vehicles that are under an account
will appear in the drop-down list box labeled as
vehicle. Select the desired vehicle from the list.
G. Date of Birth:
Enter the date of birth of the driver.
H. License Number:
Enter the license number of the driver. It could be
obtained from the driver’s license issued by the
authorities.
I. License Type:
Enter the type/ category of the license.
J. License Expiry:
Enter the expiry date of the license of the driver.
K. Notes:
Add notes in this field and these notes could be
related to the driver.
L. Upload Picture
Note: Driver image could be added to the driver’s details by uploading driver’s image. Maximum file size should not
exceed up to 500KB.
Shipment
Shipment module facilitates you to manage your shipment. Once new shipment order is created, Pegasus system will automatically
track it and manage on time shipment deliveries.
You can access this module by clicking on vehicle under the main menu of Pegasus System and it will pop up with new windows with
shipment form, as described in picture.
Manage shipments window consists of two parts. 1
st
half portion, it will give you information about existing shipment and 2
nd
portion is to order and manage new shipments. Now will discuss both respectively….
In the first half you can view / edit
shipments with vehicle information
by selecting vehicle in vehicle drop
down menu or load latest 50
shipments irrespectively of the
vehicle. Finding shipment by order
ID or with-in specific date is extra
advantage given by Pegasus System.
In second part of manage
shipments has number of entries to
take order of shipment and manage
throughout until shipment is
delivered. Here is brief introduction
of these entries,
New Shipment: For new shipment click on the button at the
bottom of the form which will allow you to add information
about new shipment along with specific vehicle detail.
New Shipment w/o vehicle: Click on the option if you
don’t require to carry this shipment by any specific vehicle.
Entry At: Date and time will be automatically filled after
selecting new shipment.
Order ID: It is important to add your order ID for further
reference and search your shipment by order ID.
Shipment ID: A reference ID is required for shipment
reference.
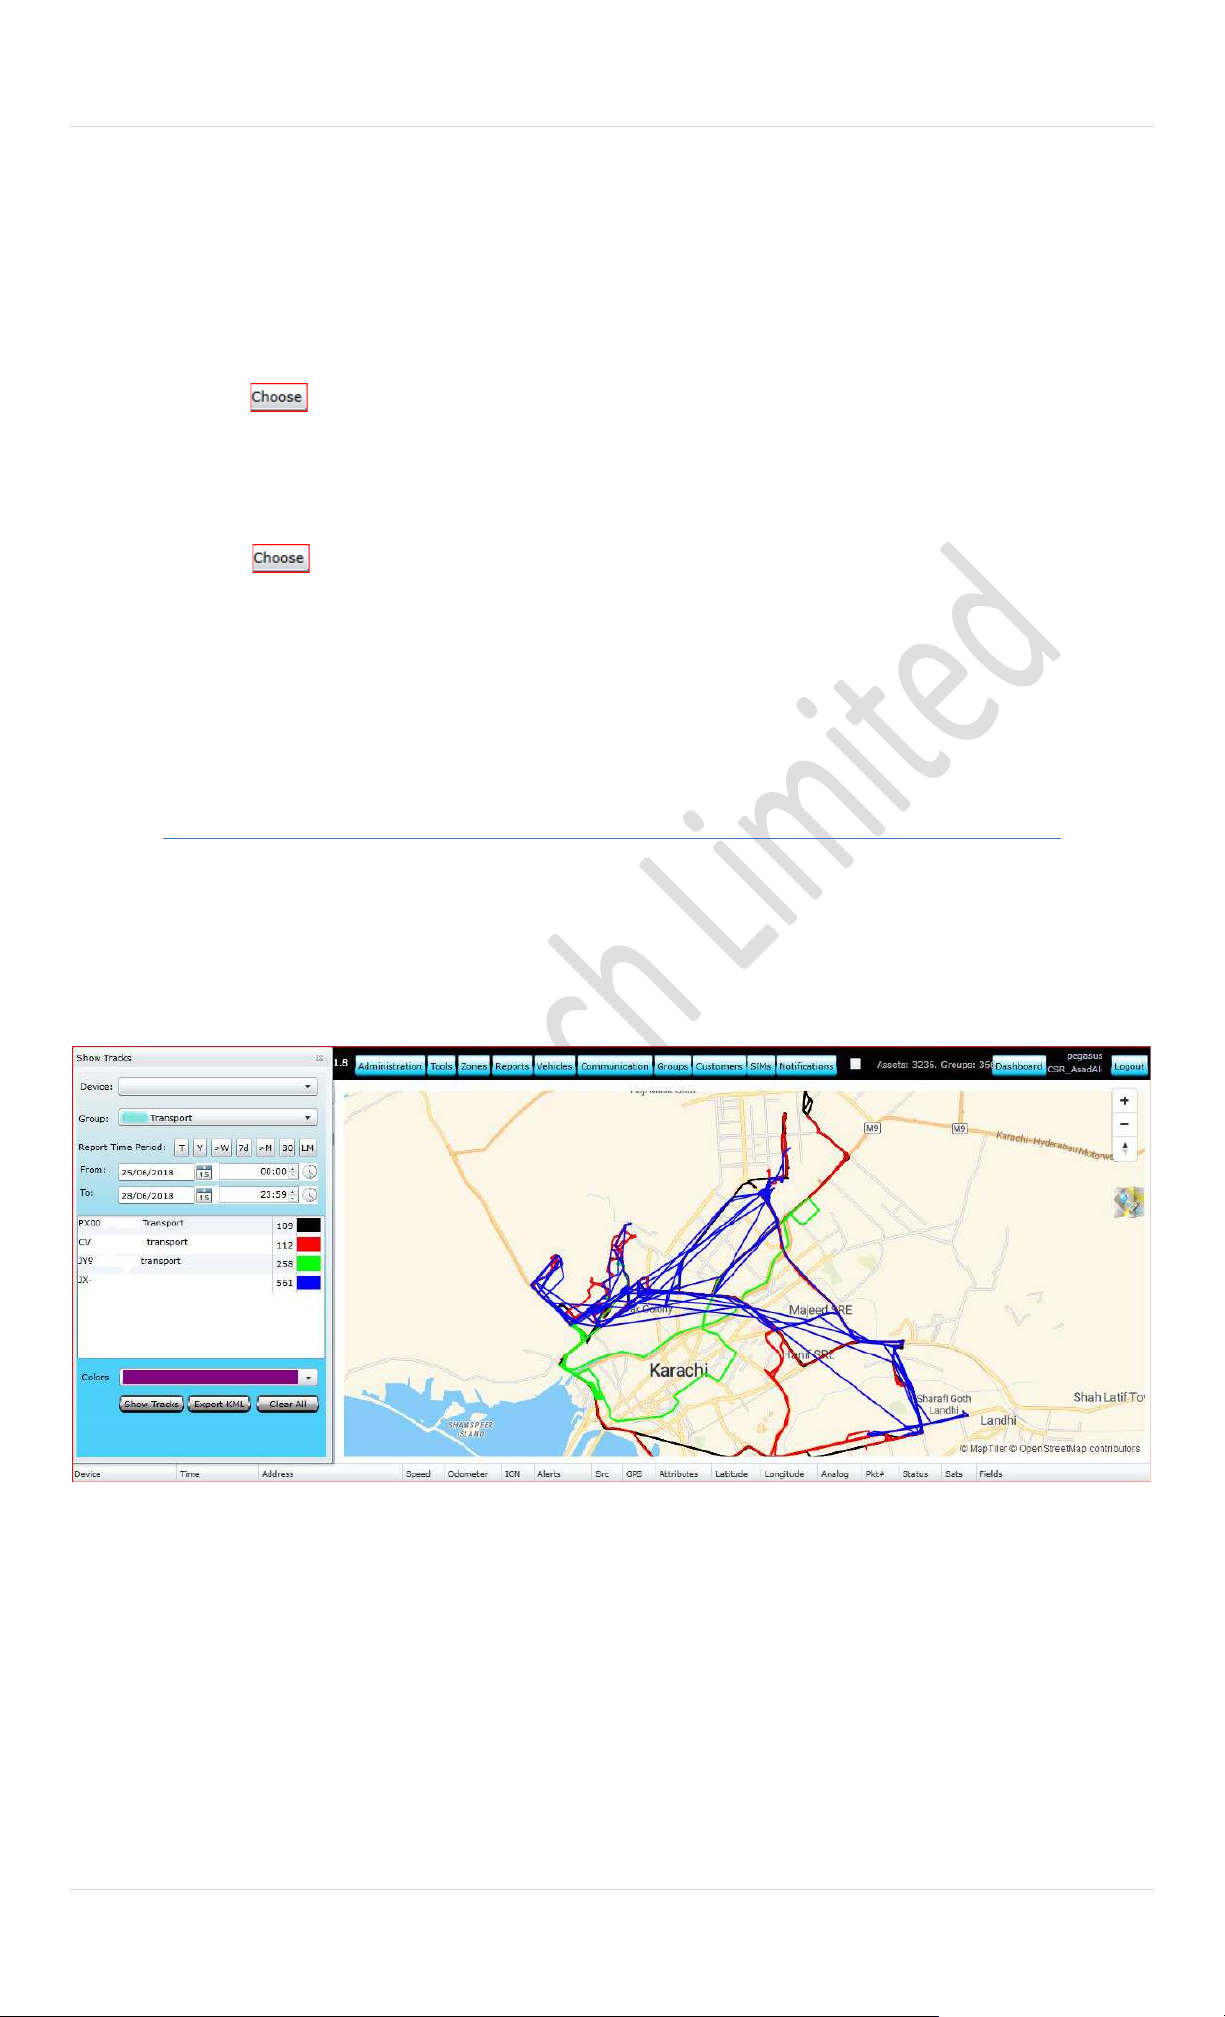
92 | P a g e
Customer: Add customer name
Weight: Add your delivery weight which can be shown in
shipments reports. This is important when your shipment
does have multiple destination or dealing as transit.
Pieces: In case of shipment is in pieces, you can mention
number of pieces for making sure at the of delivery
Load At: Add the location from where shipment is being
loaded. Click on the button which will give you list
of your already created POIs (point of interest). Select
shipment location by double click on POI. For more details of
POIs please see the section POIs under Zone.
Deliver At: Add the location where shipment is needs to off
loaded. Click on the button which will give you list
of your already created POIs (point of interest). Select
shipment location by double click on POI. For more details of
POIs please see the section POIs under Zone.
Status: There are four statuses provided in this form, 1
st
order, 2
nd
loaded, 3
rd
transit and 4
th
is delivered. You can add
and edit these statuses according to delivery status.
Loading and delivery: Loading and delivery time will be
display automatically according to shipment’s status.
Volume (CBM): CBM means Cubic Meter. Pegasus system
offers you to manage your shipment details with CBM with is
calculated by multiplying length, width and height of
packages of goods.
Vehicle Type: Identical vehicle type could be written down
for further reference i.e., 22-wheeler, 10-ton vehicle …etc.
Created by: Current logged in user will be identified and
filled up in this field, however you edit created by according
to your requirement.
Show Tracks
Show tracks will draw vehicle travelled distance in specific colour with in your defined time frame. You may show track for a
single vehicle or a group.
Pegasus System offers you to export your vehicle route in KML file format to display this geographic d ata in an Earth browser
such as google earth...etc.
Note: You can draw show tracks for maximum 20 vehicles with maximum last 20 days .
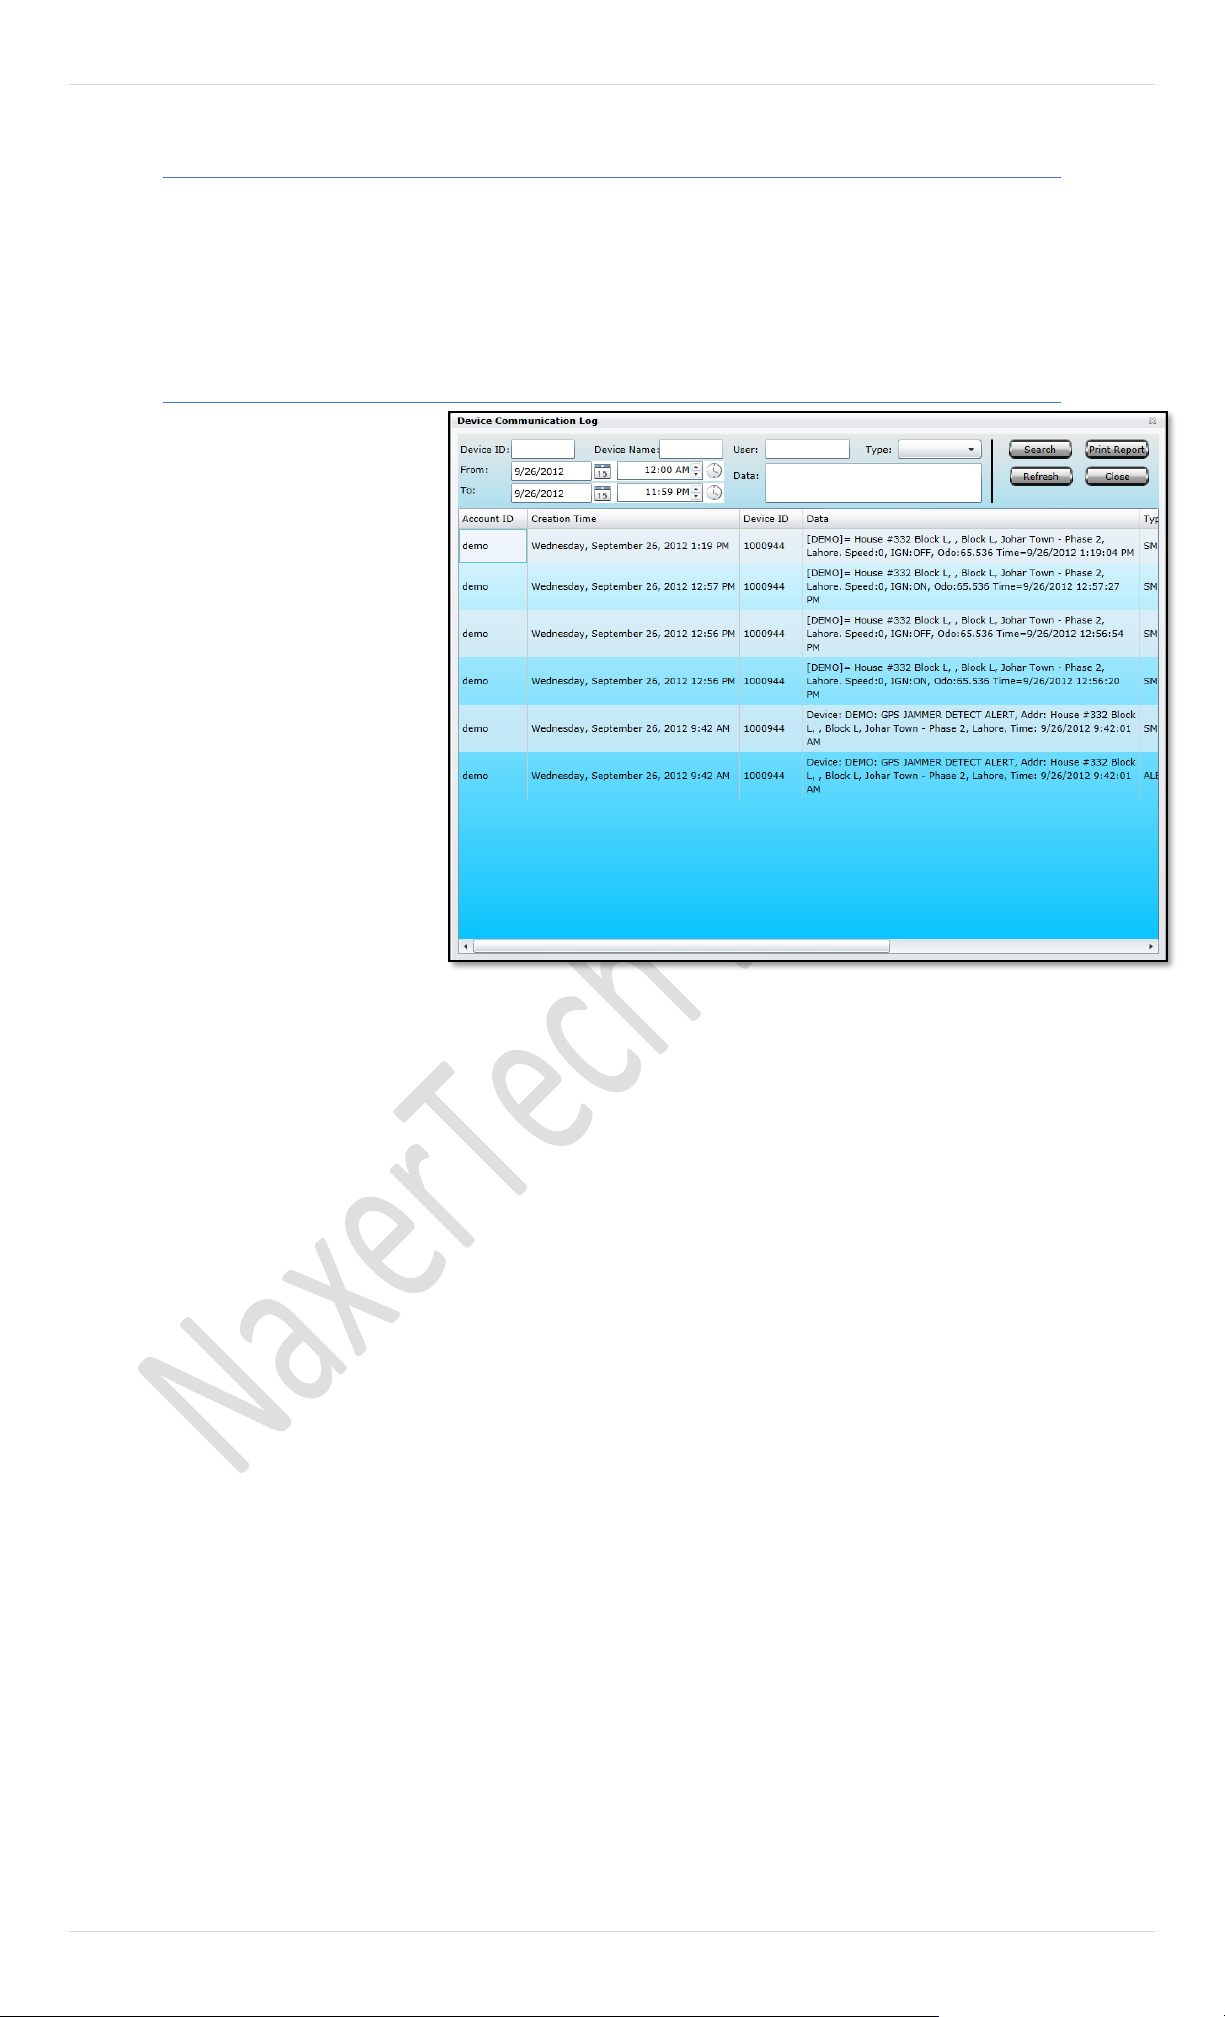
93 | P a g e
Communication
Pegasus system saves all it’s to & From communication with the tracking devices, Alerts generated by the tracking devices,
Actions taken on the tracking devices in its database. All this information can be retrieved from the Pegasus system database .
Let’s take a look at each of the options that are available under Communication button available on the main GUI of the
Pegasus system.
Communication Log
Communication log contains all the
communication made by you with the
tracking devices and tracking device’s
response through SMS or GPRS medium.
Communication log will only display the
communication of those tracking
devices that are added by you into the
Pegasus system database as per the
commands executed under the
Communicate to Device dialog box.
Communication log by default loads all
the communication of the current day
when opened.
Communication log is divided into two
parts i.e., Search area and
Communication Details, as shown in the
image:
Search
Communication log dialog box contains a
search with which you can filter out the required communication from Pegasus system database. Search could be made by
providing either Device ID or Device Name or Data or User. Search could also be refined by specify ing any of the Type of
communication i.e. All – All type of data sent/ received by the system to the device, SMS Out – SMS sent by the system to the device, SMS In–
SMS received from the device by the system, GPRS Out – Commands sent by the system to the device, GPRS In–Data received from the device by the
system through GPRS or Alert – Alerts received by the system sent from the device and specifying specific date & time duration.
Pegasus system will fetch you only those communication details which were ma de in between the specified date & time with
the given Device ID or Device Name or Data or User and Type specified.
Search could also be made by specifying specific data which will work as a keyword for Pegasus system to search for the
required data from its database.
a. Communication Details
Pegasus system display the communication in a detailed form organized into columns Account ID, Creation Time, Device ID/
Device ID, Data, Type, Status, SIM Phone Number, User ID, Processor IP and Process Time. Each of th ese columns is discussed
in detail below:
A. Account ID: Account ID column displays the account ID
with which you are logged-in to the Pegasus system.
B. Creation Time: It displays the date & time of the log
created.
C. Device ID: Device ID column displays the device ID of
the tracking device entered while adding the tracking
device to the Pegasus system.
D. Data: It contains the communication data sent by the
Pegasus system to the tracking device and vice versa.
E. Type: Type column contains the information of the
communication medium used between the Pegasus
system and the tracking device i.e., SMS or GPRS.
F. Status: Status column contains the status of the
communication between the Pegasus system and the
tracking device i.e., Pending, Processed or Fail.
G. SIM Phone Number
SIM Phone Number contains the list of the phone
numbers that are used in the tracking device.
H. User ID: It contains the list of user IDs. These are the
same user IDs which you are logged-in to the Pegasus.
b. Print Report: This will send print command for specific report print.
c. Refresh: Clicking refresh button will load all the communication of the current day.
d. Close: Clicking close button will close the communication log dialog box.
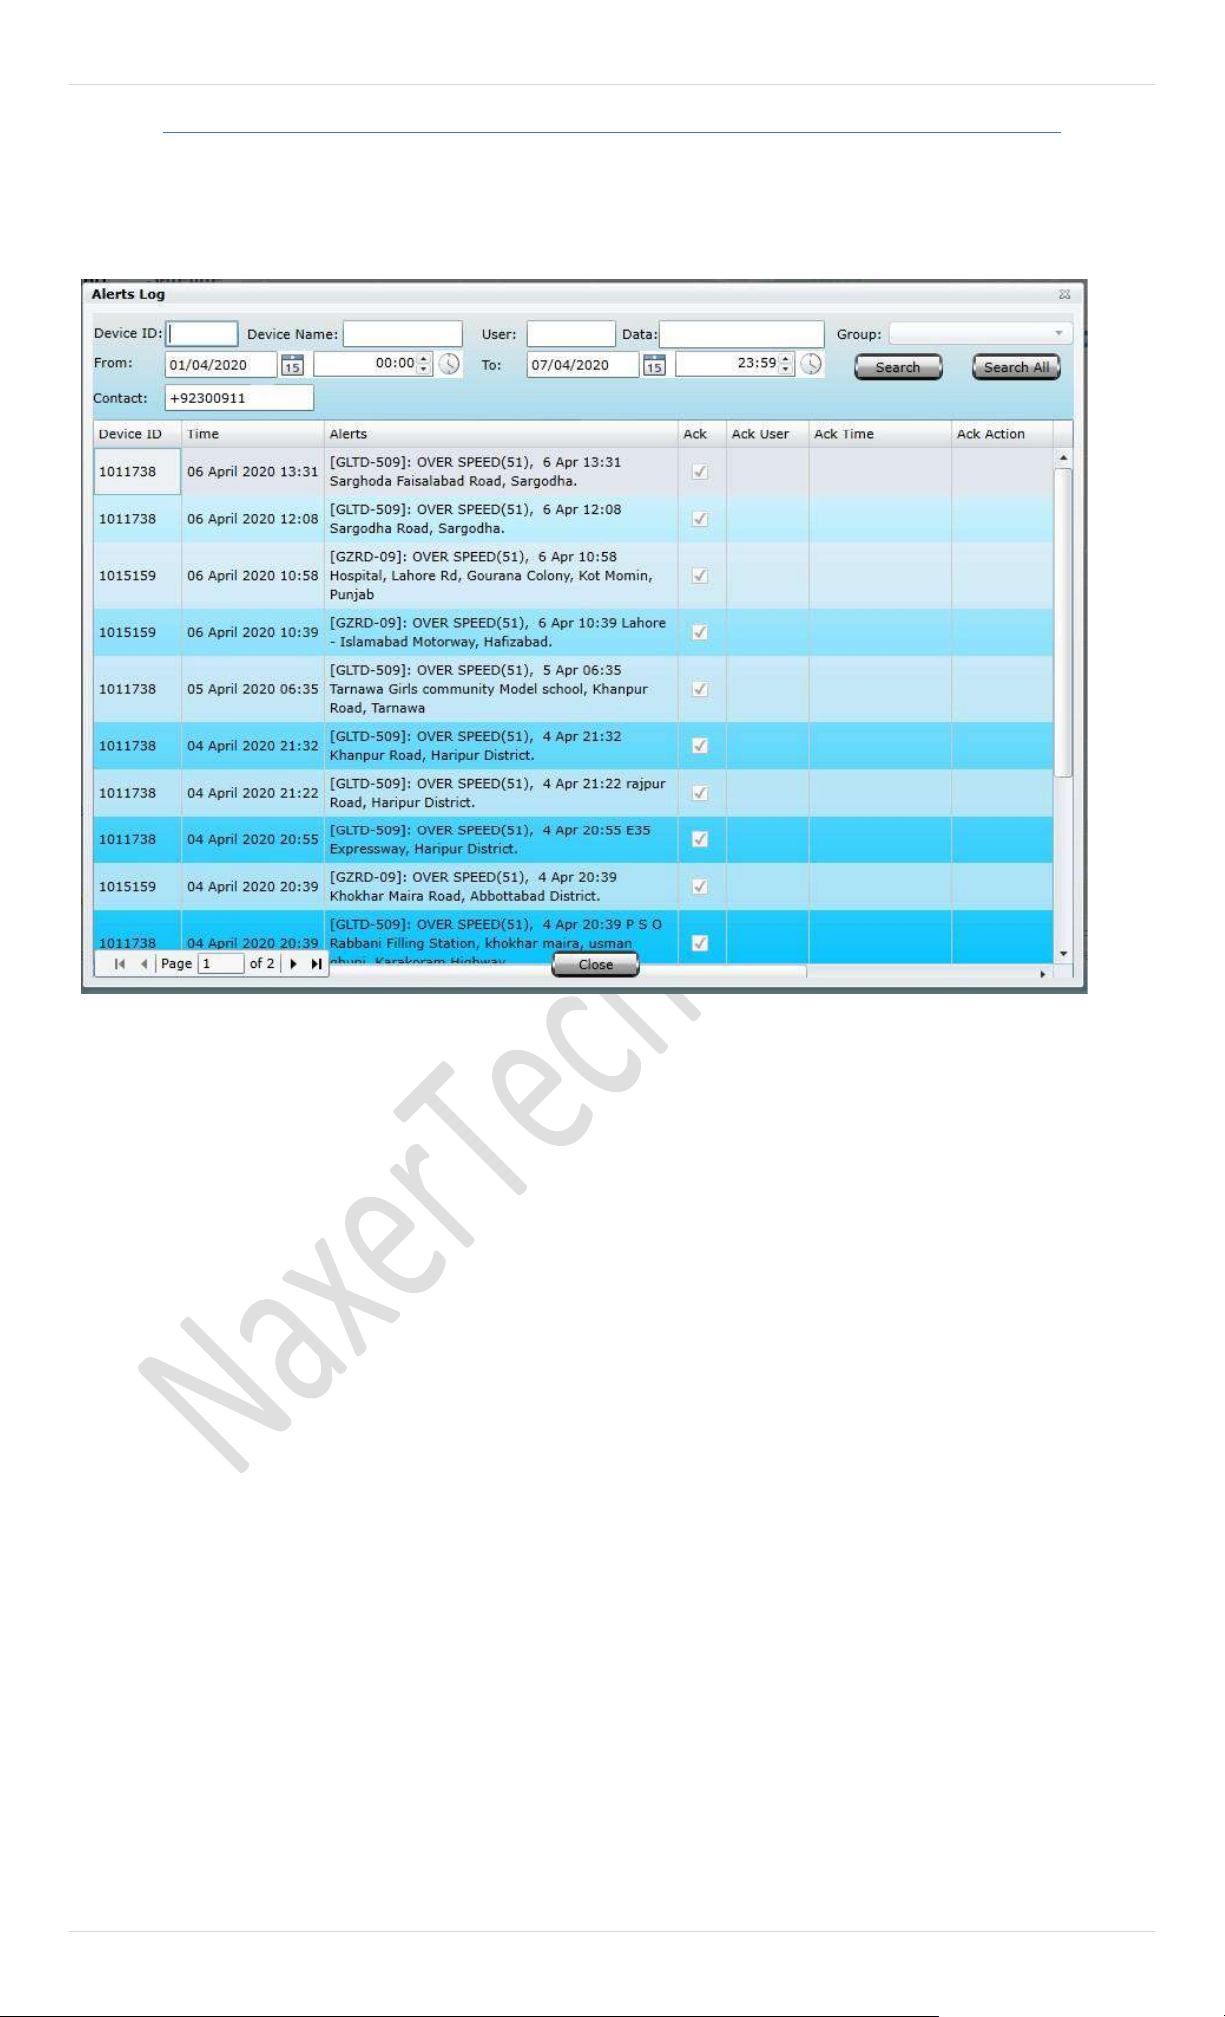
94 | P a g e
Alerts Log
All types of alerts generated by the tracking devices are saved in Pegasus system database and could be viewed under Alerts Log.
Alerts log will only display the alerts of those tracking devices that are added by you into the Pegasus system database. Alerts
log is divided into two parts i.e., Search area and Alerts Details, as shown in the below image:
a. Search
Alerts log dialog box contains a search criterion. Search could be made by providing either Device ID, Device Name,
single user or by a group, customer contact number. Search could also be refined by giving specific date & time so that
Pegasus system fetch only those alerts details which were made in between the specified date & time.
b. Communication Details
Pegasus system displays the alerts in a detailed form organized into columns of Device ID, Time, Alert, Ack User, Ack
Time and Ack Action. Each of these columns is discussed in detail below:
A. Device ID
Device ID column of the Alerts Log displays the
device ID of the tracking device entered while
adding the tracking device to the Pegasus
system.
B. Time
Time column of the Alerts log displays the date
& time of the alert generated by the tracking
device.
C. Alerts
Alerts column displays the complete alert
message generated by the tracking device.
D. Ack
Ack column displays the status of the alert if it
was acknowledged or not. Checked when it’s
been acknowledged and unchecked if the alert
is not acknowledged.
E. Ack User
Ack User displays the name of the user who
acknowledged the alert.
F. Ack Time
Ack Time column displays the date & time
when the alert has been acknowledged.
G. Ack Action
Ack Action column displays the details of the
action taken against the alert by the user.
Close: Clicking close button will close the alerts log dialog box.
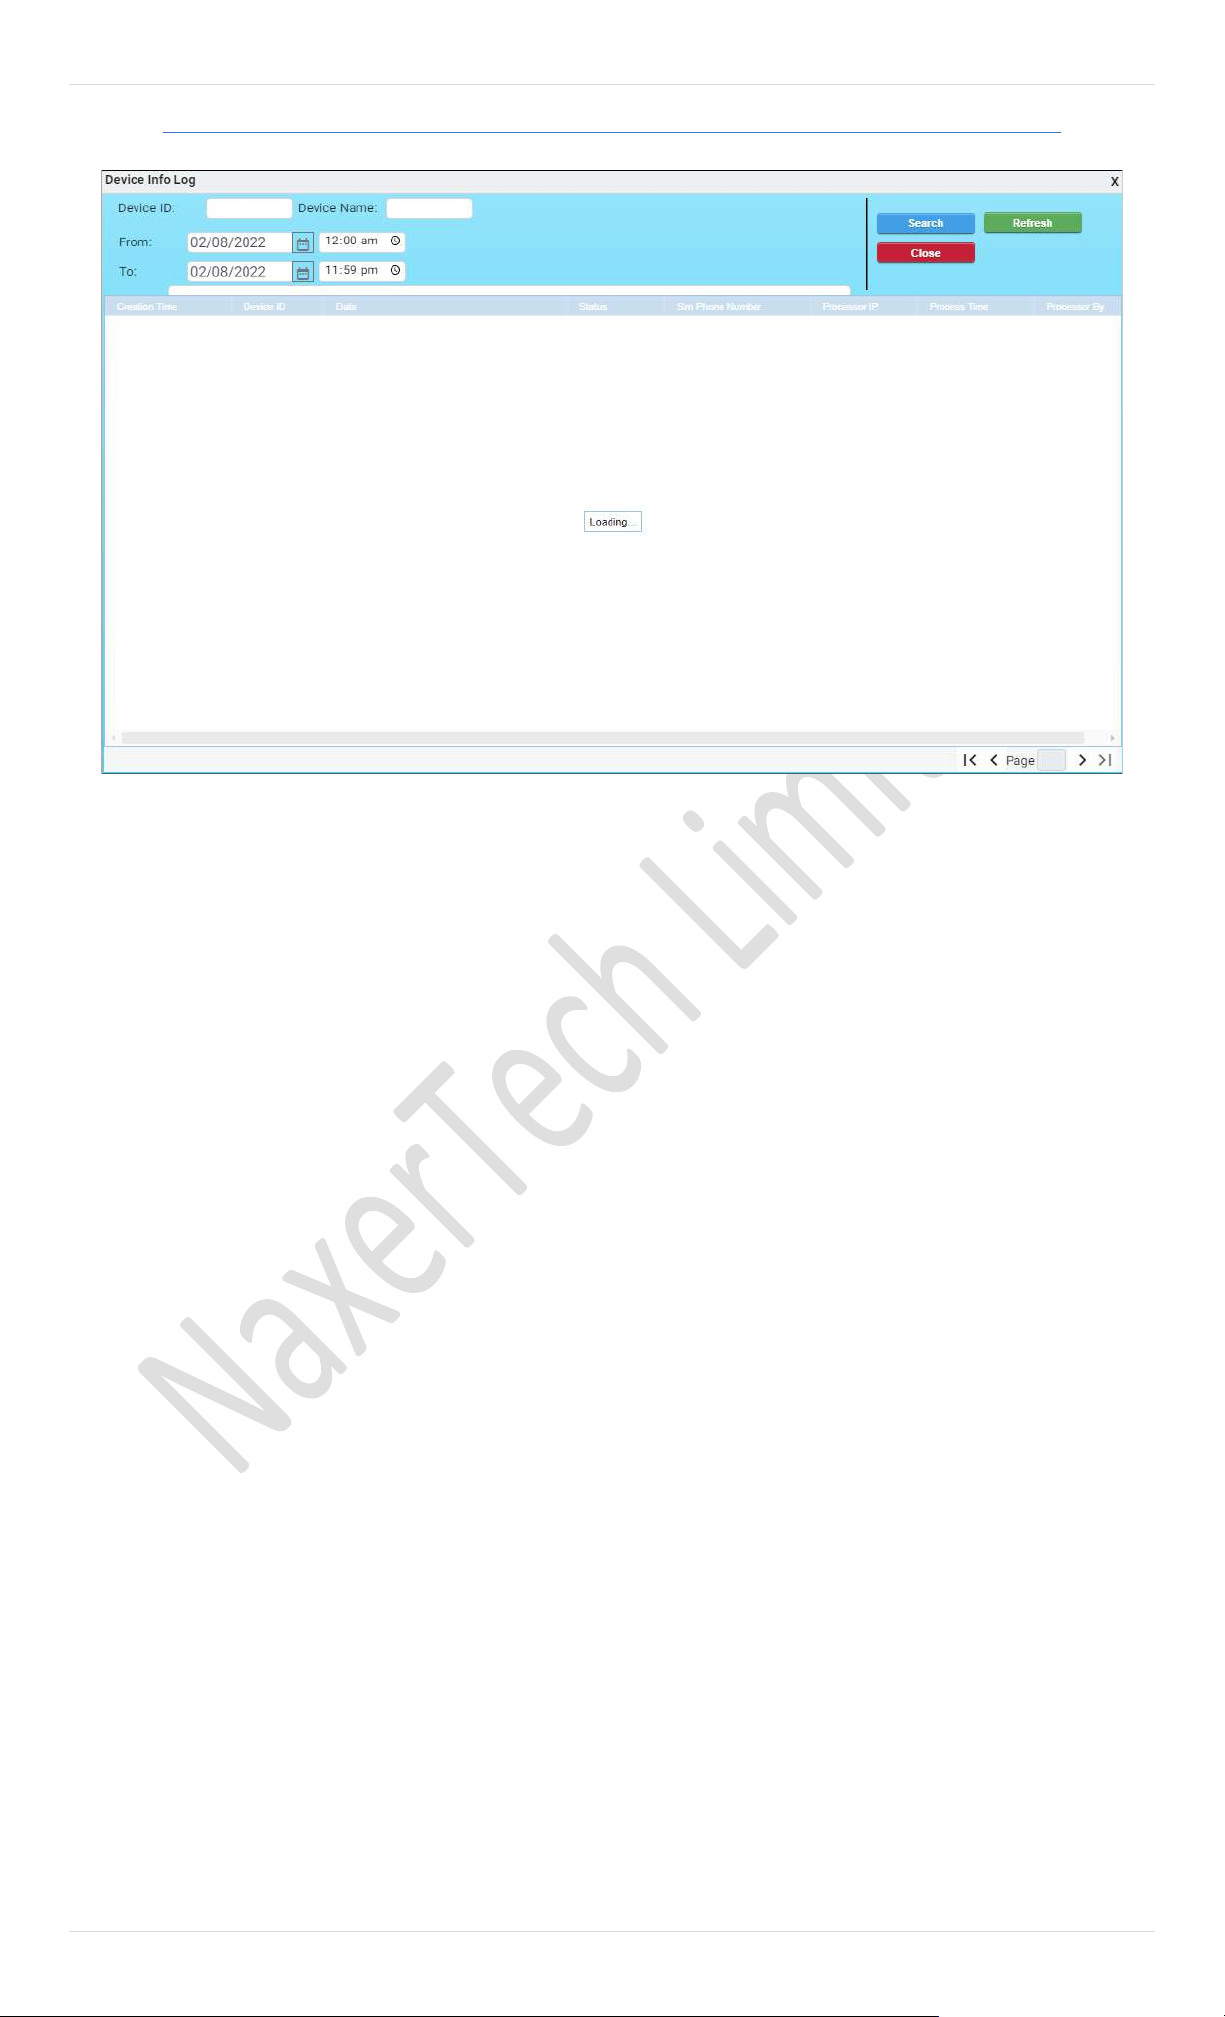
95 | P a g e
Device Info Log
Device info log is used for device troubleshooting information. It creates log on device troubleshooting
It also has two sections.
a. Search
Device log dialog box contains a search criterion. Search could be made by providing either Device ID, Device Name,
Search could also be refined by giving specific date & time so that Pegasus system fetch only those log details which
were made in between the specified date & time.
b. Communication Details
Pegasus system displays the logs in a detailed form organized into columns of Creation time, Device ID, Date, Status,
Sim phone number, Process IP, Process time. Each of these columns is discussed in detail below:
A. Creation Time
Creation time shows the time when the log
was created.
B. Device ID
Device ID column of the Alerts Log displays the
device ID of the tracking device entered while
adding the tracking device to the Pegasus
system.
C. Status
It shows the status of the log
D. Sim Phone Number
Phone number of the SIM installed in a device
E. Process IP
Shows the IP address from where the log was
created
F. Process Time
Time taken in the processing of the l

96 | P a g e
Events Log
Events log contains all types of events occurring in the device. It communicates to Pegasus system through SMS which
are shown in events log. It has search area and Message Details section
a. Search
Search section contains date fields which can be used to search events of the selected device from device panel.
From-To date is selected and the details will be shown in communication detail table
b. Communication Details
It is a sheet that consists of many rows and column, it has events/messages sent by device to Pegasus System
with dates and time on which the message was sent, below are some brief explanations of the table
A. Device ID
Device ID column of the Events Log displays the device ID of the tracking device entered while adding the tracking
device to the Pegasus system.
B. Creation Time
Shows the time or the creation of the SMS by device. It is the time on which the log is created.
C. Message
Contains the body of the message that is sent by the device
D. Type
The type of message received i.e., SMS, Email etc
E. Status
Shows the status of the log
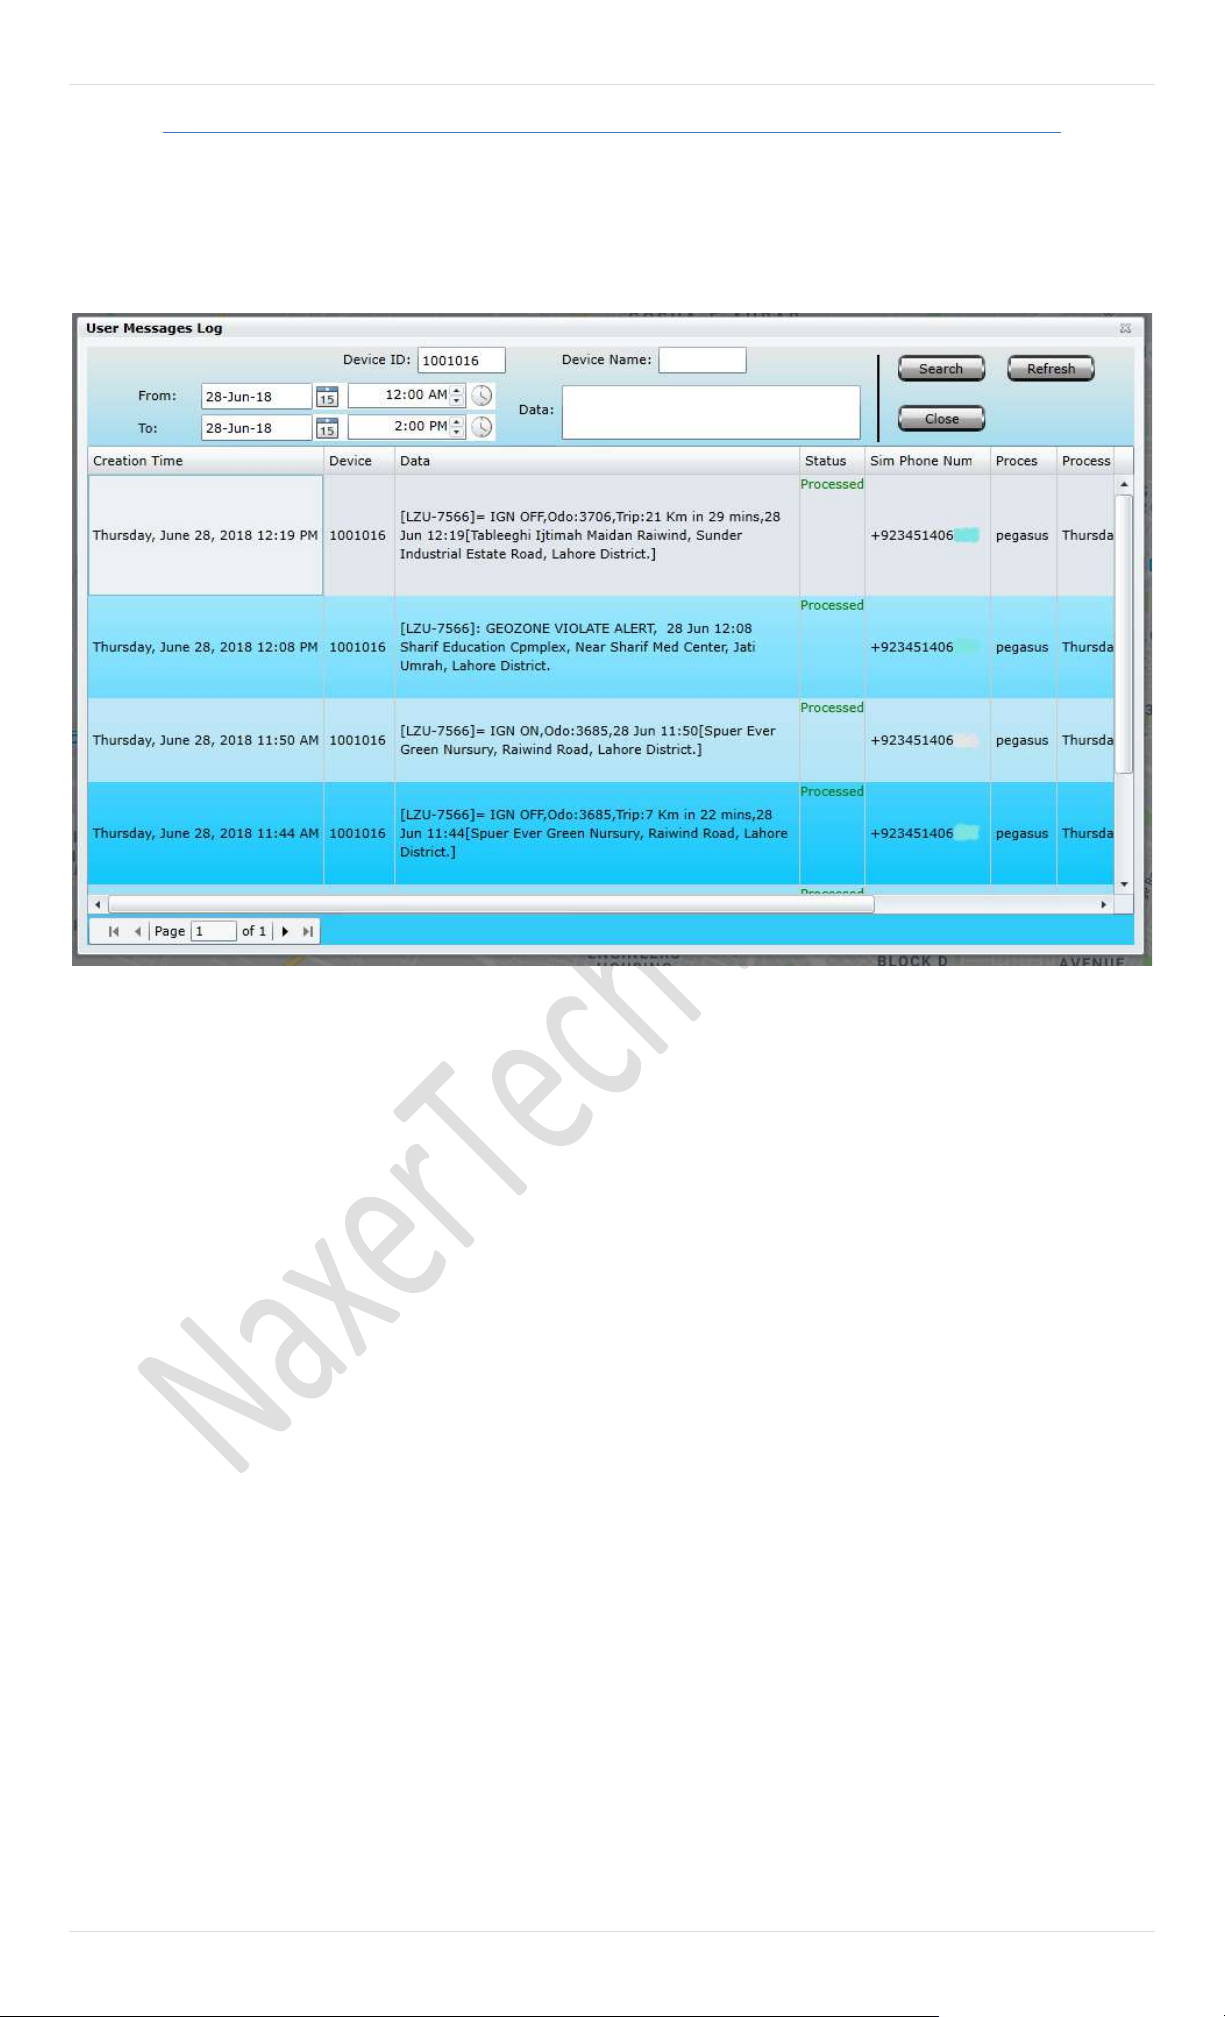
97 | P a g e
Message Log
Pegasus System is capable to send SMS to multiple recipients for specific alerts notifying, such as Ignition ON /OFF alerts,
No Power Alert, SOS Alert, GEOZONE violation alerts, Speed violation alerts …etc.
Message log dialog box is consisting of two parts, 1
st
one is for adding criteria to search and 2
nd
part will display result within
your selected criteria, as show in below image.
From & To: Message logs data can be stored up to six
months in Pegasus database and easily extract information
by selecting date and time.
Device ID: A device ID can be extract from Edit device
under device panel. You can search message logs through
device ID.
Device Name: Device name is usually vehicle registration
number which is located in device panel. You can search
message logs through device name.
Data: If you want to search any particular message having
a specific data, the field is available to add data and search.
Creation Time: The time of message creation by Pegasus
system and sent to the recipient number.
Device ID: Device ID will be displayed for reference.
Data: It will show exact data which has sent as message
Status: This will show the current status of message either
pending or processed.
Sim Number: SIM number on which these messages are
delivered. This can be set in device edit under device panel
option
Processor IP: Processor IP will display hosted IP normally
it’s with named resolution such as Pegasus.
Process Time: Process time will be displayed.
Processed by: GSM server detail will be displayed for
further reference and troubleshooting.
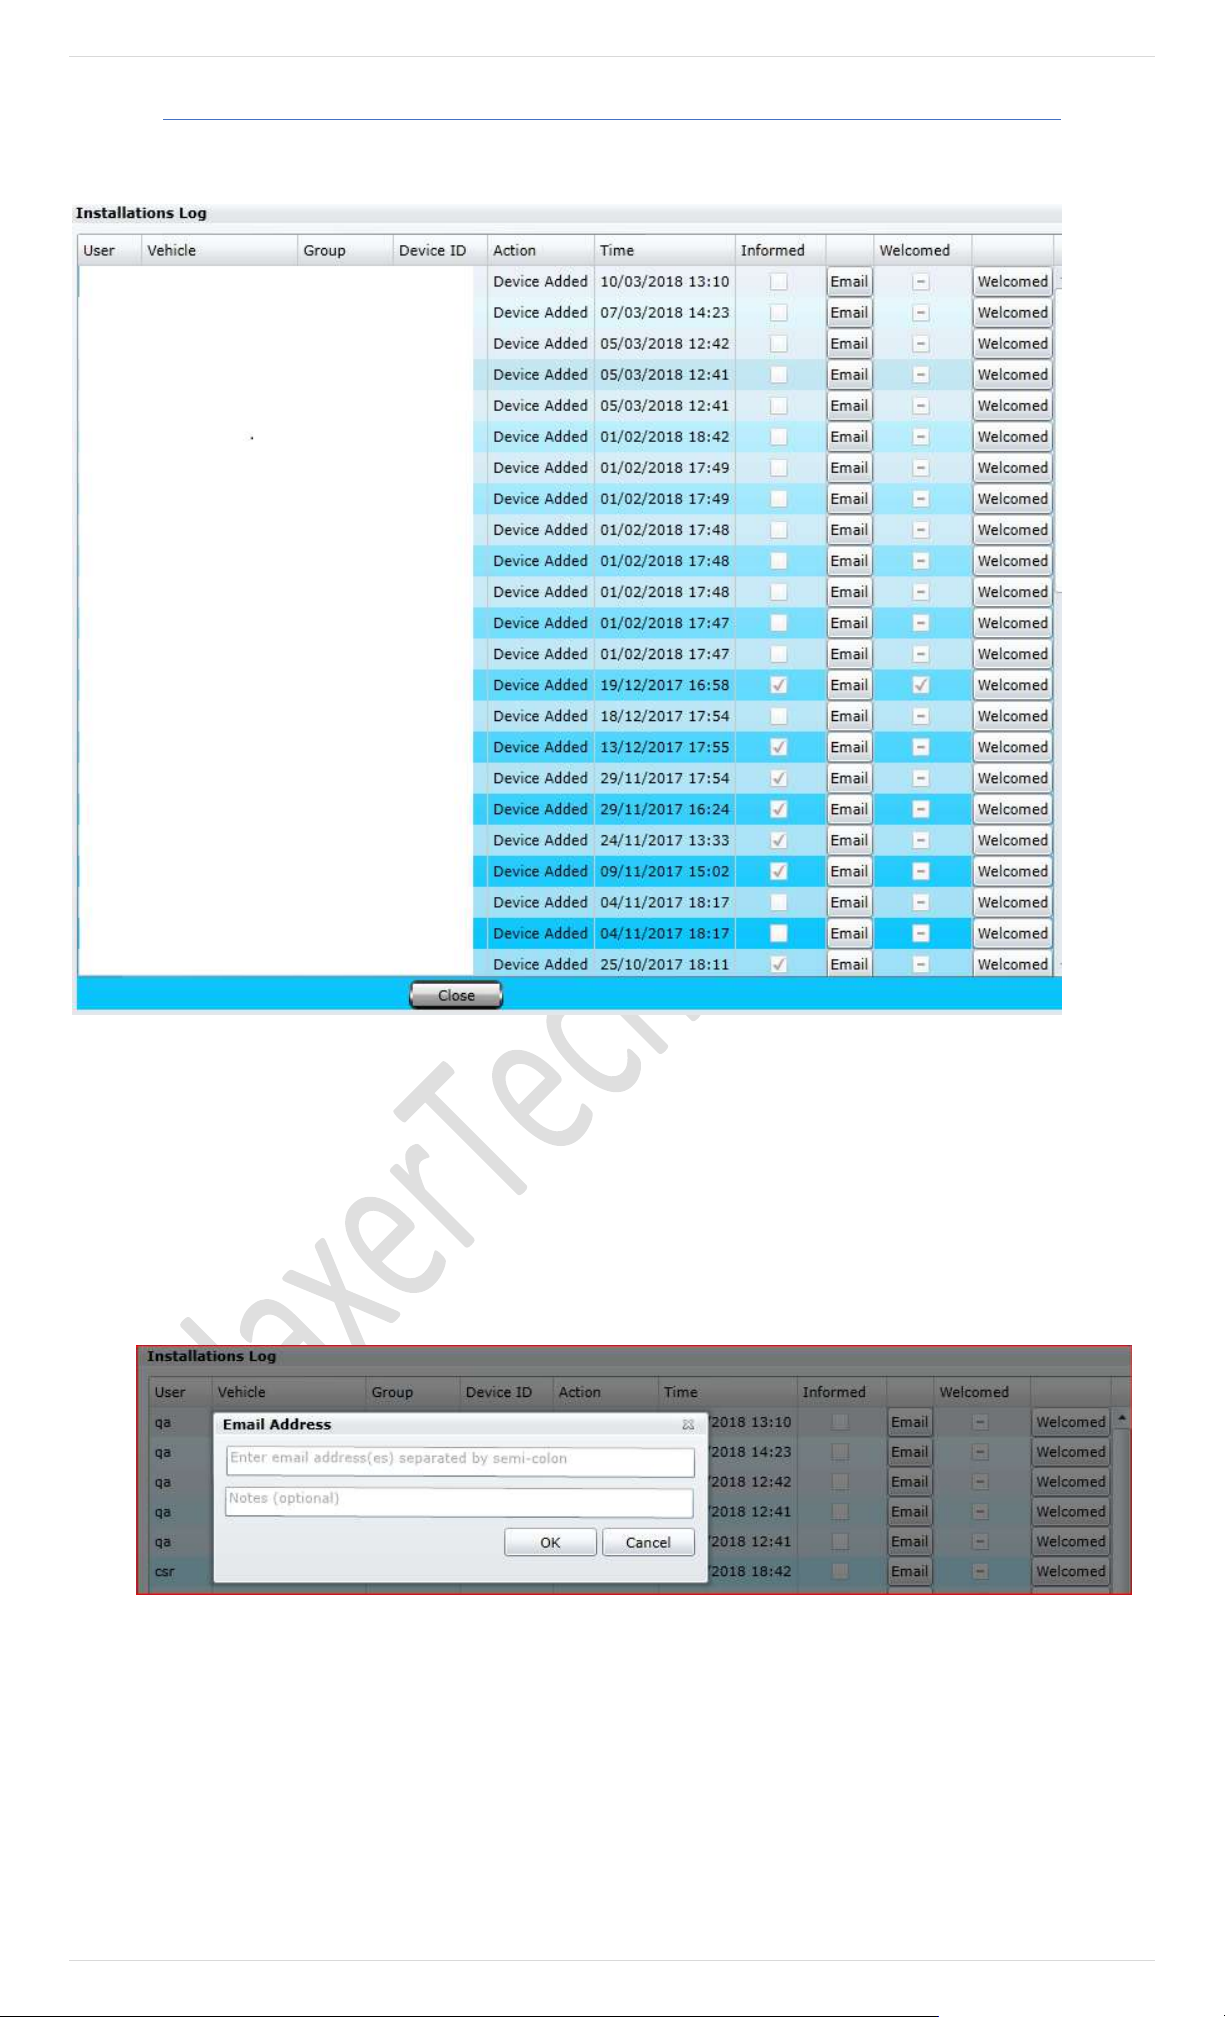
98 | P a g e
Installation Log
Installations Log will help you manipulating ongoing installations to keep in your record by using Email option and maintain
quality corresponds with your client by confirmed welcome call.
a. User. User name will be shown for particular installation in Pegasus.
b. Vehicle. Device name will be shown as vehicle name.
c. Group. Multiple groups will be shown which are being used in installation
d. Action. Action description will show here i.e., Device Added.
e. Time. Exact time of installation will be logged and shown.
f. Informed. Email tab should be used for sending installation activity information to the concerns. Enter the desired
email address and click on Ok button. Once email sent, it will be confirmed in information log by enabling check box
with tick mark.
g. Welcomed. Once a representative gives a welcome call to customer, he needs to check this tab to make sure that a
welcome call is given to client and it could be analysis in installations log by having tick mark sign.
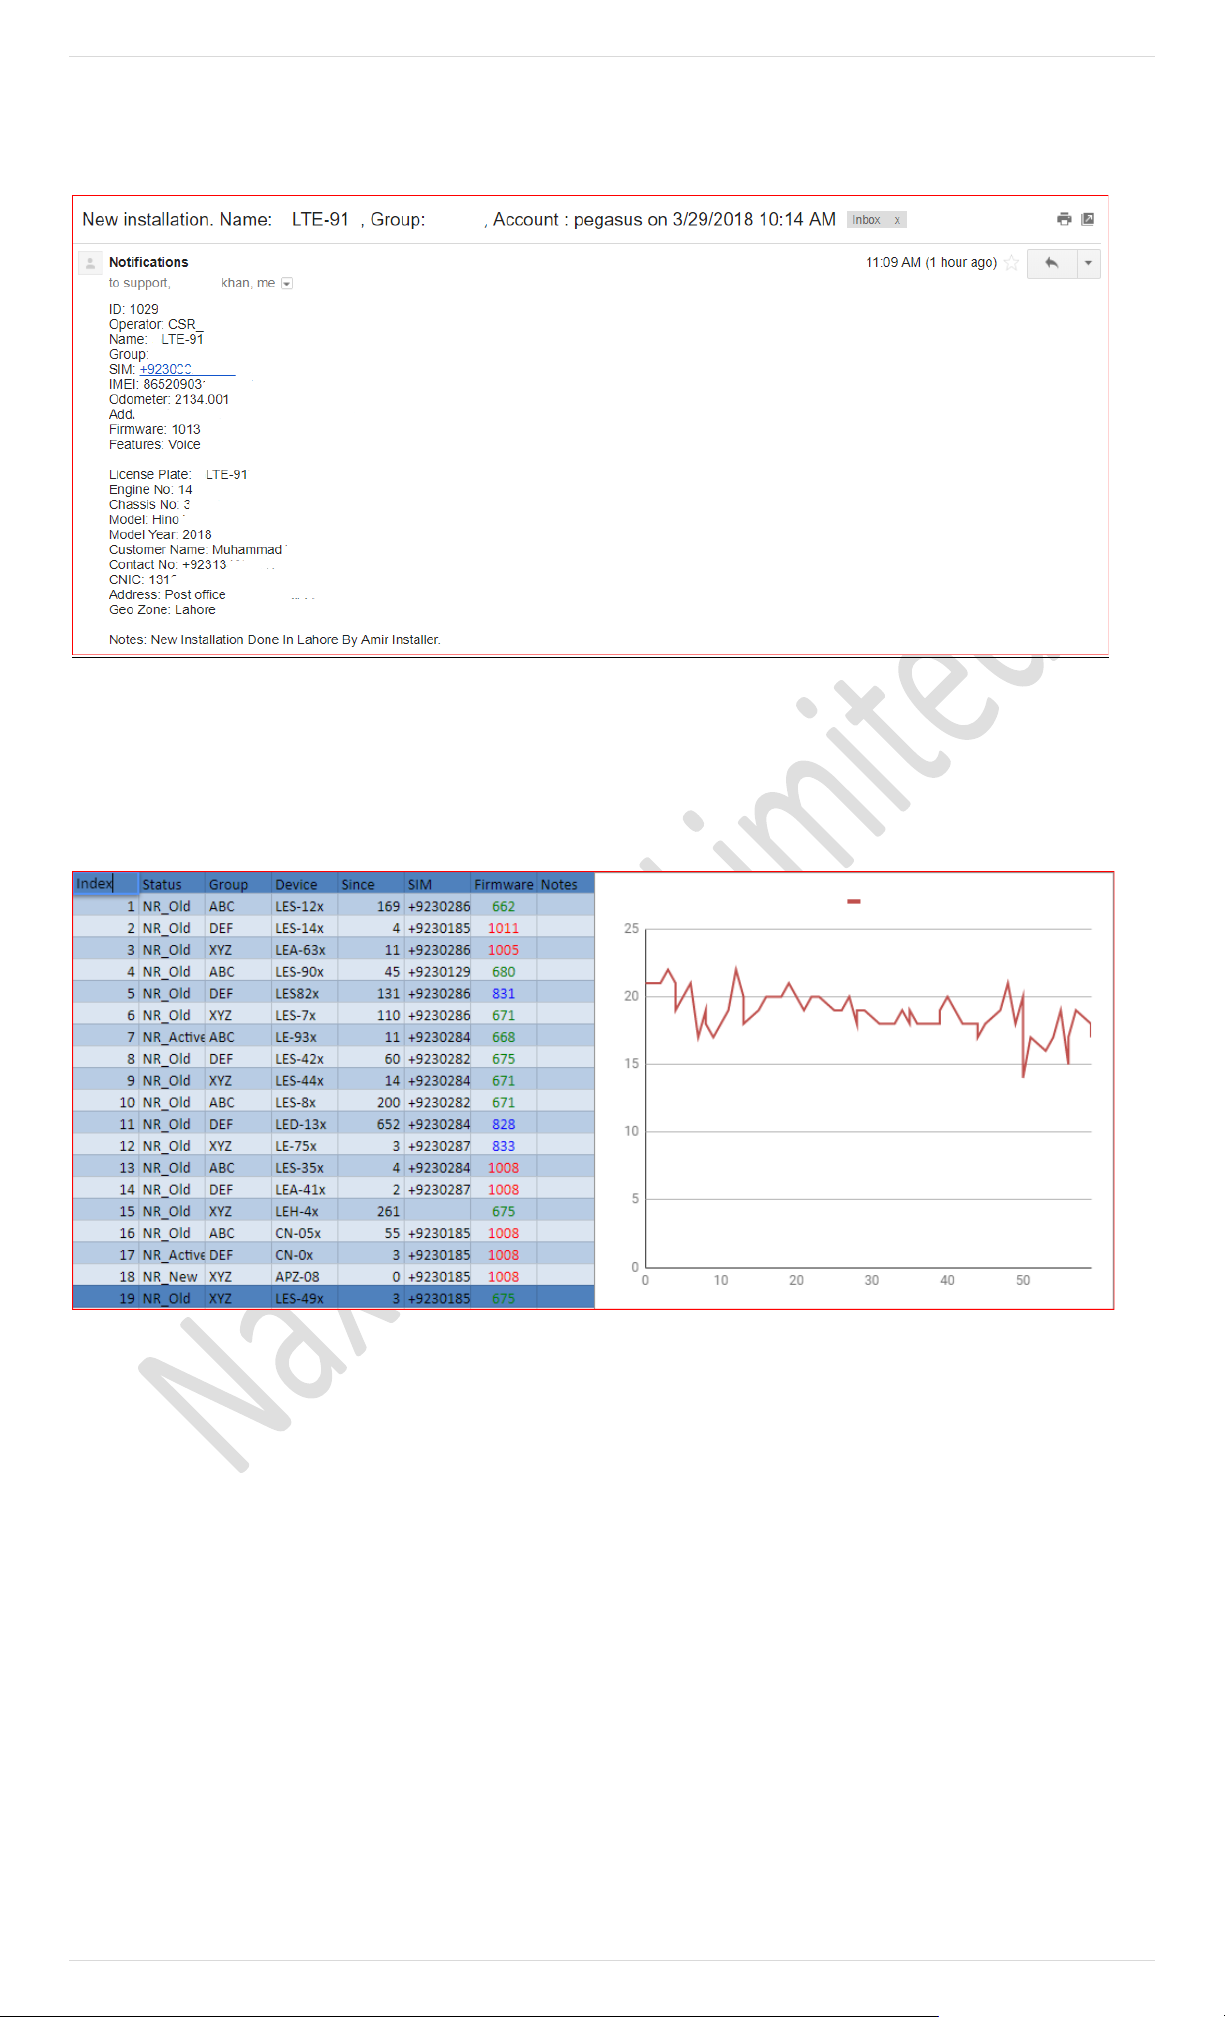
99 | P a g e
Installation Log Email
When you click on Email tab in installation log, it will be sent to selected recipients with set pattern which is described in the
picture.
NR Devices
NR Devices stand for Not Responding Devices. For maintaining your fleet online this feature will provide you the list of out of
service vehicles.
For your ease Pegasus has privilege to send you NR Devices list through email on daily bases with following entities and grap h
report.
(The graph represents number of vehicles in vertical and number of days in Horizontal line formation.)
a. Index: This field will let you know number of vehicles which are NR. and need maintenance.
b. Status: Status will give you an over look about how long this vehicle is NR. Distinct with Active, new or Old.
c. Group: At here Main Group and its Sub group will be mentioned for notifying NR Vehicles.
d. Device: Devices name will be displayed which usually belongs to vehicle registration number.
e. Since: Number of days since vehicle is NR. These will be calculated accurately and display here.
f. SIM: Display SIM number which is being used in that NR device for fixing up the issue.
g. Firmware: Configured firmware on device will be define for soft troubleshooting.
h. Notes: Important notes in this field related to a specific NR vehicl e.
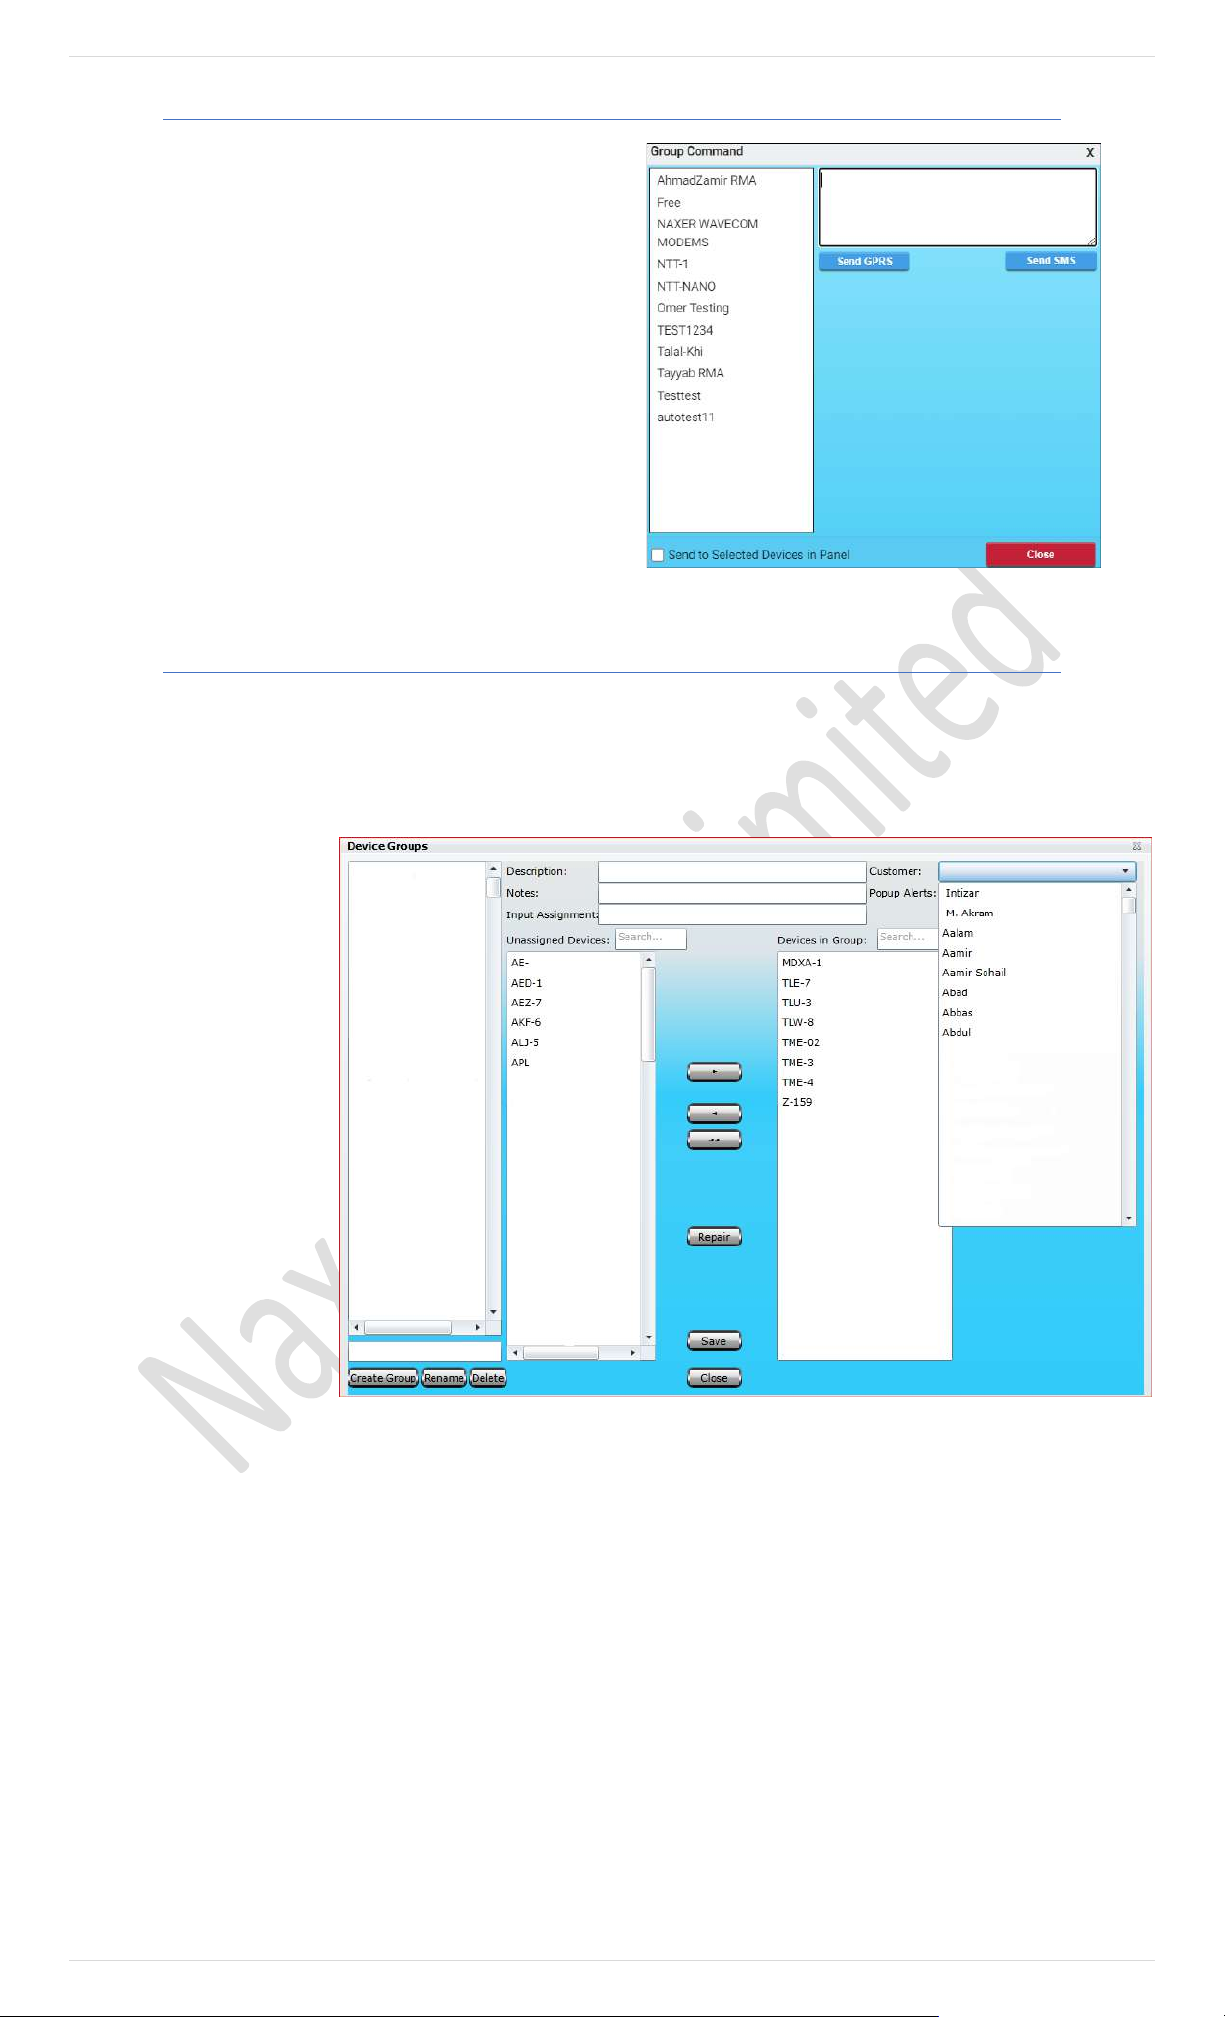
100 | P a g e
Group Command
A single command could be sent to the entire group (Single or
Multiple) instead of selecting and sending the same command each
device from the Devices Panel. Group Command option is available
under Communications button on the main GUI of the Pegasus
system. Selecting this option will display a Group Command dialog
box.
Group
Group Devices
Now that we are done with the individual vehicle tracking, let’s take a look what can be done in terms of group assets. From
the main GUI of the Pegasus system click the button Groups, a Device Groups dialog box will open up where you can create
a new group or edit an existing group as shown in the below image:
Pegasus allows you to
categorized your clients or
departments with their
groups, which will bring ease
for configuration of command,
enabling alerts with no time
for up to thousands of
vehicles…etc.
You can create unlimited
groups under the same
account and manage their
vehicle under the group quite
comfortably.
For Creating a new Group, you
need to click Groups in the
main window of Pegasus and it
will pop up with new window
having Groups management
features. Please see in the
picture.
a. Create Group: Enter the name of the Group and click
on create group.
b. Rename: You can rename exist group name.
c. Delete: It is recommended to delete unnecessary
groups from your account.
d. Device Groups: All the created groups will be list
down.
e. Unassigned Devices: Devices which are not in certain
group will be shown. A search option is also available
for fast action. You can select unassigned multiple
devices to assigning them a group.
f. Device in Group: To find out what devices are in
which group you can use this feature, normally with
scroll down or using search option.
g. Repair: This option is very handy when some of the
devices which are not shown correctly as assigned or
unassigned device then you must click on Repair
option. Our system will internally sort out.
h. Description: you can add description for selected
group.
i. Note: Important information can be written down for
further reference.
j. Input Assignment: There are number of Inputs are
available in Naxertech Tracking devices, you can
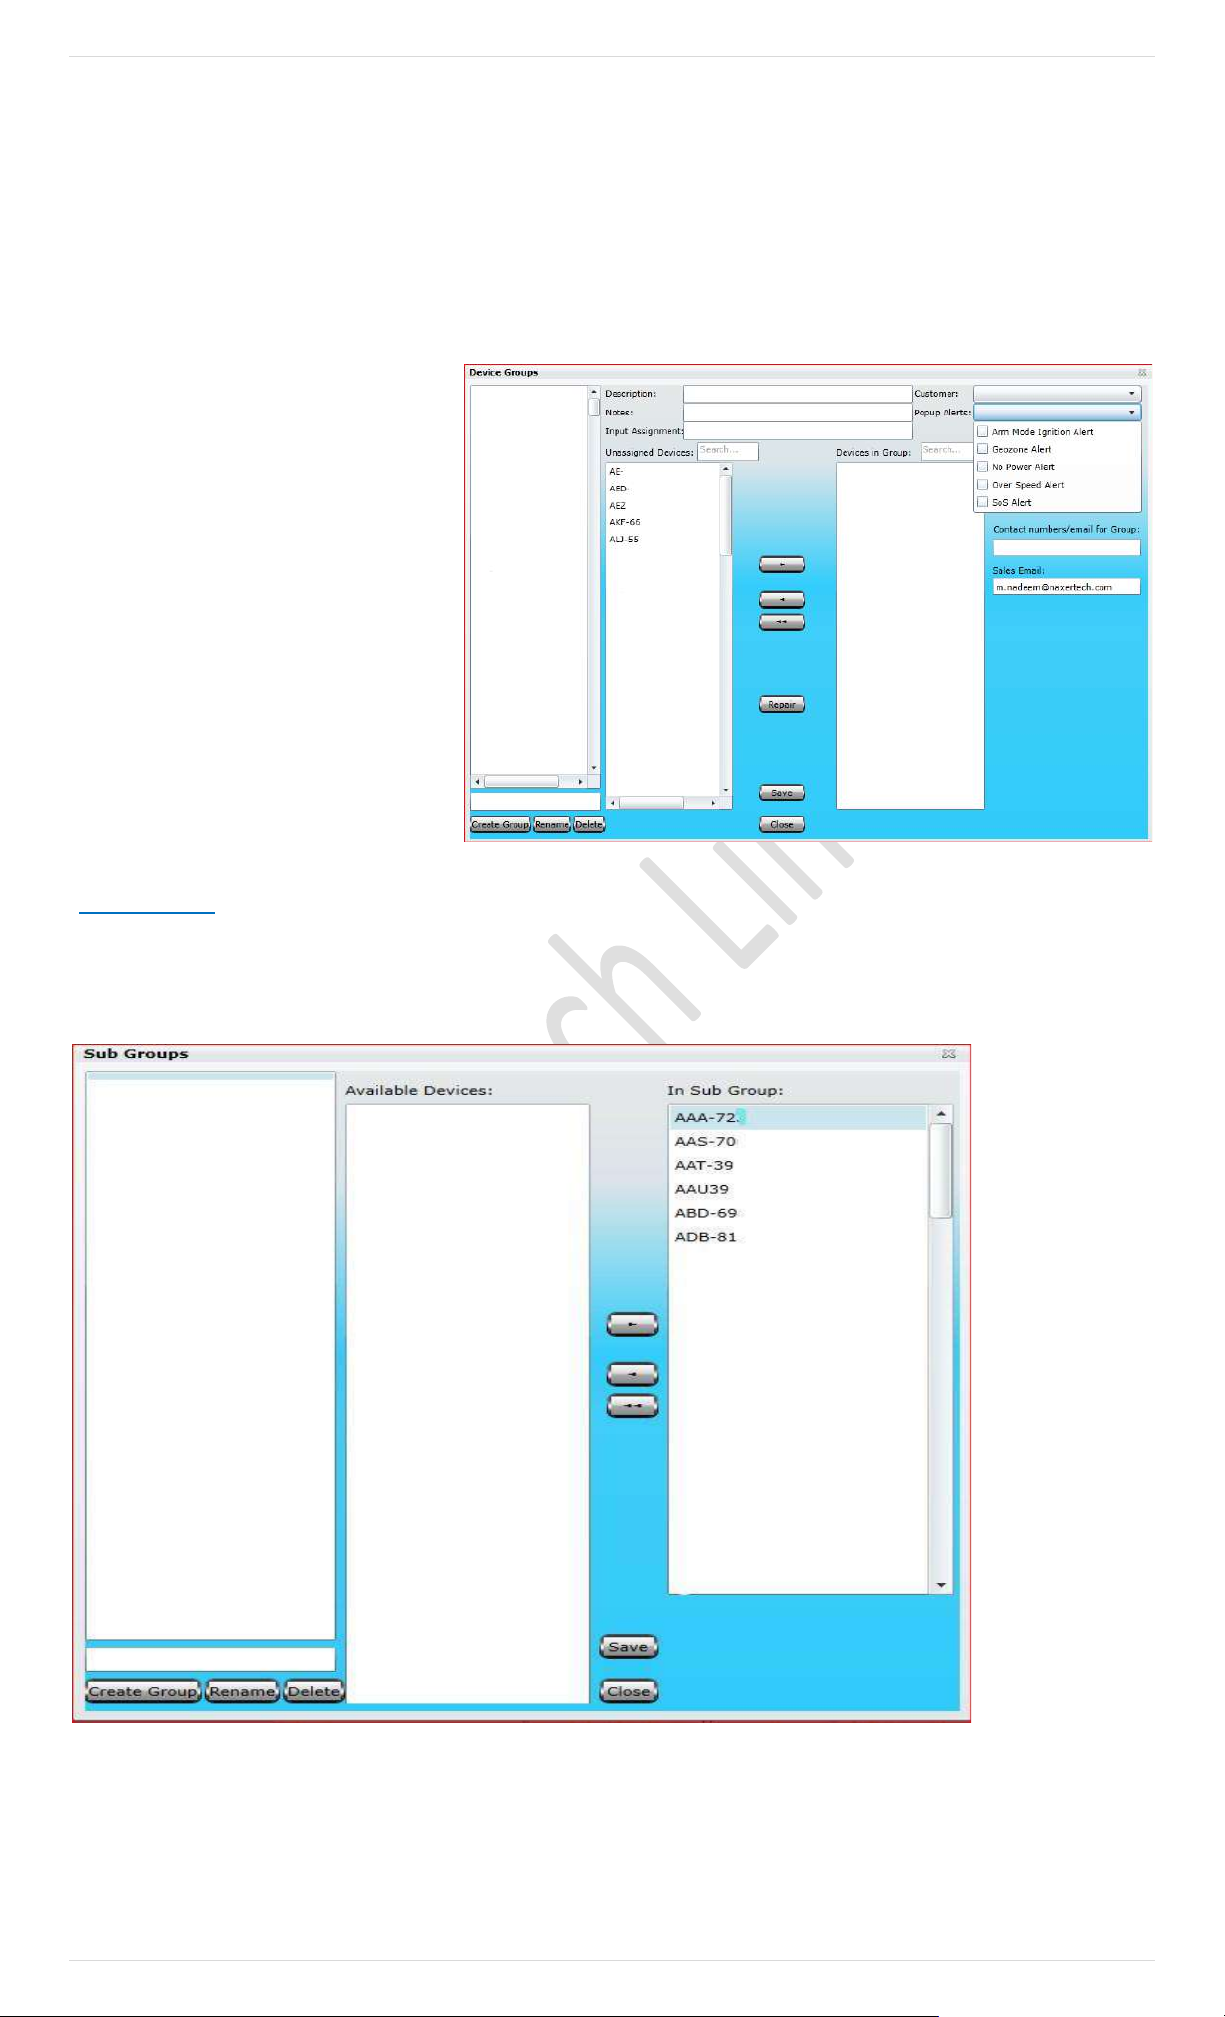
101 | P a g e
select input type and get alert either with ground or
without grounding. For further details pleases contact
Naxertech support department.
k. Customer: Customer profile can be attached with
group, so it will be shown with all vehicles of the
group when you move pointer (mouse) on it. Already
created customer’s list be shown here and you need
to select the right one. For creating new customer
profile, please go to Customer menu from the
Pegasus main window and follow the instructions.
l. Popup Alert: There is a choice to select the type of the
alert you want to activated for a specific group. In
case you don’t select any of the alert, Pegasus will
automatically consider all of the alerts to Popup. You
can see alert type in the picture.
M. Contact Numbers /Email for
Group: By filling up this field an
email or message will be delivered
to group administrator on any
activity held in the group.
N. Sales Email: Sale person will be
intimated through email on any
new installation in current group.
Sub Groups
Pegasus empowered his user to create groups and their sub groups for distinction of clients, their companies or even
departments vise. If you need to create Sub Group, you need to create Group first and login with that group user login
first. After that you need to click on group and you will find window like this in the picture.
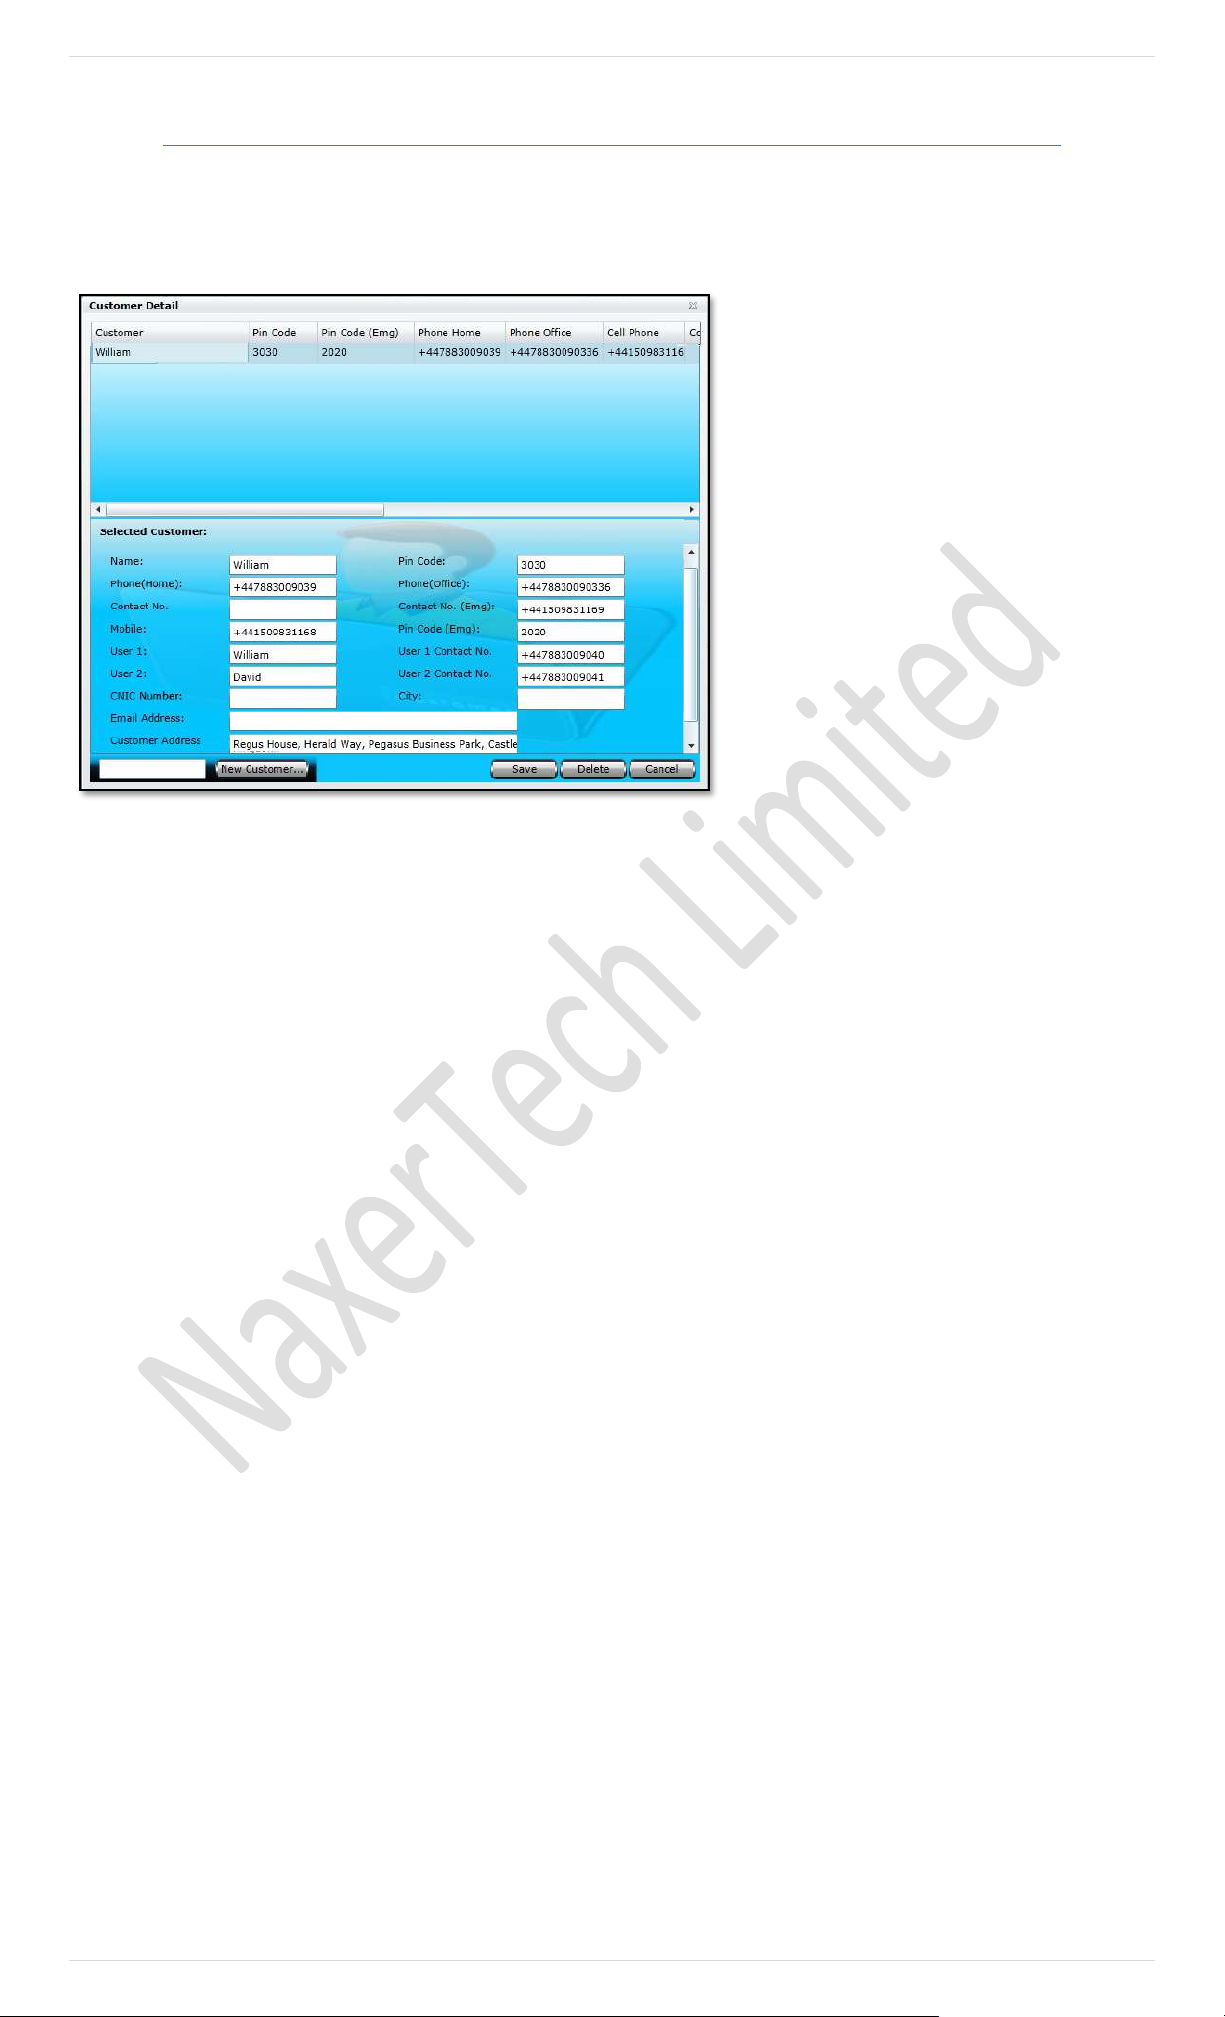
102 | P a g e
Customers
If you are using Pegasus system for commercial purposes, Pegasus system gives you the capability to save your customers
information which could later be used by the CSR (Customer Support Representative) in case of any emergency or vehicle theft. This
could be achieved by clicking the button Customers on the main GUI of the Pegasus system once you have logged into the
system and it will open up Customer Information dialog box as shown in the below image:
Customer Information dialog box is divided into two
segments; the upper part of the Customer
Information dialog box is called Customers
Information Grid where all the information of such
customers could be viewed which have already been
added to the system. The rest of the part is meant to
add and enter information of a new customer or edit
any existing customer information. Let’s create a new
customer and we will go through all the input boxes
in detail.
First, we should have a Name, to do this enter a
suitable Name in the text box available at the bottom
of the Customer Information dialog box and click the
button New Customer. When the New Customer
button is clicked notice that the same name will
appear in the Name text box in the Customer
Information Form. Now it’s time to fill in the rest of
the fields as described below:
A. Name
Name will appear automatically once you enter
customer name in the text box available at the
bottom of the Customer Information dialog box
and clicking New Customer.
B. Pin Code
Enter the Pin Code; pin code is a secret password
that you provide to a customer. It could later be
used to authenticate a customer.
C. Phone (Home)
Enter the residential telephone number of the
customer.
D. Phone (Office)
Enter the office telephone number of the
customer.
E. Contact No
Enter the authorized contact number of the
customer. This contact number would be the one
with which Pegasus system will interact in case of
any alert or emergency. It could be a landline or a
cellular contact number.
F. Contact No (Emergency)
Enter a contact number which could be
approached by the CSR (Customer Support
Representative) at the time of emergency. This could
be the same as Mobile or anyone else as per
customer requirement.
G. Mobile No
Enter the cellular contact number of the customer.
H. Pin Code (Emergency)
Enter the Pin Code Emergency; this pin code is a
secret password that you provide to a customer. It
could later be used to authenticate a customer or
the one for which contact number has been
provided for Contact No (Emergency) in case of
emergency only by the CSR (Customer Support
Representative).
I. User 1
Enter the Name of the first authorized personnel
which is usually the customer himself.
J. Contact No 1
Enter the first authorized contact number of the
customer. It could be a landline or a cellular
contact number.
K. User 2
Enter the Name of the second authorized
personnel.
L. Contact No 2
Enter the contact number of the second
authorized personnel. It could be a landline or a
cellular contact number.
M. CNIC
Enter the National Identity Card number of the
customer.
N. City
Enter the name of the city of the customer.
O. Mobile No
Enter the cellular contact number of the customer.
P. Email Address
Enter the Email Address of the customer.
Q. Customer Address
Enter the postal address of the customer.
Once all the fields are filled with appropriate information or any customer information is edited click the Save button to save
the information into the Pegasus system database otherwise changes will not take any effect. If any customer information is
required to delete, select the required customer from the customer Information Grid and click the Delete button. A warning
message will appear and clicking OK button will delete the selected account instantly. Be careful while deleting a customer a s
there is no way to undo it. Click Close button to close the Accounts Information dialog box.
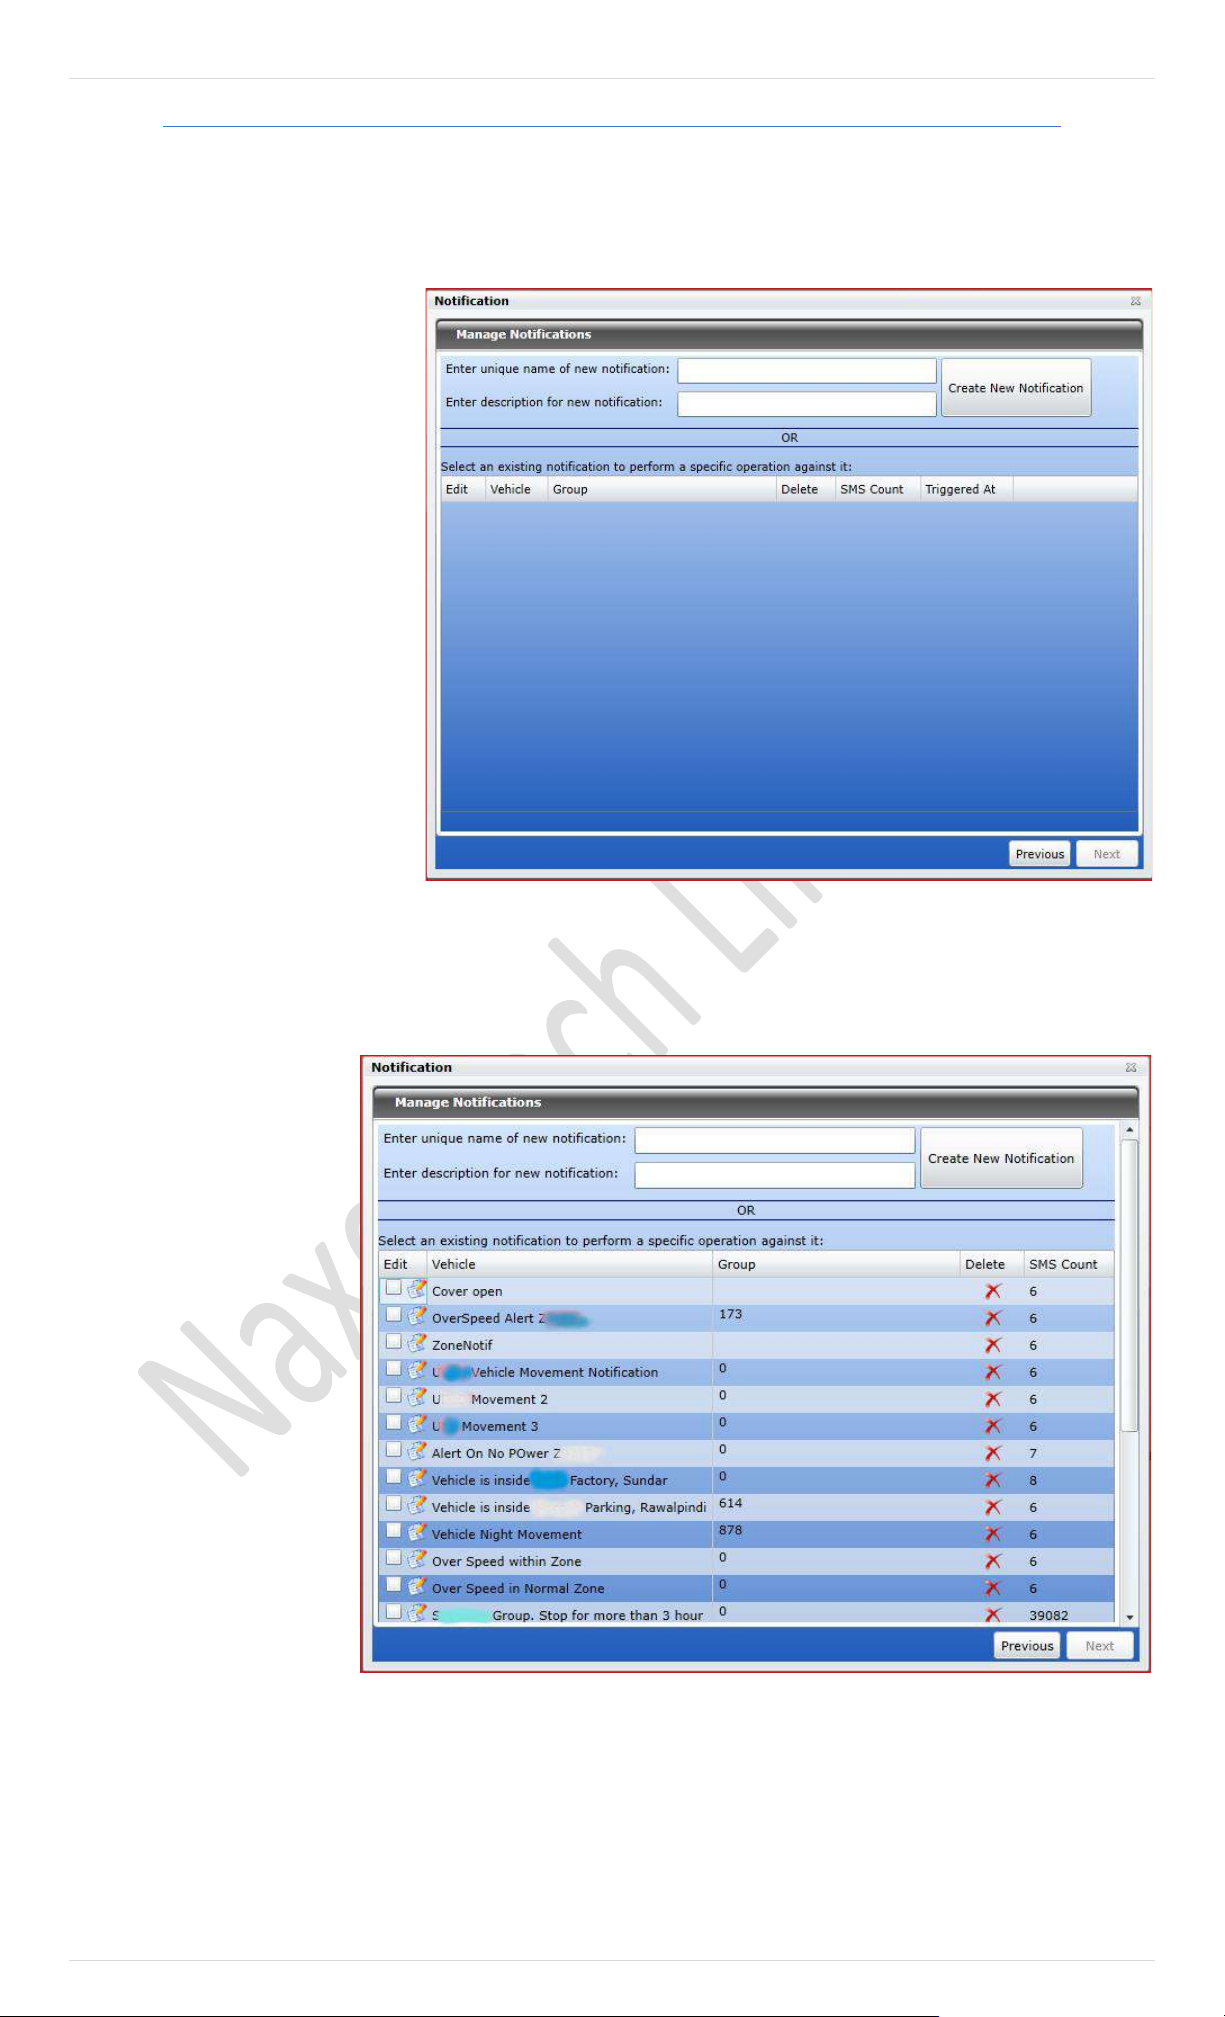
103 | P a g e
Notifications
Notifications, a new feature introduced in Pegasus system. This notification system is a combination of software and hardware
that provides a means of delivering a message to the recipient(s). A notification can be delivered by an e-mail or SMS or
displayed online in a popup window.
Notifications are very useful where
strict rules need to be followed for
example a container carrying expensive
goods. The doors of the container
should remain lock all the way from its
departure terminal to its respective
destination terminal. A digital input
connected to the doors, activates/
deactivates when the doors are
opened. A notification can be set to
send out an alert via email or SMS to
the recipient (he might be a station
manager) if the door is opened in
midway or before the arrival of the
container at its destination terminal.
Mobile Notifications can now be
restricted to specific user by setting in
Device Properties.
Let’s discuss Notifications in detail.
Click the Notifications button available
at the main GUI of the Pegasus system.
A notification dialog box would appear
to create, edit and view notifications as shown in the image below:
To create a new notification, enter a unique name in the text box marked for naming and type in little description which should
give a hint about the notification that you are going to be created. Then click Create New Notification button as shown in th e
above image:
Newly created notification will
appear in the notification grid.
Now select the newly created
notification by checking the
check box and click Next button
as shown in the image:
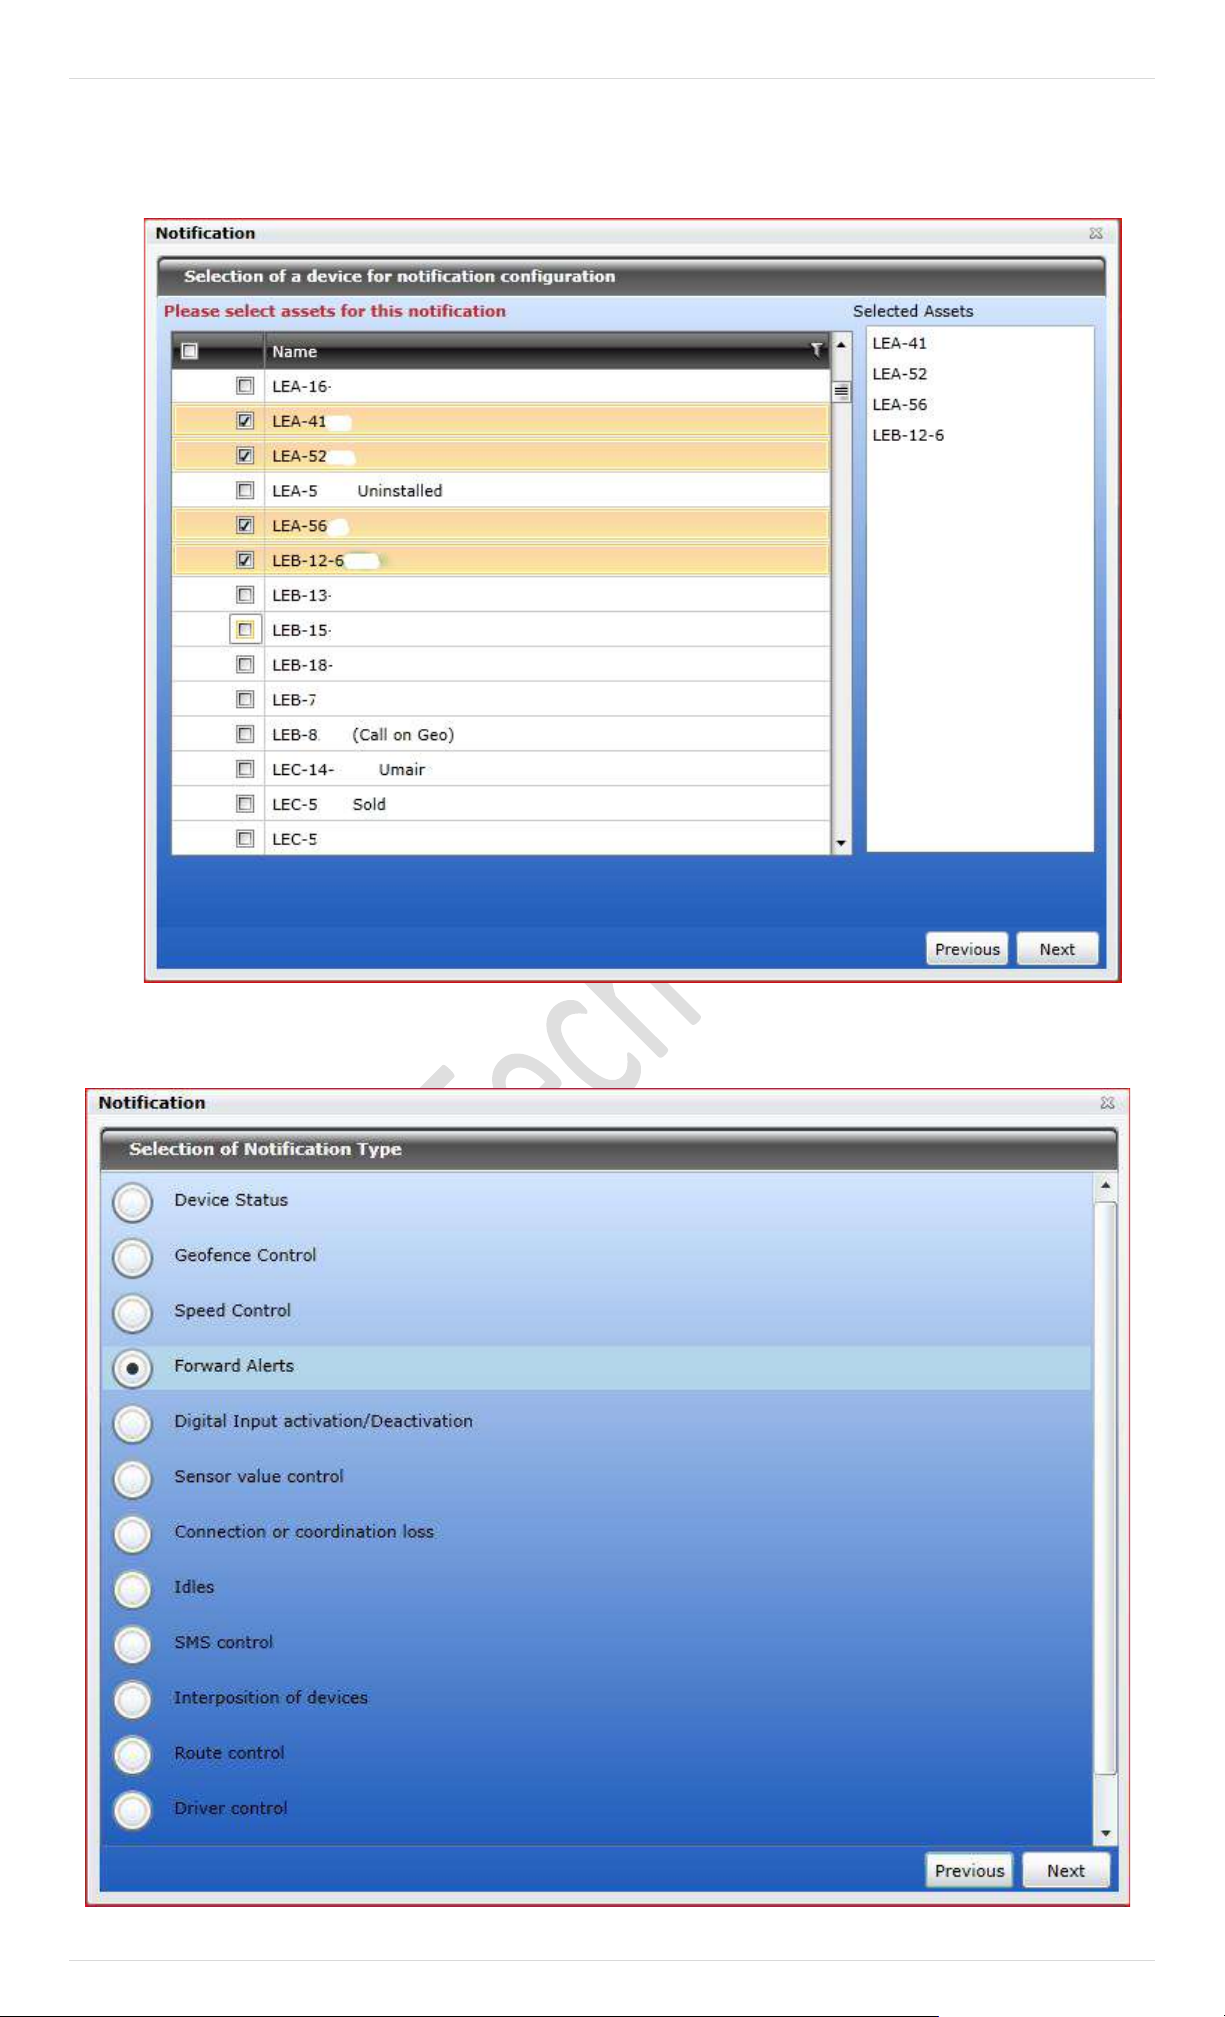
104 | P a g e
Notifications will now take you to the device selection section where a list of all th e devices that are added to the Pegasus
system under a Master Account will be displayed. Select the device from the list to create the notification and click Next bu tton
as shown in the below image:
Select the notification type from the list of given Notifications (Device Status, Geofence, Speed Control, Sensor Values etc.
and click Next button as shown in the image:
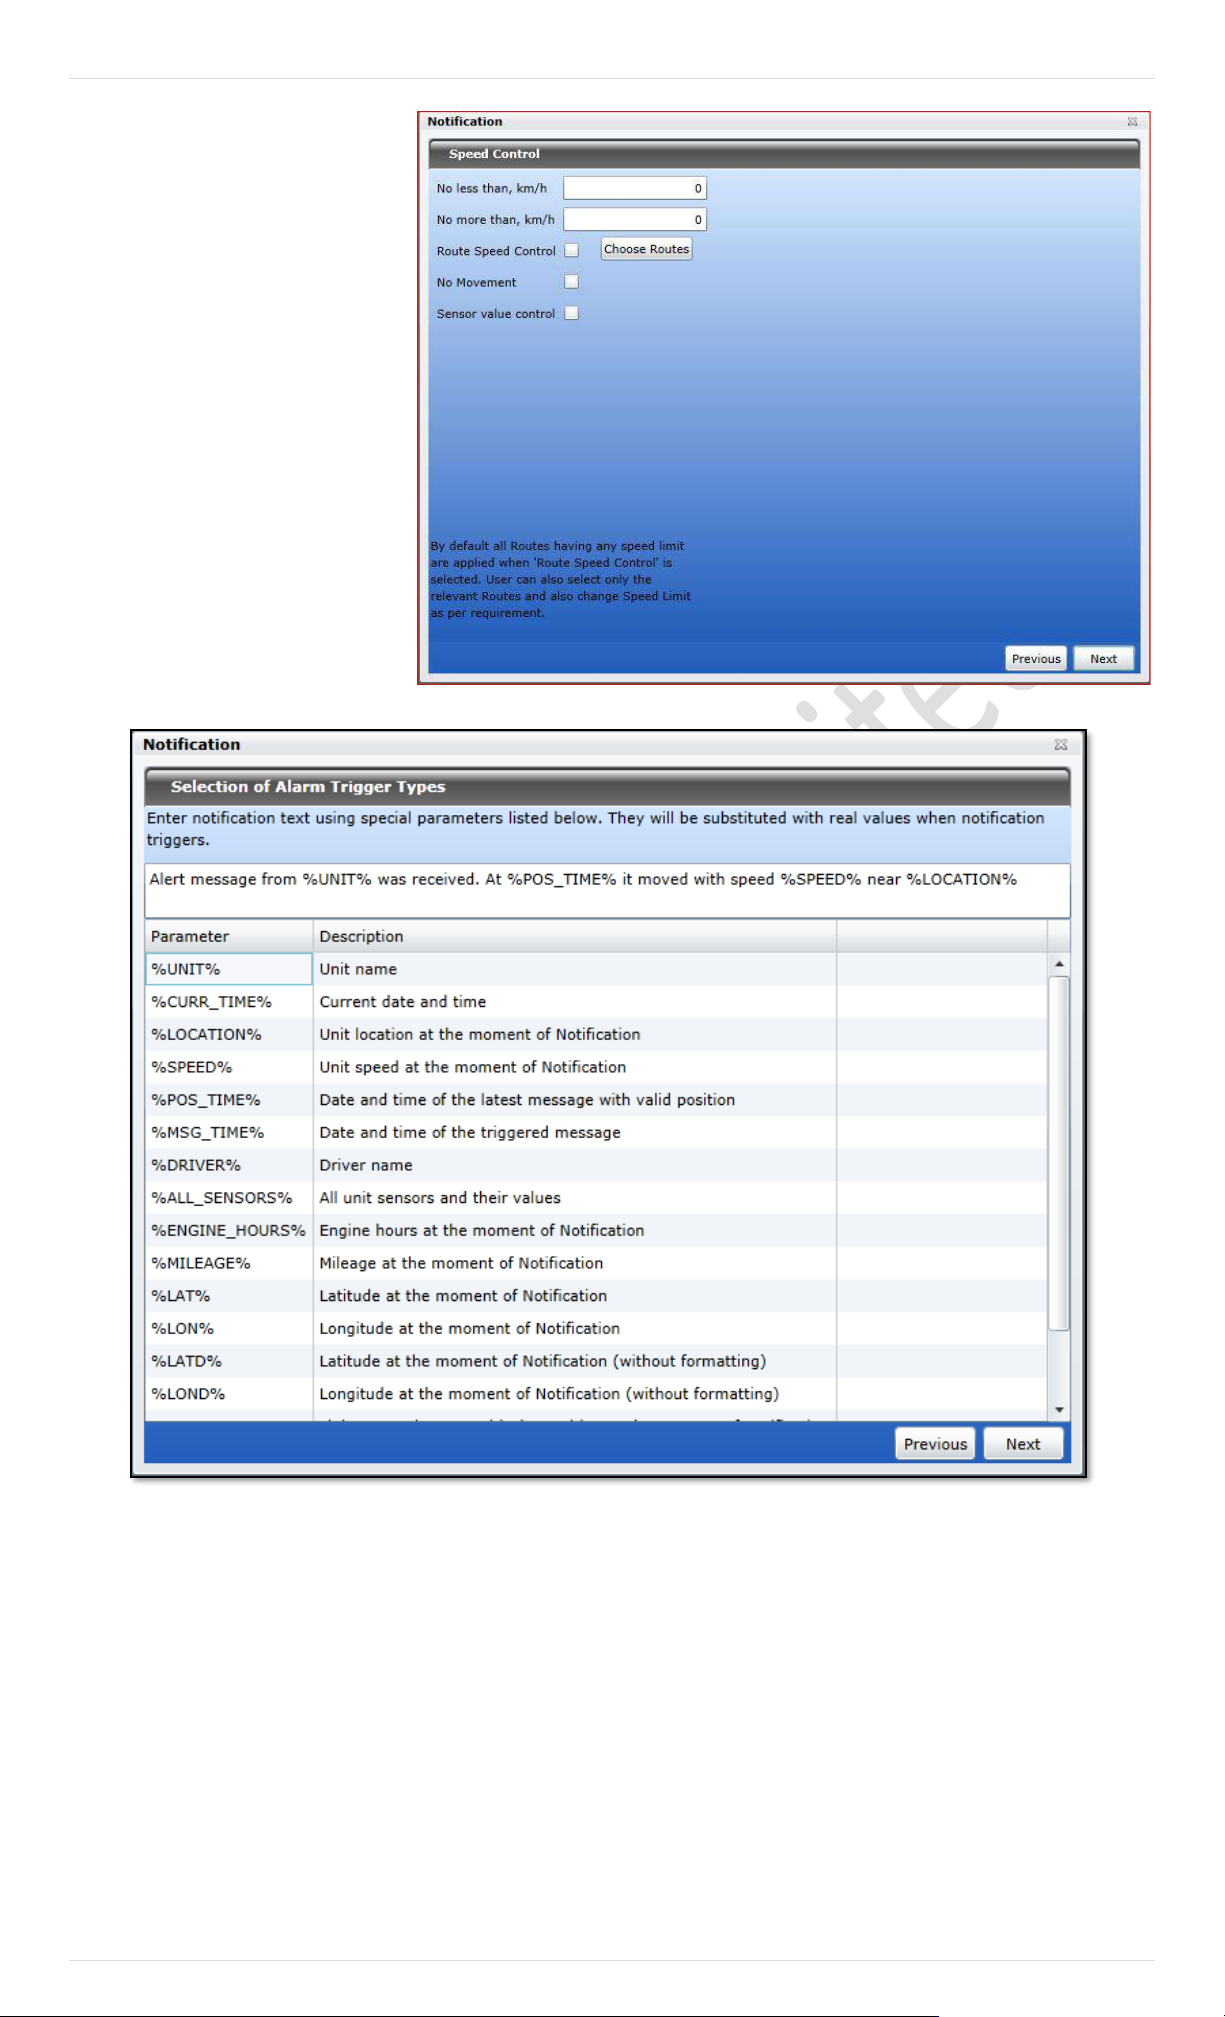
105 | P a g e
On the next screen adjust the control
parameters needed for the
notification type selected in the
previous window. These control
parameters will differ and are
dependent on the type of notification
selected on the previous screen
You can set speed range and specific
routes can be added which would
have been created under Zone in main
GUI of Pegasus system.
Enable Sensor value check box for
integrating Sensors with speed.
(We will discuss sensors and their values later
in this section)
Click Next to proceed as shown in the
image:
On the next screen type-in the text for
the notification using special
parameters listed in the list below.
They will be substituted with real values when notification triggers as shown in the below image:
Once the text message is complete, click Next button
On the next screen select the mode for the notification delivery i.e., Notify by Email or Notify by SMS or Display alerts online
etc. and click Next as shown in the image below:

106 | P a g e
On the next screen set the schedule for the notification delivery and click Next button as shown in the below image.
Click Finish to save and close the Notifications dialog box.
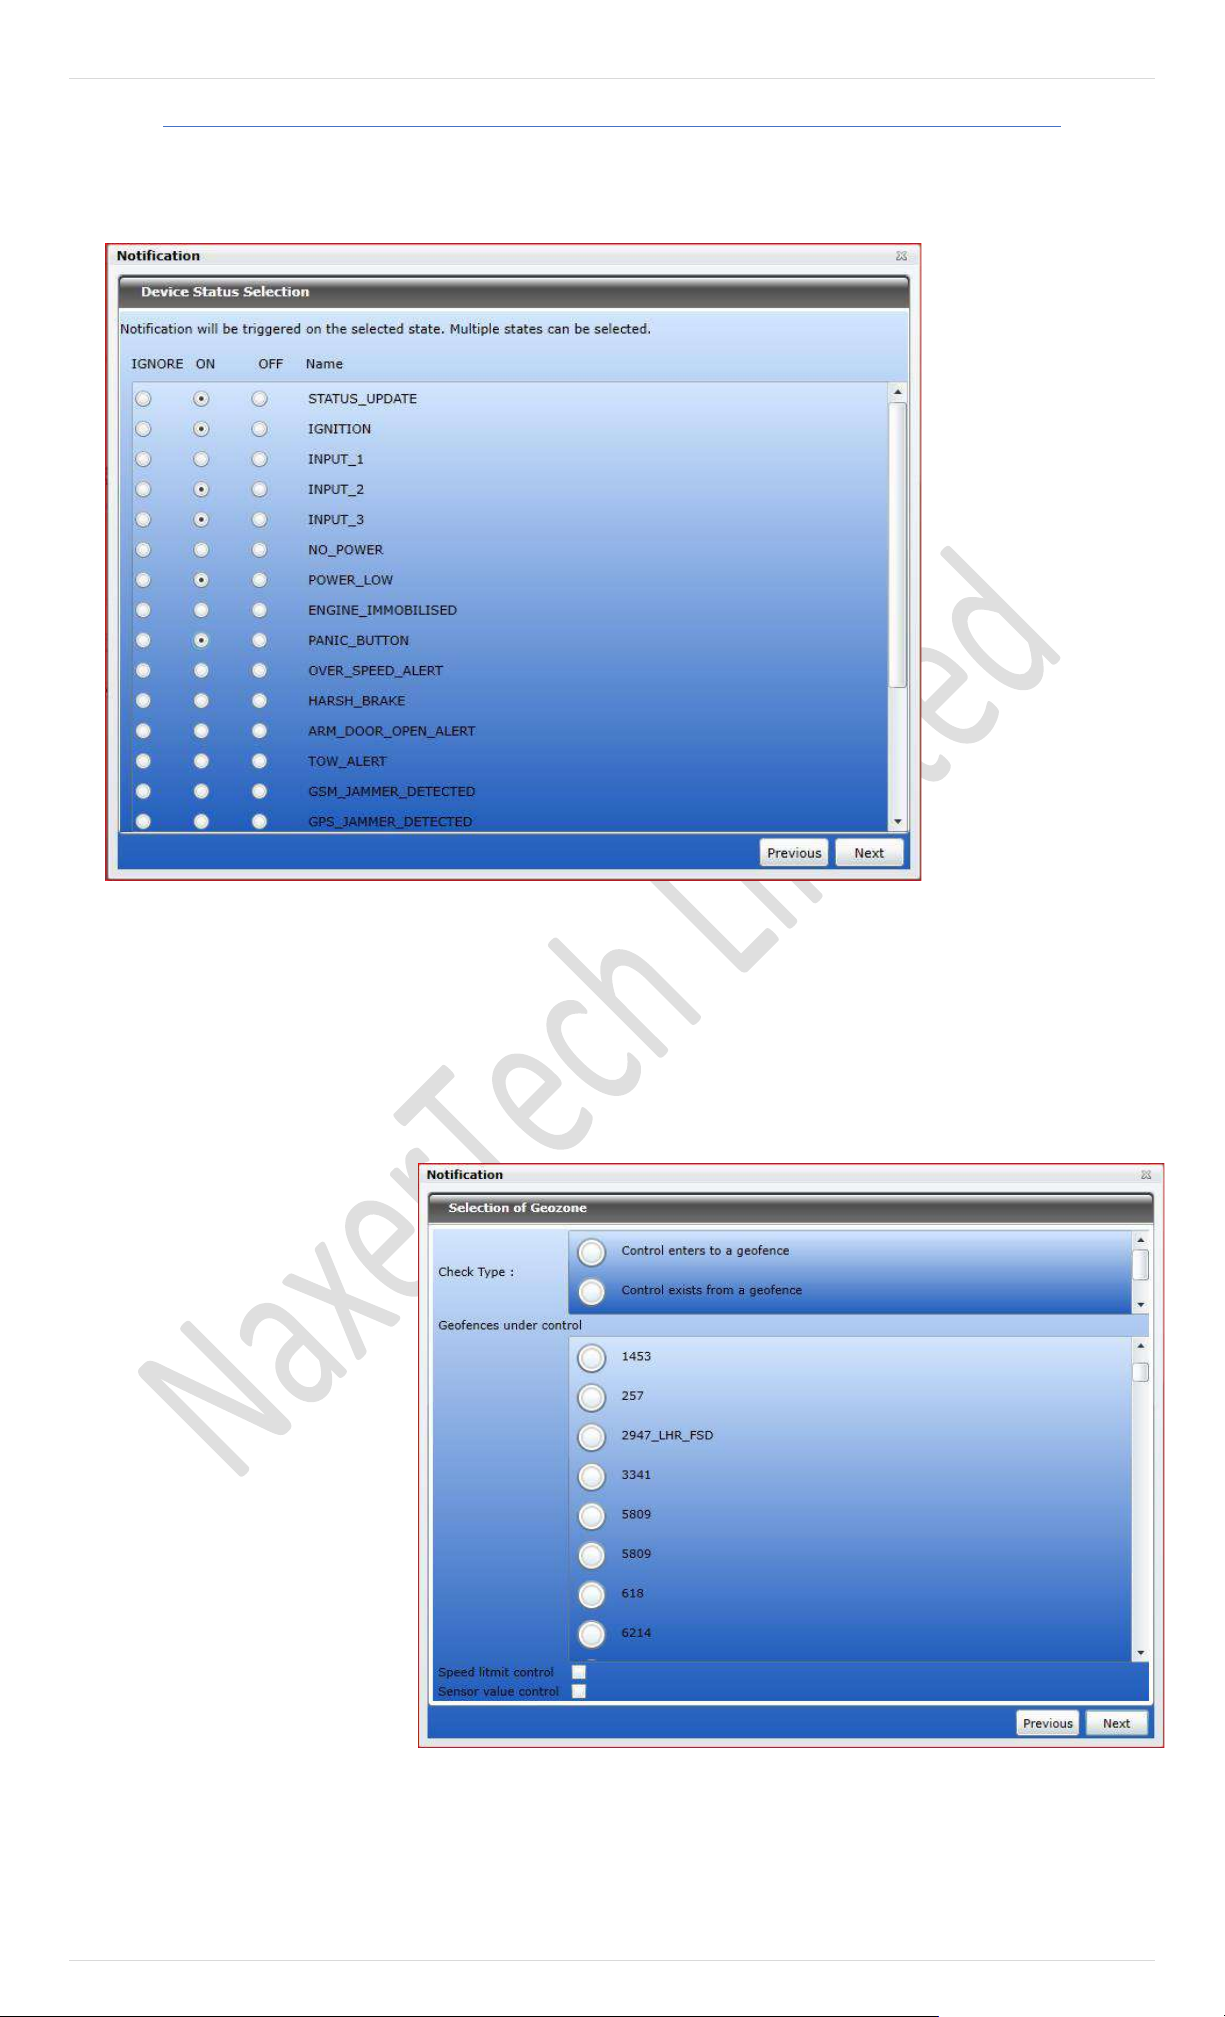
107 | P a g e
Notification Type
A. Device status.
It comes up with number of device status as described in picture. Notification will be triggered according to your selected
state. You may select multiple states in one go.
B. Geofence Control
In case of Geofence Control as a choice of notification type, in the following window you will be presented with the options
to either Control the Entries or Exists to/ from the selected geofences, a list of geofences created under a Master account.
These geofences should be created in advance and there are none in the list then create one.
In addition, you can narrow down the notification to trigger by adjusting speed limitations or sensor value range outside the
geofence. Then the notification will trigger when a unit being outside a controlled geofence breaks these limitations.
For additional speed control,
indicate lower and higher speed
limit, and the notification will
trigger if beyond the limits.
For sensor control you can set
trigger inside the indicated
values as well as outside them.
Choose sensor types on the
dropdown list. If there will be
two or more sensors of the
same type found, their values
can be summed or calculated
separately (select the
corresponding option).
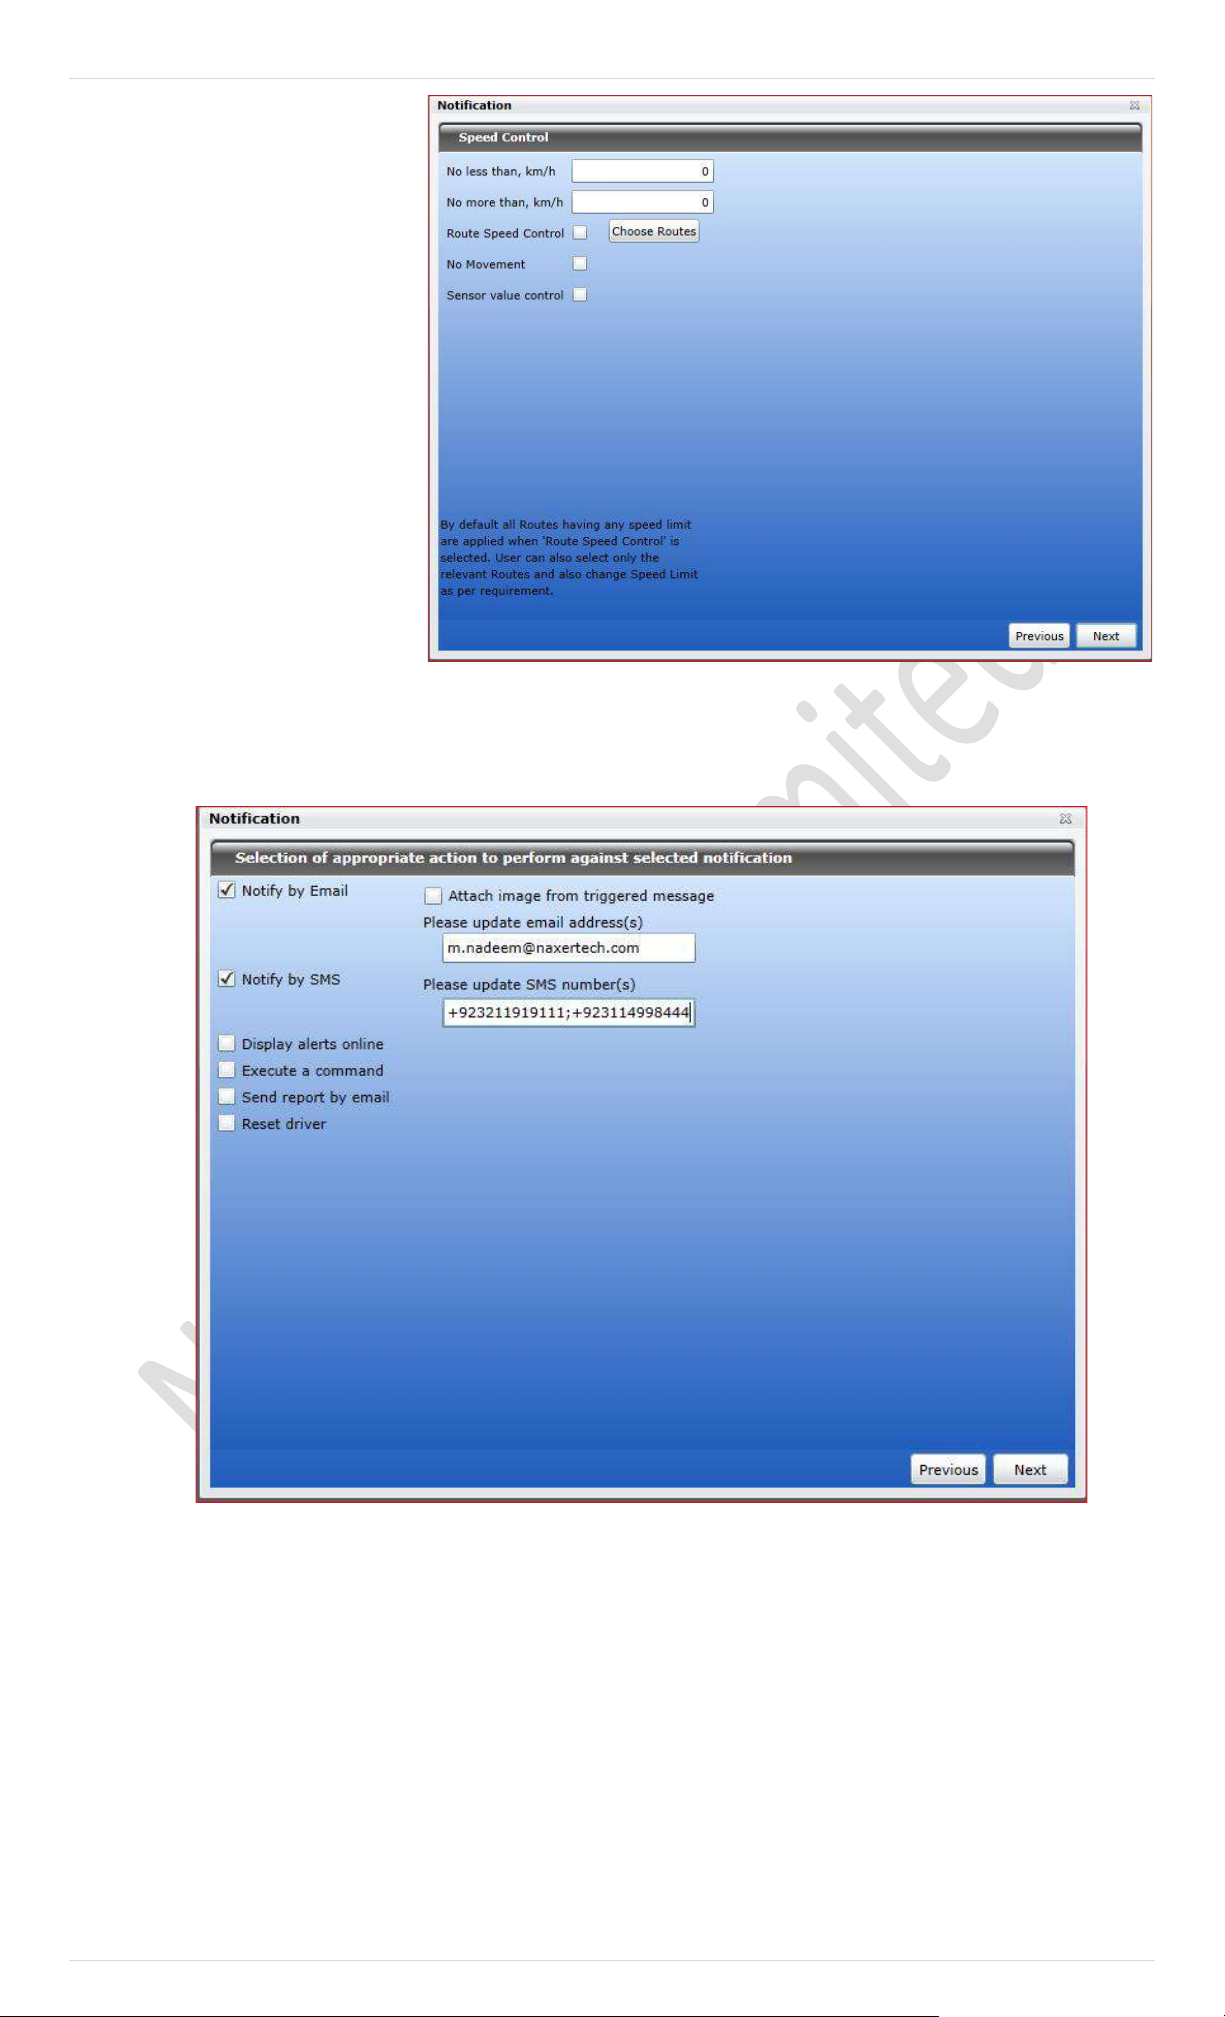
108 | P a g e
C. Speed Control
In case of Speed Control as a
choice of notification type,
define the minimum and/or
maximum speed values. If a unit
goes out of this range, the
notification will trigger. In
addition, you can activate sensor
value control – in this case the
notification will trigger only if
both conditions are met.
D. Forward Alerts
Select this type of notification in case you want to forward device alerts on desired email, notify by SMS, Display alerts for
live monitoring …etc.
Note: You can mention multiple emails or numbers separated with semi colon (;)
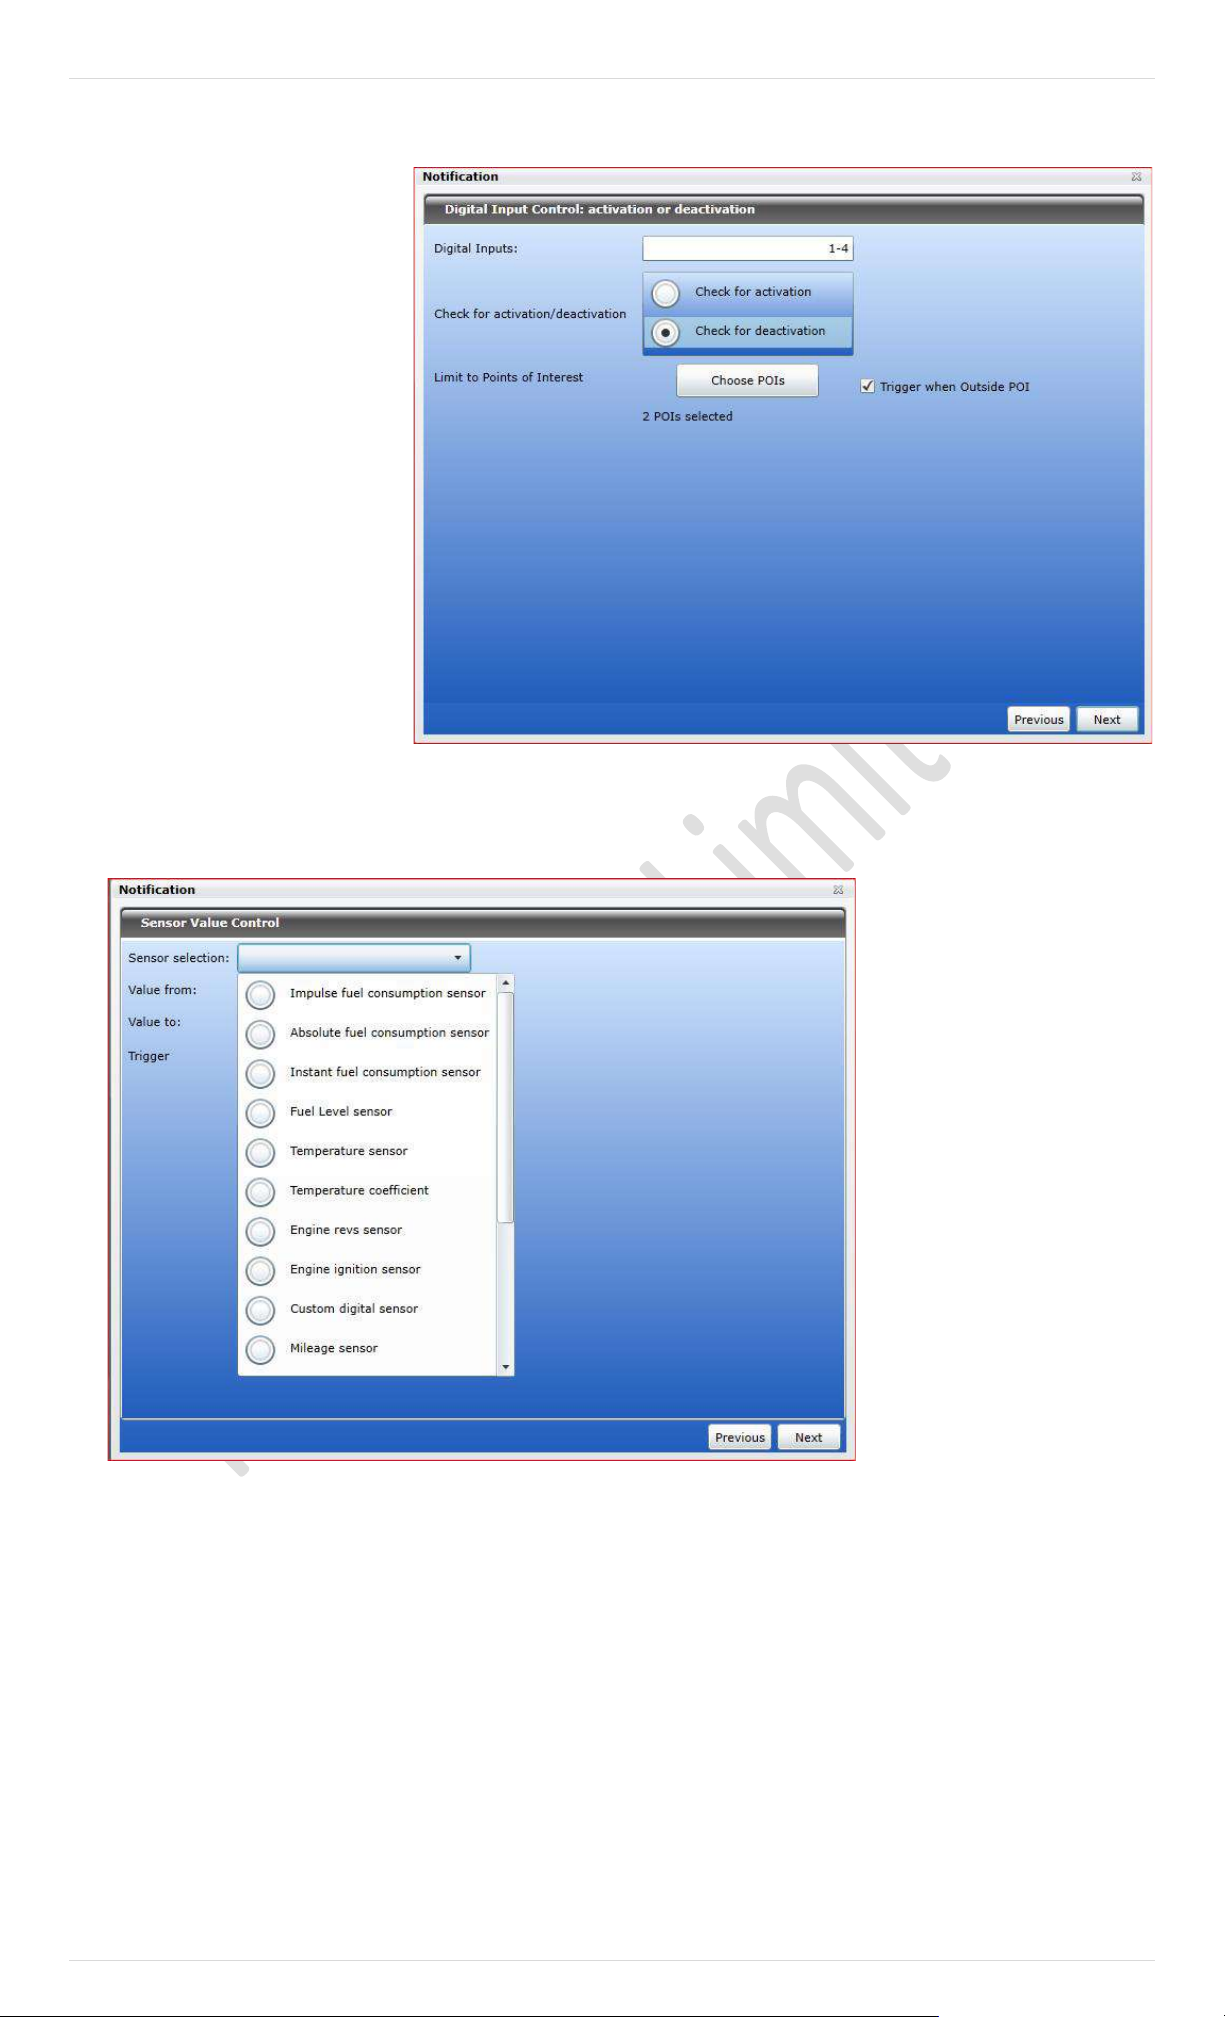
109 | P a g e
Digital Input Activation/ Deactivation
In case of Digital Input
Activation/ Deactivation as a
choice of notification, specify
the number of Input, type of
trigger i.e., activation or
deactivation and when to
trigger the notification.
Enable trigger if you have
particular point of interests to
be notified by Pegasus system.
You can select multiple POIs
from the available list and it
will also calculate selected POIs
and display in the same
window for you.
Note: POIs can be created under Zone menu from main GUI of Pegasus System.
Sensor Value Control
There are number of type of sensors which Pegasus does support and offered you to get their notification on trigger.
Select the sensor type from
dropdown menu.
Enter the range of value for
selected installed sensor.
Choose when trigger should be
occurred, either with in select
range of value or when it became
out of given values.
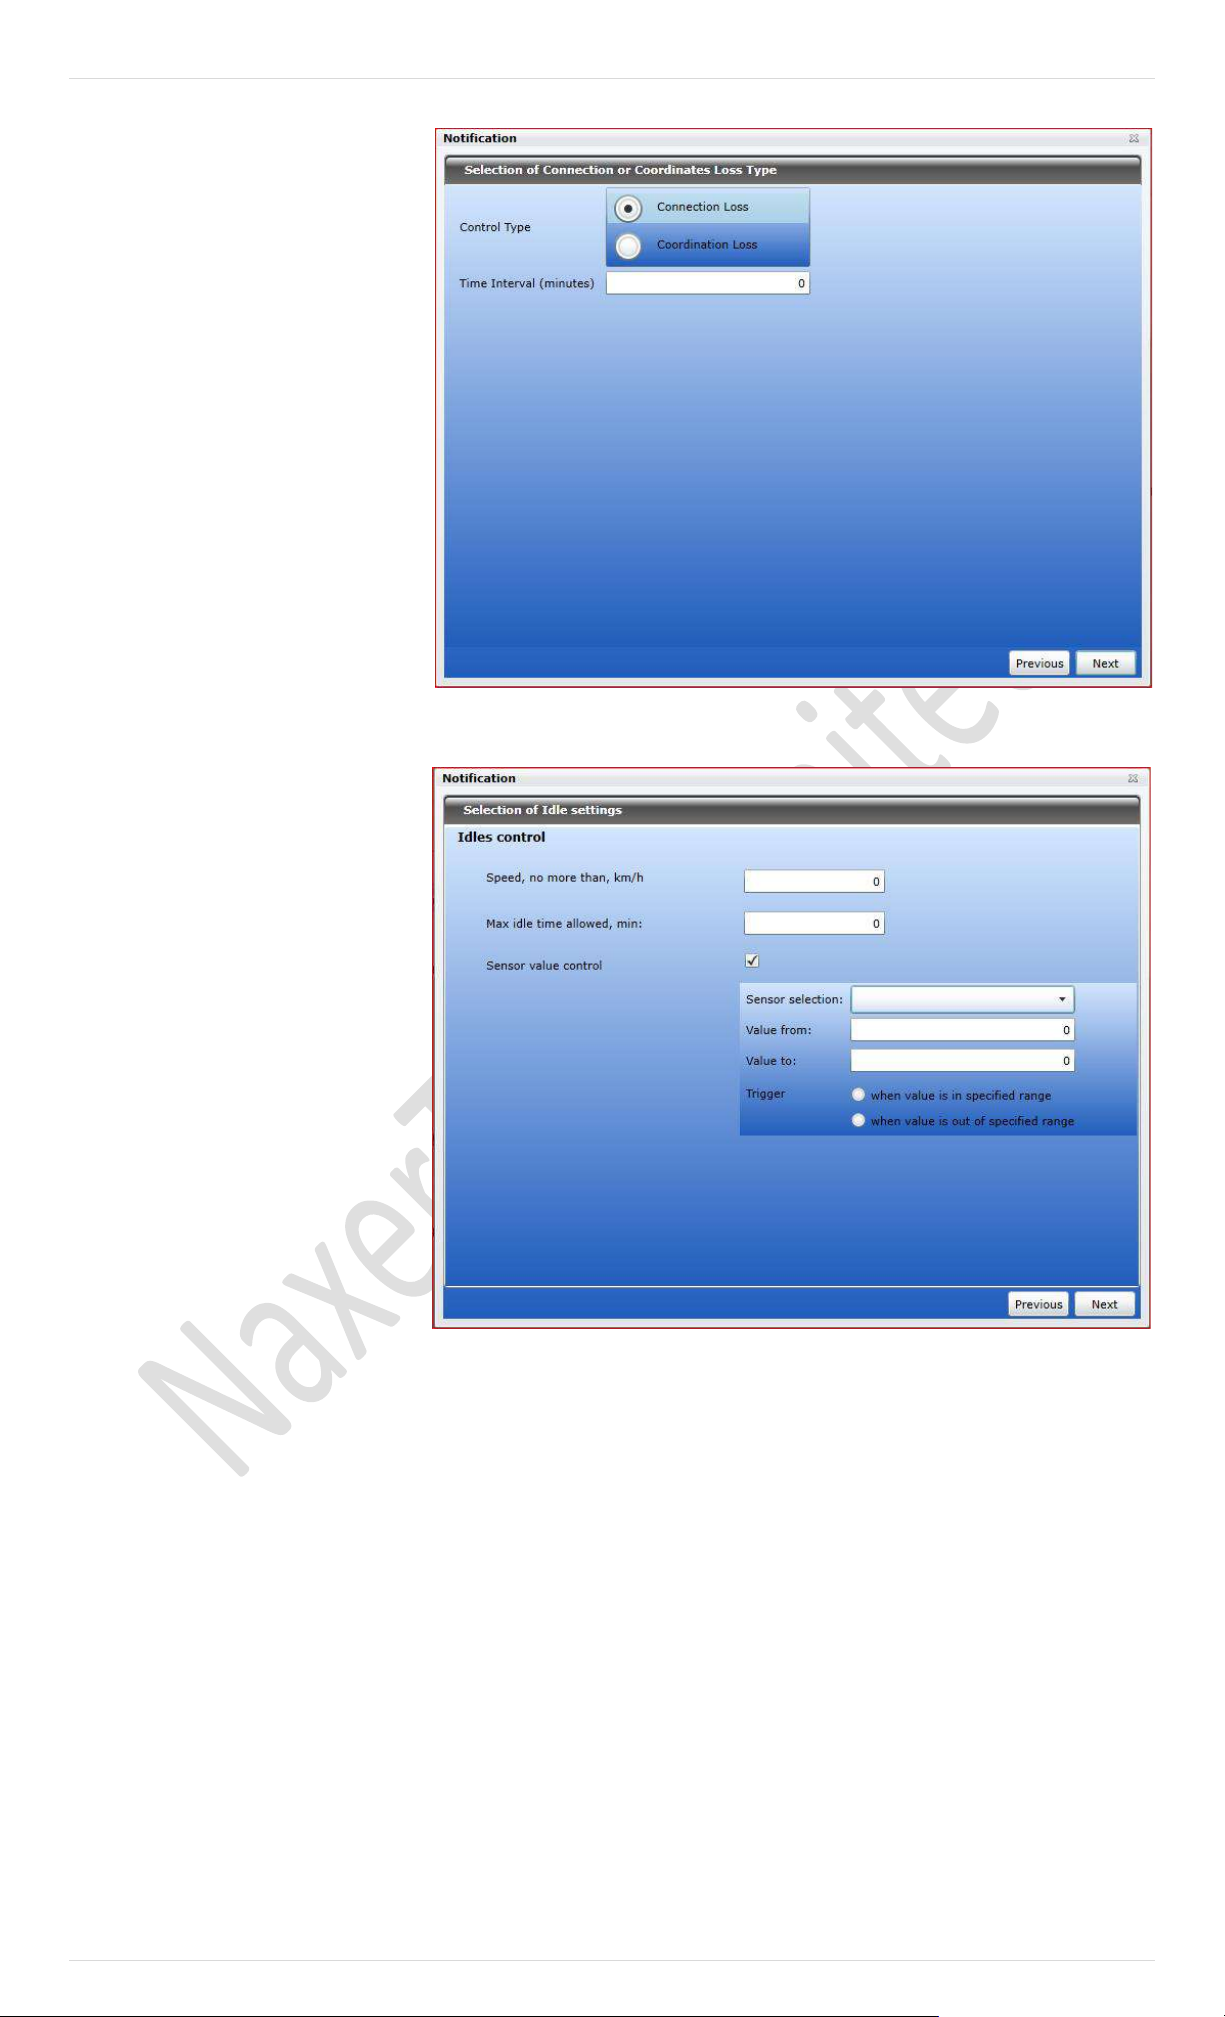
110 | P a g e
Connection or Coordinates Loss.
This notification type gives you
control to get notification either
connection loss or coordination
loss.
Connection Loss. If device
connection loss (in terms of GSM / GPRS)
with server it will generate
notification to concerns.
Coordination Loss. If device
coordinates are not synced with
service and causing device status
not responding.
Time Interval: Time interval can be
set in minutes for threshold.
Idle Control
You can set idle parameters for
customized idle state of device.
Set minimum and maximum speed in
digits. You may add sensor control
along with idle control, to analysis
sensor performance while vehicle
would be in Idle mode.
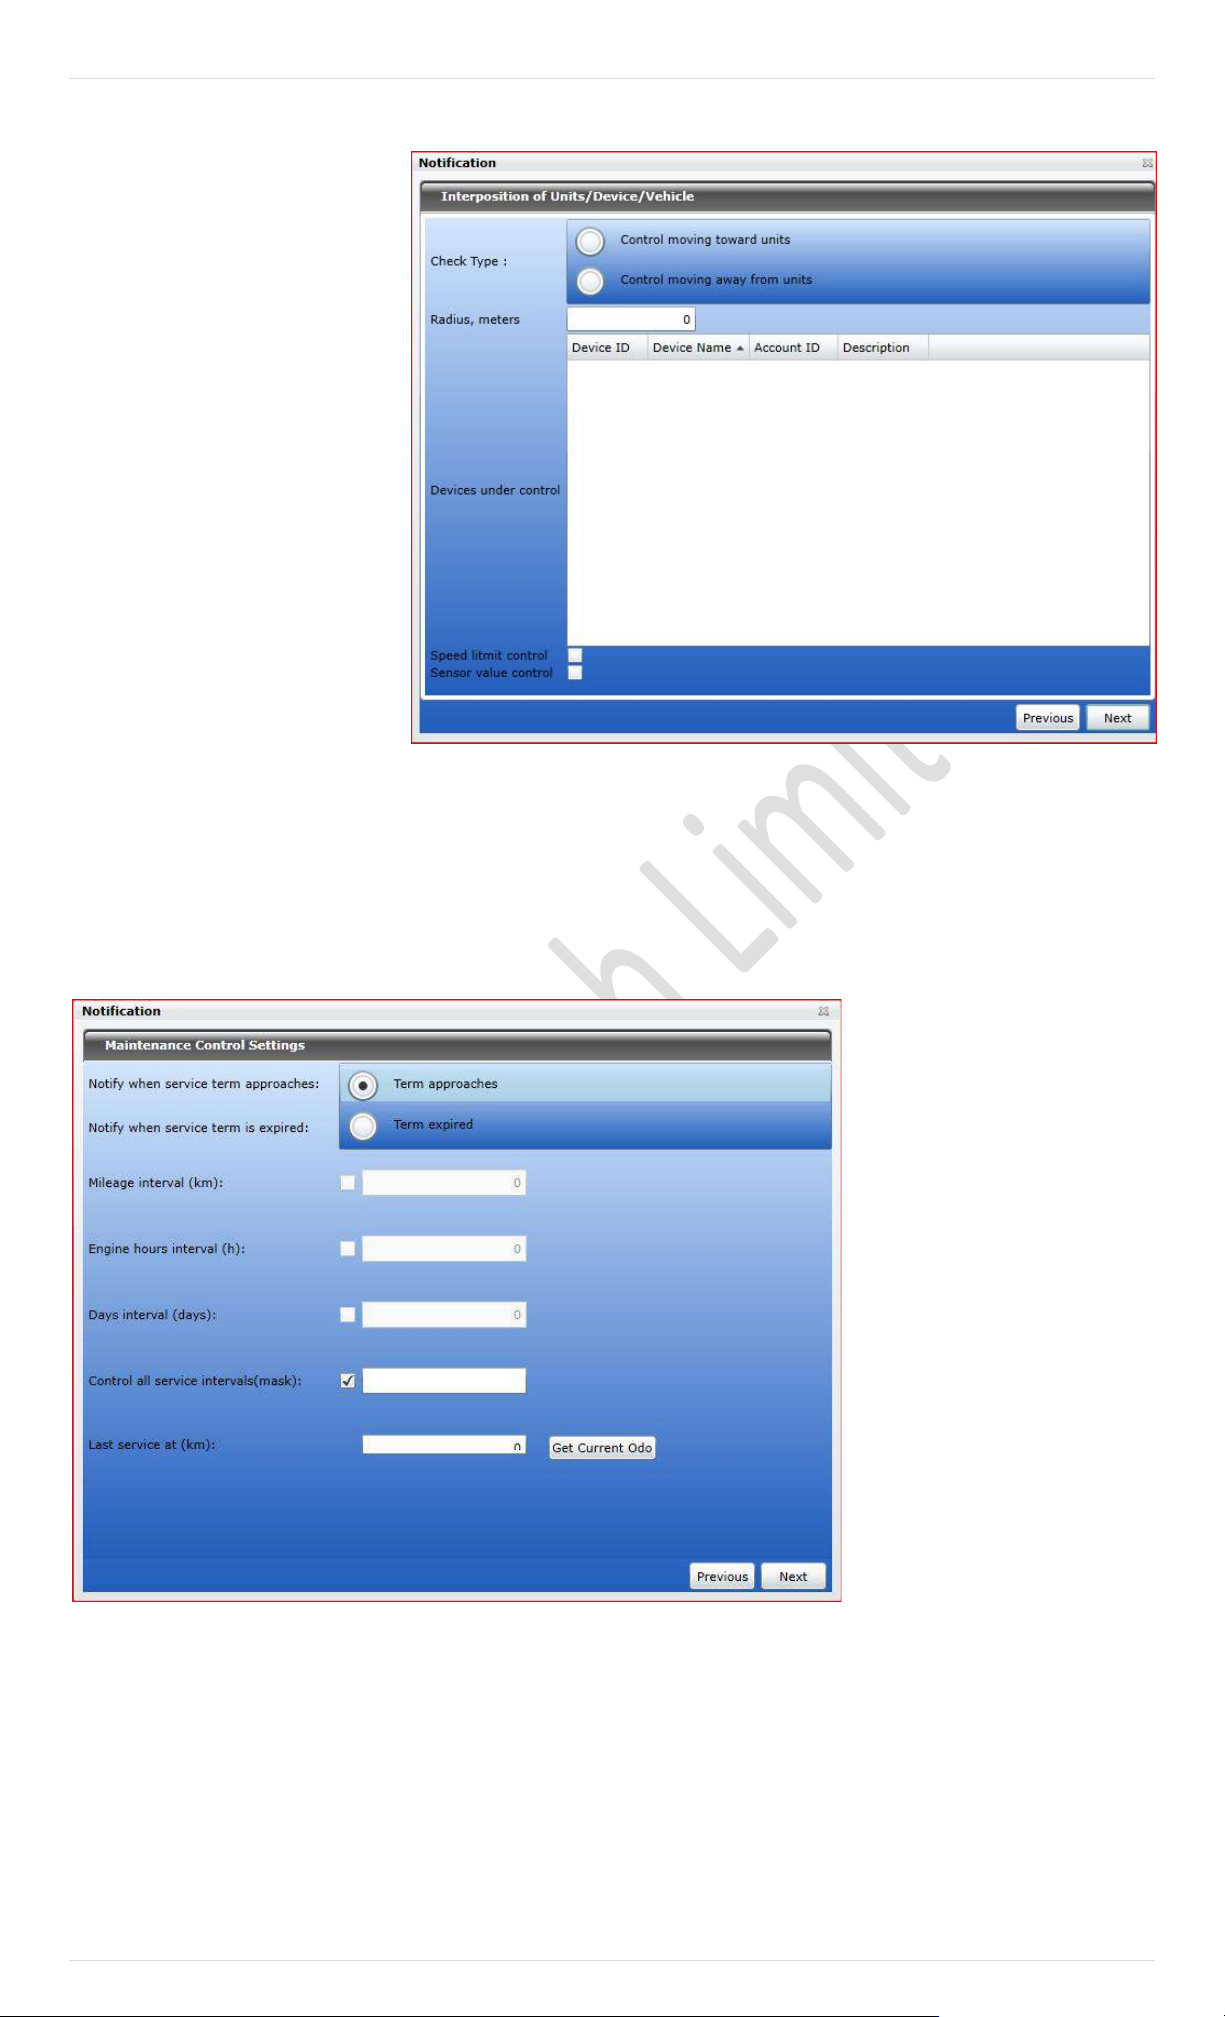
111 | P a g e
Interposition of Units/Device/Vehicle
This notification will help you to
keep an eye on interposition of your
fleet.
You may find nearest vehicle due to
number of circumstances. Select the
check type.
Define the radius in meters and it
will give you list of device ID, device
name with description.
Speed limit control and sensor value
control can be integrated on check
box enabling.
Route control and Driver Control
By selecting notification type of Route control, you can set Geo Zone with a particular device or group and also can assign vehicle to
specific driver. In case of violation will get notification on you set medium.
You can set driver control by driver assignment, get notification on driver reset and also can-do driver code masking.
E. Maintenance
In case of Maintenance as a choice
of notification, first select the
trigger type: Notify when service
term approaches or Notify when
service term is expired. Then
indicate the interval before or after
the term for the notification to
trigger. This interval can be in
Mileage Interval (in kilometers),
Engine Hours Interval (in hours),
Days Interval (number of days) or all
together. To indicate certain
intervals, disable 'Control all service
intervals' option and enter a mask
using wildcard symbols like asterisk
(*) or question sign (?).
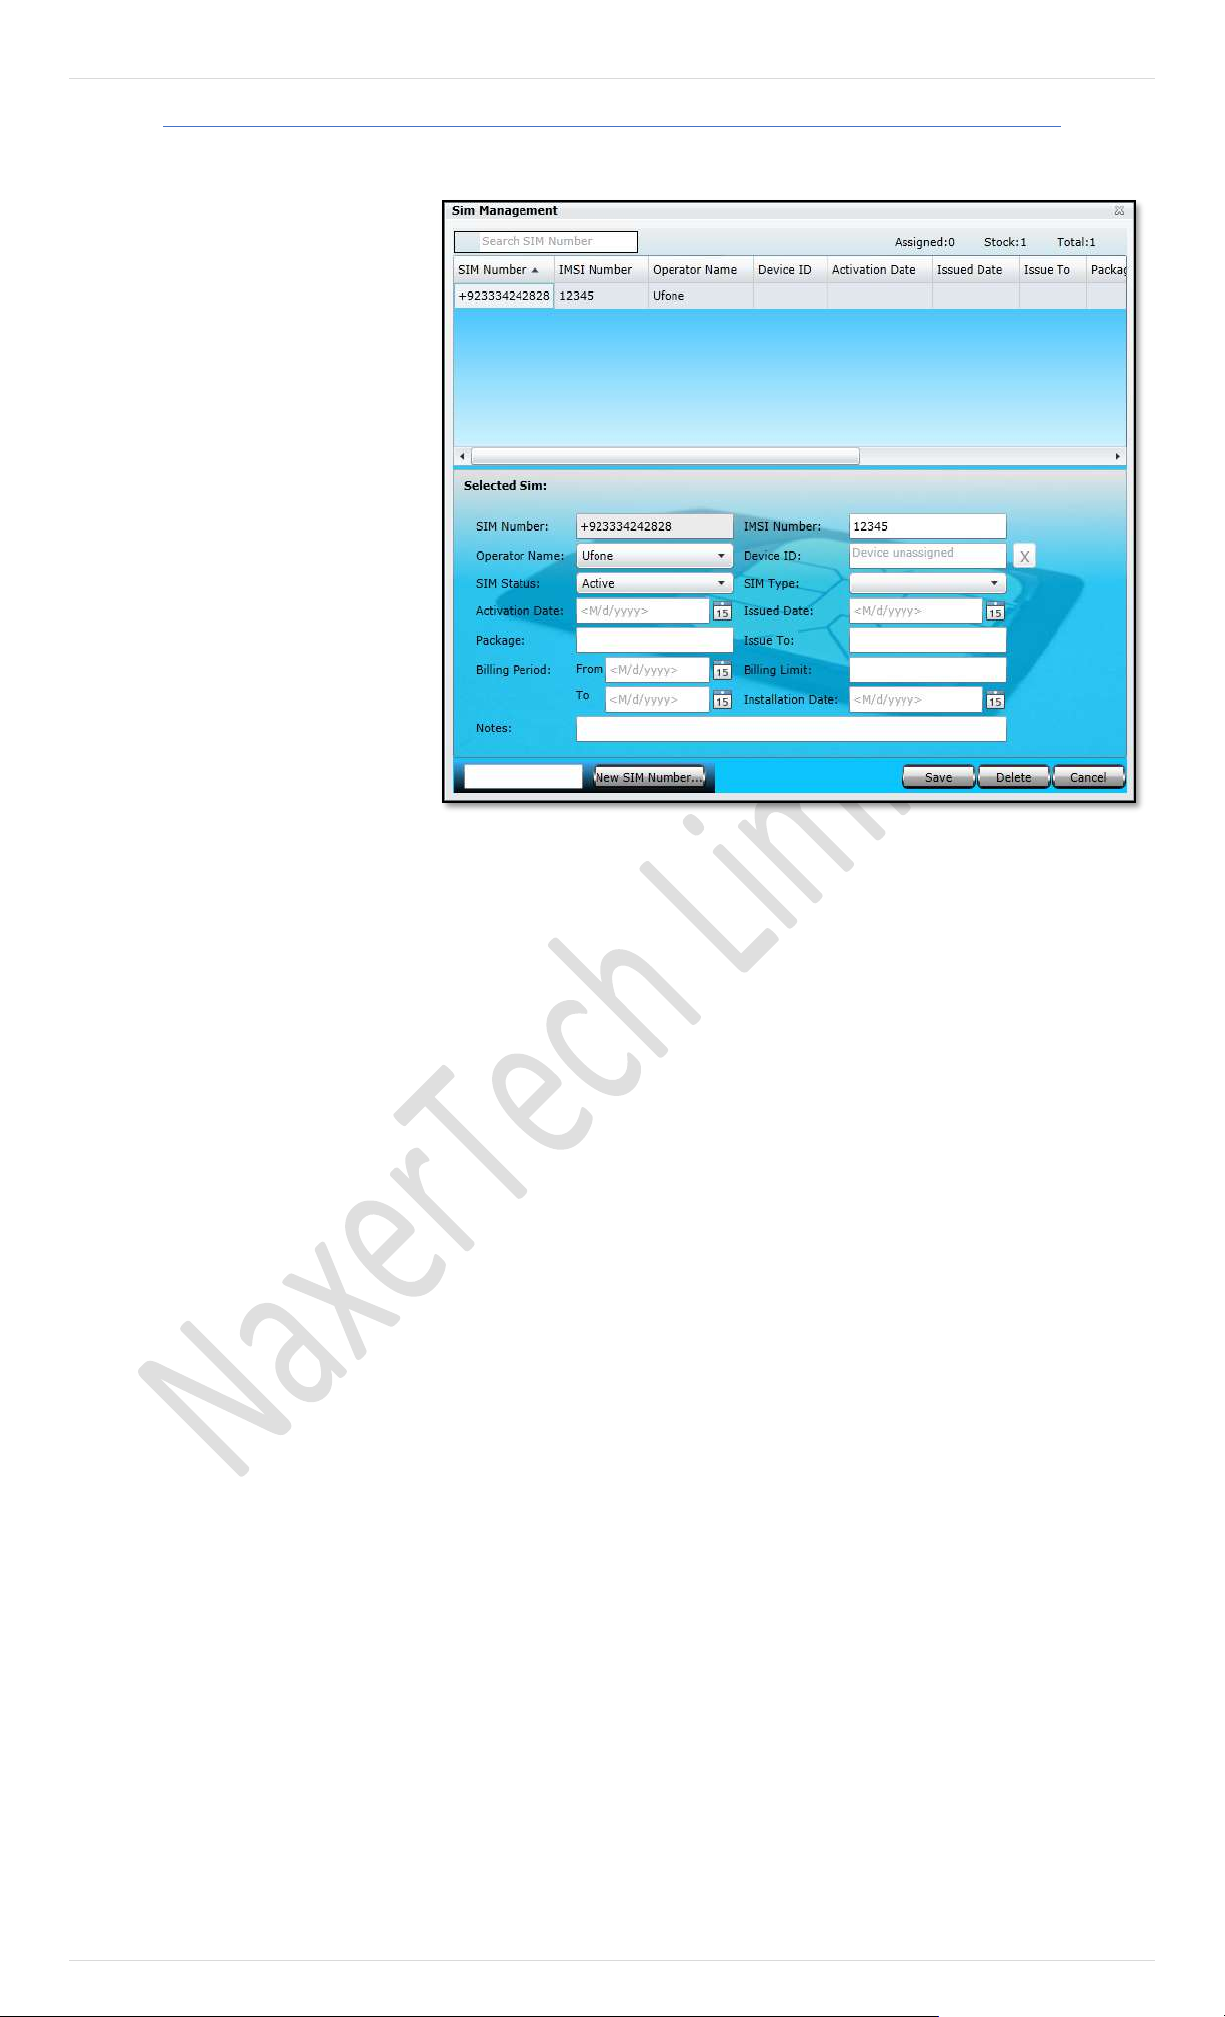
112 | P a g e
SIMs
This Module is provided especially for such users/ companies which offer fleet tracking services. SIMs facilitates user to enter
the SIM card’s basic information into the Pegasus database which later on could be assigned to a device. Such SIMs
management reduces the risk of
duplication of SIM card numbers into
the Pegasus database, assigning the
same SIM card number to multiple
devices when adding a device to the
Pegasus system, searching for the
information of a particular SIM card and
different reports could also be
generated i.e. find out how many SIM
cards are Occupied (assigned to a
tracking device) or Vacant (not assigned
to any tracking device), How many SIM
cards of a particular GSM operator are
occupied or vacant, etc. Let’s see how
the SIMs form look like and discuss
about the various options that are
available in it. An image of the SIMs is
shown in the image:
A. SIM Number
SIM Number will appear once you enter a SIM
Card Number in the text box available at the
bottom of the SIMs dialog box and clicking New
SIM Number button.
B. Operator Name
Displays the GSM Operators Name operating in a
particular country i.e., for which the country code
has entered when adding a New SIM Number.
C. SIM Status
Select the current SIM card status i.e., Active,
Inactive, Not Responding or Block, as per the
status of the SIM card from the dropdown list.
D. Activation Date
Enter the date when the SIM card was activated.
E. Package
Enter the name of the SIM card package given by
SIM operator. Its optional, leaving Package input
box empty will not affect anything but entering a
proper Package name will benefit user later.
F. Billing Period
Enter the billing date, From, could be the same
date as SIM card activation date and To, could be
the due date of the bill. Its optional, leaving Billing
Period blank will not affect anything but defining a
Bill Period will benefit later.
G. IMSI Number
Enter the IMSI (International Mobile Subscriber Identity)
Number which is usually printed on the SIM card.
An IMSI is usually presented as a 15digit long
number but can be vary.
H. Device ID
It is the device identification number. It usually
contains the last six (6) digits of the IMEI number
printed on the sticker pasted on the tracking
device. Device ID will appear automatically by the
Pegasus system once assigned to any tracking
device otherwise it will remain empty.
I. SIM Type
Select the Type of the SIM card i.e., Prepaid or
Postpaid from the SIM Type dropdown list.
J. Issued Date
Enter the date when a particular SIM card is issued
to someone i.e., Tracking Device Installer. It’s
optional, leaving Issue Date field empty will not
affect anything but entering a proper date will help
to keep a SIM record updated.
K. Issue To
Enter the name of the person to whom a particular
SIM card has been issued.
L. Billing Limit
Enter the amount of the limit for a particular SIM
that it should not cross.
M. Installation Date
Installation Date is the date when a particular SIM
card is assigned to a tracking device when adding
the tracking device into the Pegasus system.
Installation Date will appear automatically by the
Pegasus system once assigned to any tracking
device otherwise it will remain empty.
N. Notes
Write important notes in this field related to a
particular SIM card.
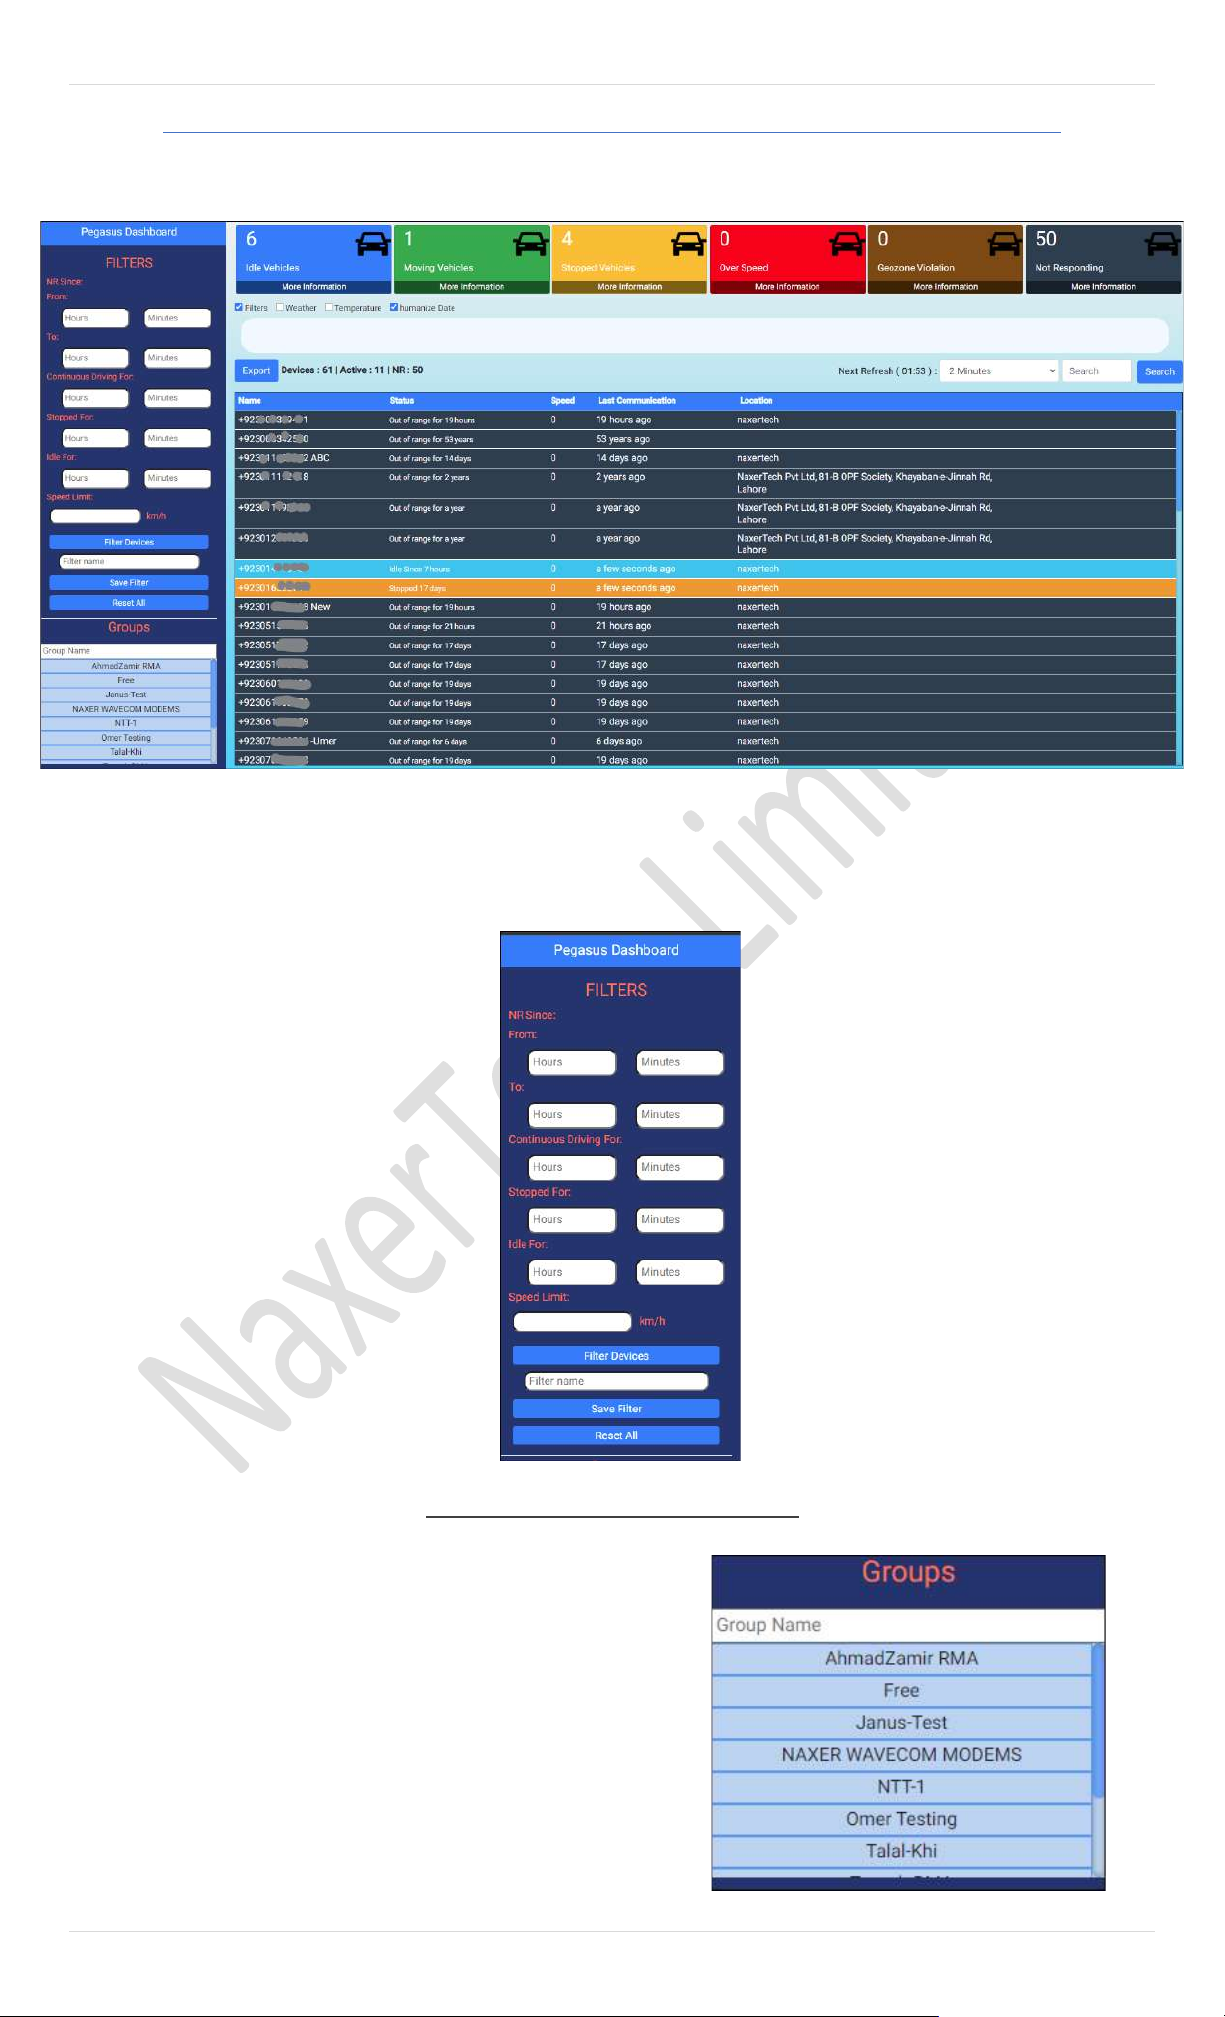
113 | P a g e
Pegasus Dashboard
Pegasus Dashboard is the set of complete data about devices in the Group. It provides variety of information about vehicles, their
current state, position and communication, etc. Pegasus Dashboard is divided into multiple sections. There are filters, Groups,
Detailed Info Table, etc.
A. Filters
Filters are helpful in locating/finding the asset of desired type. There are multiple types of filters including NR
(Not Responding) Vehicles, Continuous Driving, Stopped Vehicle, Idle Vehicle and Speed Limit.
a. NR Since
User can search NR Devices by using
FROM-TO fields which needs hours
and minutes to filter the devices.
After the fields are given the data,
they need a user will click the button
“Filter Devices” and dashboard will
show devices which are not
responding for the given amount of
time.
c. Continuous Driving For
Exactly like NR, this field requires the
same data to filter devices which are
in continuous motion. Result will be
displayed on dashboard after clicking
“Filter Devices”
d. Stopped For
This filter will show devices which are
stopped for the specific amount of time
given by the user.
e. Idle For
Filter for vehicles which are idle.
f. Speed Limit
Speed Limit works slightly different than
others, it doesn’t work with hours/minutes.
User will enter the speed limit in KM/H and
vehicles exceeding that limit will be shown
on dashboard.
User can save filters according to his need
B. Groups
Groups contain numerous devices/vehicles which are further
displayed on dashboard. Clicking on the name of group will show
number of devices of the group, active devices, NR devices, idle
vehicles from the group, moving, stopped, over speed and
geozone violation vehicles.
If no group is selected, the dashboard will show the data of
vehicles from all the groups combined.
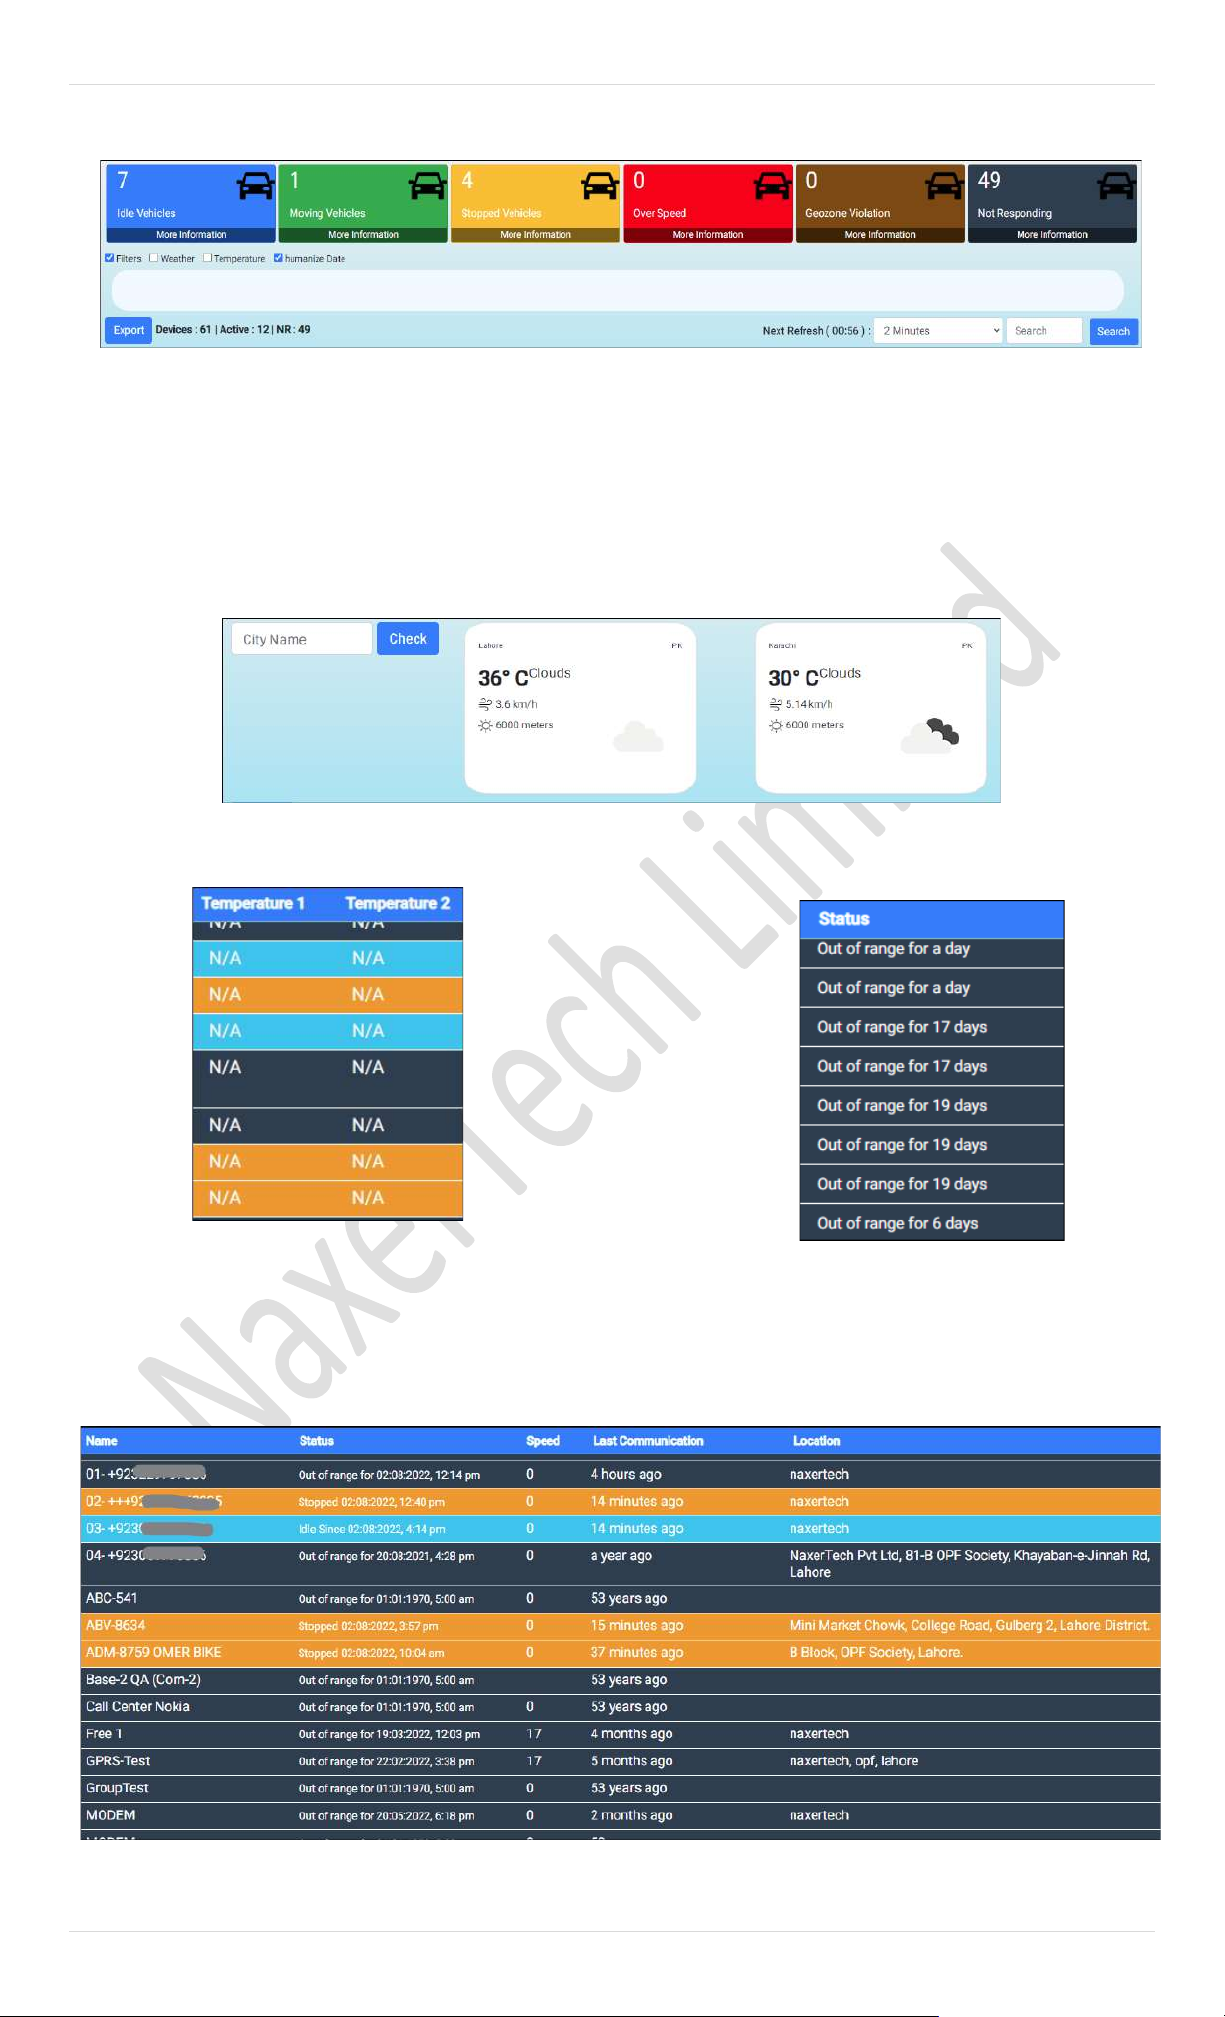
114 | P a g e
On top of dashboard, there is a section that shows numbers of vehicles in certain conditions. Different colours are
assigned to these boxes which shows the respective amount of vehicle and their data after clicking them.
State/condition of the vehicles are given specific colours for ease and to save time while looking for them in info
table of dashboard.
It also has several checkboxes which enable or disable. Filters, temperature (after enabling it adds temperature
column in the table below which shows Temperature of vehicles), humanise date (brief date i.e. “A year ago,”)
and weather which shows weather of different cities with search option available
Weather:
Temperature:
Humanise Date:
Export:
Export button is used to export the data to MS Excel.
C. Information Table
It contains the vital information about vehicles.

115 | P a g e
Name column shows the name given to the device or vehicle
Status shows the condition or state of the vehicle it is in, whether stopped, idle, moving etc with time.
Speed shows the motion of the vehicle in KM/H.
Last Communication is the last time device communicated.
Location shows location of the vehicle, if the vehicle has not communicated since certain amount of time, the
location will show the last known location.
